- Choose your Windows app platform
- Windows Forms
- Win32
- Platform comparison: UWP, WPF, and Windows Forms
- Use the Windows UI Library with Windows apps
- Other app platforms
- Progressive Web Apps (PWAs)
- Xamarin
- About Windows
- Desktop Window
- Application Windows
- Client Area
- Nonclient Area
- Controls and Dialog Boxes
- Window Attributes
- Class Name
- Window Name
- Window Style
- Extended Window Style
- Position
- Parent or Owner Window Handle
- Menu Handle or Child-Window Identifier
- Application Instance Handle
- Creation Data
- Window Handle
- Window Creation
- Main Window Creation
- Window-Creation Messages
- Multithread Applications
Choose your Windows app platform
When you want to create a new desktop application for Windows PCs, the first decision you make is which application platform to use. Windows provides four main application platforms, each with different strengths:
- Universal Windows Platform (UWP): This platform provides a common type system, APIs, and application model for all devices that run Windows 10. UWP applications can be native or managed.
- WPF and Windows Forms: These .NET-based platforms provide a common type system, APIs, and application model for managed applications.
- Win32: This is the original platform for native C/C++ Windows applications that require direct access to Windows and hardware. This makes the Win32 API the platform of choice for applications that need the highest level of performance and direct access to system hardware.
Each of these platforms include a complete UI framework and set of UI controls that let you create desktop apps like Word, Excel, and Photoshop that run in the classic Windows desktop and take full advantage of that environment’s specific features. On Windows 10, each of these platforms also support using the Windows UI Library (WinUI) to create their user interfaces.
Some of these platforms share certain traits and are better suited for specific application types. For example, both UWP and .NET have deep integration with Visual Studio. This provides many benefits, especially in the areas of developer productivity, sophisticated and customizable UI, and application security. Because these frameworks support visual designers and UI markup for rapidly creating UI, they are particularly well-suited for line-of-business applications.
No matter which app platform you choose, you can use many Windows 10 features to deliver a modern experience in your app. For example, even if your desktop app is built using WPF, Windows Forms, or the Win32 API, you can still use MSIX package deployment. For more information about all the ways to modernize your desktop apps, see Modernize your desktop apps.
UWP is the leading-edge platform for Windows 10 applications and games. It’s a highly customizable platform that uses XAML markup to separate UI (presentation) from code (business logic). UWP is suitable for desktop applications that require a sophisticated UI, styles customization, and graphics-intensive scenarios. UWP also has built-in support for the Fluent Design System for the default UX experience and provides access to the Windows Runtime (WinRT) APIs. By adopting Fluent, UWP automatically supports common input methods such as ink, touch, gamepad, keyboard, and mouse.
Not only can you use UWP to create desktop applications for Windows PCs, but UWP is also the only supported platform for Xbox, HoloLens, and Surface Hub applications. UWP is our newest, leading-edge application platform.
For more information about UWP, see the following articles:
WPF is the established platform for managed Windows applications with access to .NET Core or the full .NET Framework, and it also uses XAML markup to separate UI from code. This platform is designed for desktop applications that require a sophisticated UI, styles customization, and graphics-intensive scenarios. WPF development skills are similar to UWP development skills, so migration from WPF to UWP apps is easier than migration from Windows Forms.
For more information about WPF, see the following articles:
Windows Forms
Windows Forms is the original platform for managed Windows applications with a lightweight UI model and access to .NET Core or the full .NET Framework. It excels at enabling developers to quickly get started building applications, even for developers new to the platform. This is a forms-based, rapid application development platform with a large built-in collection of visual and non-visual drag-and-drop controls. Windows Forms does not use XAML, so deciding later to extend your application to UWP entails a complete re-write of your UI.
For more information about Windows Forms, see the following articles:
Win32
Using the Win32 API with C++ makes it possible to achieve the highest levels of performance and efficiency by taking more control of the target platform with unmanaged code than is possible on a managed runtime environment like WinRT and .NET. However, exercising such a level of control over your application’s execution requires greater care and attention to get right, and trades development productivity for runtime performance.
Here are a few highlights of what the Win32 API and C++ offers to enable you to build high-performance applications.
- Hardware-level optimizations, including tight control over resource allocation, object lifetimes, data layout, alignment, byte packing, and more.
- Access to performance-oriented instruction sets like SSE and AVX through intrinsic functions.
- Efficient, type-safe generic programming by using templates.
- Efficient and safe containers and algorithms.
- DirectX, in particular Direct3D and DirectCompute (note that UWP also offers DirectX interop).
For more information, see the following articles:
Platform comparison: UWP, WPF, and Windows Forms
The following table compares various characteristics of Windows Forms, WPF, and UWP in detail.
| Feature or scenario | UWP | WPF | Windows Forms |
|---|---|---|---|
| Supported versions | Windows 10 | Windows 7 and later | Windows 7 and later |
| Languages | C#, C++/WinRT, C++/CX, VB, JavaScript | C#, C++/CLI (Managed Extensions for C++), F#, VB | C#, C++/CLI (Managed Extensions for C++), F#, VB |
| UI runtime | Native (C++/WinRT and C++/CX) and managed (.NET Native) | Managed (.NET Framework and .NET Core 3) | Managed (.NET Framework and .NET Core 3) |
| Open source | Yes (Windows UI Library only) | Yes (.NET Core only) | Yes (.NET Core only) |
| Supports XAML | Yes | Yes | No |
| Strengths |
|
|
|
| Scenarios that have limited support |
|
|
|
1 We have publicly announced features that will address this scenario in a future release of Windows 10.
2 Although the platform lacks first-class API support for this scenario, developers can support this scenario with workarounds.
Use the Windows UI Library with Windows apps
To supplement the main Windows app platforms, you can also use the Windows UI Library (WinUI) in your apps. WinUI started as a toolkit that provides new and updated versions of WinRT controls for UWP apps that target down-level versions of Windows 10. As of WinUI 3, WinUI is growing in scope to become the premier native user interface (UI) framework for Windows 10 apps across UWP, .NET, and Win32 app platforms.
You can use WinUI in the following ways in Windows apps.
- UWP apps can use WinUI 2.x controls in place of WinRT controls provided by the Windows SDK. These releases of WinUI include both all-new controls and updated versions of existing controls from the Windows SDK.
- You can update existing WPF, Windows Forms, and C++/Win32 apps to host WinUI 2.x controls by using XAML Islands.
- Starting with WinUI 3, you can create .NET and C++/Win32 apps and UWP apps that use an entirely WinUI-based UI. This release includes Visual Studio project templates that provide everything you need to create these apps.
Other app platforms
Progressive Web Apps (PWAs)
PWAs let developers package their website code so it can be installed and run like an application on Windows 10 PCs. For more information, see Progressive Web Apps.
Xamarin
Use Xamarin to build cross-platform applications for Windows 10 that can also run on iOS and Android. For more information, see Xamarin.
About Windows
This topic describes the programming elements that applications use to create and use windows; manage relationships between windows; and size, move, and display windows.
The overview includes the following topics.
Desktop Window
When you start the system, it automatically creates the desktop window. The desktop window is a system-defined window that paints the background of the screen and serves as the base for all windows displayed by all applications.
The desktop window uses a bitmap to paint the background of the screen. The pattern created by the bitmap is called the desktop wallpaper. By default, the desktop window uses the bitmap from a .bmp file specified in the registry as the desktop wallpaper.
The GetDesktopWindow function returns a handle to the desktop window.
A system configuration application, such as a Control Panel item, changes the desktop wallpaper by using the SystemParametersInfo function with the wAction parameter set to SPI_SETDESKWALLPAPER and the lpvParam parameter specifying a bitmap file name. SystemParametersInfo then loads the bitmap from the specified file, uses the bitmap to paint the background of the screen, and enters the new file name in the registry.
Application Windows
Every graphical Windows-based application creates at least one window, called the main window, that serves as the primary interface between the user and the application. Most applications also create other windows, either directly or indirectly, to perform tasks related to the main window. Each window plays a part in displaying output and receiving input from the user.
When you start an application, the system also associates a taskbar button with the application. The taskbar button contains the program icon and title. When the application is active, its taskbar button is displayed in the pushed state.
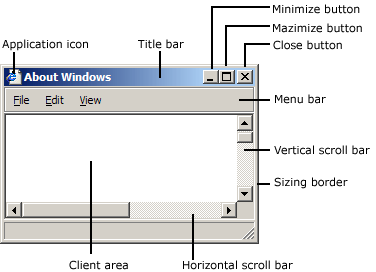
An application window includes elements such as a title bar, a menu bar, the window menu (formerly known as the system menu), the minimize button, the maximize button, the restore button, the close button, a sizing border, a client area, a horizontal scroll bar, and a vertical scroll bar. An application’s main window typically includes all of these components. The following illustration shows these components in a typical main window.
Client Area
The client area is the part of a window where the application displays output, such as text or graphics. For example, a desktop publishing application displays the current page of a document in the client area. The application must provide a function, called a window procedure, to process input to the window and display output in the client area. For more information, see Window Procedures.
Nonclient Area
The title bar, menu bar, window menu, minimize and maximize buttons, sizing border, and scroll bars are referred to collectively as the window’s nonclient area. The system manages most aspects of the nonclient area; the application manages the appearance and behavior of its client area.
The title bar displays an application-defined icon and line of text; typically, the text specifies the name of the application or indicates the purpose of the window. An application specifies the icon and text when creating the window. The title bar also makes it possible for the user to move the window by using a mouse or other pointing device.
Most applications include a menu bar that lists the commands supported by the application. Items in the menu bar represent the main categories of commands. Clicking an item on the menu bar typically opens a pop-up menu whose items correspond to the tasks within a given category. By clicking a command, the user directs the application to carry out a task.
The window menu is created and managed by the system. It contains a standard set of menu items that, when chosen by the user, set a window’s size or position, close the application, or perform tasks. For more information, see Menus.
The buttons in the upper-right corner affect the size and position of the window. When you click the maximize button, the system enlarges the window to the size of the screen and positions the window, so it covers the entire desktop, minus the taskbar. At the same time, the system replaces the maximize button with the restore button. When you click the restore button, the system restores the window to its previous size and position. When you click the minimize button, the system reduces the window to the size of its taskbar button, positions the window over the taskbar button, and displays the taskbar button in its normal state. To restore the application to its previous size and position, click its taskbar button. When you click the close button, the application exits.
The sizing border is an area around the perimeter of the window that enables the user to size the window by using a mouse or other pointing device.
The horizontal scroll bar and vertical scroll bar convert mouse or keyboard input into values that an application uses to shift the contents of the client area either horizontally or vertically. For example, a word-processing application that displays a lengthy document typically provides a vertical scroll bar to enable the user to page up and down through the document.
Controls and Dialog Boxes
An application can create several types of windows in addition to its main window, including controls and dialog boxes.
A control is a window that an application uses to obtain a specific piece of information from the user, such as the name of a file to open or the desired point size of a text selection. Applications also use controls to obtain information needed to control a particular feature of an application. For example, a word-processing application typically provides a control to let the user turn word wrapping on and off. For more information, see Windows Controls.
Controls are always used in conjunction with another window—typically, a dialog box. A dialog box is a window that contains one or more controls. An application uses a dialog box to prompt the user for input needed to complete a command. For example, an application that includes a command to open a file would display a dialog box that includes controls in which the user specifies a path and file name. Dialog boxes do not typically use the same set of window components as does a main window. Most have a title bar, a window menu, a border (non-sizing), and a client area, but they typically do not have a menu bar, minimize and maximize buttons, or scroll bars. For more information, see Dialog Boxes.
A message box is a special dialog box that displays a note, caution, or warning to the user. For example, a message box can inform the user of a problem the application has encountered while performing a task. For more information, see Message Boxes.
Window Attributes
An application must provide the following information when creating a window. (With the exception of the Window Handle, which the creation function returns to uniquely identify the new window.)
These window attributes are described in the following sections.
Class Name
Every window belongs to a window class. An application must register a window class before creating any windows of that class. The window class defines most aspects of a window’s appearance and behavior. The chief component of a window class is the window procedure, a function that receives and processes all input and requests sent to the window. The system provides the input and requests in the form of messages. For more information, see Window Classes, Window Procedures, and Messages and Message Queues.
Window Name
A window name is a text string that identifies a window for the user. A main window, dialog box, or message box typically displays its window name in its title bar, if present. A control may display its window name, depending on the control’s class. For example, buttons, edit controls, and static controls displays their window names within the rectangle occupied by the control. However, controls such as list boxes and combo boxes do not display their window names.
To change the window name after creating a window, use the SetWindowText function . This function uses the GetWindowTextLength and GetWindowText functions to retrieve the current window-name string from the window.
Window Style
Every window has one or more window styles. A window style is a named constant that defines an aspect of the window’s appearance and behavior that is not specified by the window’s class. An application usually sets window styles when creating windows. It can also set the styles after creating a window by using the SetWindowLong function.
The system and, to some extent, the window procedure for the class, interpret the window styles.
Some window styles apply to all windows, but most apply to windows of specific window classes. The general window styles are represented by constants that begin with the WS_ prefix; they can be combined with the OR operator to form different types of windows, including main windows, dialog boxes, and child windows. The class-specific window styles define the appearance and behavior of windows belonging to the predefined control classes. For example, the SCROLLBAR class specifies a scroll bar control, but the SBS_HORZ and SBS_VERT styles determine whether a horizontal or vertical scroll bar control is created.
For lists of styles that can be used by windows, see the following topics:
Extended Window Style
Every window can optionally have one or more extended window styles. An extended window style is a named constant that defines an aspect of the window’s appearance and behavior that is not specified by the window class or the other window styles. An application usually sets extended window styles when creating windows. It can also set the styles after creating a window by using the SetWindowLong function.
Position
A window’s position is defined as the coordinates of its upper left corner. These coordinates, sometimes called window coordinates, are always relative to the upper left corner of the screen or, for a child window, the upper left corner of the parent window’s client area. For example, a top-level window having the coordinates (10,10) is placed 10 pixels to the right of the upper left corner of the screen and 10 pixels down from it. A child window having the coordinates (10,10) is placed 10 pixels to the right of the upper left corner of its parent window’s client area and 10 pixels down from it.
The WindowFromPoint function retrieves a handle to the window occupying a particular point on the screen. Similarly, the ChildWindowFromPoint and ChildWindowFromPointEx functions retrieve a handle to the child window occupying a particular point in the parent window’s client area. Although ChildWindowFromPointEx can ignore invisible, disabled, and transparent child windows, ChildWindowFromPoint cannot.
A window’s size (width and height) is given in pixels. A window can have zero width or height. If an application sets a window’s width and height to zero, the system sets the size to the default minimum window size. To discover the default minimum window size, an application uses the GetSystemMetrics function with the SM_CXMIN and SM_CYMIN flags.
An application may need to create a window with a client area of a particular size. The AdjustWindowRect and AdjustWindowRectEx functions calculate the required size of a window based on the desired size of the client area. The application can pass the resulting size values to the CreateWindowEx function.
An application can size a window so that it is extremely large; however, it should not size a window so that it is larger than the screen. Before setting a window’s size, the application should check the width and height of the screen by using GetSystemMetrics with the SM_CXSCREEN and SM_CYSCREEN flags.
Parent or Owner Window Handle
A window can have a parent window. A window that has a parent is called a child window. The parent window provides the coordinate system used for positioning a child window. Having a parent window affects aspects of a window’s appearance; for example, a child window is clipped so that no part of the child window can appear outside the borders of its parent window.
A window that has no parent, or whose parent is the desktop window, is called a top-level window. An application can use the EnumWindows function to obtain a handle to each top-level window on the screen. EnumWindows passes the handle to each top-level window, in turn, to an application-defined callback function, EnumWindowsProc.
A top-level window can own, or be owned by, another window. An owned window always appears in front of its owner window, is hidden when its owner window is minimized, and is destroyed when its owner window is destroyed. For more information, see Owned Windows.
Menu Handle or Child-Window Identifier
A child window can have a child-window identifier, a unique, application-defined value associated with the child window. Child-window identifiers are especially useful in applications that create multiple child windows. When creating a child window, an application specifies the identifier of the child window. After creating the window, the application can change the window’s identifier by using the SetWindowLong function, or it can retrieve the identifier by using the GetWindowLong function.
Every window, except a child window, can have a menu. An application can include a menu by providing a menu handle either when registering the window’s class or when creating the window.
Application Instance Handle
Every application has an instance handle associated with it. The system provides the instance handle to an application when the application starts. Because it can run multiple copies of the same application, the system uses instance handles internally to distinguish one instance of an application from another. The application must specify the instance handle in many different windows, including those that create windows.
Creation Data
Every window can have application-defined creation data associated with it. When the window is first created, the system passes a pointer to the data on to the window procedure of the window being created. The window procedure uses the data to initialize application-defined variables.
Window Handle
After creating a window, the creation function returns a window handle that uniquely identifies the window. A window handle has the HWND data type; an application must use this type when declaring a variable that holds a window handle. An application uses this handle in other functions to direct their actions to the window.
An application can use the FindWindow function to discover whether a window with the specified class name or window name exists in the system. If such a window exists, FindWindow returns a handle to the window. To limit the search to the child windows of a particular application, use the FindWindowEx function.
The IsWindow function determines whether a window handle identifies a valid, existing window. There are special constants that can replace a window handle in certain functions. For example, an application can use HWND_BROADCAST in the SendMessage and SendMessageTimeout functions, or HWND_DESKTOP in the MapWindowPoints function.
Window Creation
To create application windows, use the CreateWindow or CreateWindowEx function. You must provide the information required to define the window attributes. CreateWindowEx has a parameter, dwExStyle, that CreateWindow does not have; otherwise, the functions are identical. In fact, CreateWindow simply calls CreateWindowEx with the dwExStyle parameter set to zero. For this reason, the remainder of this overview refers only to CreateWindowEx.
This section contains the following topics:
There are additional functions for creating special-purpose windows such as dialog boxes and message boxes. For more information, see DialogBox, CreateDialog, and MessageBox.
Main Window Creation
Every Windows-based application must have WinMain as its entry point function. WinMain performs a number of tasks, including registering the window class for the main window and creating the main window. WinMain registers the main window class by calling the RegisterClass function, and it creates the main window by calling the CreateWindowEx function.
Your WinMain function can also limit your application to a single instance. Create a named mutex using the CreateMutex function. If GetLastError returns ERROR_ALREADY_EXISTS, another instance of your application exists (it created the mutex) and you should exit WinMain.
The system does not automatically display the main window after creating it; instead, an application must use the ShowWindow function to display the main window. After creating the main window, the application’s WinMain function calls ShowWindow, passing it two parameters: a handle to the main window and a flag specifying whether the main window should be minimized or maximized when it is first displayed. Normally, the flag can be set to any of the constants beginning with the SW_ prefix. However, when ShowWindow is called to display the application’s main window, the flag must be set to SW_SHOWDEFAULT. This flag tells the system to display the window as directed by the program that started the application.
If a window class was registered with the Unicode version of RegisterClass, the window receives only Unicode messages. To determine whether a window uses the Unicode character set or not, call IsWindowUnicode.
Window-Creation Messages
When creating any window, the system sends messages to the window procedure for the window. The system sends the WM_NCCREATE message after creating the window’s nonclient area and the WM_CREATE message after creating the client area. The window procedure receives both messages before the system displays the window. Both messages include a pointer to a CREATESTRUCT structure that contains all the information specified in the CreateWindowEx function. Typically, the window procedure performs initialization tasks upon receiving these messages.
When creating a child window, the system sends the WM_PARENTNOTIFY message to the parent window after sending the WM_NCCREATE and WM_CREATE messages. It also sends other messages while creating a window. The number and order of these messages depend on the window class and style and on the function used to create the window. These messages are described in other topics in this help file.
Multithread Applications
A Windows-based application can have multiple threads of execution, and each thread can create windows. The thread that creates a window must contain the code for its window procedure.
An application can use the EnumThreadWindows function to enumerate the windows created by a particular thread. This function passes the handle to each thread window, in turn, to an application-defined callback function, EnumThreadWndProc.
The GetWindowThreadProcessId function returns the identifier of the thread that created a particular window.
To set the show state of a window created by another thread, use the ShowWindowAsync function.


