- Windows 10 Neovim terminal doesn’t properly display 256 colors #9937
- Comments
- moshen commented Apr 25, 2019
- Steps to reproduce using nvim -u NORC
- Actual behaviour
- Expected behaviour
- justinmk commented Apr 27, 2019 •
- moshen commented Apr 27, 2019 •
- justinmk commented Apr 27, 2019 •
- moshen commented Apr 27, 2019
- justinmk commented Apr 27, 2019 •
- justinmk commented Apr 27, 2019 •
- moshen commented Apr 27, 2019
- erw7 commented Apr 28, 2019
- Extend to 256 colors limit in Windows 10 Anniversary Update #24
- Comments
- AlexeiScherbakov commented Apr 10, 2017 •
- 0xF6 commented May 17, 2017
- tomakita commented Jun 17, 2017 •
- tomakita commented Jun 18, 2017
- nblumhardt commented Jun 19, 2017
- tomakita commented Jun 19, 2017
- AlexeiScherbakov commented Jun 20, 2017
- AlexeiScherbakov commented Jun 20, 2017
- tomakita commented Jul 3, 2017 •
- mitchcapper commented Nov 15, 2017
- mitchcapper commented Nov 15, 2017
- Windows 10 Anniversary Update Virtual Terminal 256 Color functionality #29
- Conversation
- AlexeiScherbakov commented Jun 20, 2017
- AlexejheroYTB commented Jun 21, 2019
- This comment has been hidden.
- tomakita commented Jun 21, 2019 •
- tomakita commented Jun 22, 2019 •
- Калибровка цветов монитора в Windows 10
- Калибруем цвета монитора в Windows 10
- Способ 1: Использование калибратора
- Способ 2: Стороннее программное обеспечение
- Способ 3: Встроенное в Windows средство
Windows 10 Neovim terminal doesn’t properly display 256 colors #9937
Comments
moshen commented Apr 25, 2019
|
Steps to reproduce using nvim -u NORC
Actual behaviour

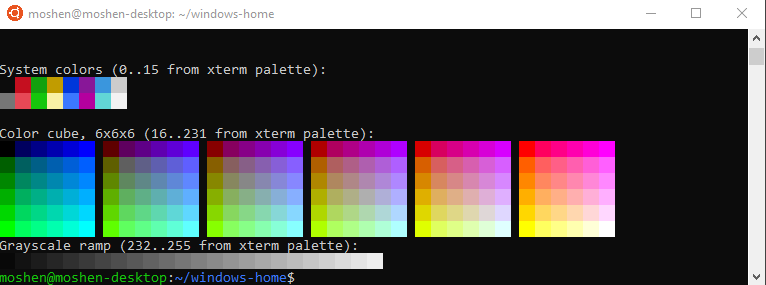
Also broken inside neovim-qt:

Expected behaviour

Using the WSL terminal and nvim inside WSL, this appears to work properly:

The text was updated successfully, but these errors were encountered:
justinmk commented Apr 27, 2019 •
Try the development version (0.4.0). The Releases page has pre-built archives for Linux/Windows/macOS.
Using the WSL terminal and nvim inside WSL, this appears to work properly:
So it works in some terminals and not others?
Nvim 0.4.0 supports more TERM values, see :help $TERM and try the various Windows values mentioned there.
moshen commented Apr 27, 2019 •
@justinmk No, I meant using the WSL terminal (A Console Window Host? Process looks the same as a cmd window and I don’t know that much about it) with the linux version of neovim running within WSL, 256 colors appear properly within the neovim :terminal .
When running the windows version of neovim, regardless of the terminal emulator, the neovim :terminal does not show 256 colors properly.
I just tried 0.4.0 and I get the exact same result.
justinmk commented Apr 27, 2019 •
@moshen The last screenshot shows 256 colors working in a :terminal , doesn’t it?
And which $TERM values did you try with 0.4.0? What does :echo &term show in each case?
moshen commented Apr 27, 2019
@justinmk The last screenshot is the example of the linux version of neovim running within wsl. I’ve been attempting to use that (but that setup has unrelated issues). Running the windows version doesn’t appear to work as expected.
:echo &term for various setups:
- nvim-qt
- nvim
- nvim in powershell
- builtin_vtpcon
- nvim in powershell in Fluent Terminal
- builtin_xterm
When I change $TERM to something like xterm-256color in powershell, it appears to be set correctly in neovim (shows as builtin_xterm ).
All these result in the same thing.
justinmk commented Apr 27, 2019 •
see #9937 (comment)
see :help $TERM . Try the recommended Windows TERM values mentioned there.
justinmk commented Apr 27, 2019 •
Actually if term=builtin_vtpcon doesn’t show improvement then that settles it.
Maybe try the artifact from #9094 . If that doesn’t work then this is out of scope.
moshen commented Apr 27, 2019
Reviewed the $TERM list again and yes, vtpcon seems like it is appropriately set. Also when I load my init the 256 colorscheme seems to work. It is just colors within :terminal seem to be stuck in a 16 color mode.
erw7 commented Apr 28, 2019
This is limitation with winpty . As discussed in rprichard/winpty#152, we need to make winpty correspond to ConPTY , or if ConPTY is available, we need to change neovim to use ConPTY instead of winpty .
Extend to 256 colors limit in Windows 10 Anniversary Update #24
Comments
AlexeiScherbakov commented Apr 10, 2017 •
Windows 10 Anniversary Update can use VT100 terminal codes. (Enabled by setting flag ENABLE_VIRTUAL_TERMINAL_PROCESSING by SetConsoleMode) and have 256 extended colors.
Sample (uses indexes)
`
class Program
<
[DllImport( «kernel32.dll», SetLastError = true )]
public static extern bool SetConsoleMode( IntPtr hConsoleHandle, int mode );
[DllImport( «kernel32.dll», SetLastError = true )]
public static extern bool GetConsoleMode( IntPtr handle, out int mode );
[DllImport( «kernel32.dll», SetLastError = true )]
public static extern IntPtr GetStdHandle( int handle );
Also color can be set in r,g,b mode but it is replaced to nearest of 256.
The text was updated successfully, but these errors were encountered:
0xF6 commented May 17, 2017
rate it
request an implementation it
tomakita commented Jun 17, 2017 •
[Apologies for the delayed reply!]
Thanks for the suggestion. This seems like a simple thing to implement, and I’m not opposed to doing it. However, I don’t have Windows 10 installed, and wouldn’t be able to test it. I can think of 2 ways of proceeding if we want to implement this:
- I can make the change in a separate branch, and then someone else could test in Windows 10.
- Someone who has an install of Windows 10 with the Anniversary Update handy could make these changes and submit a PR.
I think that option 2 is much better than option 1. In either case, we’d need to implement this feature in such a way that it is compatible with other versions of Windows, e.g. (from the MSDN page you linked to):
Anyway, thanks again for the suggestion!
tomakita commented Jun 18, 2017
That sounds great! The best place to add this sort of functionality would probably be in the static constructor of the Colorful.Console class:
This will run each time the application loads. Let me know if I can help in any other way, and thanks for making this change!
nblumhardt commented Jun 19, 2017
Regarding the platform-dependent code, I think it’s safe to add [DllImport] s as if the code will run on Windows, and then check at runtime whether or not they should be called.
..and the accompanying CSPROJ file demonstrate how we’re going to do this for Serilog.
tomakita commented Jun 19, 2017
Thanks @nblumhardt, this is very helpful!
AlexeiScherbakov commented Jun 20, 2017
Windows 10 have some version detection issues:
https://msdn.microsoft.com/en-ca/library/windows/desktop/dn481241(v=vs.85).aspx
All version detection functions are now deprecated — Windows looks at app.manifest and if Windows 10 is not explicitly supported — version functions return Windows 8.1 instead.
Before turning on Virtual Terminal commands we must detect OS. In this code it is maked by detection of Windows RT class ‘Windows.ApplicationModel.AppExtensions.AppExtensionCatalog’ which is exist after Anniversary Update
`internal static class OperationSystemDetector
<
private static readonly bool _isAnniversaryUpdate;
AlexeiScherbakov commented Jun 20, 2017
I added basic support. Also I found that current color replace functionality is not working if color is setted by VT command. I don’t know how to integrate it in Console class because it will need frontend/backend separation, VT functionality is a completly different
tomakita commented Jul 3, 2017 •
Thanks for the PR! I’ve been thinking about this over the past 2 weeks — it’s difficult for me to know exactly what to do here, as I can’t actually run the code myself.
You mentioned that the VT functionality is not integrated into the Colorful.Console class. While this is not necessarily a problem, I do think that there is risk of confusing users if not all coloring functionality is supported by the Colorful.Console class. Still, I would love to merge this PR, as long as it has compelling benefits as-is. In other words: even though the VT functionality in this PR is not integrated with the Colorful.Console class, is it still useful? If you think it is, then I’ll go ahead and merge.
Thanks again for the hard work.
All participants in this thread are welcome to chime in — not just Alexei!
mitchcapper commented Nov 15, 2017
@tomakita it would be good to get this merged as a starting point for adding support to Colorful.Console. Right now resetting the pallet after use is tricky, and the .net applications output is then screwed up. This would be a far more elegant coloring solution allowing proper colors to remain behind on the console after use even if it only works on modern platforms.
mitchcapper commented Nov 15, 2017
@tomakita further I would probably work on this some after merge to start converting methods to use this instead. As we want to keep back compat support, do we want to just #define with a compiler flag for WIN10 vs normal support? I believe we could also do runtime detection as well.
Windows 10 Anniversary Update Virtual Terminal 256 Color functionality #29
Conversation
Copy link Quote reply
AlexeiScherbakov commented Jun 20, 2017
Basic functionality, not integrated it Colorful.Console class
see — #24
AlexejheroYTB commented Jun 21, 2019
This pull request has not been updated since 2017. Is this still being worked on?
This comment has been hidden.
tomakita commented Jun 21, 2019 •
You’re right, work will need to be done to add .NET Core support. I don’t have to time begin working on this yet, but it’s on my list of things to do, as .NET Core 3.0 is almost upon us. I’ll also accept PRs for .NET Core support 🙂
Thanks for the reminder. I never merged this PR because I didn’t have access to Windows 10, and I was worried that I wouldn’t be able to test the PR version of the code. I have Windows 10 now, and will test this out over the weekend, so that @AlexeiScherbakov ‘s PR doesn’t go to waste.
tomakita commented Jun 22, 2019 •
I’ve looked through and tested the code. It looks good, and works very well. Thanks for the PR!
I have a thought about how we can detect VT support, though: I’m thinking that, rather than using operating system detection, we should just try to detect whether or not the feature is available. This might work better if e.g. VT support is removed in later versions of Windows. Your code already does this — I’ll add a bit more code once you merge this PR, but your code does most of what we’ll need to do. So if we go this route of feature detection instead of operating system detection, I think we can remove the OperationSystemDetector class. We could also remove lines 23-34 (inclusive) from NativeMethods.cs. What do you think?
BTW, you don’t have to make these changes, I can make them after I merge the PR.
Калибровка цветов монитора в Windows 10

Не всегда стандартные настройки передачи цветов дисплея подходят пользователю после подключения самого устройства к компьютеру. Обычно это касается людей, часто взаимодействующих с графикой, которые занимаются, например, рисованием или обработкой фотографий. В таких ситуациях особенно важно настроить корректную передачу цветов. Сегодня мы хотим рассказать о трех методах выполнения поставленной задачи в Windows 10, рассмотрев каждый из них.
Калибруем цвета монитора в Windows 10
Как вы уже знаете, существуют разные методы калибровки цветов монитора. Некоторые из них не приносят вообще никакого результата, поскольку конфигурация осуществляется «на глаз». Касается это специализированных онлайн-сервисов и универсальных изображений, которые, как заявляют их создатели, должны помочь справиться с настройкой. Мы пропустим эти варианты, поскольку они попросту неэффективны, и сразу же перейдем к проверенным способам, начиная с самого эффективного, но дорогого.
Способ 1: Использование калибратора
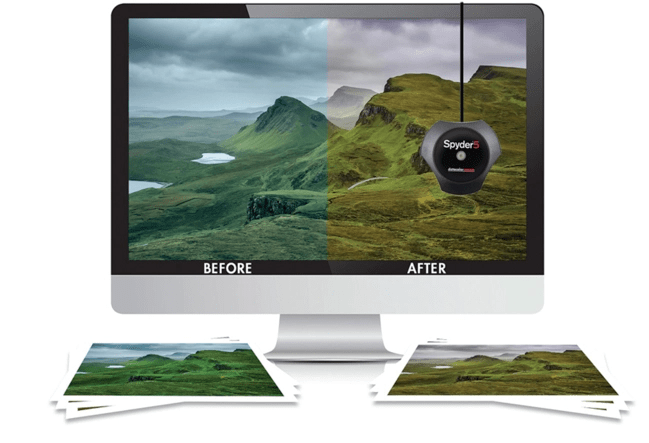
Калибратор — дорогостоящее оборудование, подключаемое к компьютеру через USB-кабель и имеющее фирменное программное обеспечение. Есть смысл использовать его только тем юзерам, кто профессионально занимается графикой и нуждается в максимально точной настройке цветов. Самый популярный калибратор на рынке — DataColor Spyder5Pro. Через него сначала осуществляются замеры освещения окружающего пространства, а затем происходит подключение к компьютеру и установка самого устройства на дисплей. Ему потребуется от пяти до пятнадцати минут на обработку информации, а после этого уже через программное обеспечение в автоматическом режиме создастся несколько доступных профилей. Каждый пользователь уже выбирает оптимальный для себя вариант, отталкиваясь от увиденного изображения.
Конечно, такое средство далеко не всем по карману, поэтому мы и остановились на нем лишь вкратце. Всем желающим, кого заинтересовал калибратор, настоятельно рекомендуем перед покупкой изучать отзывы профессионалов и инструкцию к прибору. После приобретения прочтите официальную документацию, чтобы узнать, как именно выполнить правильную калибровку, ведь этот алгоритм зависит непосредственно от модели устройства.
Способ 2: Стороннее программное обеспечение
Специальные программы по сути являются усовершенствованной версией стандартного средства операционной системы, однако иногда оказываются более эффективными, поэтому мы решили включить такой софт в формат сегодняшней статьи. Предлагаем ознакомиться с принципом взаимодействия на примере одного из самых популярных приложений под названием CLtest.
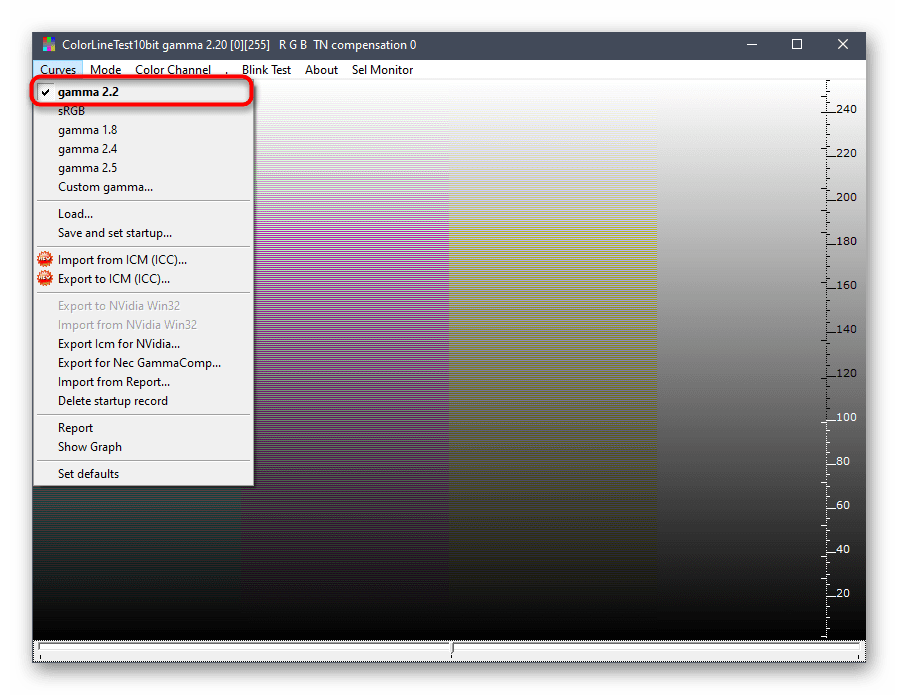
- Воспользуйтесь оставленной выше ссылкой, чтобы прочесть обзор на CLtest и скачать ее себе на компьютер. После установки запустите программу и сразу же в разделе «Curves» убедитесь, что установлен режим «gamma 2.2», поскольку он является наиболее подходящим для обычных пользователей.
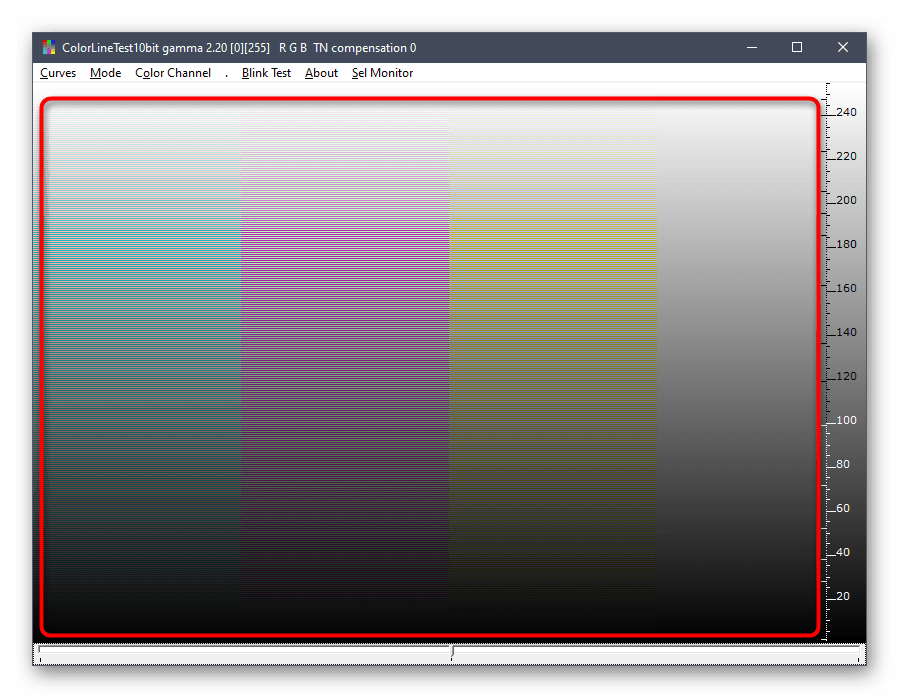
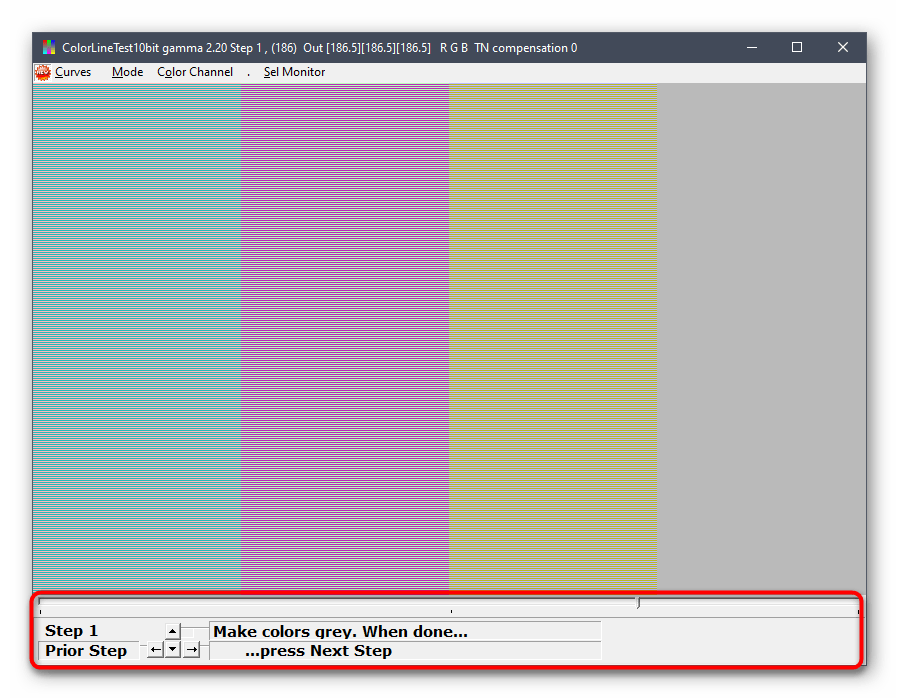
Теперь посмотрите на главное окно, где отображаются цветные полосы или просто серое полотно. Если сами полосы слегка различимы, проводить калибровку не имеет смысла. В противном случае переходите далее.
Во всплывающем меню «Mode» выберите «Calibrate Fast», чтобы запустить быстрый процесс настройки.
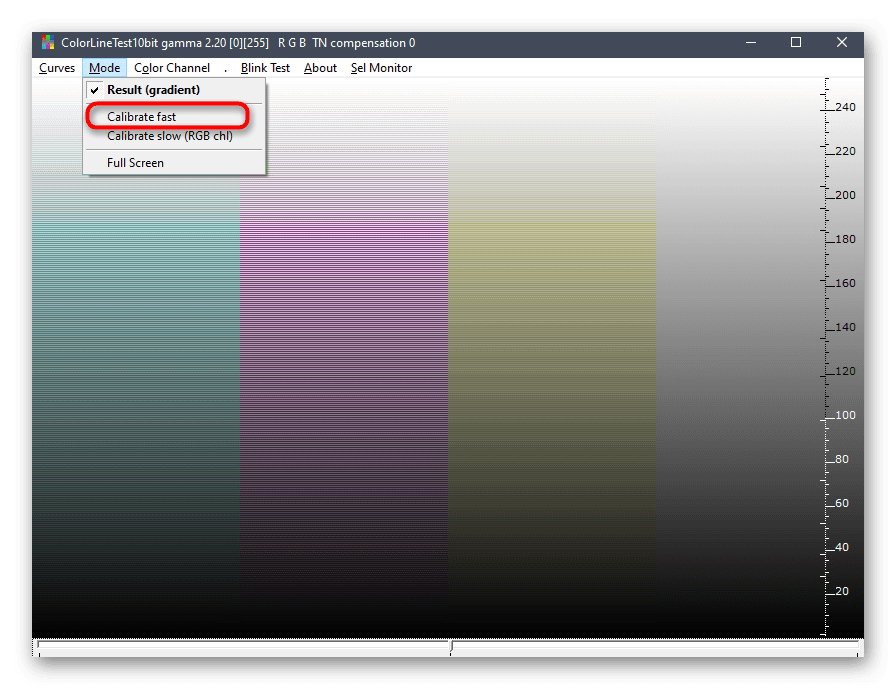
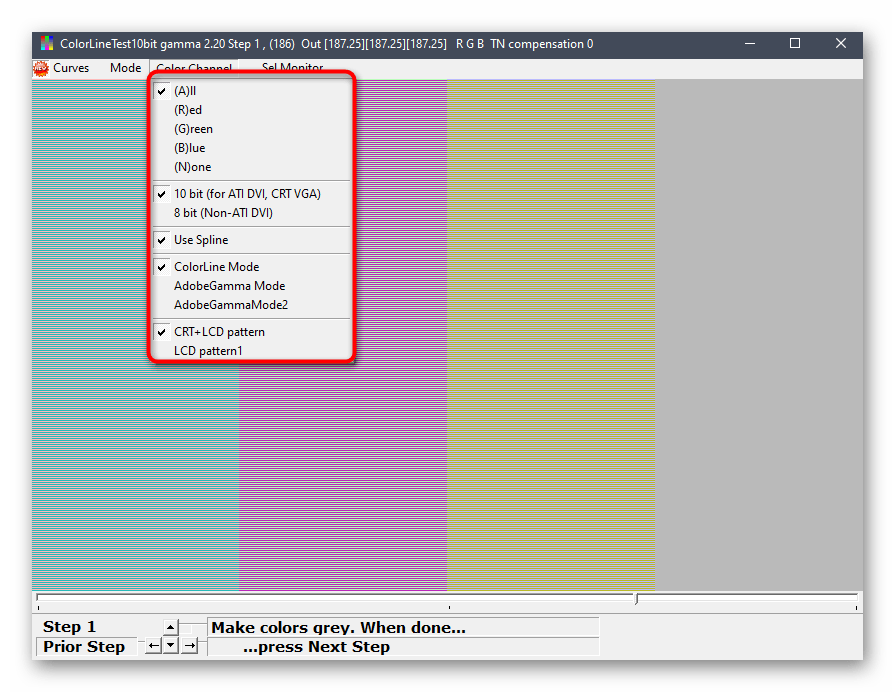
Если какой-то из цветов отображается некорректно, придется создать для него отдельную конфигурацию через режим «Color Channel». Отметьте галочкой нужный цвет, а затем повторите все шаги.
После прохождения всех шагов программа предложит оставить текущую конфигурацию или заменить ее на предыдущую. В любой момент вы можете сбросить настройки до состояния по умолчанию, если итоговый результат вас не устраивает.
Отметим, что далеко не всех пользователей удовлетворяет функциональность CLtest. Таким юзерам мы рекомендуем прочесть отдельный материал на нашем сайте, который посвящен обзору программ, предназначенных для калибровки монитора. Там вы можете изучить их основные особенности и понять, подходит ли какое-то из представленных решений для используемого монитора.
Способ 3: Встроенное в Windows средство
Выше мы уже упоминали о существовании специального встроенного в Windows средства, которое позволяет создать подходящую для монитора конфигурацию передачи цветов. Сейчас предлагаем более детально остановиться на ней, максимально подробно разобрав сам процесс настройки, чтобы даже у начинающих пользователей не осталось вопросов по этой теме.
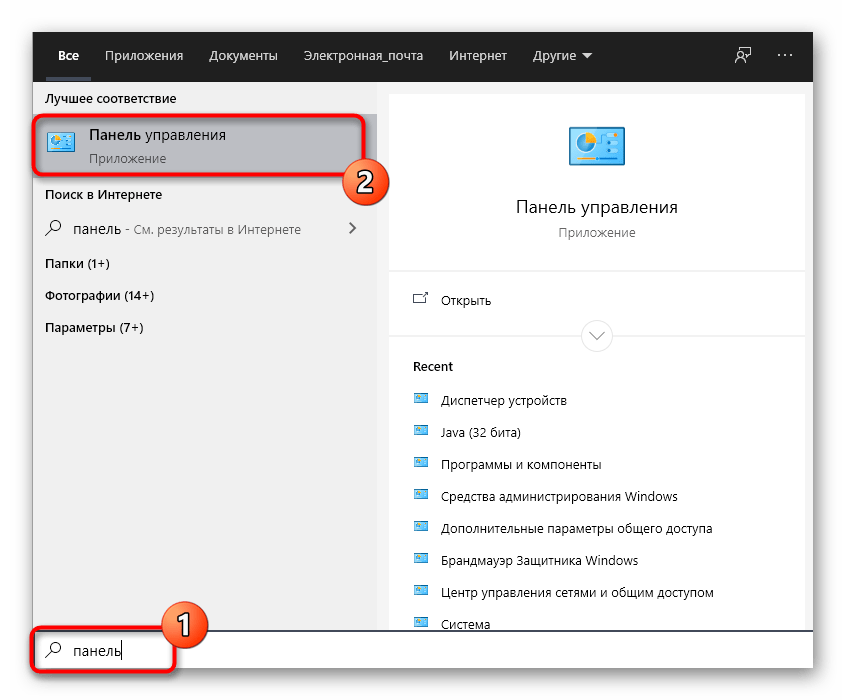
- Для начала потребуется запустить этот инструмент. Откройте «Пуск», через поиск отыщите приложение «Панель управления» и запустите его.
Переместитесь в раздел «Управление цветом».

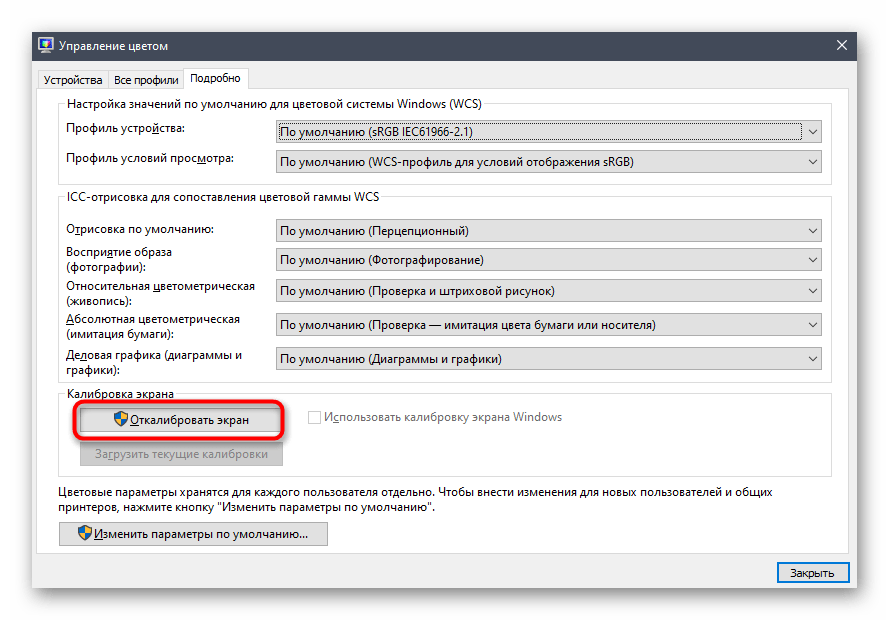
Здесь вас интересует вкладка «Подробно».
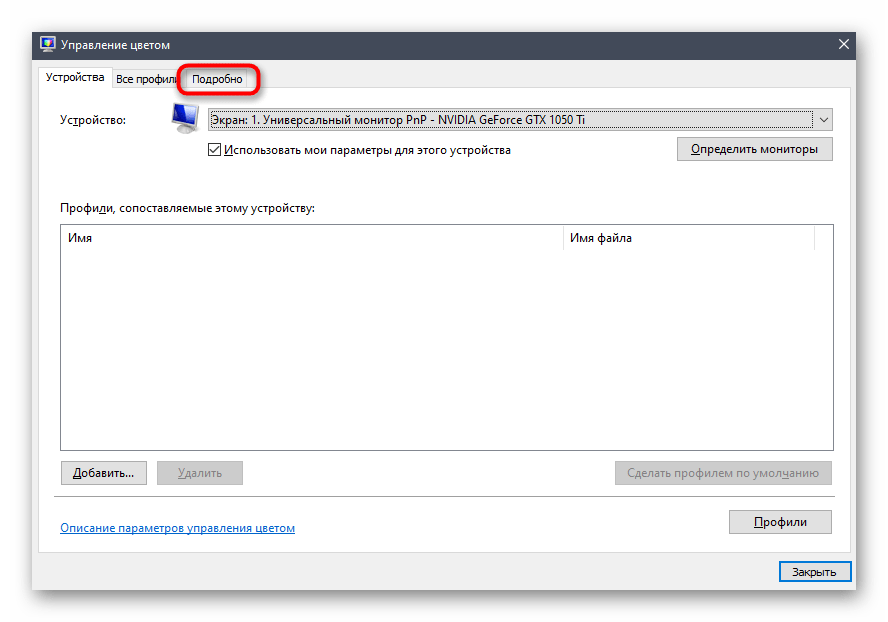
Оказавшись на ней, щелкните по отведенной кнопке «Откалибровать экран».
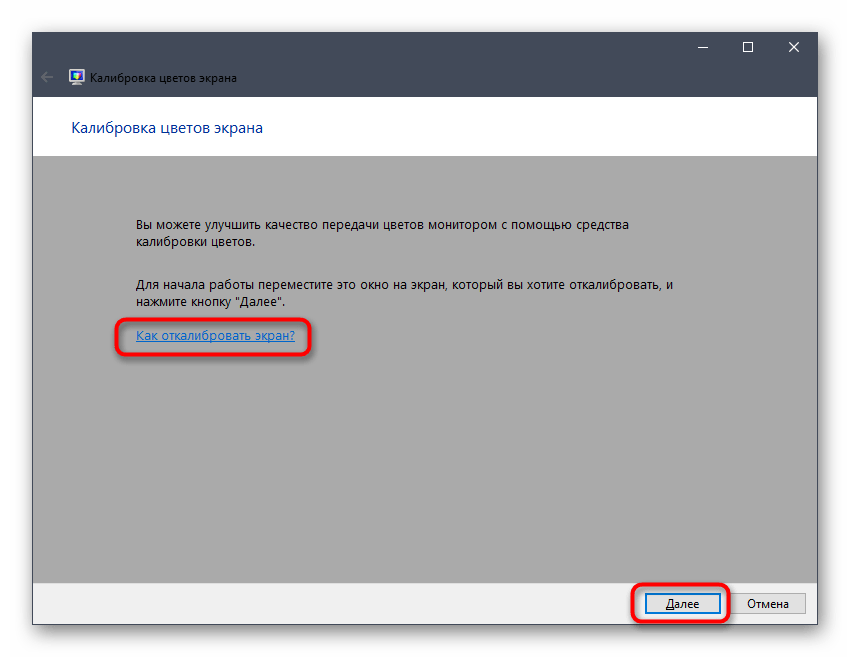
Отобразится окно Мастера настройки. Здесь Microsoft рекомендуют прочесть собственное руководство по реализации этого редактирования. При готовности приступить нажмите на «Далее».
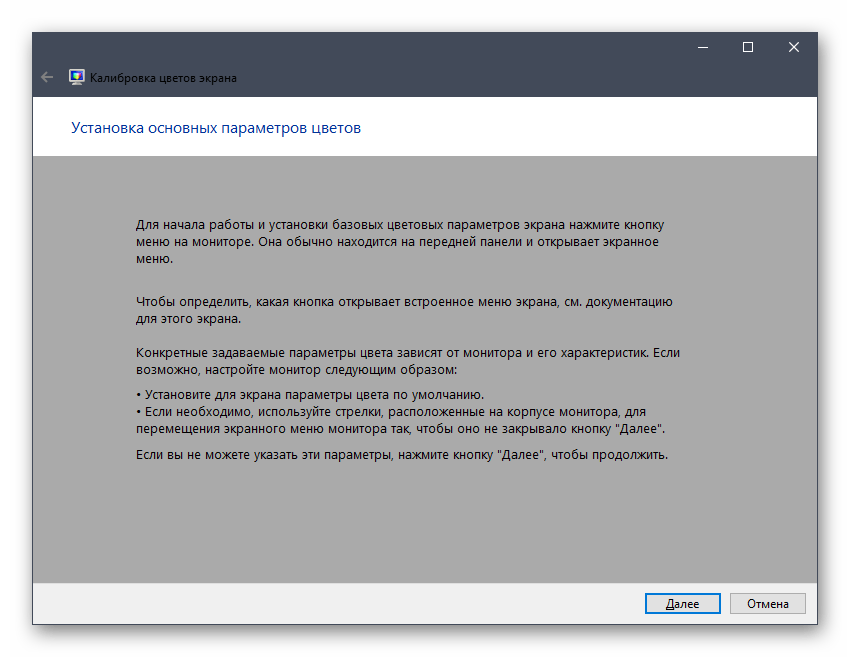
Изучите первую рекомендацию, которая заключается в установке параметров по умолчанию во встроенном меню настройки монитора. Сделайте это только в том случае, если модель поддерживает такое меню.
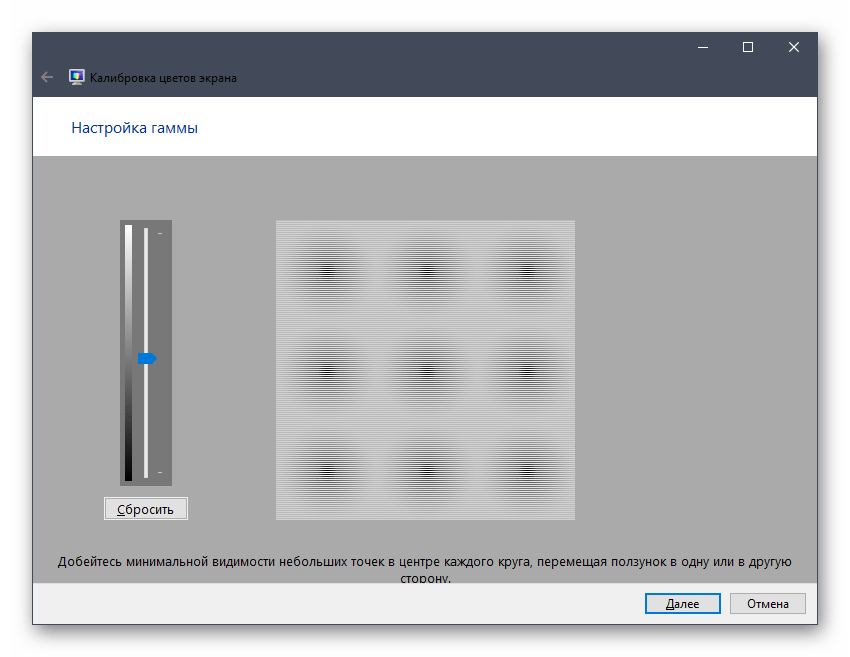
Первый этап заключается в настройки гаммы. В окне вы видите примеры отображения. По центру находится идеальный вариант, к которому и нужно стремиться. Запомните его вид и переходите далее.
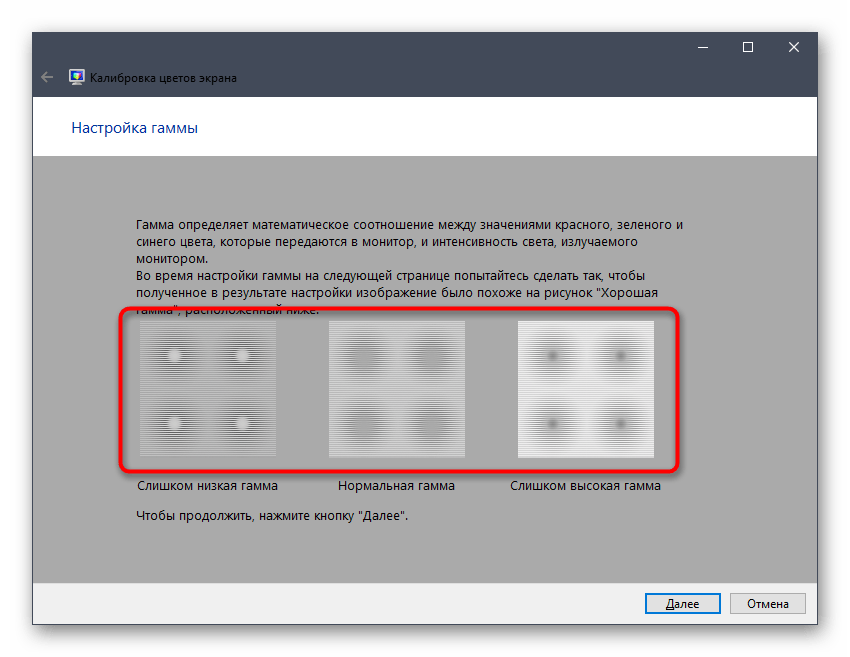
Регулируйте положение ползунка пока не добьетесь нужного результата.
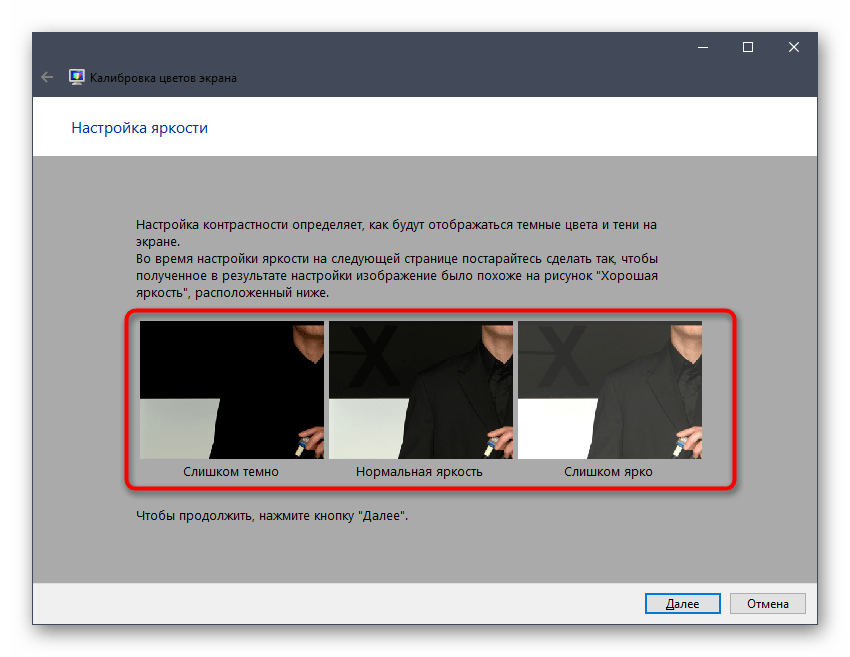
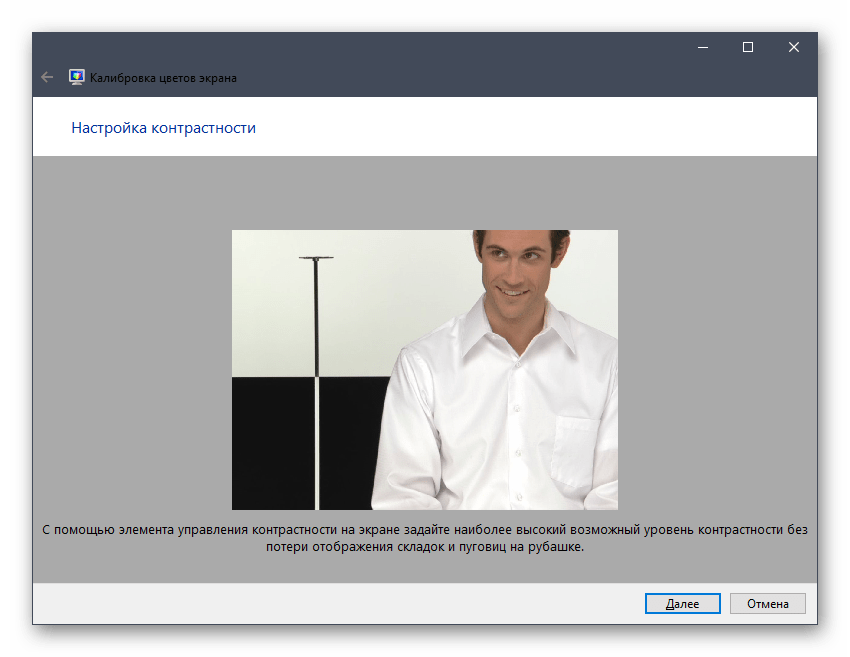
После этого начинается операция регулировки яркости и контрастности экрана. Заняться этой операцией лучше только тем пользователям, у кого монитор наделен встроенным меню или специально отведенными кнопками, отвечающими за настройку этих параметров. Если это сделать невозможно, придется пропустить данный шаг.

При настройке яркости так же придется запомнить нормальное отображение картинки.
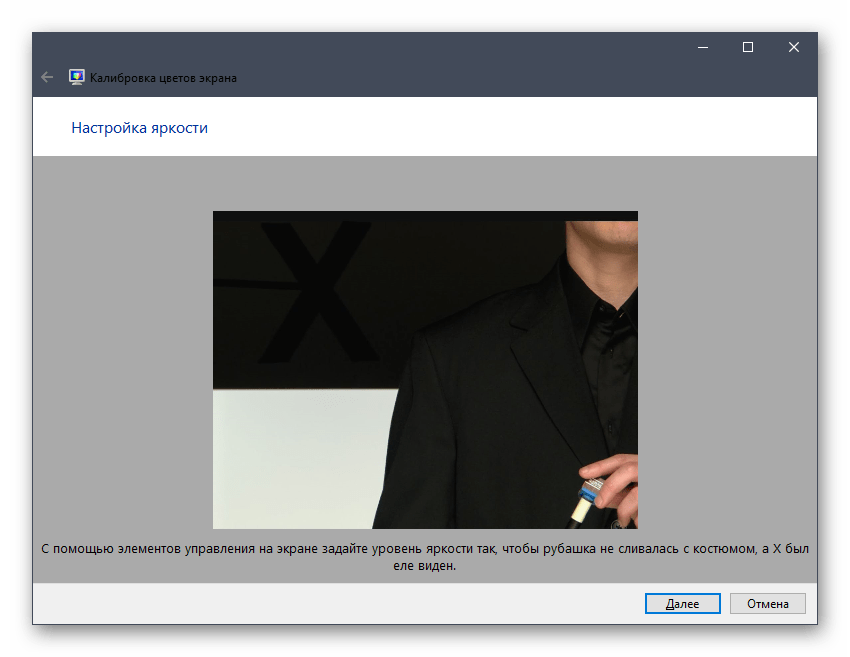
Затем само изображение отобразится в более крупном формате. Используйте кнопки или встроенное меню для регулировки цвета.
То же самое предстоит проделать и с контрастностью. Для начала посмотрите на три представленных картинки.
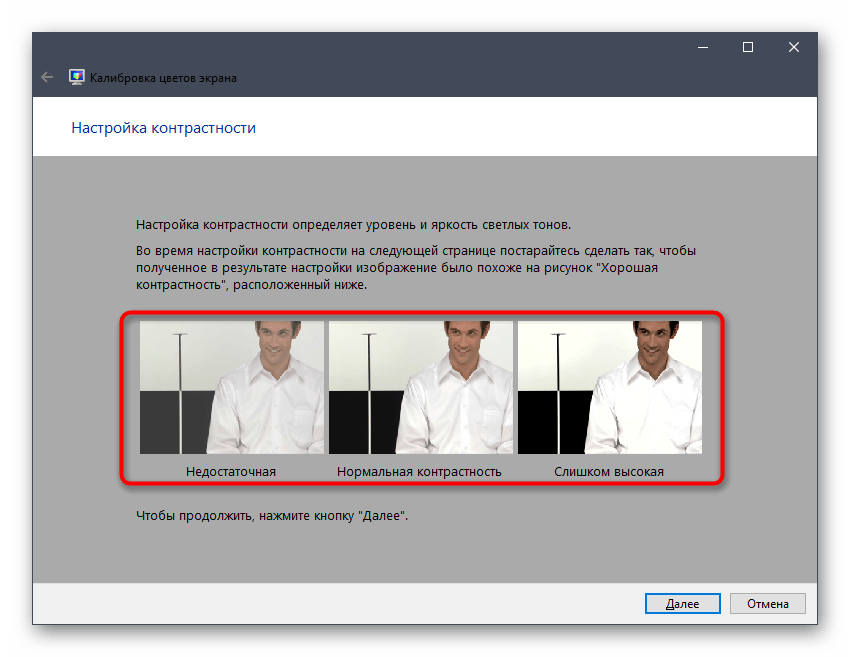
После этого осуществите регулирование и переходите к следующему этапу только тогда, когда итоговый результат будет вас устраивать.
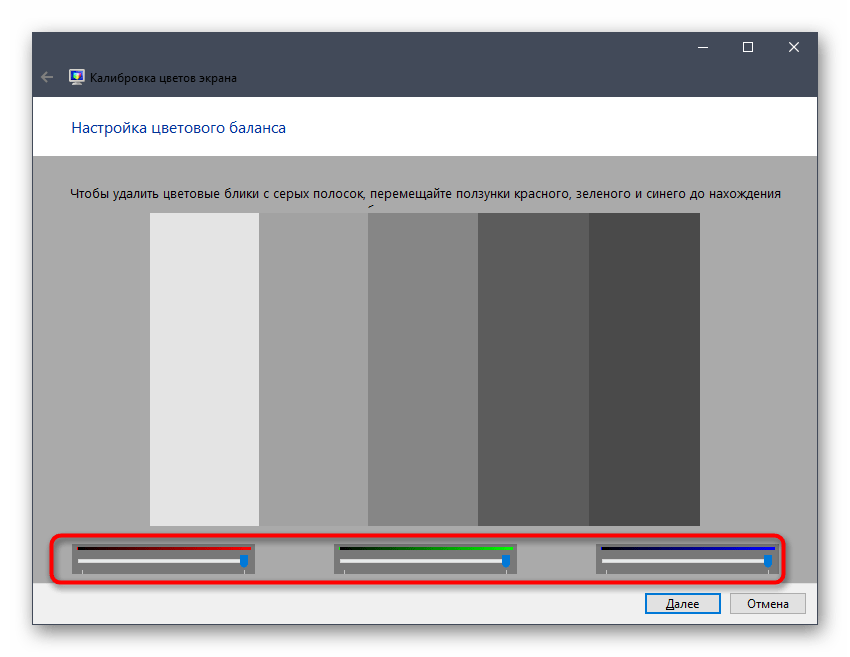
Ознакомьтесь с инструкцией по конфигурации баланса цветов. Описанные здесь критерии придется применить на следующем шаге, поэтому запомните основные рекомендации.

Регулируйте горизонтальные ползунки для достижения должного эффекта.
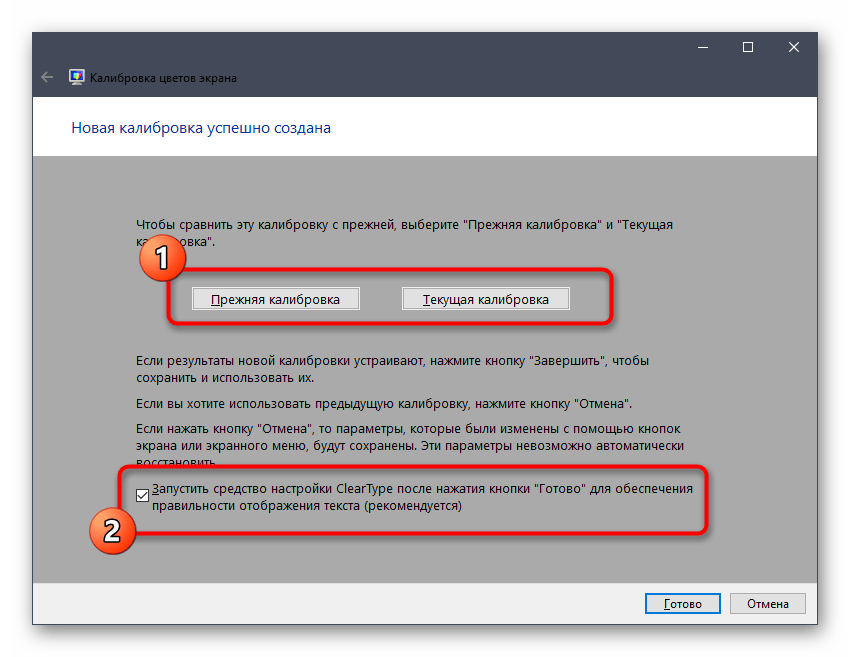
На этом конфигурация экрана завершена. Вы можете выбрать текущую калибровку или вернуть прежнюю, а также запустить средство ClearType сразу после выхода из данного окна, чтобы поработать и над отображением цветов.
Как видно, ничего сложного в настройке экрана через штатное средство Windows нет. Вам остается лишь внимательно изучать инструкции и не пренебрегать рекомендациями, чтобы в итоге получить желаемый результат отображения цветов.
В рамках этой статьи вы были ознакомлены с тремя вариантами калибровки цветов монитора. Осталось только выбрать оптимальный, чтобы реализовать его и получить максимально корректную передачу изображения на дисплее. Однако это еще не все действия, которые желательно выполнить для обеспечения полного комфорта взаимодействия с монитором. Развернуто о других манипуляциях читайте в другой статье на нашем сайте, кликнув по расположенной далее ссылке.


