- 3g modems and linux
- Использование USB-3G-модемов
- Содержание
- Общий алгоритм настройки подключения к 3G-сети
- Инструкция в картинках (Ubuntu 10.10)
- Возможные проблемы и решения
- Модели модемов, AT-команды и заметки
- Huawei E1550
- Modem 3G
- Installation with PPP and /etc/network/interfaces
- Advanced Installation with WVDial
- For Novatel
- For Option
- Extra Steps for the HSDPA card
- Extra steps for the Novatel U740 Card
- Extra Steps for the Huawei Cards
- Huawei E169
- Huawei E220
- Notes
- How to connect using a Franklin U210 USB wireless/WAN/mobile broadband modem
3g modems and linux
Linux. Сага о 3G USB модемах
Рассказка как подключить 3G USB модем а Linux’е.
Как обычно для того чтобы найти информацию и разобраться как это работает потребовалось довольно много времени. Показалось разумным сжато записать в копилку.
Как это работает (разборки со «свистком»)
Основная идея большинства таких модемов в том, что с одной стороны они используют подписку на услугу оператора связи (SIM карточка, UMTS сети),а с другой стороны стыкуются с обычным компьютером через USB. Такие модемы часто называют «свистками» за внешнее сходство, но в принципе они достаточно нормально работают.
Некоторые модемы, которые продаются вместе с пакетом услуг могут быть залочены на работу с конкретным оператором, это значит, что поставить SIM карточку другого оператора так просто не получится (разлочка возможна, но дело не простое и не гарантирующее 100% результат).
После подключения к компьютеру модем прикидывается внешним CD-ROM, на котором есть софтина для работы. Конечно чаще всего только под винюки, хотя бывают и исключения, например Nokia CS-15 содержит все необходимое для работы Linux. Я расскажу про CS-15, но в том же Huawei все абсолютно идентично.
Для перевода модема в режим именно модема можно вручную использовать usb_modeswitch или же использовать udev. Во втором случае при подключении «свистка» он будет автоматически переключаться в режим модема.
Запуск через usb_modeswitch
Нужен usb_modeswitch, который берем отсюда.
Далее создаем файл конфигурации /etc/usb_modeswitch.setup: Я утащил этот файл отсюда. Для Huawei можно сюда заглянуть.
Идея в том, что для некого vendor’а и model (Nokia CS-15 = 0x0421-0x0610) нужно заслать некую последоветельность байт и тогда как по мновению палочки в системе появится новое устройство.
Говорим: и создаем searial устройство:
После этого syslog появится нечто вроде (для devfs это будет /usb/tts/0): Затем можно сказать (если устройства нет в /dev/) и все в порядке — имеем реальный модем.
Вышеописанный способ единственный на дистрибутивах без udev (например перешитый DIR-320), но работает на ура.
Запуск через udev
Как сказано выше есть другой способ запуска через настройку правил udev. К Нокии, как уже говорил, прилагается все необходимое.
При установке пакета в набор правил udev добавляется /etc/udev/rules.d/25-nokia-zerocd.rules (символы \ показаны для наглядности, на самом деле нужно писать одной строкой!): Скрипт nokia-testcd проверяет версию «CD-ROM» и если все ok, то дает добро на переключение в режим модема.
После перезагрузки правил udev Syslog: Модем готов к работе.
В результате всех манипуляций мы получили новое serial устройство ttyUSB0 или ttyACM0 (ttyACM1 не интересует).
Чтобы не возиться с вводом PIN кода всякий раз проще его отключить, вставляем SIM карточку в любой телефон и снимаем блокировку. В принципе можно сделать ввод PIN’а при дозвонке, добавив команду AT+CPIN=»1234″ (1234 = PIN) в скрипт дозвонки.
Врубаем модем, запускаем терминальную программу, например minicom, указываем наше устройство (/dev/ttyACM0 или /dev/ttyUSB0). Скорость и flow control по барабану.
Выбираем нашего провайдера: Если все прошло удачно, светодиод поменяет цвет (у Nokia CS-15 с красного на голубой).
Необходимо отметить, что при слабом уровне сигнала со станции поиск может закончиться неудачно, поэтому можно сразу попробовать выбрать оператора (если известно имя сети, конечно).
Еще один ньюанс есть в установке так называемого APN, параметры можно спросить у оператора. К примеру, для эстонского EMT нужно будет сказать: Если оператор не использует APN, то все записанные значения игнорируются.
Если APN не указан, но используется оператором, то все будет внешне нормально, но после дозвонки ppp будет разрывать соединение.
После выключения модема настройка на оператора и APN сохраняются.
Теперь имеем обычный модем, на котором нужно просто поднять PPP.
Создаем /etc/ppp/peers/3g: И /etc/chatscripts/3g (вот сюда можно прикрутить ввод PIN):
Осталось сказать магическое заклинание и спокойно юзать мобильный интернет.
Источник
Использование USB-3G-модемов
Содержание
Общий алгоритм настройки подключения к 3G-сети
 Скриншоты
Начиная с версии Ubuntu 9.10 большинство USB-модемов определяются и работают нормально независимо от оператора сотовой связи.
Перед началом настройки необходимо установить пакеты usb-modeswitch и usb-modeswitch-data , которые позволяют корректно работать с устройствами, совмещающими функции модема, CD-ROMа и картридера (коими являются большинство 3G-USB-модемов).
После этого, при подсоединении USB-модема, стандартный апплет NetworkManager позволит создать «Новое широкополосное соединение», где мастер поможет выбрать регион, оператора и тариф.
Инструкция в картинках (Ubuntu 10.10)
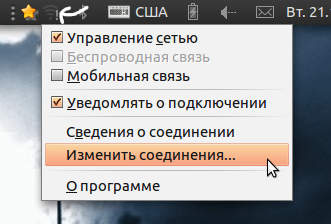
1. Щёлкните правой кнопкой мыши на апплете NetworkManager и откройте «Изменить соединения».
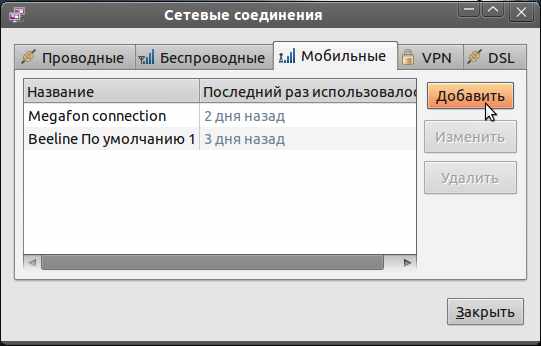
2. Перейдите во вкладку «Мобильные» и добавьте новое соединение.
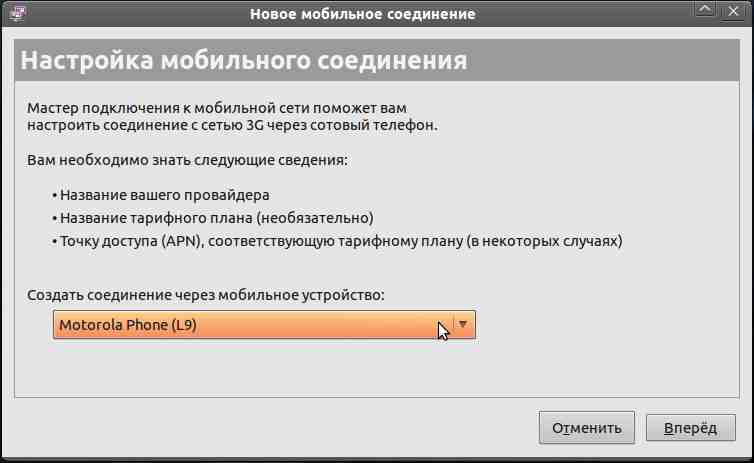
3. Выберите устройство, для которого вы настраиваете соединение. Можно выбрать «Любое».
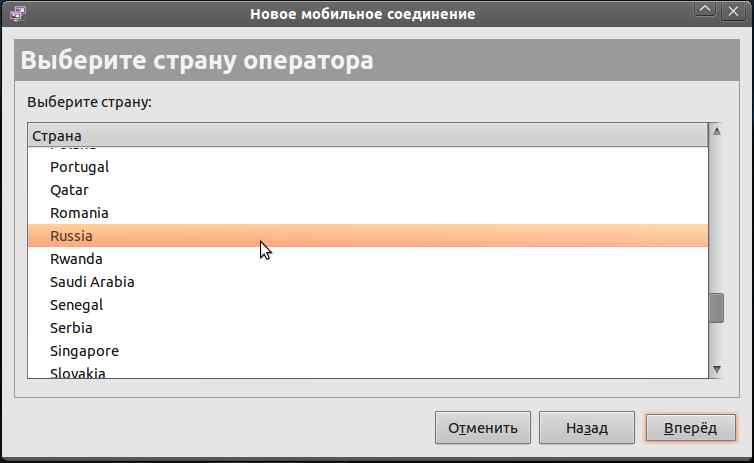
4. Выберите страну.
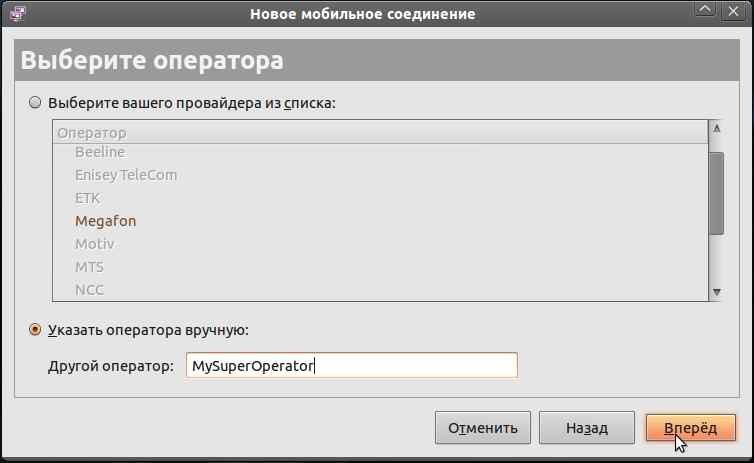
5. Выберите оператора. Если нужного нет или полно фантазии, можно самому написать название.
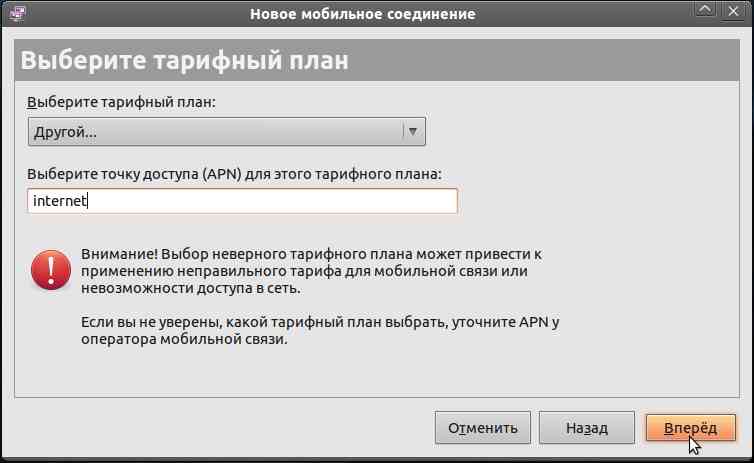
6. Выберите или напишите точку доступа (APN). Список для некоторых операторов представлен ниже в этой статье.
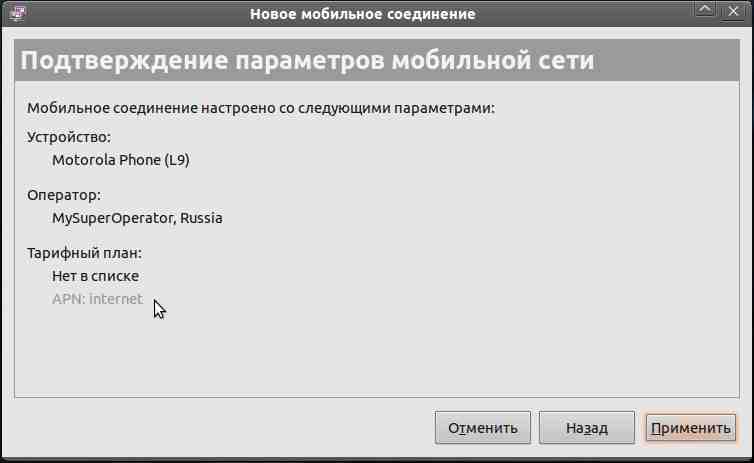
7. Почти всё. Нажмите «Применить».
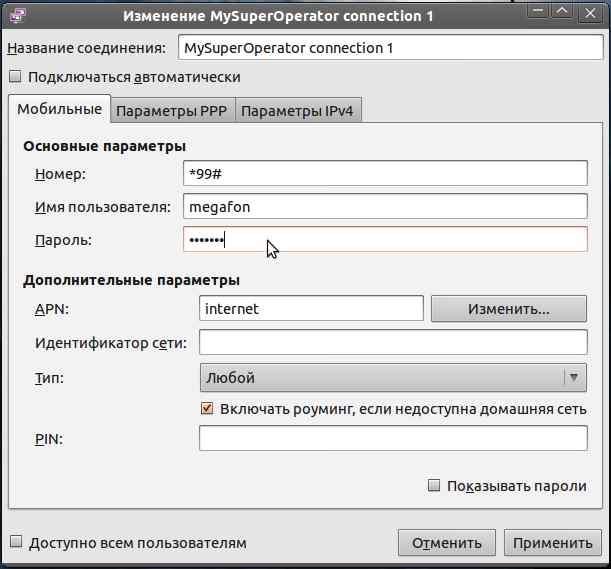
8. Появится окно, в котором можно написать имя пользователя и пароль, изменить точку доступа и т. д.
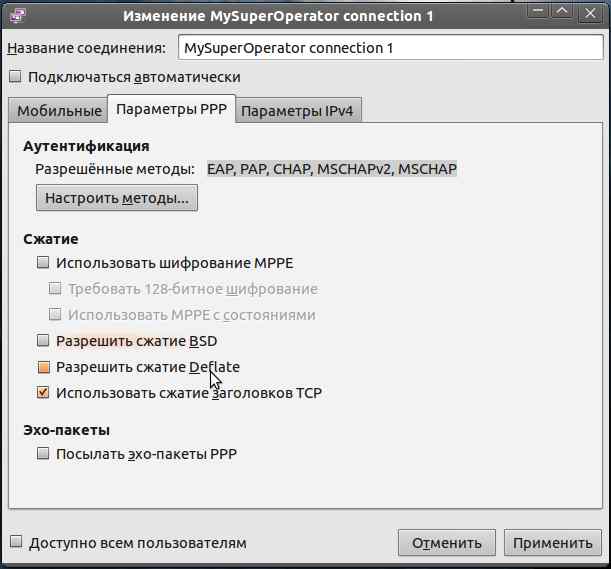
9. На другой вкладке можно включить или отключить шифрование и сжатие. После настроек нажмите «Применить».
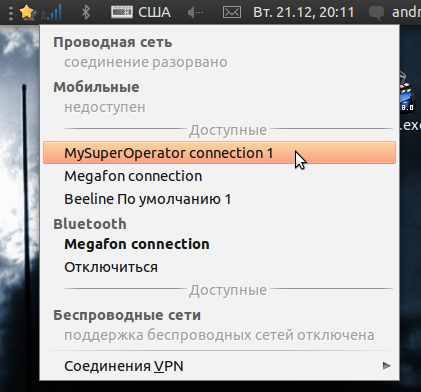
10. Щёлкнув по значку апплета и выбрав созданное подключение, вы сможете подключиться.
11. Изменение готового соединения аналогично, только вместо «Добавить» на шаге 2 нужно выбрать нужное соединение и нажать «Изменить», тем самым вы перейдёте к шагу 8.
Возможные проблемы и решения
Для надёжной работы также рекомендуется перевести устройство в режим «только модем». Это можно сделать с использованием терминальной программы cutecom , соединившись на порт /dev/ttyUSB0 и послав соответствующую конкретной модели устройства команду.
В случае проблем с установлением связи попробуйте в PPP параметрах подключения отключить компрессию Deflate, BSD или обе сразу.
Не забудьте проверять ваш баланс. При недостатке средств соединение может устанавливаться, но доступа к сетевым ресурсам не будет!
Модели модемов, AT-команды и заметки
Huawei E1550
AT-команды для переключения режима работы устройства:
Источник
- Modem
- 3G
The following cards/phones works 100% with next scripts/configs:
BandLuxe C100
Huawei/E176 (works out of the box)
Huawei/E169 works without any problems
Huawei/K3565-Z
Nokia N80 (with a nice How-To UseYourCellPhoneAsModem)
Installation with PPP and /etc/network/interfaces
This works with Debian Wheezy 7.
Install the packages netbase, ifupdown, and ppp if you don’t have them already:
Create a file /etc/ppp/peers/gprs with this content:
Then edit /etc/ppp/chap-secrets and add at the end:
Similarly, edit /etc/ppp/pap-secrets and add at the end:
Then edit /etc/network/interfaces and add the following:
That’s all you need most of the time. The connection will be brought up at boot, you can start it with ifup gprs or stop it with ifdown gprs.
Advanced Installation with WVDial
You need to download the new wvdial.conf for the HSDPA stuff to work .
This was originally written for Gentoo Linux which compiles everything from source. As a result of things might be a bit different, but we can work around it. Firstly, we need to get Linux to detect your card, start your PCMCIA services — normally this can be done using (most distros do this for you):
Before you insert your card, open a console/switch to an open console and as root run the following :
This will allow you to «see» what Linux is doing :
Right, now insert your card and you should see some stuff happening. I have included log traces of what the two cards «look» like under /var/log/messages in the attachment section.
If you see only the option_insert_nousb.txt messages using an option card run the following command:
If you had to run the above command, you will need to save the vmc_g file attached into /etc/modules.d.
Now we need to find out where your card is — you will see in the messages where the card is — /dev/ttyS* for Novatel or /dev/ttyUSB* for Option:
Should show /dev/ttyS0 or /dev/ttyS1 for a Novatel Card.
Should show /dev/ttyUSB0 and USB1 and USB2 for an Option Card. (or /dev/tts/ttyUSB0-2 for udev)
Once we found that, we need to change /etc/wvdial.conf to match your settings, attached is my working wvdial.conf (this one is tested on GSM network Play in Poland, with e169 modem, but uses no specific options so should be very portable). The file is:
Init3 PIN number above is to unlock SIM card. If your SIM does not have a PIN number, you don’t need it. Some SIM cards do not need the PIN to work as modems.
Now we can start dialing up.
For Novatel
For Option
If you need to send your PIN, add «pin» infront of all the commands, e.g.
Once your connection is up — surf away Now you can setup things like KPPP and Gnome’s Modem Lights to do your dialing for you.
Extra Steps for the HSDPA card
Download the kernel module from the link below. Extract it to a directory somewhere safe.
Compile the driver using the following commands:
Once this is done, run the following command to insert the module into the kernel
Once you have done that, use the following command to setup the connection:
Extra steps for the Novatel U740 Card
Until I get time to update the files etc. our Novatel Linux Users out there can just type this command before using the normal dialing command:
Using lsusb will show you the Vendor and Product ID’s or cat /proc/bus/usb/devices will do the same.I will still add them into the FAQ but at least this should help for now
This will add the USB’s like the 3G Option did — am I seeing a swap here ? — so just dial /dev/ttyUSB0 or so — check the logs
Extra Steps for the Huawei Cards
None really — just make sure usbserial is loaded and the card will come up on /dev/ttyUSB0 — check the logs again to confirm
If the card doesn’t come up, unload usbserial and reload with the following command:
I am still trying to work on the USB only card, so at the moment, I don’t know if it will work under Linux.
Huawei E169
Tested by rfree on Debian Wheezy with Polish operator Play. All works well:
make sure with stat /dev/ttyUSB0 that such device-file is (re)created when you connect the modem (and wait 10 seconds), the date of file should change.
copy the attached example file wvdial.conf-e169 to /etc/wvdial.conf
run wvdial (install wvdial if you don’t have it) — and should be done
Huawei E220
I have found that this modem will only work with the short cable supplied. not the long one with two plugs. *shrug*
Same as the E620, except use the following modprobe command:
(Some have reported an ID of 0x1001 — use lsusb to confirm) After that, you will notice only one USB serial coming up, then, remove the device and re-attach it, you shouldn’t need to re-insert usbserial.
Notes
I have only seen 3G speeds on this device, but I think it is because of my RF conditions and location. More on this to follow.
How to connect using a Franklin U210 USB wireless/WAN/mobile broadband modem
Though this section needs work, it documents how one Debian user connects to the Internet over NTelos’ cellular network in the United States using a Franklin CDMA EV-DO U210 USB modem. NTelos uses Sprint’s network, and moreover it would appear that Franklin’s U210 is the base model of Franklin’s U-series (U210, U600, U601, U602, U770, U772), so there is a reasonably good chance that you can use this information even if your situation differs somewhat from the writer’s — but, as they say, your mileage may vary.
This advice is targeted to the beginning-to-intermediate user. Advanced users are challenged to edit the wiki to improve the advice.
Your Franklin USB modem presents itself to the wireless network as though it were a cell phone. It has a phone number. To connect, it calls another phone number. On NTelos’ (and presumably also on Sprint’s) network in the United States, the phone number your USB modem must call is «#777». You need not, but probably can, discover your USB modem’s own phone number by logging into your account on your cellular provider’s website. The only number you need today however is the «#777».
As root or via sudo(1), install the Debian package «wvdial», for instance by
If desired, save the original state of /etc/wvdial.conf using RCS’s ci(1) or the like (you can ignore this advice re RCS if you neither know nor care what it is about). Edit /etc/wvdial.conf to look something like this:
The important lines are the «Stupid Mode = true» and the «Phone = #777». You need not fill in a password or username.
Edit «/etc/group» [again after using ci(1) first if you wish] to change
typing your username in place of «foo».
At this point, you may need to log out and log back in to get the system (which part of the system? not sure) to recognize that you now belong to the «dialout» group. If unsure, check with the groups(1) command.
Plug in your USB modem if you have not already done so. Not as root but as yourself, give the command «wvdial» at the terminal’s command line. If all goes well, this should connect you to the Internet over your cellular network. Later, press to disconnect.
One is given to understand that the «usb-modeswitch» package may be necessary if your USB modem has not been used before. The writer has neither met nor tested the circumstance in question.
To state the obvious: the procedure should be expected to work only if you have paid a subscription to the cellular network.
It is not asserted that the procedure were the smoothest possible, but the procedure does have the virtue of being relatively obvious in its operation. Refinements may occur to the interested user.
A) Since the 2.6 kernel is main stream etc. I will only cover IPTables and Kernel 2.6. I am also assuming that ppp0 is your dialup and eth0 is your lan.
Firstly — we need to add some rules to iptables — run the following commands:
That should do it — from here you can add rules to block incomming connections etc. My card is broken/replies «ERROR» to all the commands A) You didn’t send your PIN to the card — either add the «pin» command or disable the PIN on the SIM My Novatel card is very slow — +-800 bytes per second
Источник


