This section discusses the various special options related to the creation of Door/Window library elements.
General Guidelines
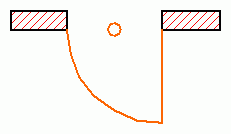
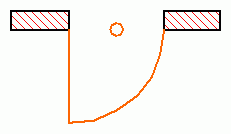
Once a door/window is inserted into a wall, the default position of these library parts’ coordinate system is rotated so that the x-y plane is vertical and the z axis points horizontally into the wall. The origin is placed on the bottom center of the wall opening, on the exterior side of the wall. This way, doors/windows can be easily modeled by elements in the x-y plane. See the illustrations below.
Because of the special behavior of these library parts, the 2D symbol is generated from a special built-in projection otherwise not accessible by users (an upside-down side view from a 90 degree direction). The symbol and the 3D shape are fitted to the Door/Window origin by the lower (y) center (x) of the bounding box, but no adjustment is made along the z axis to enable users to design doors/windows extending beyond the wall in either z direction.
Considering these rules, here are some hints that will help you construct doors/windows that will work properly:
When constructing the door/window in the floor plan window, visualize it as if you are looking at it from the inside of the wall it will be inserted into.
Think of the project zero level as the external surface of the wall.
Elements that should be inside the wall, like the window frame, should be above the zero level.
Door panels opening to the outside should be below the zero level.
Positioning
A door is correctly defined if its insertion works as follows: clicking to the right of the insertion point means that the door leaf will open to the same side on the right. A window is correctly defined if, upon insertion, the side that is clicked corresponds to the outer side.
An opening position can take one of 8 forms. These are represented by three global variables in GDL:
mirroring to the Y-Z plane in 3D or to the Y axis in 2D ( SYMB_MIRRORED )
mirroring by the longitudinal axis of the wall (rotation by 180 degrees: SYMB_ROTANGLE )
flipping ( WIDO_REVEAL_SIDE )
Usually each part of the window should react in a different way to these conditions. The specification must be clear on deciding how the parts of the object should, or should not act. E.g. a door leaf moves with these transformations, but the cavity closure does not. To keep the library part consistent, several transformations should be used for these combinations. When changing the reveal side (flipping), the library part is mirrored and dragged back by the value of the nominal frame thickness.
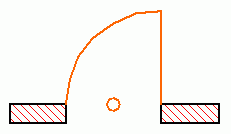
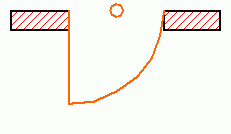
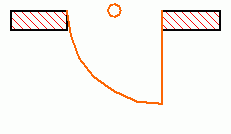
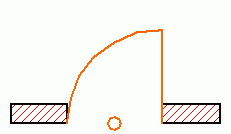
Illustration of the 8 states with a simplified door – the little circle flags the origin.
Global variables 1.
Example drawing 1.
Global variables 2.
Example drawing 2.
Sample code undoing the automatic transformations done by ARCHICAD:
Note that though flipping and mirroring is possible for all doors and windows, it is incorrect in manufacturer libraries where a library part models a real window – which, of course, cannot be turned inside out. In this case the script should undo the mirroring done by ARCHICAD.
Creation of Door/Window Library Parts
When creating Door/Window type library parts, several possibilities exist, presenting different problems:
Creation of rectangular doors/windows in straight walls
3D related challenges
Creation of non-rectangular doors/windows in straight walls
Creation of rectangular doors/windows in curved walls
Creation of non-rectangular doors/windows in curved walls
Cutting custom wall opening
WALLHOLE2
Extending the wall polygon
WALLBLOCK2
WALLLINE2
WALLARC2
Rectangular Doors/Windows in Straight Walls
This is the easiest and most straightforward way of creating doors and windows. The use of simple GDL commands such as PRISM_ or RECT is recommended.
If you want to match the surface materials of door/window elements to those of the wall, the bottom surface of the elements should match the outside, and the top surface the inside of the wall. You can achieve this from your scripts using the WALL_MAT_A, WALL_MAT_B and WALL_MAT_EDGE global variables representing the surface materials of the wall into which the door/window is placed. In the 2D script, the WALL_SECT_PEN, WALL_FILL_PEN and WALL_FILL global variables can be useful, as these give you the pen numbers of the wall contour and fill plus the index number of the fill of the wall on the floor plan into which the door/window is placed. With composite walls, you have to use the corresponding global variables.
The object libraries come with a large set of door/window macros. These GDL scripts contain common building elements which are used by many doors/windows in the library. There are macros for generating commonly-used frames, panels and many other types of door/window parts. Open some door/window library parts to see what kind of macros they call and what type of parts those macros generate.
3D Related Challenges
Non-Rectangular Doors/Windows in Straight Walls
When working with doors/windows, it is important to know that placing a door/window always cuts a rectangular hole into the wall. The size of this hole is determined by the A and B parameters of the door/window library part. However, when the door/window is not rectangular in elevation, it does not entirely fill the cut rectangular hole. The solution to this is to use the WALLHOLE or WALLNICHE command to define a polygon shape to be cut into the wall where the door/window is placed. There are two solutions for this:
The 3D script has to contain parts that generate those parts of the wall that fill the hole between the door/window body and the edges of the rectangular wall cut. In this case, special attention must be paid to the visibility of the edges of these fillings.
WALLHOLE
This command can be used in doors’/windows’ 3D script to cut custom hole(s) in the wall they are placed into. During the 3D generation of the current wall, the 3D script of all its doors/windows is interpreted without model generation to collect the WALLHOLE commands. If they exist, the current wall will be cut using an infinite tube with the polygonal cross-section and direction defined in the script. There can be any number of WALLHOLEs for any door/window, so it is possible to cut more holes for the same door/window, even intersecting ones. If at least one WALLHOLE command is interpreted in a door/window 3D script, no rectangular opening will be generated for that door/window.
The 3D reveal will not be generated automatically for custom holes, you have to generate it from the script. The hole customized this way will only be visible in 3D, because WALLHOLE commands do not have any effect in 2D. A 2D representation can be scripted if needed (used with framing in plan off).
The use of convex polygonal cross-sections is recommended; using concave polygons may result in strange shadings/renderings or cut errors. Convex polygons can be combined to obtain concave ones. Mirroring transformations affect the cutting direction in an unexpected way – to get a more straightforward result, use the WALLNICHE command.
Doors
Doors can be found in any mission and you have to open them to reach certain areas. There are many different doors and a lot of ways to open them. Most normal doors can also be opened by enemies.
Contents
Doors
These doors can be encountered in every mission and you will have to open a lot of them. There are both silent and loud ways to open them.
Wooden Door
The wooden door is first encountered in The Freelancer. Not all wooden doors are locked, some just block line of sight, such as the ones in The Deposit. The wooden doors in The Killhouse with a red line (excluding the spawn door) can only be opened by shooting it or by NPCs. These doors also sometimes spawn as a normal wooden door replacing metal doors in The Killhouse but it is a very rare occurrence.
You can open this door silently with a lockpick. It can also be opened with a crowbar or a drill, but these will force the door open which will get detected by NPCs. If you have the Precision Drilling perk the door will not be forced open, but NPCs will detect it if they open it or see it open. You can shoot the lock of the door with any weapon to open it instantly and any explosive will open it too, though it will alert any NPC who sees it open. In The SCRS there is a gray variant of this door. In The Scientist most wooden doors have glass windows. There is a blue variant found only in The SCRS.
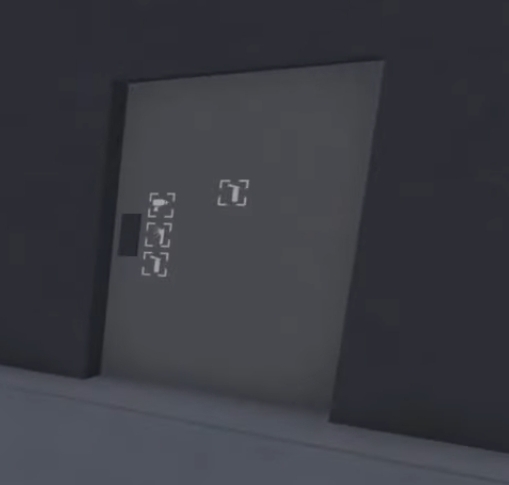
Metal Door
Metal doors are also first encountered in The Freelancer. They usually indicate a higher level of security and are more difficult to open than wooden doors. The door comes in three colors, light grey in most missions, dark grey in The Blacksite and dark brown in The Cache.
You can open this door silently with a lockpick. It can also be opened with a drill or a blowtorch, but these will force the doors open. The blowtorch can also be used to burn a small hole into the door, which can be used as a hole to shoot at enemies. In The Blacksite, some metal doors can also be opened by a crowbar. This door can also be opened with any explosive. You cannot shoot the door handle to forcefully open the door as it is metal.
Keycard Door
Keycard doors are first encountered in The Freelancer, if your first class is Hacker. They are almost identical to the metal door with the only change being that they can not be opened with a lockpick. They can be drilled, blowtorched, and blown open like the Metal Door.
To open it silently you have to use the keycard scanner which is located next to the door. The scanner can be hacked with a keycard scrambler or opened with a keycard. Once you close the door it will lock again, so you will have to use or hack the scanner again. If the door does not have a scanner on both sides, it can be opened from the inside by interacting with it like unlocked doors. The door can also be opened with an explosive.
Glass Door
The glass doors can be encountered in The Deposit, The Withdrawal, The Cache, The Auction, The Setup, and The Score. These doors serve as the entrance to the banks. They can also be seen on The Freelancer as part of the environment with an alternative texture. Most have a white color paired with a sand texture and they will break if shot with a weapon. The doors are alarmed in The Cache and The Setup.
One-Way Door
The one-way door can be encountered in The Freelancer (Mission), The SCRS, Black Dusk, The Setup and The Score. These doors can only be opened from one side, being the side with the push bar. The other side can only be opened by drilling, blowtorching or with explosives. They are used to prevent players from accessing an area easily, and are usually used as an alternative escape route.
Special Doors
These doors can only be encountered in certain missions and are usually unique.
Heavy Security Door
This door can be seen in The Financier and The Lakehouse. This door can be opened by blowtorching its right side, drilling 2 places on its left side, blowing it up with C4 or Thumper shots (2 in The Financier, 3 in The Lakehouse), using a keycard scrambler to activate the timelock in The Financier, or using a code to open it in The Lakehouse.
The door can be quickly opened up from the other side. In The Financier it will stay permanently open after that while in The Lakehouse it can be closed again during stealth.
Sensor Door
The sensor doors can be encountered in The Deposit and The Withdrawal.
The one in The Deposit is a regular metal door that has sensors at the top. The camera operators will raise the alarm if you open the door while the sensors are active. The lower door at the back alley will always have a sensor, and door of the upper camera operator will have a sensors on Elite or above. The sensors can be disabled by an engineer and they will not trigger the alarm if both camera operators have been taken out.
The one in The Withdrawal is a fire exit. It is red and has a push bar similar to the one-way door. It can only be opened after an engineer disables the sensors next to it. This is used as a much faster and safer way to get money to the van.
They are also encountered in The Setup where all outside doors are with sensors excluding the glass doors. They can be disabled by an engineer or can be disabled by the outside boxes. If the camera operator is neutralized then the doors can be opened even with the sensors still on.
Magnetic Door
These doors with magnetic locks can be found in The Lakehouse. They can only be opened with a blowtorch or by rewiring the outer power box. However, rewiring the box only opens one of the doors. They can also be opened with explosives.
Shadow War Door
This door is only found in the PvP gamemode Shadow War. The ones on the outer edges of the map can be opened by a crowbar, the others can be opened by interacting with them. A blowtorch also allows you to burn a small hole into the doors. They make distinct noises when opened or closed.
High-Security Door
High-security keycard doors are first encountered in The Scientist. They require a high-security keycard to open and have a short timelock to them. The ones found in The SCRS can also be opened with explosives, drills or blowtorches.
There is a special variant of this door in The Cache which can only be opened by completing a mission objective.
Chip Reader Door
This door can be found in The SCRS and Black Dusk. It is similar to a keycard door, except there is a chip reader on the side instead. Unlocking a chip door requires a specific disguise, which is specified by the chip. This can also be permanently bypassed through a lengthy process with an engineer. Like keycard doors, the chip door will lock when closed, unless it has been permanently disabled by an engineer. Any NPC that sees a chip door left open will come over and close it.
Blast Door
Blast doors can be found in The Blacksite and Black Dusk. They can be opened by interacting with a panel next to it, immediately during stealth but after some time during loud. In Black Dusk, the blast doors will also have to be unlocked in the control center before the panel can be interacted with, except for the first blast door. There is also a smaller variant which opens for enemy spawns in The Blacksite loud and can be opened by the player in Black Dusk, in Black Dusk loud they will close if opened and take a minute to unlock before you can open them again.
Vault Door
The vault door can be found in The Freelancer, The Auction, The Gala, The Deposit, The Withdrawal, The Cache, Black Dusk and The Killhouse. It can be opened in various ways but is unique per mission.
The first part of The Freelancer’s vault can only be opened with a C4.
The Auction’s can only be opened with the keycard and code from interrogating the employee.
The Gala’s can be opened with the keycard which is in a safe or dropped by a guard and needs the sensors to be disabled.
The Deposit’s needs the keycard from the safe on all difficulties or the manager on Operative and below as well as the code from interrogating the manager or hacking his PC.
The Withdrawal’s needs the manager to open it for you and have the metal detectors sensors disabled.
The Cache’s is not able to be interacted with.
Black Dusk’s can be opened after the Diamond Drill is done drilling, getting the keycard and code from interrogating the workshop techs who drop the keycard, or grabbing the keycard inside the operations room and hacking the computer in the same room near the keycard, or using Thermite above when finished will open the door automatically.
The Killhouse’s can be opened with the code and card from interrogating the guard who drops the keycard, or waiting for the Diamond Drill to finish drilling.
Other Doors
These doors are usually only found in a certain mission and do not act like regular doors.
Vault Cell Door
This door can be found in the vault of The Withdrawal and The Freelancer and The Lockup’s Lockup. It is made up of gray metal bars and can be opened with a lockpick, drill, blowtorch or any explosive. There are also two cell doors in The Blacksite that will automatically open after Rose gets into the cell opening area with a computer. There is also 2 doors that cannot be interacted with in The Lockup in the hallway connecting to the garage.
Jail Cell Door
The jail cell door is a gray door that can only be found in the prison block of The Blacksite. It can only be opened by interacting with the panels found in the security room. On Professional+, you need to use a drill or blowtorch to make a small hole to find Rose without having to open every door.
Server Room Door
This door can be encountered in the basement of The Lakehouse. It can be opened with the Head of Security’s keycard, drilling or blowtorching it. Scanning the keycard on the timelock begins a timelock where the amount of time it takes depends on the difficulty. It has two other unique features compared to the metal door. It cannot be opened with a Breaching Charge, however, it can be opened by using C4 or by shooting the breaker box in the server room (usually with a 480 MCS or CH-A with Sniper Mastery, although other guns can be used).
Skylight
The skylight is a window found on the first floor roof in The Setup. It is locked and can only be opened via lockpicking, drilling or using a blowtorch. It can be shot at and break to be opened as well. Failing to disable the window alarms will alert the camera operator and set off the alarm, unless taken out.
Elevator Doors
The elevator doors are found in The SCRS and The Score. They differ in use: in The SCRS it is used as the entry and opens when spawning in, while in The Score it is open to put in the gold and closes when all players and gold are in the elevator, it will then stop halfway through and has to be pried open. There are closed variants that cannot be interacted with in The Financier and in The SCRS next to spawn.
Garage Gate
In The Setup, there is a garage gate that can be only opened by engineers and can only be opened by them if all boxes are disabled even if the camera operator is neutralized. There is a similar garage gate in The Lockup Loud. Interacting with the toolbox in the north parking lot will close the garage door.
Truck Doors
Trucks are found only in The Score and can be opened by 3 C4 or Thumper shots, by blowtorching or by drilling.
The Lockup Door
The Lockup door, which is found only in The Lockup, is used to access the police station’s lockup. The only way to open this door is to find the code. The code can be found in 2 ways:
Interrogating a police or detective can yield the code.
Obtaining the code from hacking the police captain’s computer. On stealth you will need to lure away the captain with a radio, or knock the captain and face a random timer. You will have to search the file cabinet next to the computer if you are not a Hacker. On loud, the hack will stop halfway and all computers around the map that are turned on marked by a crimson swirl will be able to be searched. After hacking 4 specific computers that depend on the seed, the hack will progress then the code can be collected.
The evidence custodian will be alerted when the door opens; to counter this you can distract the evidence custodian with an evidence box found upstairs, allowing them to be hostaged near the door. Alternatively, they and the camera can be shot.
Blocked-off Door
The blocked-off door is found only in The Killhouse. It is a white barrier which prevents the player from going through into the next room. It randomly appears depending on the seed, replacing an opening, a metal door or rarely a wooden door. There is no way to get past this other than finding another route.


 Precision Drilling perk the door will not be forced open, but NPCs will detect it if they open it or see it open. You can shoot the lock of the door with any weapon to open it instantly and any explosive will open it too, though it will alert any NPC who sees it open. In The SCRS there is a gray variant of this door. In The Scientist most wooden doors have glass windows. There is a blue variant found only in The SCRS.


