- WindowsPro — Портал о Windows
- HD Color на компьютере с Windows 10. Включение и настройка
- Включение HD Color в Windows 10
- Настройки
- Что такое Windows HD Color?
- COLOR
- Contents
- Syntax
- Description
- Screen Mode Attributes
- 24/32-Bit colors using QB64
- RGB Palette Intensities
- Reading and setting color port intensities using INP and OUT
- Examples
- Windows 10 Color Control 1.3.0.0
WindowsPro — Портал о Windows
Home » Полезная информация » HD Color на компьютере с Windows 10. Включение и настройка
HD Color на компьютере с Windows 10. Включение и настройка
Посмотрело: 3 863
Функция HD Color помогает персональному компьютеру показывать контент в режиме HDR с палитрой оттенков WCG. Представленный фотографиями, играми и видеороликами контент контролируется моделью подключенного монитора, приобретая приемлемый уровень насыщенности и яркости.
Включение HD Color в Windows 10
Чтобы воспользоваться рассматриваемой функцией, пользователю необходимо произвести щелчок по кнопке, способствующей немедленному открытию меню «Пуск».
Дальше выбирается пункт под наименованием «Параметры», где отыскивается надпись Специальные возможности. Затем отыскиваем пункт «Дополнительные параметры дисплея», там и будет пункт Windows HD Color.
Под ней присутствует переключатель Play HDR games, который необходимо переключить в активное положение.
Некоторые версии с русскоязычным интерфейсом предлагают открыть раздел настроек, выбрать подходящий дисплей, задействовать потоковое воспроизведение видео, а также применение игр в формате HDR. Обычно функция HD Color поддерживает исключительно игры и программы, пользующиеся большими значениями разрешения High dynamic range. Поэтому некоторые приложения немного потеряют яркость оттенков.
Настройки
HD Color обладает опциями, позволяющими:
- Выбрать дисплей, когда к одному системному блоку компьютера подключено несколько мониторов.
- Включить потоковое воспроизведение видеоролика в HDR.
- Активировать применение высокий динамическом диапазоне игр и программ.
- Задействовать расширенную палитру цветов при работе софта.
- Выбрать параметр аккумуляторной батареи (в ноутбуках выполняет оптимизацию для уровня заряда или оптимального качества демонстрируемой картинки).
Дополнительно вы можете включать или выключать HDR на Windows 10 при помощи небольших скриптов. Ниже есть архив с ними — для быстрого запуска или выключения просто запустите соответствующий скрипт.
Что такое Windows HD Color?
В последних версиях Windows 10 появился термин Windows HD Color. Этот термин относится к возможностям в Windows 10, позволяющим отображать на ваших устройствах Windows содержимое в режиме HDR.
Содержимое в режиме HDR отличается повышенной яркостью и цветовой насыщенностью по сравнению с традиционным режимом (который иногда называют SDR, стандартный динамический диапазон). В традиционном режиме обычно отображается детализация либо более яркой области изображения, либо более темной, но не обеих одновременно. Например, если фотография сфокусирована на ярком окне, детали в тени видно плохо.
В режиме HDR, в свою очередь, возможны отображение более широкого диапазона цветов и световых зон и более высокая детализация в промежутке между крайними точками. Содержимое в режиме HDR отличается более яркими и уникальными цветами. Кроме того, яркие области изображения в этом режиме становятся ярче, а темные — темнее, причем без потери деталей.
По мере усовершенствования оборудования все больше устройств поддерживают режим HDR. Если вы интересовались новыми моделями телевизоров и мониторов, вы могли заметить, что термин HDR встречается все чаще. Благодаря функции Windows HD Color вы сможете просматривать содержимое в режиме HDR и на устройствах с Windows 10.
Для получения наилучших результатов в режиме HDR пользуйтесь устройствами с дисплеем, полноценно поддерживающим HDR10. Такой дисплей понадобится вам для запуска приложений и игр с поддержкой HDR. Видео также лучше всего воспроизводить на дисплее с полноценной поддержкой HDR. Однако, вы можете воспроизводить HDR-содержимое и на многих новых ноутбуках без поддержки HDR.
Дополнительные сведения о режиме HDR в Windows 10 см. в следующих разделах.
COLOR
The COLOR statement is used to change the foreground and background colors for printing text.
Contents
Syntax
Description
- background& colors are available in all QB64 color SCREEN modes.
- SCREEN mode 10 has only 3 white foreground attributes including flashing.
- To change the background& color only, use a comma and the desired color. Ex: COLOR , background&
- Graphic drawing statements like PSET, PRESET, LINE, etc, also use the colors set by the COLOR statement if no color is passed when they are called.
- The $COLOR metacommand adds named color constants for both text and 32-bit modes.
- COLOR works when outputting text to $CONSOLE.
- On macOS, colors in console mode will not match the VGA palette. See 8-bit ANSI colors
Screen Mode Attributes
- SCREEN 0background& colors 0 to 7 can be changed each text character without affecting other text. Use CLS after a background color statement to create a fullscreen background color. 64 DAC hues with 16 high intensity blinking foreground (16 to 31) color attributes. See _BLINK.
- See example 7 below for more SCREEN 0 background colors.
- SCREEN 1 has 4 background color attributes: 0 = black, 1 = blue, 2 = green, 3 = grey. White foreground color only.
- SCREEN 2 is monochrome with white forecolor and black background.
- SCREEN 7 can use 16 (DAC) colors with background colors. RGB settings can be changed in colors 0 to 7 using _PALETTECOLOR.
- SCREEN 8 has 16 color attributes with 16 background colors.
- SCREEN 9 can use up to 64 DAC color hues in 16 color attributes with background colors assigned to attribute 0 with a _PALETTECOLOR swap. RGB settings can be changed in colors 0 to 5 and 7 using _PALETTECOLOR.
- SCREEN 10 has only 4 color attributes with black background. COLOR 0 = black, 1 = grey, 2 = flash white and 3 = bright white.
- SCREEN 11 is monochrome with white forecolor and a black background.
- SCREEN 12 can use 16 color attributes with a black background. 256K possible RGB color hues. Background colors can be used with QB64.
- SCREEN 13 can use 256 color attributes with a black background. 256K possible RGB hues.
- PALETTE swaps can be made in SCREEN 7 and 9 only. Those screens were DAC screen modes in QBasic.
- _DEST can be used to set the destination page or image to color using QB64.
- _DEFAULTCOLOR returns the current color being used on an image or screen page handle.
24/32-Bit colors using QB64
- Pixel color intensities for red, green, blue and alpha range from 0 to 255 when used with _RGB, _RGBA, _RGB32 and RGBA32.
- Combined RGB function values returned are LONG values. Blue intensity values may be cut off using SINGLE variables.
- _ALPHA transparency values can range from 0 as transparent up to 255 which is fully opaque.
- _CLEARCOLOR can also be used to set a color as transparent.
- Colors can be mixed by using _BLEND (default) in 32-bit screen modes. _DONTBLEND disables blending.
- NOTE: Default 32-bit backgrounds are clear black or _RGBA(0, 0, 0, 0). Use CLS to make the black opaque.
RGB Palette Intensities
RGB intensity values can be converted to hexadecimal values to create the LONG _PALETTECOLOR value in non-32-bit screens:
SCREEN 12 alpha$ = «FF» ‘solid alpha colors only OUT &H 3C8, 0: OUT &H 3C9, 0: OUT &H 3C9, 0: OUT &H 3C9, 20 ‘set black background to dark blue PRINT «Attribute = Hex value Red Green Blue » PRINT COLOR 7 FOR attribute = 0 TO 15 OUT &H 3C7, attribute ‘set color attribute to read red$ = HEX$ ( INP ( &H 3C9) * 4) ‘convert port setting to 32 bit values grn$ = HEX$ ( INP ( &H 3C9) * 4) blu$ = HEX$ ( INP ( &H 3C9) * 4) IF LEN (red$) = 1 THEN red$ = «0» + red$ ‘2 hex digits required IF LEN (grn$) = 1 THEN grn$ = «0» + grn$ ‘for low or zero hex values IF LEN (blu$) = 1 THEN blu$ = «0» + blu$ hex32$ = » &H » + alpha$ + red$ + grn$ + blu$ _PALETTECOLOR attribute, VAL (hex32$) ‘VAL converts hex string to a LONG 32 bit value IF attribute THEN COLOR attribute ‘exclude black color print PRINT » COLOR » + STR$ (attribute) + » = » + hex32$, red$, grn$, blu$ ‘returns closest attribute NEXT
Attribute Hex value Red Green Blue COLOR 0 = &HFF000050 00 00 50 COLOR 1 = &HFF0000A8 00 00 A8 COLOR 2 = &HFF00A800 00 A8 00 COLOR 3 = &HFF00A8A8 00 A8 A8 COLOR 4 = &HFFA80000 A8 00 00 COLOR 5 = &HFFA800A8 A8 00 A8 COLOR 6 = &HFFA85400 A8 54 00 COLOR 7 = &HFFA8A8A8 A8 A8 A8 COLOR 8 = &HFF545454 54 54 54 COLOR 9 = &HFF5454FC 54 54 FC COLOR 10 = &HFF54FC54 54 FC 54 COLOR 11 = &HFF5454FC 54 FC FC COLOR 12 = &HFFFC5454 FC 54 54 COLOR 13 = &HFFFC54FC FC 54 FC COLOR 14 = &HFFFCFC54 FC FC 54 COLOR 15 = &HFFFCFCFC FC FC FC
Explanation: The RGB intensity values are multiplied by 4 to get the _RGB intensity values as hexadecimal values. The individual 2 digit HEX$ intensity values can be added to «&HFF» to make up the 32-bit hexadecimal string value necessary for VAL to return to _PALETTECOLOR. The statement is only included in the example to show how that can be done with any 32-bit color value. Note: Black has a blue hex value of 50 due to the OUT background color setting which makes it dark blue.
Reading and setting color port intensities using INP and OUT
- Legacy code may use INP and OUT to read or set color port intensities. QB64 emulates VGA memory to maintain compatibility.
- The same can be achieved using _PALETTECOLOR (recommended practice).
OUT &H3C7, attribute ‘Set port to read RGB settings with: color_intensity = INP(&H3C9) ‘reads present intensity setting OUT &H3C8, attribute ‘Set port to write RGB settings with: OUT &H3C9, color_intensity ‘writes new intensity setting
- After every 3 reads or writes, changes to next higher color attribute. Loops can be used to set more than one attribute’s intensities.
- Color port setting of red, green and blue intensities can be done in ascending order.
- Color port attribute intensity values range from 0 to 63 (1/4 of the 32-bit values) in QBasic’s legacy 4 and 8 bit screen modes.
Examples
Example 1: Reading the default RGB color settings of color attribute 15.
OUT &H3C7, 15 red% = INP (&H3C9) green% = INP (&H3C9) blue% = INP (&H3C9) PRINT red%, green%, blue%
Example 2: Changing the color settings of attribute 0 (the background) to dark blue in SCREENs 12 or 13.
SCREEN 12 OUT &H 3C8, 0 ‘set color port attribute to write OUT &H 3C9, 0 ‘red intensity OUT &H 3C9, 0 ‘green intensity OUT &H 3C9, 30 ‘blue intensity OUT &H 3C7, 0 PRINT INP ( &H 3C9); INP ( &H 3C9); INP ( &H 3C9) END
Example 3: Printing in fullscreen SCREEN 0 mode with a color background under the text only.
SCREEN 0: _FULLSCREEN ‘ used for fullscreen instead of window COLOR 30, 6: LOCATE 12, 4: PRINT «Hello!»
Result: Hello! is printed in flashing high intensity yellow with brown background behind text only when in QBasic fullscreen.
Example 4: Using CLS after setting the background color in SCREEN 0 to make the color cover the entire screen.
Result: The blue word Hello is printed to a totally grey background in fullscreen.
Example 5: Using a different foreground color for each letter:
H E L L O W O R L D
Example 6: Doing the same as Example 5 but in only a few lines:
SCREEN 0 text$ = «HelloWorld» FOR textpos = 1 TO LEN (text$) COLOR textpos IF textpos <> 5 THEN PRINT MID$ (text$, textpos, 1); IF textpos = 5 THEN PRINT MID$ (text$, textpos, 1) ‘start print on next row NEXT
H e l l o W o r l d
Explanation:Semicolon(;) means that the next PRINT happens on the same line, we don’t want that when it comes to position 5 so when it is at position 5 the next PRINT will move to the next line (when it isn’t at position 5 we want it to continue printing the letter side-by-side on the same line though).
Example 7: Since SCREEN 0 only uses background colors 0 to 7 by default, use _PALETTECOLOR to change color intensities of color 0.
_PALETTECOLOR 0, _RGB32(255, 255, 255) ‘change color 0 intensity _PALETTECOLOR 8, _RGB32(0, 0, 0) ‘change color 8 intensity COLOR 8: PRINT «Black on bright white!»
Black on bright white!
Explanation: Since QB64 does not have DAC SCREEN 0 limitations, changing color intensities for custom background colors is possible.
Example 8: Changing light gray text in SCREEN 0 to a 32 bit custom color using a LONG HTML hexadecimal value:
COLOR 7 PRINT «Color 7 is gray» K$ = INPUT$ (1) _PALETTECOLOR 7, &H FFDAA520 ‘ FF alpha makes the color translucent PRINT «Color 7 is now Goldenrod in SCREEN 0!
Color 7 is gray Color 7 is now Goldenrod in SCREEN 0!
Explanation: _RGB32 could be used to make custom 32 bit colors or HTML values could be used after &HFF for solid colors.
Windows 10 Color Control 1.3.0.0
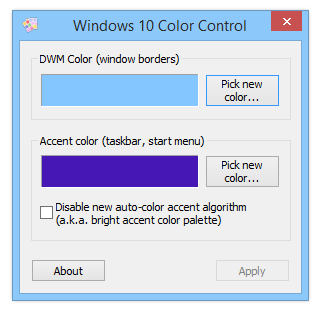
В Windows 10 вы сможете настроить цвет панели задач, окон и меню пуска, однако выбор будет невелик, так как получите в свое распоряжение ограниченный цветовой набор. Плюс независимо от того, какой цвет вы выбрали, панель задач не будет смотреться темной. Windows 10 Color Control — решит эти проблемы! Утилита от RaMMicHaeL, который в свое время бился над этой задачей, однако простого способа смены цветов он не нашел, надо было править реестр, что давало вам более обширный выбор, более яркие цвета.
После он создал эту программу, запустив Windows 10 Color Control вы сможете выбрать произвольный цвет для тонкой рамки вокруг окон, как писалось выше, сможете работать с панелью задач и меню пуском, а если у вас сборка 10525, то сможете изменять цвет для заголовка окон. Обратите внимание, что программа позволит вам выбирать между любыми яркими цветами, я думаю кто «сидит» на Windows 10 знает, что зайдя в палитру панели Персонализации, найти там ярких оттенков у вас не получится.

Если вы хотите получить полное удовольствие от работы с Windows 10 Color Control, то вам надо выключить алгоритм автоматического подбора цвета, для этого надо в главном окне программы отметить галочкой пункт «Disable new auto-color accent algorithm» — что делать дальше, я думаю вы сможете разобраться и без меня, ведь никаких настроек и фишек нет, остается просто выбрать цвет и наслаждаться.


 [/not-group]
 —>
—> 


