- Установка сервера 7 Days to Die на Linux
- Содержание
- Первичная настройка Linux
- Установка сервера 7 Days to Die
- Настройка сервера 7 Days to Die
- Лог консоли сервера
- Проверка обновлений и автоматический перезапуск игрового сервера после падения или перезапуска VDS
- Важные файлы сервера
- Setup 7 Days to Die Server on Ubuntu 14
- Prerequisites
- Installation
- Configure the server
- Start the server
- Shut down the server
- Auto-update
- Optional: Setup the server to run as a service
- Final notes
- 7 days to die для linux
Установка сервера 7 Days to Die на Linux

В данной инструкции мы расскажем как установить сервер игры 7 Days to Die на ОС Linux Debian 10
Минимальная характеристика сервера для игры 7 Days to Die до 8 игроков.
- Тариф: Medium
- Процессор: от 2.6 GHz
- Количество потоков: 2
- Оперативная память: 8 Gb
- Сервер занимает: 12 Gb
Содержание
Первичная настройка Linux
Вы заказали на сайте MyArena виртуальный сервер, выбрали и установили операционную систему, что же делать дальше? Прежде чем перейти к установке сервера игры, нам потребуется провести предварительную настройку Linux.
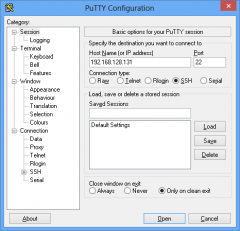
1. Скачиваем и устанавливаем программу PuTTY себе на компьютер, что бы подключиться к серверу.
- Запускаем программу, открываем вкладку Window, переходим в Translation и в меню Remote character set выбираем UTF-8.
- Возвращаемся во вкладку Session.
- В Host Name указываем IP адрес вашего сервера, порт 22, ниже в Saved Sessions придумайте имя для подключения и нажмите на кнопку Save.
- Выделяем название сервер и нажимаем на кнопку Open.
- У вас откроется черное окно терминала в котором вам потребуется указать логин и пароль от вашего сервера.
2. Установка дополнительных библиотек, при использование 64 битной операционной системы
3. Установка дополнительных программ.
4. Устанавливаем редактор Nano для пользователя root по умолчанию.
Установка сервера 7 Days to Die
1. Создаем нового пользователя с паролем, например gameserver.
Все последующие шаги выполняются под созданным пользователем. Выйти из него можно командой ‘exit’.
2. Переключаемся на пользователя gameserver.
3. Устанавливаем редактор Nano для пользователя gameserver по умолчанию.
4. Создаем и переходим в папку, куда будем загружать steamcmd.
5. Скачиваем архив steamcmd и разархивируем его.
6. Запускаем steamcmd.sh. Важно: нужно находиться в папке steamcmd.
7. Загрузка и установка сервера
8. Запуск сервера. После загрузки сервера выходим из steamcmd введя команду ‘quit’
Теперь проверим, запускаем сервер, для этого пропишите в консоли команду
После этих действий сервер начнет запускаться, вы сможете зайти на него указав ip адрес и порт, например 37.230.228.208:26900
Завершить процесс и выключить игровой сервер нажатием клавиш ctrl+c.

Настройка сервера 7 Days to Die
1. Чтобы в будущем избежать правок конфигурационного файла serverconfig.xml при обновлении сервера, следует создать его копию.
Находясь в директории /7dtd, прописываем данную команду.
Данная команда скопирует файл serverconfig.xml и создаст его копию с названием server_config.xml.
2. Открываем конфиг сервера server_config.xml командой
Список самых важных переменных:
| Переменные | Стандартное значение | Описание |
|---|---|---|
| ServerName | My Game Host | Название сервера. |
| ServerPort | 26900 | Игровой порт сервера. |
| ServerVisibility | 2 | Видимость сервера в интернете: 2 = Виден в интернете, в поиске серверов, 1 = Виден только друзьям, 0 = отсутствует в списке. 1 — Это значит, что сервер станет виден всем друзьям игрока, который подключился к серверу. |
| ServerPassword | Пароль сервера, который будет требоваться при подключении. | |
| ServerMaxPlayerCount | 8 | Максимальное количество игроков. |
| ServerDescription | A 7 Days to Die server | Описание сервера. |
| EACEnabled | true | Включает или отключает античит EasyAntiCheat. |
| GameWorld | Navezgane | Карты сервера. Можно установить значение «RWG» для случайной карты. |
| GameName | My Game | Названия игры, должно быть написано Латиницей. Не используйте «:» и прочие специфические символы. |
| WorldGenSeed | asdf | Если выбрали RWG, нужно указать семя (пример: asdf) для создания новой случайной карты. Если карта с таким именем уже существует, она просто будет загружена. |
| WorldGenSize | 4096 | Если выбрали RWG, нужно указать ширину и высоту для новой карты (пример: 4096). Размер карты должен быть от 2048 до 16384, создание новой карты может занять очень много времени. |
| DayNightLength | 60 | Длительность суток в игре. |
| LootRespawnDays | 30 | Через какое количество игровых дней будет происходить респаун лута. |
| PlayerKillingMode | 3 | Настройки PVP режима. (0 = PVP запрещен для всех, 1 = можно убивать только союзников, 2 = можно убивать только незнакомцев, 3 = PVP включен для всех |
3. Сохраняем результат нажатием одновременно ctrl+x, у вас попросят подтвердить действия, нажимаем на Y и enter.
4. Проверим сервер, запустим startserver.sh командой
После этих действий сервер начнет запускаться. Завершить процесс и выключить игровой сервер нажатием клавиш ctrl+c.
Лог консоли сервера
После того, как вы запустили сервер, будет создан output_log.txt в папке 7DaysToDieServer_Data.
В нем вы можете посмотреть полностью лог консоли сервера, запуск сервера, ошибки, подключение\отключение игроков, информацию по работе античита и многое другое.
Проверка обновлений и автоматический перезапуск игрового сервера после падения или перезапуска VDS
1. Находясь в директории /7dtd, создадим дополнительный файл start_7dtd_server.sh для запуска сервера.
2. Проверка обновлений. В этот файл прописываем данные параметры.
3. Автоматический запуск сервера. Ниже прописываем данные параметры, после этого сохраняем результат нажатием одновременно ctrl+x, у вас попросят подтвердить действия, нажимаем на Y и enter.
4. Добавляем права на файл start_7dtd_server.sh, командой.
5. Под пользователем gameserver прописываем команду crontab -e и указываем эти данные.
- После этого нажимаем на сочетание клавиш ctrl+x и сохраняем результат
- Чтобы посмотреть, что запущено в скрине наберите screen -ls
- Чтобы посмотреть отдельный скрин screen -x название скрина или его номер.
- Чтобы выйти из выбранного скрина нажмите ctrl+a затем d.
- Чтобы убить запущенный процесс пропишите команду kill и номер процесса.

6. Перезапуск сервера в час ночи.
Выходим из под пользователя gameserver командой exit обратно под root, прописываем вновь crontab -e и указываем эти данные.
Теперь каждый день, в час ночи игровой сервер будет перезапущен.
Важные файлы сервера
1. Расположение папки с картами сервера. Если у вас есть своя карта, то её нужна закачать в данную папку.
2. После запуска сервера, будет создан новый каталог.
Сервер сохраняет данные игры в «скрытую» директорию учетной записи gameserver, каталог называется .local (с точкой).
Тут вы найдете игроков, админов, информацию по открытым регионам и многое другое.
Вы можете изменять инвентарь игроков, переносить его между серверами, даже части карты можно перенести, достаточно скопировать соответствующие файлы в другой каталог для сохранения.
Источник
Setup 7 Days to Die Server on Ubuntu 14
Archived content
This article is outdated and may not work correctly for current operating systems or software.
In this guide, you will learn how to setup your own «7 Days to Die» server (7D2D) on Ubuntu. Please note that this game is still «early access» and that the installation steps may change without notice as updates are released.
Prerequisites
Ensure that you are logged in as the root user. 64-bit Ubuntu users need to install the 32-bit libraries.
7D2D has very little output to the console. The option is up to you whether or not to use screen. If so, then you may need to install it.
Next, we want to create a user account for 7D2D to run under. We will also create a secure password.
Switch to the newly created user account.
Installation
Download the steamcmd utility from the Steam website. This tool is also available on the Steam Wiki.
Once this is done, make the steamcmd «executable», and run it.
Once it loads, enter your login credentials. You may receive a Steamguard warning. You could also login anonymously with login anonymous .
Warning: Your password is visible in plain text.
Set the installation directory and install the application.
Configure the server
Edit startserver.sh with your favorite text editor.
Once this is open, replace:
Now, edit the config file:
There are a few key settings in this file that you may want to modify.
- ServerName — Public server name.
- ServerIsPublic — Will appear on the public list.
- ServerPort — Port number.
- ServerPassword — Password to join.
- ServerMaxPlayerCount — Max players.
- GameWorld — Navezgane, MP Wasteland Horde, MP Wasteland Skirmish, MP Wasteland War, Random Gen.
- GameName — Game name / seed.
- ControlPanelEnabled — Enabled web control «console».
- ControlPanelPort — Port to connect to console.
- ControlPanelPassword — Password (cannot have special chars).
- TelnetEnabled — Enable telnet.
- TelnetPort — Telnet port.
- TelnetPassword — Telnet password.
Now is a good time to look through other settings that you may want to modify.
Start the server
Time to start the server. If want to use screen, make sure that you are in the 7D2D directory.
Otherwise, start the server without screen.
Shut down the server
If you have enabled telnet, you can type «shutdown» from the telnet window.
If you are running in screen, Ctrl + C will break it out and shut down.
If you are not running screen, run these commands.
Auto-update
Everyone likes a new 7 days to die update. You can set to your 7D2D server to auto-update with a few steps. First, you need to create an update file with the steam login and update commands. Then, create a cron job to run it.
Start by creating the update file.
Save the file. Then, the update script.
Save the update script. Make the script «executable».
Add a cron entry.
Save the crontab file.
Optional: Setup the server to run as a service
Using your favorite text editor, create the following file: /usr/lib/systemd/system/7dtd.service then add the following to it:
After saving the file, you can use the systemctl to start 7dtd as follows:
You can also set 7dtd to start automatically when the server (re)starts using the following command:
Final notes
At this point, you’re all set. Enjoy your 7D2D server!
If you restart your server, it will reset the game back to day 1.
Источник
7 days to die для linux


| 7,212 | уникальных посетителей |
| 84 | добавили в избранное |

This guide is for 10.4 b9. Update to alpha19 release.
Guide is for Ubuntu systems as that’s what Valve is supporting. However, it’s extremely easy to install this on RedHat systems too.
I assume that you’re at least somewhat familiar with unix commands. If you don’t understand what commands will do, look them up on search engine and do some learning before proceeding. If you’re completely new to linux systems, you should remember that files are case-sensitive.
Also I assume that you run SSHd on your server. It’s installed as «openssh-server» on Ubuntu.
If you want to install Windows-server, there is a video guide by [SAO] BigC90210.
You can skip this step.
This requires you have root access.
Test your new account by logging in from the remote computer.
You need to edit server config files. Easiest way to do this is to use text editor on the server. You can also edit them locally on your computer and transfer them to server with SFTP.
If you haven’t used any command line editor before, let’s install text editor nano (if it already isn’t installed).
Otherwise just use whatever editor suits you.
As you can’t daemonize the server with command line switches, you most likely want to install screen.
Open the package:
Remove install package:
Note: if you don’t have wget installed, you can install it:
You can download the dedicated server anonymously without logging in. Otherwise use your account credentials on login and authenticate yourself with Steam Guard.
SteamCMD shell appears after a while and you can type commands in SteamCMD prompt. Note that SteamCMD prompt always begins with Steam>.
You can use this same procedure to UPDATE THE SERVER.
Updating might overwrite your config files! You might want to backup and/or rename them later when everything works.
Note: You can insert all SteamCMD-commands in the text file and run it with crond whenever you want to update your server.
Experimental and old server builds:
You can see available server builds from Steam:
Go to Library > Tools > 7days > Properties > Beta
Note that’s «alpha13.8» without spaces!
Revert to current build from old:
Server was installed in «7daysded» directory. It contains startup script and config files.
On new versions startup script works as it should so you don’t have to edit it.
Setup the server anyway you want. There is explanation text after each of the options in serverconfig.xml.
Here are the most important options:
- ServerName — name of your server
- ServerPort — do you want default game port and if you’re inside LAN, please think about how you’re going to route the port out. Usually this means you have to edit NAT settings on your WAN/xDSL/router box.
- ServerVisibility — do you want private server for friends or public internet server. Option 0 means private server which is not published on the game server lists.
- ServerPassword — if you run private server, you might want to set a password
- ServerMaxPlayerCount — your server might not support lots of players without lagging. It’s best to test which value is suitable for you.
- ServerDescription — type brief description of your server here
- EACEnabled — anti-cheat, if you get bad lag and weird behaviour, you might want to turn this off, especially on private servers.
Game world is the map you’ll see in the game. Navezgane is the default map.
- GameWorld — Navezgane is the default map, or you might want to try «RWG» for randomized map. Note that RWG generation takes lots of time when you start the server up but on next startup it should load up fairly fast.
- GameName — you can name your save game here. Do not use : in the name or windows players can’t connect.
- WorldGenSeed — for RWG, random seed for changing the map layout
- WorldGenSize — for RWG, map size options. Note that larger numbers like 8192 will increase the generation time.
- DayNightLength — length of the game day in real time (minutes).
- LootRespawnDays — game days before loot respawns.
This is «PvP setting».
- PlayerKillingMode — are players able to damage each others. This is important if you have public server and do not want player to kill each others.
You’ll need some way to shut your server down and possibly manipulate it. Here is how to enable the telnet interface.
- TelnetEnabled — if your server is directly connected on the internet, consider blocking direct connects to this port
- TelnetPort — you can change the default port (e.g. 12345)
- TelnetPassword — documentation claims that telnet is only bound to local interface if the password is empty.
Section 6.1: Map generation times
Important: if server «does not start» and you have RWG selected, just wait. That will take LOOONG time on slower computers. For testing, it’s best to try on smaller map size, Navezgane or use pregenerated maps.
Источник


