- Set up iCloud on your Windows PC
- Download iCloud for Windows
- Sign in to iCloud
- Choose the iCloud services that you want to use
- Find the storage plan that’s right for you
- One safe place for all your photos, files, and more
- Set up and use iCloud for Windows
- Before you begin
- Set up iCloud for Windows
- Download and share your photos
- Share your photos
- See your files and folders with iCloud Drive
- Keep your apps up to date
- On your PC
- Download and use iTunes for Windows
- If you can’t access the Microsoft Store
- Explore iTunes for Windows
- Manually manage and sync your iPhone, iPad, or iPod touch
- Change settings and manage your account
- Загрузка приложения iCloud для Windows
- Вот что вам нужно
- Используйте iCloud для Windows максимально эффективно
- How to Access iCloud Notes on PC
- Part 1. How to set up iCloud Notes on iOS device
- Part 2. How to access iCloud Notes on PC via iCloud.com
- Part 3. How to access iPhone notes on PC without iCloud
- Part 4. Most Common Questions and Answers Related to Notes
- Q1. How to save notes on iPhone
- Q2. How to remove notes from iPhone
- Q3. How to backup notes to iCloud
- Q3. How to sync notes from iPhone to MacВ
- Q3. iCloud notes not syncing
- Q4. How to restore/retrieve notes with/without iCloud
- Conclusion
Set up iCloud on your Windows PC
Learn how to set up iCloud on all of your devices. The rest is automatic.
For the best iCloud experience, make sure that your device meets the minimum system requirements.
Download iCloud for Windows
iCloud for Windows lets you access your files, photos, contacts, calendars, and more on your Apple devices and your Windows PC.
Want to access iCloud’s latest features? See the recommended system requirements. If you’re not sure which Windows system you use, find out. iCloud requires an Internet connection. iCloud might not be available in all areas and features vary. If you use a Managed Apple ID, iCloud for Windows isn’t supported.
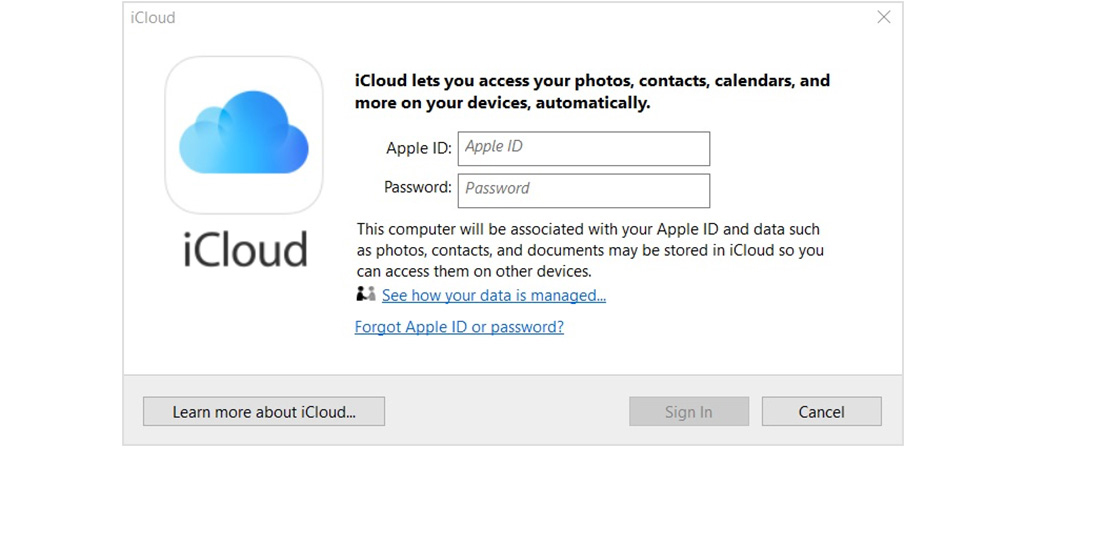
Sign in to iCloud
After you download iCloud for Windows, sign in using the Apple ID that you use on your Apple devices.
Have questions about Apple ID?
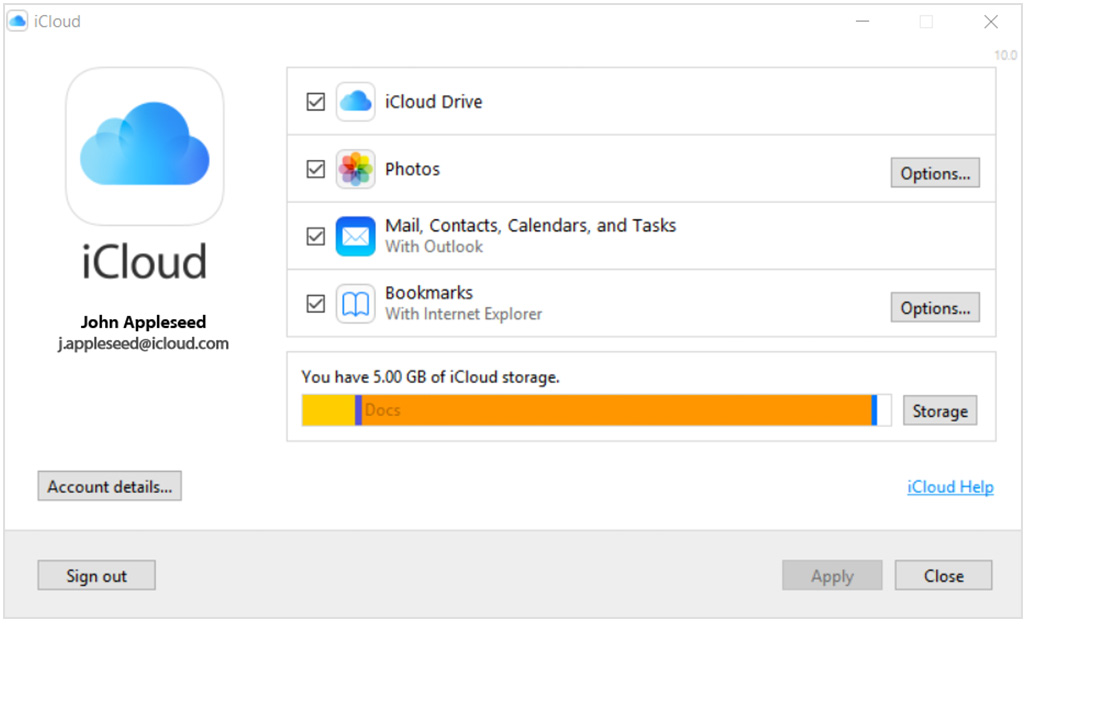
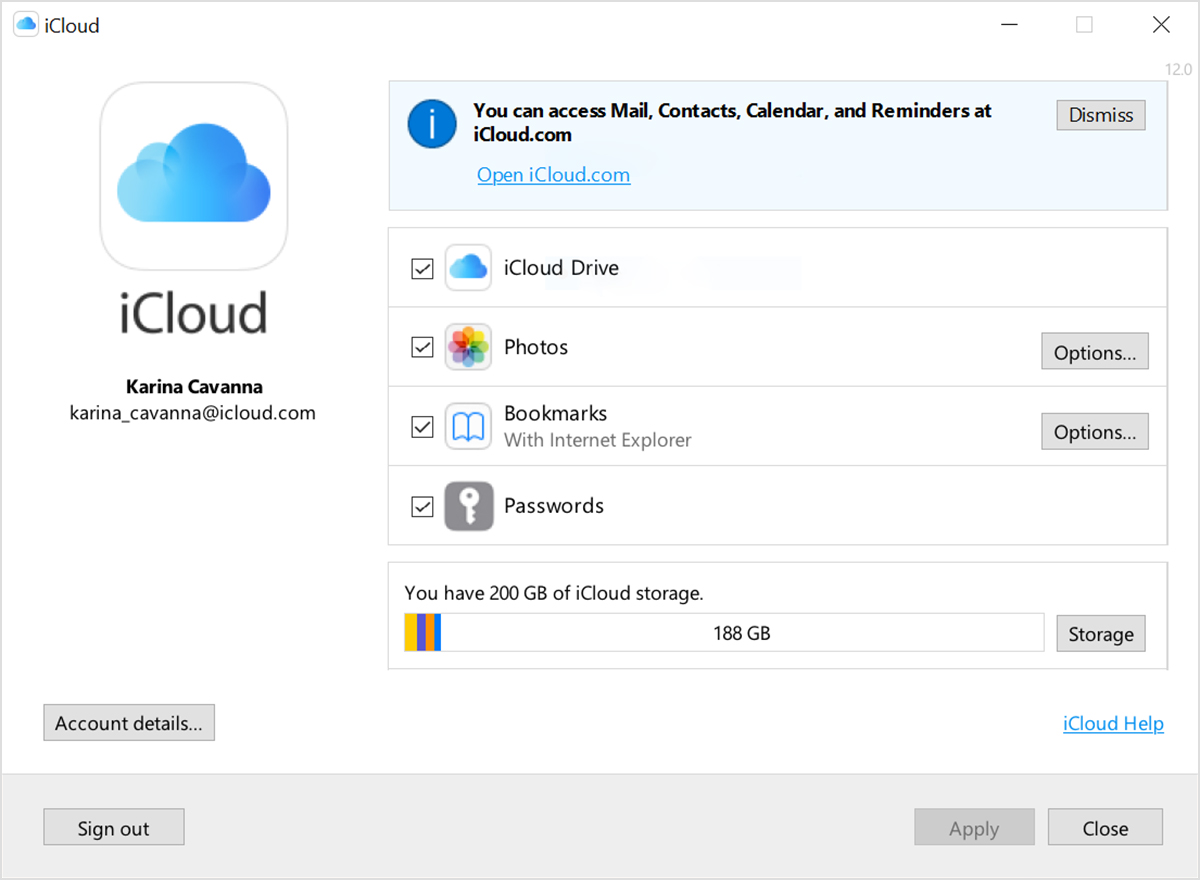
Choose the iCloud services that you want to use
After you turn on iCloud, select the services that you want to use and click Apply.
For example, if you turn on iCloud Photos and iCloud Drive, iCloud for Windows creates new folders for those files in File Explorer. Now, the files that you add to the iCloud folders automatically appear on your Apple devices.
If you have photos on your PC that you want to see on your iPhone or iPad, upload photos from your PC to iCloud.
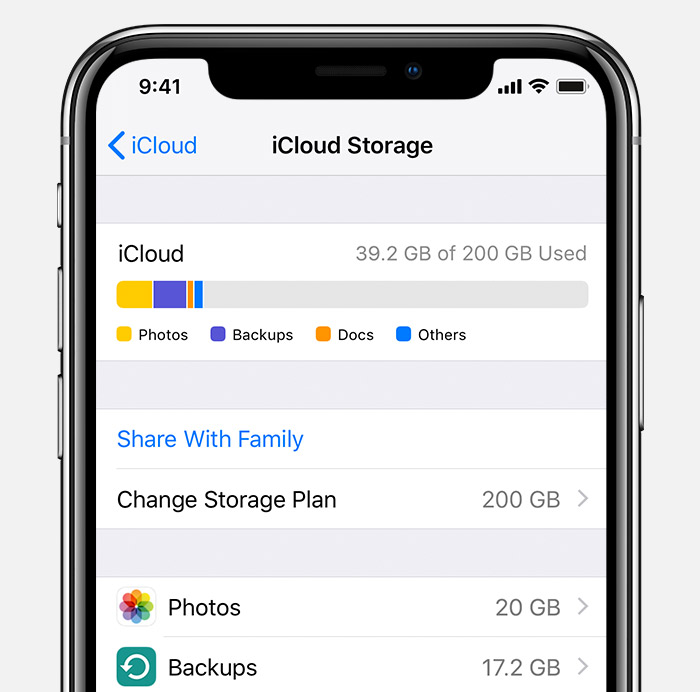
Find the storage plan that’s right for you
One safe place for all your photos, files, and more
![]()
Information about products not manufactured by Apple, or independent websites not controlled or tested by Apple, is provided without recommendation or endorsement. Apple assumes no responsibility with regard to the selection, performance, or use of third-party websites or products. Apple makes no representations regarding third-party website accuracy or reliability. Contact the vendor for additional information.
Set up and use iCloud for Windows
With iCloud for Windows, the photos, documents, and bookmarks on your PC are updated automatically on your Apple devices.
Before you begin
Make sure that you set up iCloud on your iPhone, iPad, or iPod touch or Mac and that you’re signed in with your Apple ID. Then follow the steps below to download and set up iCloud for Windows.
Want to access iCloud’s latest features? See the recommended system requirements. iCloud requires an Internet connection. iCloud might not be available in all areas and features vary. If you use a Managed Apple ID, iCloud for Windows isn’t supported.

Set up iCloud for Windows
- Download iCloud for Windows on your PC.
- Windows 10: Go to the Microsoft Store to download iCloud for Windows.
- Earlier versions of Windows*: Download iCloud for Windows from apple.com.
- If it doesn’t install automatically, go to File Explorer and open iCloud Setup.
- Restart your computer.
- Make sure iCloud for Windows is open. If it doesn’t open automatically, go to Start, open Apps or Programs, and open iCloud for Windows.
- Enter your Apple ID to sign in to iCloud.
- Choose the features and content that you want to keep up to date across your devices.

- Click Apply.
Download and share your photos
When you turn on Photos, iCloud for Windows creates a Photos folder in File Explorer called iCloud Photos. iCloud Photos uploads new photos and videos that you add to the iCloud Photos folder on your PC so you can see them in the Photos app on your iPhone, iPad, iPod touch, and Mac, and on iCloud.com. New photos and videos you take automatically download from iCloud Photos.
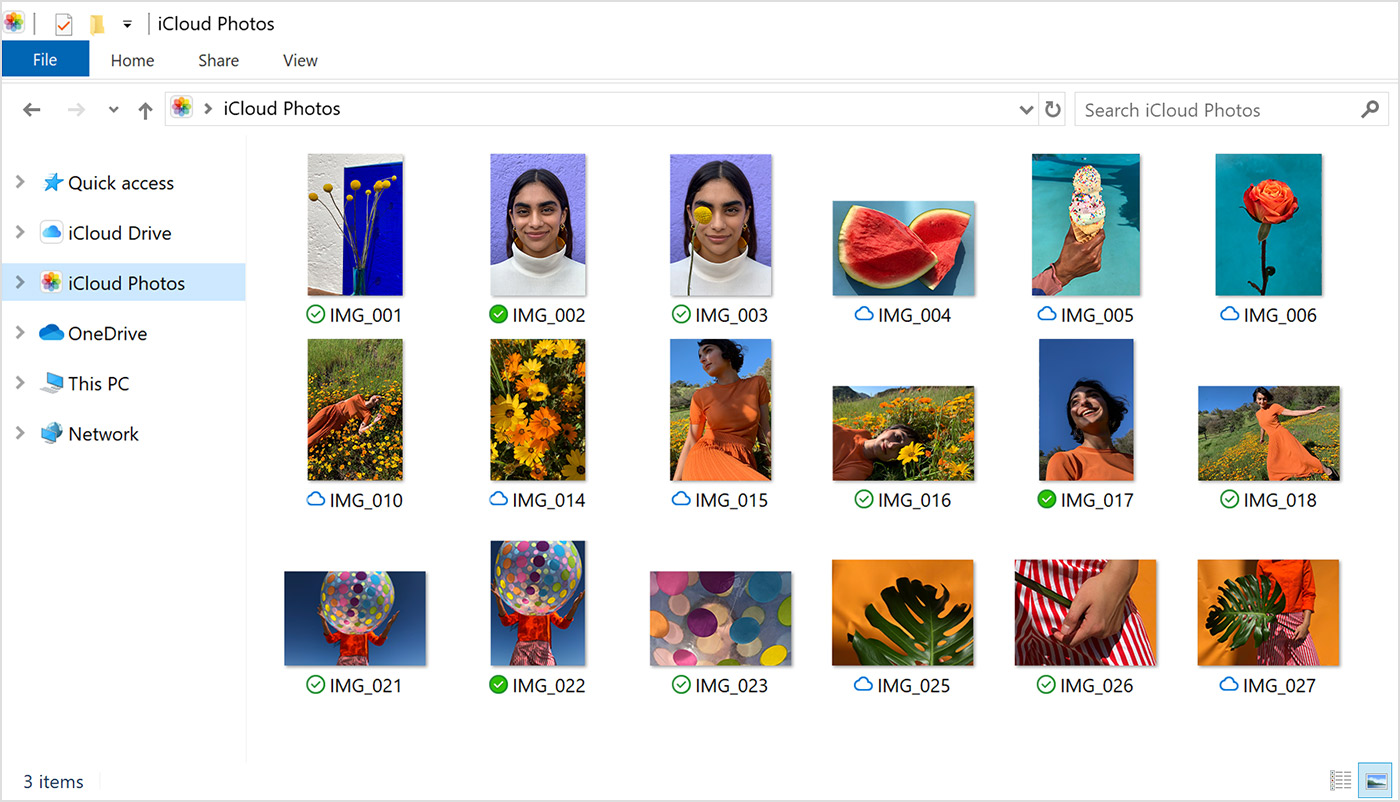
Share your photos
You can also share your photos. Shared Albums lets you view, share, and comment on the photos and videos you share with other people. And if you use the latest version of iCloud for Windows, you can pin photos to keep them local to your device. When you unpin them, they upload to iCloud instead.
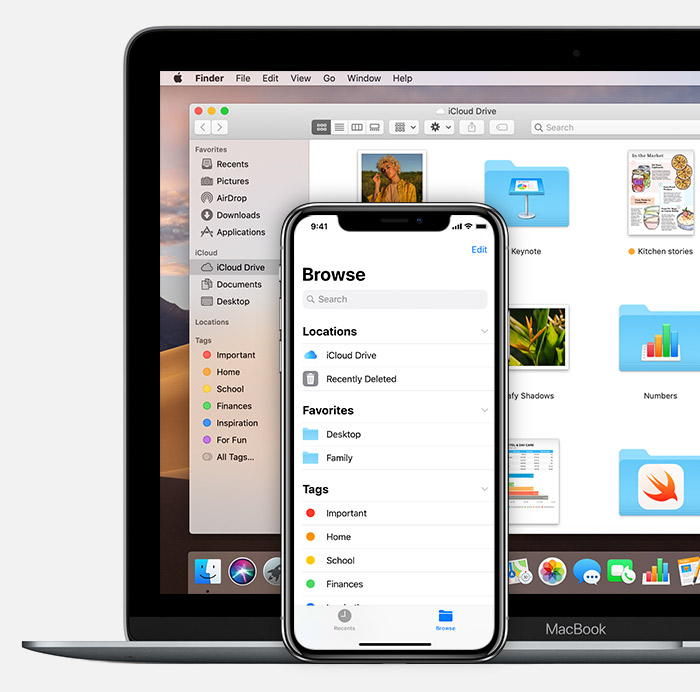
See your files and folders with iCloud Drive
When you turn on iCloud Drive, iCloud for Windows creates an iCloud Drive folder in File Explorer. You can find documents that you’ve stored in iCloud in this folder. When you create a file on your PC and save it to the iCloud Drive folder, it also appears on your other devices.
If you want to work on files with friends or colleagues, you can share individual files or create a shared folder to share a group of files. You can also pin files and folders so you can use them offline, and easily check the status of a download or shared file. In iCloud for Windows 12, you can find and recover files deleted from iCloud Drive in the past 30 days in Recently Deleted in iOS, iPadOS, or iCloud.com, in Trash in macOS, and in Recycle Bin in Windows. If you use Delete or Delete All in Recently Deleted or empty the Trash in macOS, files aren’t recoverable. If you don’t see the files you wish to restore, you can recover files deleted within the last 30 days at iCloud.com.
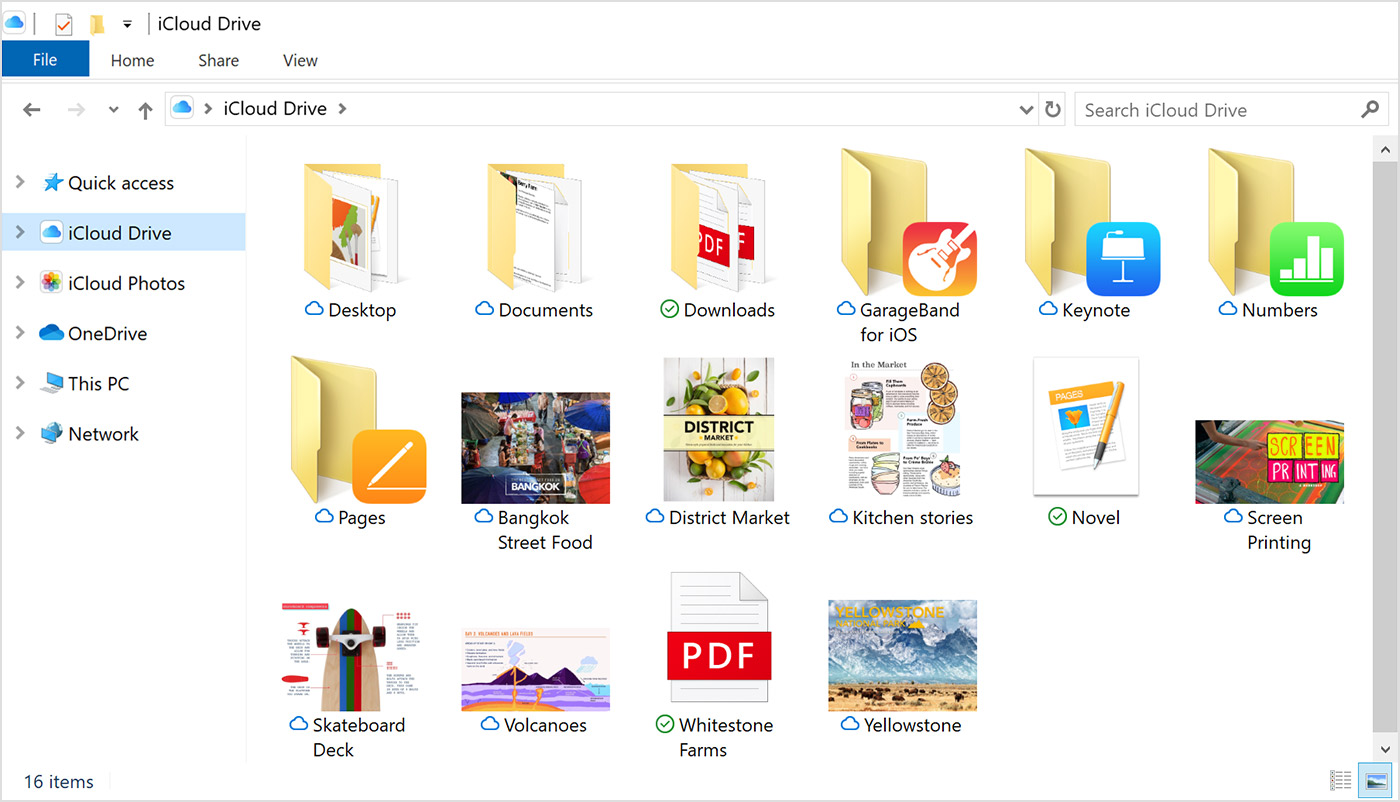
You can also access your iCloud Drive files and folders at iCloud.com.
If you receive an error when you try to move a file from iCloud for Windows, you might need to download the file to your Windows PC. After you download the file, try moving it again.
Keep your apps up to date
When you use iCloud on all of your devices, you can keep your Mail, Contacts, Calendars, and Tasks* updated no matter which device you’re using. Just make sure iCloud is set up on your PC, iPhone, iPad, iPod touch, or Mac using the steps below.
* On a Mac or iOS device, you see Reminders instead of Tasks.
On your PC
- Open iCloud for Windows.
- Select Mail, Contacts, Calendars, and Tasks then click Apply.
- You’ll see your iCloud Mail account in the folder pane on the left side of Microsoft Outlook 2007 through Outlook 2016.
If you sign in to iCloud using a third-party Mail app outside of iCloud for Windows, learn how to create an app-specific password to keep information up to date on your devices.
Download and use iTunes for Windows
With iTunes for Windows, you can manage your entire media collection in one place. Subscribe to Apple Music to access millions of songs. Buy music and movies from the iTunes Store. And sync content from your computer to your iPhone, iPad, or iPod touch.
If you can’t access the Microsoft Store
![]()
Explore iTunes for Windows
To navigate iTunes, use the buttons in the navigation bar at the top of the iTunes window. To switch to a media type, like Music, Movies, TV Shows, Podcasts, or Audiobooks, click the pop-up menu in the upper-left corner.
Listen to music
Subscribe to Apple Music to access millions of songs, buy music from the iTunes Store, listen to Radio, or listen to music imported into iTunes.
Listen to Apple Podcasts
Discover and subscribe to podcasts that entertain, inform, and inspire. Browse free episodes and shows about a variety of topics.
![]()
Watch movies and TV shows
Browse categories to find movies and TV shows that you can buy, or find movies you can rent.
Listen to audiobooks
Browse categories to find audiobooks that you can buy.
Store availability and features might vary by country or region. See what you can buy in your country or region.
![]()
Manually manage and sync your iPhone, iPad, or iPod touch
You can use iTunes for Windows to back up and update your iPhone, iPad, or iPod touch, and to sync content from your computer to your device.
You can also use iCloud for Windows to access your photos, contacts, calendars, files, and more across all of your devices.
![]()
Change settings and manage your account
- Choose Account > View My Account to view information about your purchase history, manage your subscriptions, change your payment information, and more.
- Choose Account > Sign Out to sign out of iTunes with your Apple ID and remove access to your content from iTunes.
- Choose Edit > Preferences to change things like your language, set restrictions, and more.
If you change your language in iTunes, you might have to quit iTunes and reopen it.
Загрузка приложения iCloud для Windows
С iCloud для Windows у вас будет доступ к своим фотографиям, видео, данным почты и календаря, файлам и важной информации на любом устройстве и компьютере с Windows.
Вот что вам нужно
- Убедитесь, что на компьютере с Windows или устройстве Microsoft Surface установлена последняя версия Windows 10*.
- Вспомните свой идентификатор Apple ID и пароль. Если у вас нет идентификатора Apple ID, создайте его.
* Если вы используете Windows 7 или Windows 8, загрузите iCloud для Windows с веб-сайта Apple.
Используйте iCloud для Windows максимально эффективно
После загрузки и настройки iCloud на компьютере с ОС Windows фотографии, видео, данные почты, файлы и закладки станут доступны на всех ваших устройствах.
Если вам требуется помощь, ознакомьтесь с готовыми решениями распространенных проблем или с дополнительными сведениями об iCloud для Windows.
Хотите получить доступ к новейшим функциям iCloud? См. системные требования для iCloud. Можно также узнать о проблемах системы безопасности, устраняемых этим обновлением. Если используется управляемая учетная запись Apple ID, iCloud для Windows не поддерживается.
Информация о продуктах, произведенных не компанией Apple, или о независимых веб-сайтах, неподконтрольных и не тестируемых компанией Apple, не носит рекомендательного или одобрительного характера. Компания Apple не несет никакой ответственности за выбор, функциональность и использование веб-сайтов или продукции сторонних производителей. Компания Apple также не несет ответственности за точность или достоверность данных, размещенных на веб-сайтах сторонних производителей. Обратитесь к поставщику за дополнительной информацией.
How to Access iCloud Notes on PC
Want to view and edit your iCloud Notes from your PC? No worry, you can make it by visiting iCloud.com. The method is quite easy. To make sure the process goes smoothly, you need to ensure that you have set up iCloud Notes on your iPhone or iPad.
If you haven’t set it up, you can read Part 1 to know how to turn on iCloudВ Notes first. Then go to Part 2 to learn how to access your iCloud Notes from PC. While if you are interested in the way to access and view your iPhone Notes on PC without using iCloud, you can go to Part 3 instead. At the end of this guide, we also gather some common questions and answers related to notes.
| Page Content | Quick Navigation |
|---|---|
| Part 1. Set Up iCloud Notes | Go to Settings > Tap [your name]..Full content |
| Part 2. Access iCloud Notes in iCloud | Go to visit iCloud.com > Enter Apple ID. Full content |
| Part 3. Access iCloud Notes on PC | Connect your iPhone to the computer. Full content |
| Part 4. Additional Tips Related to Note | Tips to save/remove/sync/retrieve notes . Full content |
Part 1. How to set up iCloud Notes on iOS device
iCloudВ services offer users great convenience to sync iOS content among your iOS devices. You just need to turn it on and make your devices connect to Wi-Fi.
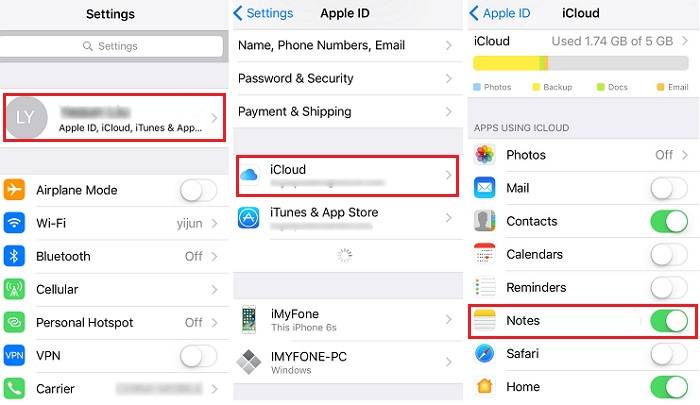
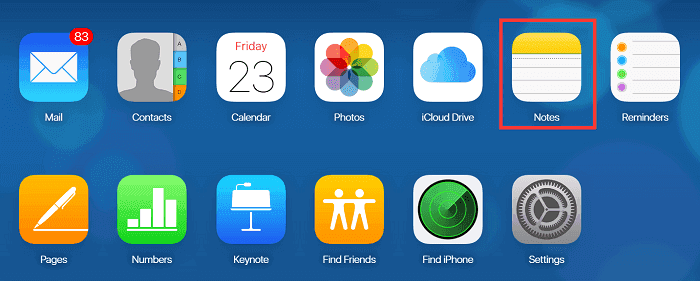
Step 1. Go to the «Settings» app on your iOS device.
Step 2. Tap onВ your nameВ and choose «iCloud». (In iOS 10.2 and earlier, choose «iCloud» directly.)
Step 3. Switch on the «Notes» option.
When you use iCloudВ to back up your iPhone/iPad content, you may have problems like «iPhone can’t back up to iCloud». If so, learn how to fix it first before you continue.
Part 2. How to access iCloud Notes on PC via iCloud.com
If you have turned on iCloud В Notes on your iPhone, you can access them from your PC as long as you have the network connection and browser available.
Step 1. Go to visitВ iCloud.comВ on your PC.В
Step 2. Enter yourВ Apple IDВ and sign in to iCloud.
Step 3. Tap on «Notes» to view and manage your iCloud Notes.
For you who like to use iCloud, it’s likely that you may be interested in how to make iCloud backup faster.
Part 3. How to access iPhone notes on PC without iCloud
Using iCloud is not the only way that enables you to access and view your iPhone notes on PC. An alternative way to make it is by usingВ EaseUSВ MobiMover, an iPhone data transfer tool, to import your iPhone notes to PC, and then you can access and view them as you like even without a networkВ connection.
In addition to this, EaseUS MobiMover can do more for you. For instance, you can use it to transfer files like photos, videos, music, and more between PC and iPhone/iPad or between two iOS devices (iPhone/iPad). And unlike iCloudВ just offers 5GB free storage, EaseUS MobiMover enables you to transfer as manyВ filesВ as yourВ computer’s storageВ spaceВ allows. Follow the steps below to learn how to use MobiMover to solve your problem.
Click the button below to safely download and install EaseUS MobiMover on your PC running Windows 7 or later.
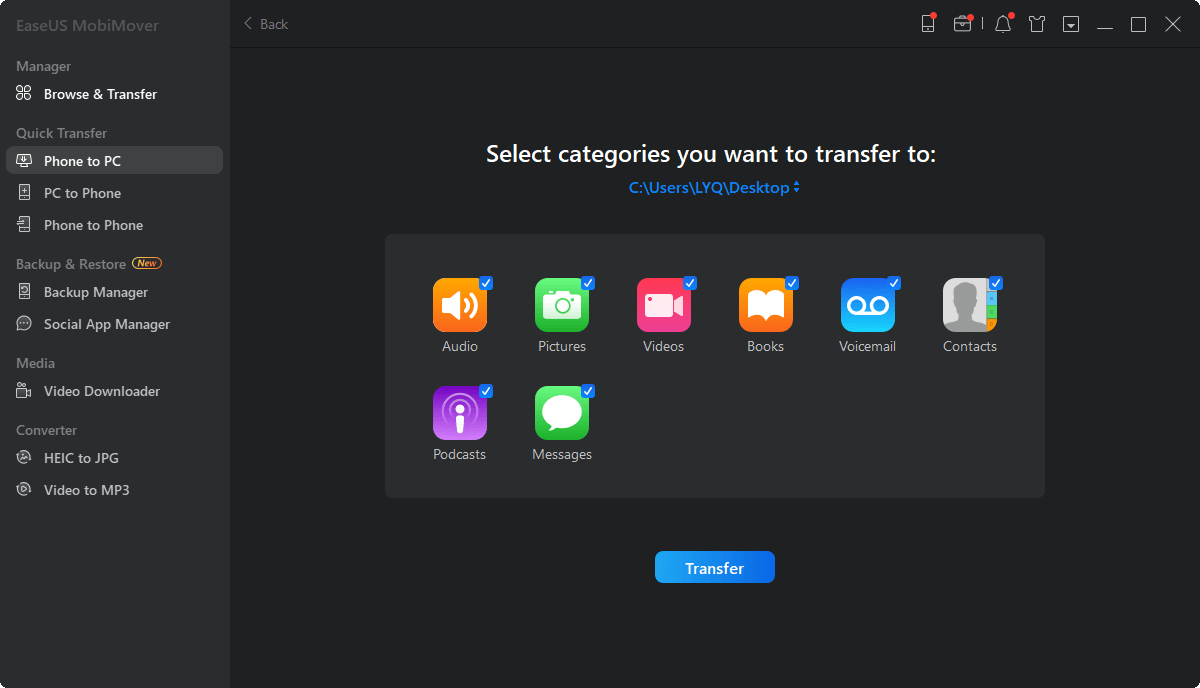
Step 1. Connect your iPhone/iPad to your computer, launch EaseUS MobiMover, then unlock your iDevice and click «Trust» in the prompt asking for your permission. Among the options, choose «Phone to PC» > «Next».

Step 2. Select the category or categories you want to transfer from your iPhone/iPad to computer. You can click the default path and then set a custom storage path for the notes to be transferred. Afterward, click «Transfer».
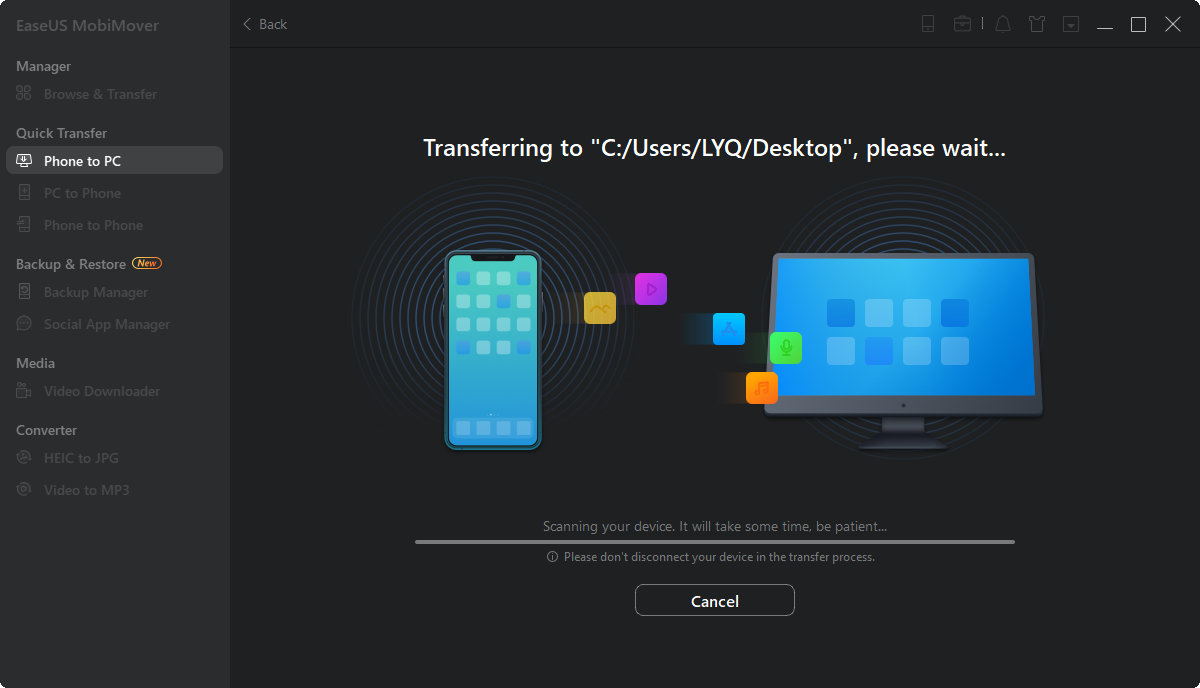
Step 3. When the transfer process has finished, you can view and manage the notes on your computer with ease.
If you have tried this tip and installed MobiMover on your PC, you can do things like transferring photos from iPhone to iPhone and transferring contacts from iPhone to iPhone the next time you buy a new iPhone with MobiMover without worrying about how to migrate data from your old iPhone to the new iPhone anymore.
Part 4. Most Common Questions and Answers Related to Notes
These are some of the most commonly asked questions related to Notes, along with the best way to answer them. By the way, we will frequently update this page with the latest information on Note, so we suggest you add this page to your Favorites list on your computer so that you can easily access it the next time.
Q1. How to save notes on iPhone
It is quite simple to save notes on iPhone. You just need to follow the two steps below to do it.
Step 1. Launch Notes from your Home screen > Tap on the note you want to open.
Step 2. Tap on the «Share» button, which is on the top right corner of your screen > You will see many options including «Print», «Copy», «Move to Folder», «Save to Files». just choose the one you want to house this note.
Q2. How to remove notes from iPhone
If you want to delete a single note at a time or delete all notes at once, follow the steps below to do it.
Delete all notes at once: Open the Note app > Select the folder you want to remove > Tap the «Edit» button in the upper-right corner > Tap the «Delete All» button in the bottom-right corner.
Delete a single note at a time: Tap the «Edit» in the upper-right corner > Select the individual note, or notes that you want to delete > Tap the «Delete» button in the bottom-right corner.
If you want to manage your notes with ease, this all-in-one iOS data management tool — EaseUS MobiMover can help you transfer notes from iPhone to iPhone.
Q3. How to backup notes to iCloud
To back up notes via iCloud, follow these simple steps. In fact, iCloud is not the only way to back up your notes, you can also use a reliable iCloud alternative tool to back up iPhone notes to the PC with ease.В
Step 1. Go to the Settings app on your iPhone or iPad > iCloud > Storage & Backup > Toggle the «iCloud Backup» on.
Step 2. Enter your iCloud ID if asked > Click the «Back UP Now» button.
Q3. How to sync notes from iPhone to MacВ
Syncing notes from iPhone to Mac is a great way to organize your notes across all your devices. Before syncing, you’ll need to make sure your Mac is open for syncing. Here’s how to do it.
Step 1. Open the System Preference app on your Mac > Click on the «iCloud» icon. If you are using a Mac running macOS Catalina, it may also be called «Apple ID.»
Step 2. Next, you will find details for your Apple ID account. Tick the «Notes» option.
Q3. iCloud notes not syncing
There are many factors that may result in the «iCloud notes not syncing» issue. Whatever the reasons, you can try to fix it with these basic troubleshooting methods.
Tip 1. Force restart your device.
Tip 2. Sign out of iCloud and back in again.
Tip 3. Save the note on another device.
Tip 4. Make sure Notes syncing is turned on.
Q4. How to restore/retrieve notes with/without iCloud
It is easy to restore notes with iCloud. You just need to:
Step 1. Go to Settings > General > Reset > Erase All Contents and Settings. (This will erase everything on your iPhone)
Step 2. Follow the prompts on the Set-Up assistant until you get to the “Apps & Data” screen. Here, select “Restore from iCloud Backup”.
Step 3. Sign in to iCloud, agree to the terms and conditions, and then select the relevant backup. Wait for the process to be completed. The iPhone will reboot and you should see the Notes on your Note app.
Without iCloud? Don’t worry, you still have the chance to free restore lost or deleted notes from iPhone with ease.В
Conclusion
In conclusion, you can apply the methods we introduced to access iCloud notes with ease. Even there is no iCloud available, you can also access and view your notes via EaseUS MobiMover. Additionally, if you want to save, delete, back up, sync, or retrieve notes on your iPhone, this guide also offers you the useful tips in Part 4. We hope our guide is helpful to you. If it does help you, don’t forget to share it with others who need it.
о™љо™љо™љо™љо™љ
4.5 out of 5 stars, based on 10 votes
EaseUS MobiMover allows you to easily transfer all data from your iPhone to your PC. The app is available for both Windows and Macs so irrespective of which platform you use, you are covered.

EaseUs MobiMover solves this problem as it allows you to transfer data from an iPhone to a Mac, Mac to an iPhone, or from one iPhone to another iPhone fast.

EaseUS MobiMover is a program that allows you to share files between your iOS device and your PC in an easy manner. This is very useful, since both operative systems are not compatible.

EaseUS MobiMover for Mac and PC is a powerful tool for transferring data from your Apple mobile device to your computer, managing the variety of files that you create, and moving those huge videos quickly.

Related Articles — ALSO ON EaseUS SOFTWARE


