- Подключение EXT4 в Windows 7/8/8.1/10
- Подключение EXT4 в Windows 7/8/8.1/10
- Восстановление личных файлов
- Выводы
- Как в среде Windows получить доступ к файловым системам Ext2, Ext3, Ext4
- 1. Программа DiskInternals Linux Reader
- 2. Плагин для Total Commander DiskInternals Reader
- 3. Плагин для Total Commander ext4tc
- 4. Драйвер поддержки Ext2Fsd
- How to Access Linux EXT4 Partition and Data on Windows 10/8/7 in 2021
- Part 1. Can I Read EXT4 on Windows
- Part 2. How to access Ext4 from Windows 10/8/7
- #1. View and Read EXT4 Partition Content
- #2. Access EXT4 Partition Data from Windows 10/8/7
- Part 3. How to Mount EXT4 on Windows 10/8/7
- #1. Mount EXT4 on Windows using Ext2Fsd
- #2. Mount EXT4 Partition on Windows 10 via DiskInternals Linux Reader
- #3. Mount EXT4 on Windows using Ext2explore
- Part 4. Conclusion
- FAQs about EXT4
Подключение EXT4 в Windows 7/8/8.1/10
В этой статье рассказывается о том, как вы можете получить доступ к разделам файловой системы Linux Ext2, Ext3 и Ext4 в Windows 10 и автоматически сохранить их в проводнике, как все другие разделы NTFS или FAT32. Вы даже можете копировать файлы и записывать новый файлы на эти разделы.
Хотя Windows использует файловую систему NTFS и FAT32, Linux (например, Ubuntu) использует расширенные архитектуры файловой системы Ext 3, Ext4 и т. д. Самое интересное то, что Linux может получать доступ, читать и записывать файлы в файловые системы Windows, а Windows не может получить доступ к файлу Linux — системы. Я имею в виду, что Windows не имеет поддержки для чтения или доступа к разделам Ext3 или Ext4.
Таким образом, если у вас есть система с двойной загрузкой или более, в которой вы можете переключаться между Windows и Linux из меню загрузчика, иногда вам может понадобиться доступ к Linux-дискам / разделам. Или предположим, что вы находитесь в Windows, и у вас есть съемный / жесткий диск, который отформатирован в Ext3, и теперь вам нужно открыть файл внутри него. Или ваша система Linux «зависла», и вам необходимо восстановить важные файлы с помощью Windows. В таких случаях вам необходимо прочитать эти файловые системы без переключения с Windows.
Хотя Windows никогда не интересовалась файловыми системами Linux, к счастью, существуют сторонние диски и инструменты для открытия и чтения разделов Linux из Windows. Мы рассмотрим несколько инструментов в этой статье. Однако здесь мы будем использовать драйвер файловой системы Linux с открытым исходным кодом под названием Ext2Fsd, который предназначен исключительно для поддержки Ext2/3/4 в Microsoft Windows. При этом вы можете автоматически монтировать разделы Ext при загрузке диска, когда вам нужно.
- Размонтируйте разделы Linux Ext4/3/2 в проводнике Windows
- Загрузите Ex2Fsd из sourceforge.net/projects/ext2fsd/.
Подключение EXT4 в Windows 7/8/8.1/10
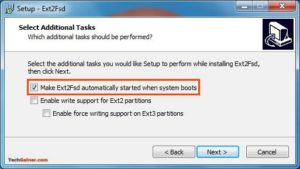
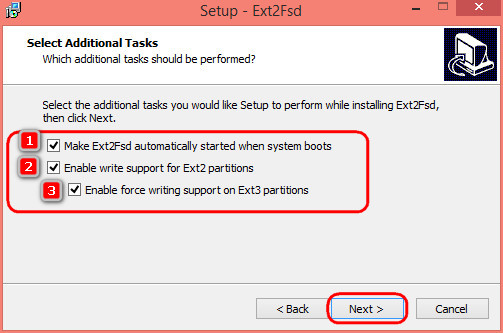
При установке отметьте «Make Ext2Fsd автоматически запускается при загрузке системы» и нажмите «Далее» и завершите настройку. Он будет автоматически запускать драйвер Ex2Fsd с Windows после следующей перезагрузки.
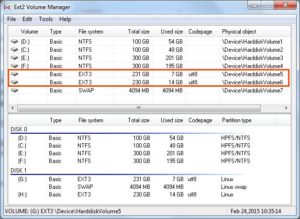
Запустите диспетчер томов Ext2Fsd. С помощью этого вы можете установить точку монтирования и настройки.
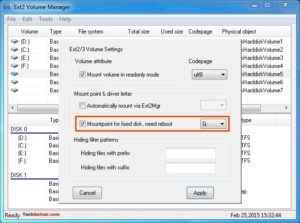
Чтобы назначить последний том, дважды щелкните раздел (или выберите раздел и выберите «Инструменты»> «Управление томами Ex2»), включите «Mountpoint for fixed disk» и назначьте букву диска. Затем нажмите Применить.
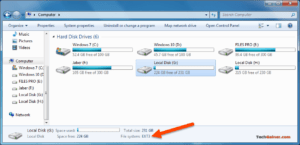
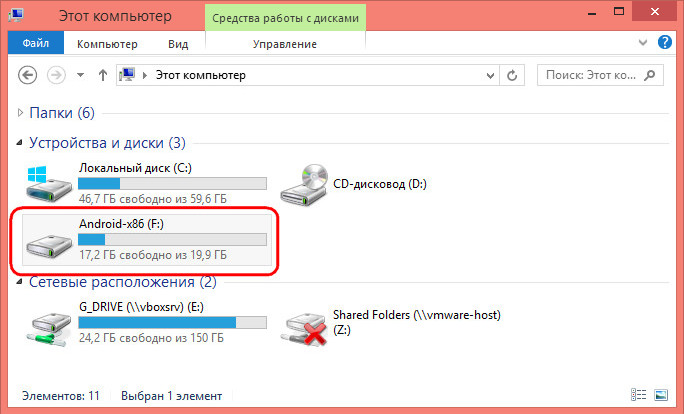
При следующей перезагрузке Windows вы увидите, что ваш желаемый раздел Linux монтируется в Проводнике в качестве других стандартных разделов.
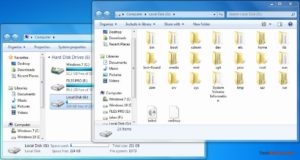
Вы также можете указать свое имя, переименовав имя по умолчанию «Локальный диск». Готово!
Примечание 1: Рекомендуется хранить ваши разделы Linux только для чтения, чтобы вы или ваша система не могли повредить системе Linux.
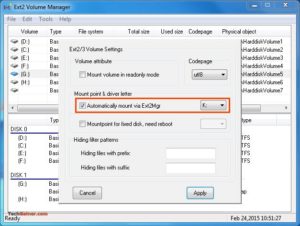
Примечание 2: Если вы не хотите, чтобы Ext2Fsd автоматически монтировал диск в проводнике при загрузке, вы можете отметить «Автоматически монтировать через Ex2Mgr». При этом ваш раздел будет монтироваться только при открытии диспетчера томов Ex2Fsd, как показано ниже:
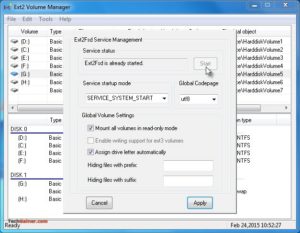
Примечание 3: Во время установки Ext2Fsd, если вы не устанавливали службу Ex2Fsd для автоматического запуска с Windows, вам необходимо вручную запустить службу из меню «Сервис»> «Управление службами»> «Пуск», как показано ниже:
Восстановление личных файлов
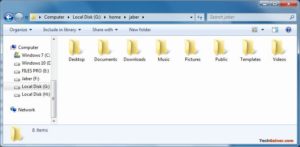
Про подключение EXT4 в Windows поговорили, теперь узнаем что делать дальше. Если вы ищете доступ к своим личным файлам, хранящимся в Linux, перейдите в home\name\, как показано ниже:
Хотя это руководство сделано в Windows 7, я протестировал его на Windows 10 и способ должен также работать с Windows 8.x в соответствии с его редакциями. Возможность просмотра и чтения всех разделов в обеих ОС — это, безусловно, классная функция для тех, кто использует Linux и Windows на одной машине.
Выводы
Подключение EXT4 в Windows является очень простым. Надеемся, Вам была интересна наша статья об этом — расскажите нам в комментариях.
Также, не забудьте поделится ссылкой на статью в Google+, Facebook, Twitter, Одноклассники или, например, ВКонтакте.
Если вы нашли ошибку, пожалуйста, выделите фрагмент текста и нажмите Ctrl+Enter.
Как в среде Windows получить доступ к файловым системам Ext2, Ext3, Ext4

Как в среде Windows сделать возможным доступ к разделу диска или съёмному носителю с файловыми системами Ext2/3/4 ? Если, к примеру, на компьютере есть ещё и вторая система Linux. И с её данными необходимо поработать из среды Windows. Или другой пример – когда внутри Windows смонтированы виртуальные диски с установленными на виртуальные машины системами Linux или Android . С Ext2/3/4 Windows нативно не умеет работать, ей для этого нужны сторонние средства. Что это за средства? Рассмотрим ниже таковые.
***
Тройка первых средств сделает возможным только чтение устройств информации с Ext2/3/4 . Последнее решение позволит и читать, и записывать данные. Все рассмотренные ниже средства бесплатны.
1. Программа DiskInternals Linux Reader
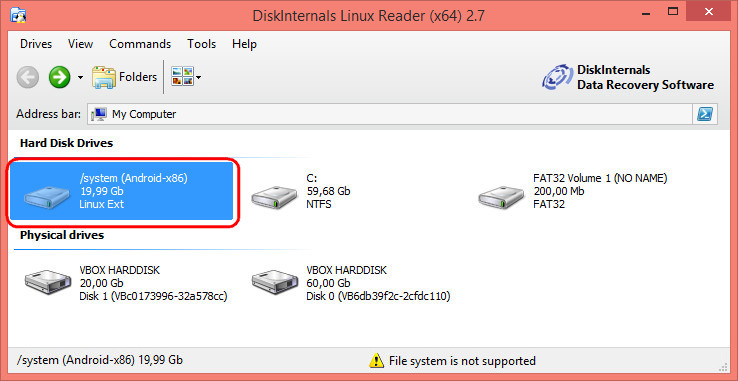
Простенькая программка DiskInternals Linux Reader – это примитивный файловый менеджер, сделанный по типу штатного проводника Windows, с поддержкой файловых систем Ext 2/3/4 , Reiser4 , HFS , UFS2 . В окне программы увидим разделы и устройства с Linux или Android.
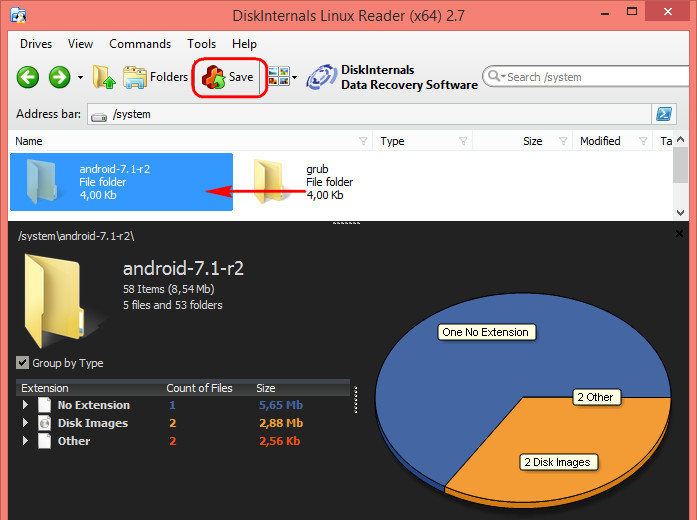
Для копирования необходимо выделить папку или файл, нажать кнопку «Save».
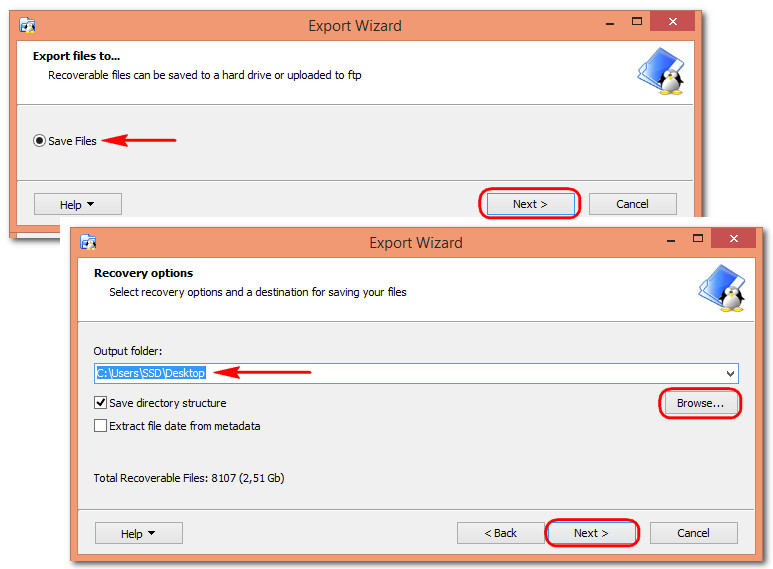
Затем указать путь копирования.
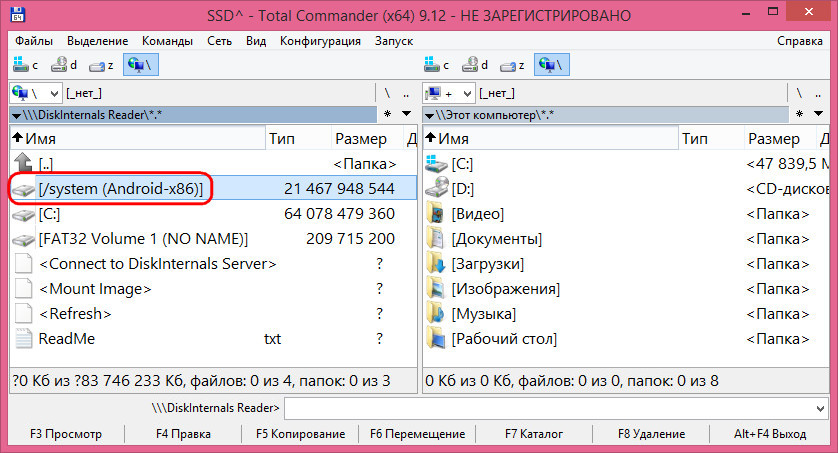
2. Плагин для Total Commander DiskInternals Reader
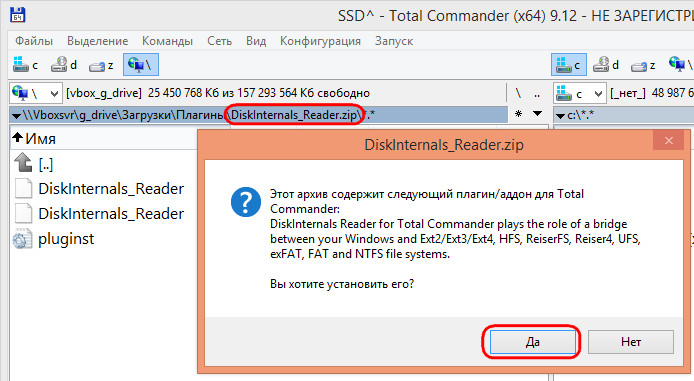
Любители популярного Total Commander могут извлекать данные Linux или Android внутри Windows с помощью этого файлового менеджера. Но предварительно установив в него специальный плагин. Один из таких плагинов — DiskInternals Reader, он умеет подключать и читать устройства информации, форматированные в Ext2/3/4 , Fat/exFAT , HFS/HFS+ , ReiserFS . Загружаем плагин, распаковываем его архив внутри Total Commander, подтверждаем установку.
Запускаем Total Commander (важно) от имени администратора. Заходим в раздел «Сеть / FS плагины». Нажимаем «DiskInternals Reader».

Здесь, наряду с прочими разделами диска и носителями, будет отображаться тот, что с Ext2/3/4 .
Данные копируются традиционным для Total Commander способом – клавишей F5 на вторую панель.
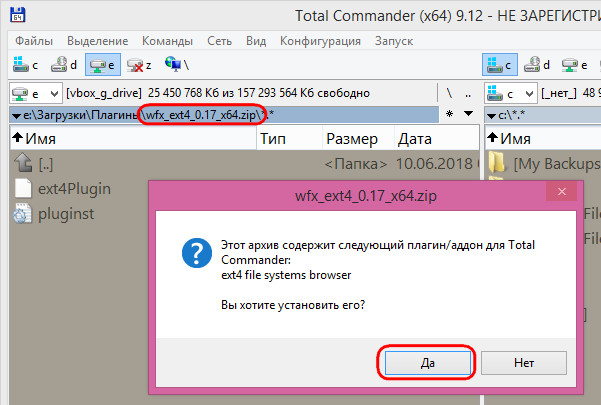
3. Плагин для Total Commander ext4tc
Упрощённая альтернатива предыдущему решению – ext4tc, ещё один плагин для Total Commander. Он может подключать для чтения устройства информации, форматированные только в Ext2/3/4 . Скачиваем плагин, распаковываем его архив внутри файлового менеджера, запускаем установку.
Запускаем Total Commander (важно) от имени администратора. Кликаем «Сеть / FS плагины». Заходим в «ext4plugin».
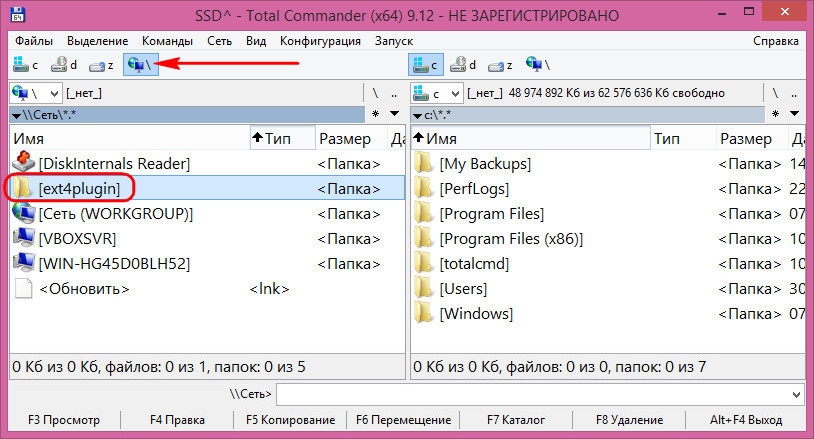
При необходимости копирования данных используем обычный способ с клавишей F5 .
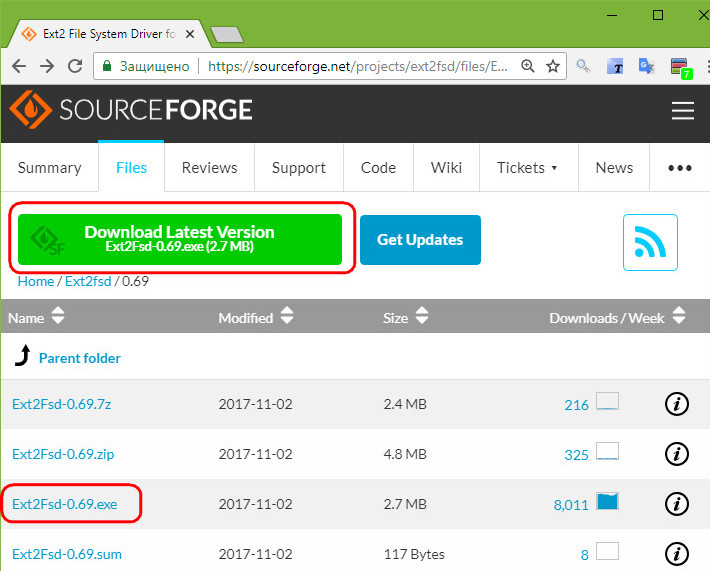
4. Драйвер поддержки Ext2Fsd
Программа Ext2Fsd – это драйвер Ext2/3/4 , он реализует поддержку этих файловых систем на уровне операционной системы. С разделами диска и накопителями, форматированными в эти файловые системы, можно работать как с обычными, поддерживаемыми Windows устройствами информации в окне проводника или сторонних программ. Драйвер позволяет и считывать, и записывать данные.
Скачиваем последнюю актуальную версию Ext2Fsd.
При установке активируем (если для длительной работы) три предлагаемых чекбокса:
• 1 — Автозапуск драйвера вместе с Windows;
• 2 — Поддержка записи для Ext2;
• 3 — Поддержка форматирования для Ext3.
На предфинишном этапе активируем опцию запуска окошка диспетчера драйвера — Volume Manager — с попутным присвоением устройствам информации с Ext2/3/4 буквы диска.

В окошке открывшегося Volume Manager увидим носитель с уже присвоенной буквой. Например, в нашем случае носителю с Ext4 задана первая свободная буква F.
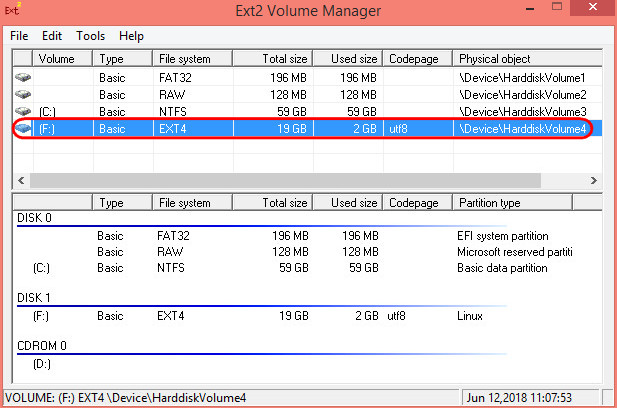
Теперь можем работать с диском F в окне проводника.
Присвоить букву новым подключаемым устройствам с Ext2/3/4 можно с помощью контекстного меню, вызываемого на каждом из отображаемых в окне Volume Manager устройств. Но просто при присвоении буквы диска такое устройство не будет отображаться после перезагрузки Windows, это решение только для одного сеанса работы с компьютером. Чтобы сделать новое устройство с Ext2/3/4 постоянно видимым в среде Windows, необходимо двойным кликом по нему открыть настроечное окошко и установить постоянные параметры подключения. Во второй графе нужно:
• Для съёмных носителей активировать чекбокс, обозначенный на скриншоте цифрой 1, и указать букву диска;
• Для внутренних дисков и разделов активировать чекбокс, обозначенный на скриншоте ниже цифрой 2, и также указать букву диска.
Далее применяем всё только что настроенное: нажимаем внизу «Apply».
How to Access Linux EXT4 Partition and Data on Windows 10/8/7 in 2021
On this page, you’ll unveil 6 practical methods to access EXT4 partition from Windows 10/8/7 in two parts. Follow to learn how to access and read Linux EXT4 partition data on Windows with ease:
If you are dual-booting Windows and Linux on your laptop or desktop computer, you may probably want to access files on your Linux partition like EXT4 on Windows at some point. Check out how to access and open EXT4 partition files on your Windows PC with ease.
Part 1. Can I Read EXT4 on Windows
«Hi, I recently moved my old Linux computer hard drive to my current Windows 10 laptop. I’m thinking about using the Linux hard drive as a data drive. Does anyone know how to read and access EXT4 partition from Windows 10?»
Are you having a similar issue that you can’t access nor mount a Linux EXT4 partition to Windows 10/8/7? To do so, you’ll need first to figure out the following two questions:
1. What is EXT4?
EXT4, known as the fourth extended file system, the successor to EXT3, is one of the most recent file system used by Linux users. It is the default file system for many Linux distributions, including Debian and Ununtu.
2. Can Windows 10 or Windows 8/7 read EXT4?
Although EXT4 is the most common Linux file system, it’s not supported on Windows by default. Therefore, the answer to «can Windows read EXT4» is no. You may easily visit a Windows NTFS partition from Linux. However, Windows cannot read Linux partitions directly.
But it doesn’t mean there is no way to open or access EXT4 from Windows. To do so, you’ll need third-party tools and resolutions for help.
Continue reading andВ follow provided methods in Part 2 and Part 3, you will learn how to access and read Linux EXT4 partition data on Windows.
Part 2. How to access Ext4 from Windows 10/8/7
In this part, you will learn:
- 1. A quick way to view EXT4 partition content;
- 2. How to access EXT4 partition data and make it accessible by Windows.
To use the Linux hard drive as a data disk on Windows, making EXT4 partition accessible on Windows, you will need first to check if there is important data saved on the drive by using an EXT4 viewer tool.
If you have saved important data, you can apply a reliable EXT4 reader to access and restore data from the partition. Then you can format and convert EXT4 partition to NTFS with a professional EXT4 formatter. No data loss will occur.
Go through the following complete process, and you’ll make EXT4 accessible on Windows 10/8/7:
Note that, if you don’t care about the data, jump to EXT4 formatter in #2 for help.
#1. View and Read EXT4 Partition Content
Applies to: View EXT4 partition content and data on Windows
Important Tool: Linux EXT4 partition manager software — EaseUS Partition Master
Before you start converting or accessing EXT4 partition from Windows, it’s essential to view and check the saved content in the volume. Here, we would like to recommend you try reliable EXT4 partition manager software — EaseUS Partition Master.
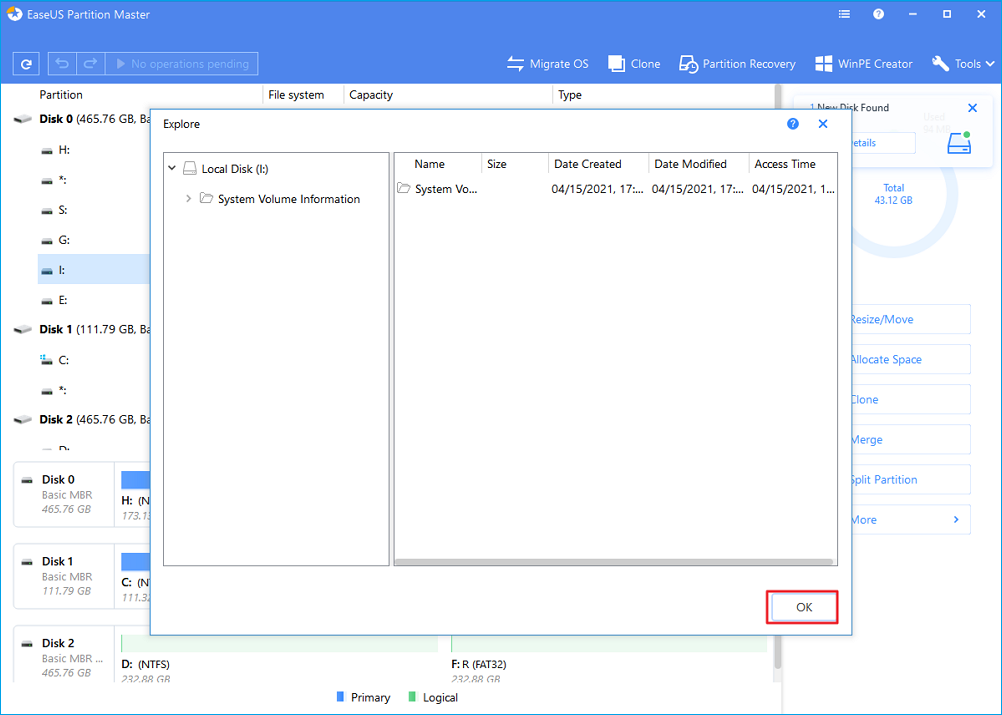
Step 1. Launch EaseUS Partition Master, locate the EXT4 partition.
Step 2. Right-click on the EXT4 partition and select «Properties».
Step 3. Open and expand the folders on the left pane to check the content of EXT4 partition.
If the Linux EXT4 partition contains some valuable files, move to the next phase, and you’ll learn how to access and regain data from a Linux partition on Windows.
#2. Access EXT4 Partition Data from Windows 10/8/7
Applies to: Read and access EXT partition data on Windows, making EXT4 partition accessible by formatting EXT4 to NTFS.
Important Tools: 1. EXT4 reader; 2. EXT4 formatter tool.
To avoid unnecessary data loss issue, before converting EXT4 partition, we suggest you apply reliable EXT4 reader to access the saved data in advance. Follow to make EXT4 partition accessible without losing any data:
First. Use EXT4 Reader to Read and Restore EXT4 Partition Data
So how to regain data from the inaccessible EXT4 partition on Windows? You’ll need a reliable EXT4 reader for help. EaseUS Data Recovery Wizard, as a professional hard drive data recovery software, is capable of helping.
Note that if you lost or deleted data on other types of storage devices, such as EXT2/EXT3 partitions, FAT32 USB drive, or exFAT external hard drive, this software will quickly scan and restore everything you lost immediately.
Here, you can apply this software to scan, preview and restore everything saved in the EXT4 partition in only 3 steps:
Step 1. Select a location and start scanning.
Launch EaseUS Data Recovery Wizard, hover on the partition where you lost data, then click «Scan».

Step 2. Preview and select the files.
Wait until the scanning completes. If you need to double-click the item to preview the file, then select the data you attempt to recover.

Step 3. Recover lost data.
Click «Recover», choose a location to save the recovered data, then click «OK». You should store the data in another place instead of the original one.

Remember to save the restored EXT4 partition data to another secure location on your Windows hard drive.
Next. Use EXT4 Formatter to Make EXT4 Partition Accessible on Windows
As you’ve known that Windows doesn’t support accessing Linux based file system partitions, which as a result, Windows users can neither view nor make any changes to the EXT4/3/2 partitions on Windows PC.
The easiest way that you can try is to change the file system ofВ Linux partition from EXT4/3/2 to a Windows supported one — NTFS or FAT32, making an EXT4/3/2 partition accessible on Windows. Here, we would like to recommend you try a reliable EXT4 formatter — EaseUS Partition Master for help.
You can easily convert an EXT4 partition to NTFS in only a few simple clicks by formatting:
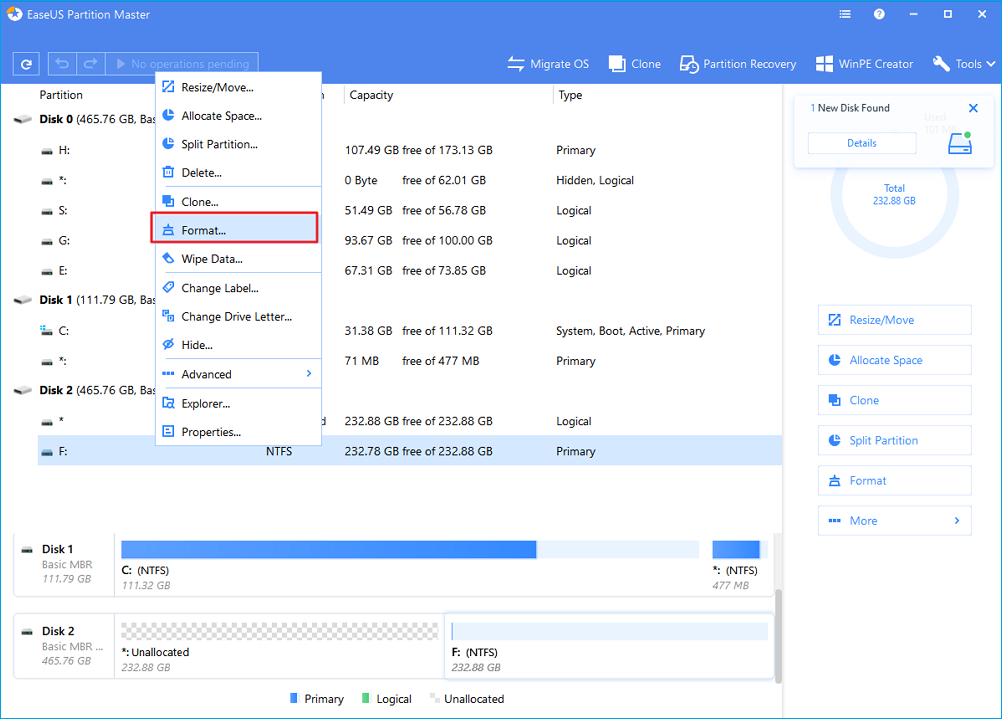
Step 1. Launch EaseUS Partition Master, right-click on the target drive and choose «Format».
Step 2. Set the partition file system as EXT2, EXT3, EXT4.
A mini window pops out, on which you can edit the partition label, and choose a file system. Here you should chooseВ EXT2, EXT3, or EXT4. Click «OK».

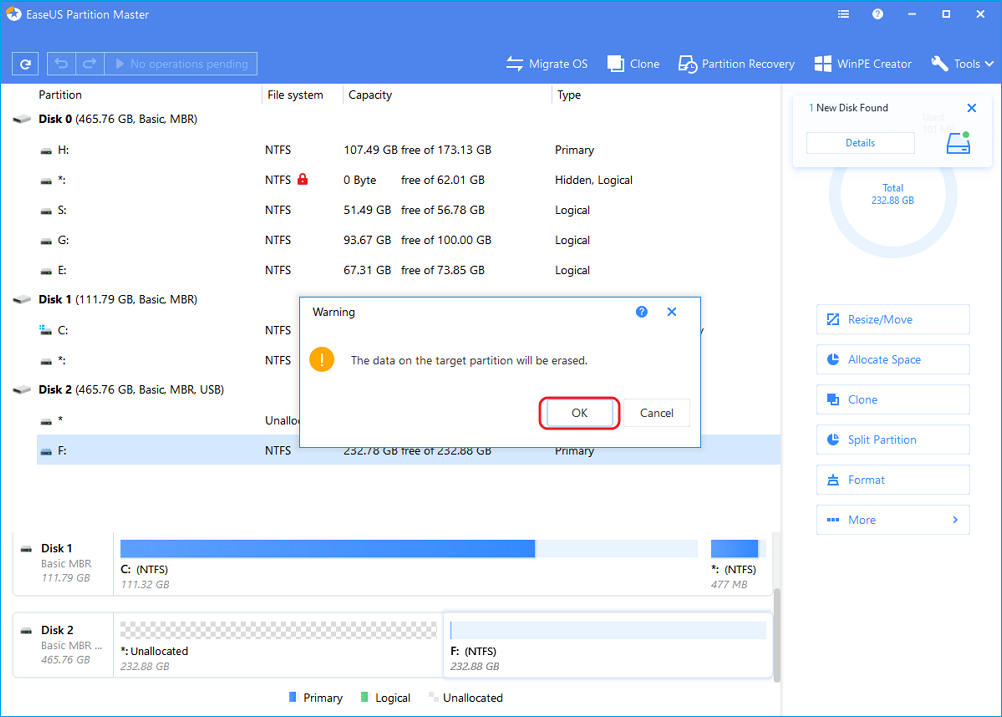
Step 3. Confirm to format data. Then,В you will see a warning window, click «OK» in it to continue.
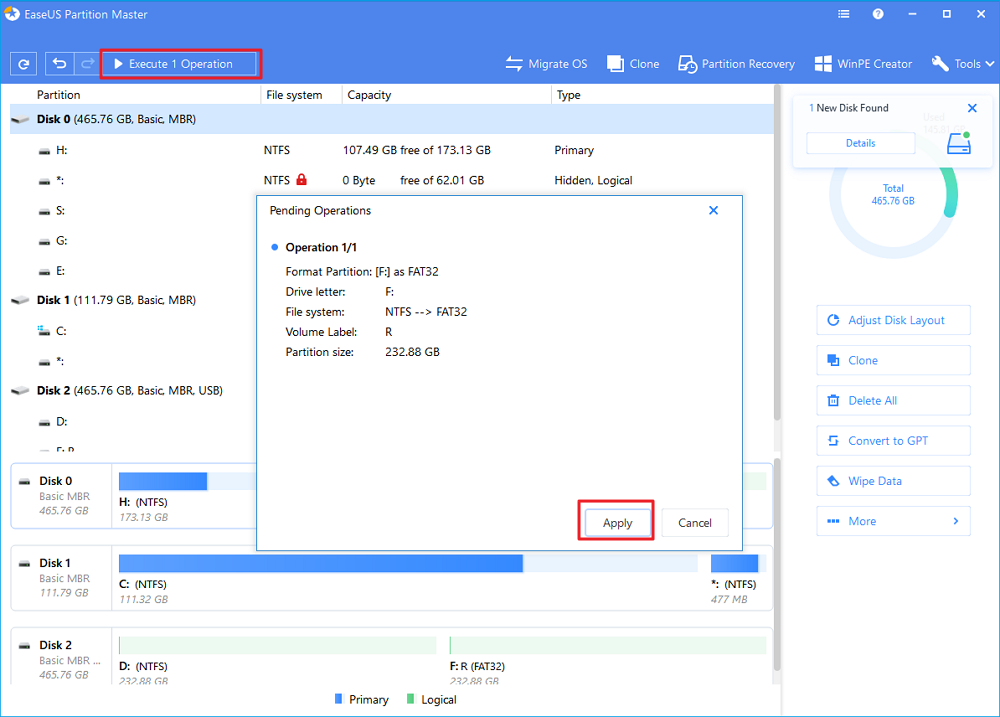
Step 4.В Click «Execute Operation > Apply». Now you’ve successfully formatted an EXT2/EXT3/EXT4 hard drive that can be used on a Linux computer.
You May Also Like:

After formatting the EXT4 partition to a normal file system, you may also like to repartition the volume. Follow to learn how to partition a hard drive on your own.В
Part 3. How to Mount EXT4 on Windows 10/8/7
In this part, you will learn: How to mount EXT4 partition on Windows, accessing EXT4 files from Windows using third-party software.
If you intend to keep Linux with Windows on the computer, accessing EXT4 files from Windows, you can try to mount EXT4 partition on Windows 10/8/7. But how do I mount a Linux drive in Windows 10?
If you are having the same question on your mind, stay here. In this part, we’ll introduce to you 3 relaible Linux readers, helping you to mount EXT4 on Windows 10/8/7:
Pick up one tool and follow the tutorials below to mount EXT4 on your Windows computer now:
#1. Mount EXT4 on Windows using Ext2Fsd
Ext2Fsd is a Windows file system driver, designed for EXT4/3/2 file systems. It enables Windows users to read and access Linux file systems like EXT4 by mounting the EXT4 partition on Windows.
Here are the steps:
Step 1. Install and launch Ext2Fsd driver on your Windows PC.
Step 2. Go to Tools > Service Management > Start Ext2Fsd service before accessing Linux files.
Step 3. Check «Mount all volumes in read-only mode» and «Assign drive letter automatically» boxes, and click «Apply».
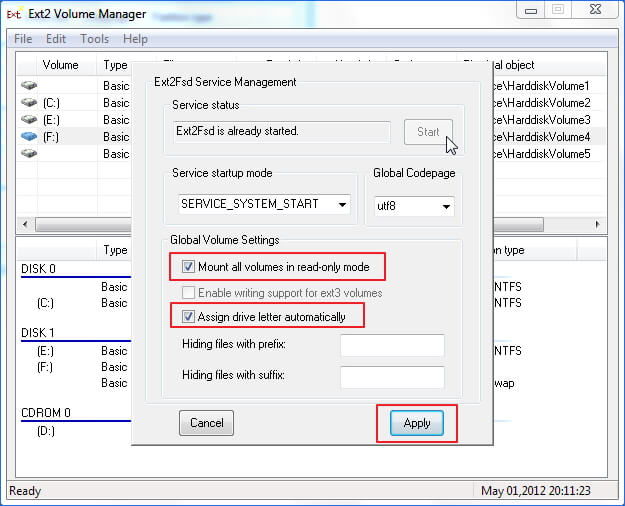
After this, you can find your EXT4 partitions with its own drive letters in Windows Explorer. You can even directly access files on the EXT4 partition.
#2. Mount EXT4 Partition on Windows 10 via DiskInternals Linux Reader
DiskInternals Linux Reader supports EXT4, ReFS, HFS and HFS+ file systems. Unlike Ext2Fsd, DiskInternals Linux Reader enables Windows users to visit and browse Linux partitions within this application.
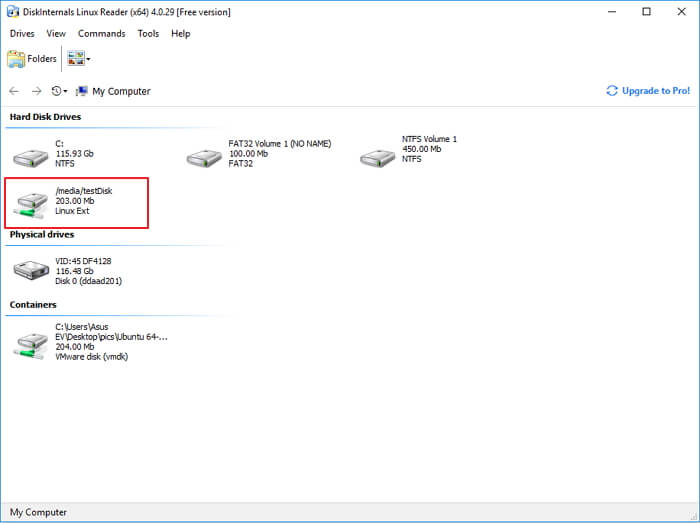
Step 1. Install and launch DiskInternals Linux Reader on Windows PC.
Step 2. Locate the EXT4 partition on this application.
Step 3. Double-click to open EXT4 partition, view, and check the saved data on the partition.
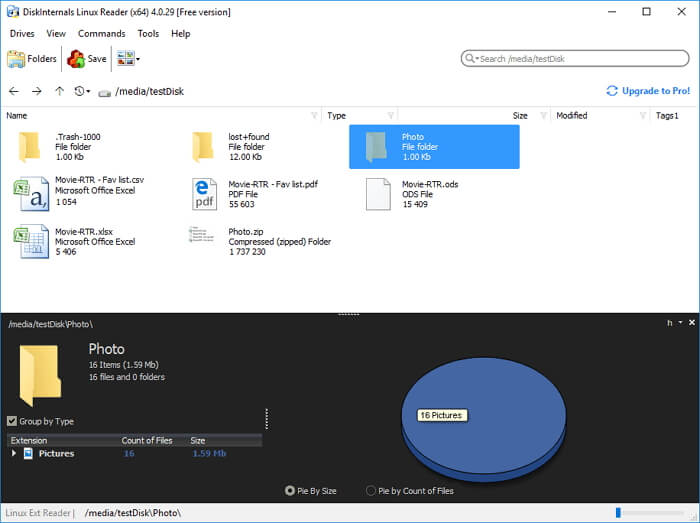
Step 4. To make use of the files on EXT4 partition, select files and click «Save» to store them to another secure location on your Windows PC.
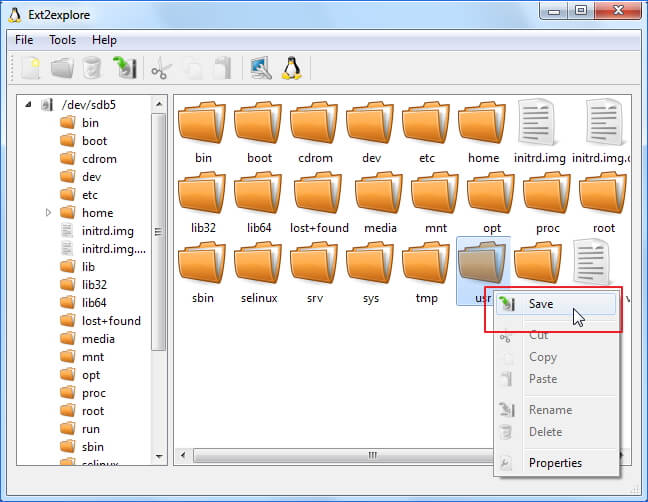
#3. Mount EXT4 on Windows using Ext2explore
Ext2explore is an open-source application that works similarly to DiskInternals Linux Reader. It enables users to access EXT4 partition content only in this application.
Here are the steps that you can apply to access EXT4 from Windows via Ext2explore:
Step 1. Download Ext2explore.ext and run this program on Windows PC.
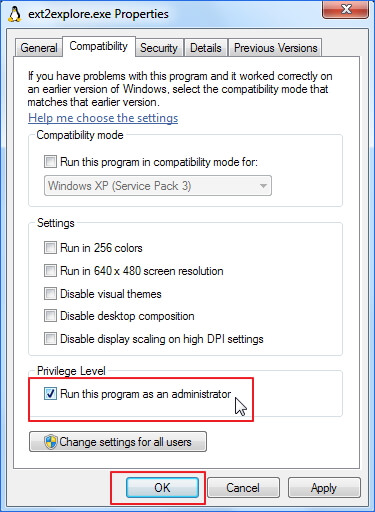
Step 2. Once launched, right-click on it and select to «Run as administrator».
You can also right-click on ext2explore.exe and select «Properties» > Compatibility > Check «Run this program as an administrator» > «OK».
Step 3. After this, you can then browse the Linux EXT4 partition and its content.
To make use of the files, right-click on files and select «Save» > Navigate another secure location to save the files on Windows computer.
Part 4. Conclusion
On this page, you’ve learnt what is EXT4 is and two different ways to access and open EXT4 partition on Windows.
To make use of Linux EXT4 partition as a data drive on Windows, you’ll need to export and restore EXT4 partitino data first using EaseUS Data Recovery Wizard. Then convert the EXT4 partitoin to a Windows recognized file system — NTFS or FAT32 by formatting via EaseUS Partition Master.
To keep Linux and Windows on your computer, and access EXT4 files from Windows, you’ll need to mount the Linux partition on Windows. To do so, you can try the recommended tools for help. For the most direct way, we suggest you try Ext2Fsd.
If you have further questions about EXT4 or Linux file systems, check the FAQs below, you may get the desired answer.
FAQs about EXT4
1. Can Windows read ext4?
Windows Operating Systems don’t support the Linux file system, including EXT4. As a result, Windows cannot directly read or detect an EXT4 partition or device. But if you want to access EXT4 from Windows, try the listed methods on this page. You’ll make it possible.
2. Which is better NTFS or EXT4?
As NTFS and EXT4 are two different file systems designed for two operating systems, to test the performance, you’ll need to do it in the native OS.
As tested, NTFS is much faster than EXT4 in Windows. Also, if it’s in Linux, EXT4 is faster than NTFS.
3. Can Windows write to EXT4?
As a matter of fact, if you are running Windows and Linux on the same PC, it’s impossible to access EXT4 under Windows, which as a result, you can’t do anything to an EXT4 partition or storage device.
In a word, Windows cannot write to EXT4. If you really need to write things on EXT4 on Windows OS, you’ll need to convert EXT4 to an NTFS or FAT32 file system based device first. You can run EaseUS Partition Master with its Format feature for help, as shown on this page in Part 2.
4. How do I open a Linux drive in Windows?
Being similar to the ways shown on this page, to open a Linux drive in Windows, you can either try to change its file system to NTFS/FAT32 or mount the Linux drive to Windows.
If you prefer to change the Linux drive file system so as to make it readable and writable, format it into NTFS or FAT32 with solutions in Part 2 on this page.
If you only want to visit or access files saved on the Linux drive from Windows, mount it on Windows using applications recommended in Part 3.


