- Use an Azure file share with Windows
- Prerequisites
- Using an Azure file share with Windows
- Mount the Azure file share
- Mount the Azure file share with File Explorer
- Accessing share snapshots from Windows
- List previous versions
- Restore from a previous version
- Securing Windows/Windows Server
- Auditing SMB 1 usage
- Removing SMB 1 from Windows Server
- Removing SMB 1 from Windows client
- Disabling SMB 1 on legacy versions of Windows/Windows Server
- SMB resources
- Next steps
- Ways to share an Access desktop database
- In this article
- An overview of ways to share Access data
- Share a single database
- Share a split database
- Share data on a SharePoint site
- Share data by using a database server
Use an Azure file share with Windows
Azure Files is Microsoft’s easy-to-use cloud file system. Azure file shares can be seamlessly used in Windows and Windows Server. This article discusses the considerations for using an Azure file share with Windows and Windows Server.
In order to use an Azure file share outside of the Azure region it is hosted in, such as on-premises or in a different Azure region, the OS must support SMB 3.0.
You can use Azure file shares on a Windows installation that is running either in an Azure VM or on-premises. The following table illustrates which OS versions support accessing file shares in which environment:
| Windows version | SMB version | Mountable in Azure VM | Mountable on-premises |
|---|---|---|---|
| Windows Server 2019 | SMB 3.0 | Yes | Yes |
| Windows 10 1 | SMB 3.0 | Yes | Yes |
| Windows Server semi-annual channel 2 | SMB 3.0 | Yes | Yes |
| Windows Server 2016 | SMB 3.0 | Yes | Yes |
| Windows 8.1 | SMB 3.0 | Yes | Yes |
| Windows Server 2012 R2 | SMB 3.0 | Yes | Yes |
| Windows Server 2012 | SMB 3.0 | Yes | Yes |
| Windows 7 3 | SMB 2.1 | Yes | No |
| Windows Server 2008 R2 3 | SMB 2.1 | Yes | No |
1 Windows 10, versions 1507, 1607, 1803, 1809, 1903, 1909, and 2004.
2 Windows Server, versions 1809, 1903, 1909, 2004.
3 Regular Microsoft support for Windows 7 and Windows Server 2008 R2 has ended. It is possible to purchase additional support for security updates only through the Extended Security Update (ESU) program. We strongly recommend migrating off of these operating systems.
We always recommend taking the most recent KB for your version of Windows.
Prerequisites
Ensure port 445 is open: The SMB protocol requires TCP port 445 to be open; connections will fail if port 445 is blocked. You can check if your firewall is blocking port 445 with the Test-NetConnection cmdlet. To learn about ways to work around a blocked 445 port, see the Cause 1: Port 445 is blocked section of our Windows troubleshooting guide.
Using an Azure file share with Windows
To use an Azure file share with Windows, you must either mount it, which means assigning it a drive letter or mount point path, or access it via its UNC path.
This article uses the storage account key to access the file share. A storage account key is an administrator key for a storage account, including administrator permissions to all files and folders within the file share you’re accessing, and for all file shares and other storage resources (blobs, queues, tables, etc.) contained within your storage account. If this is not sufficient for your workload, Azure File Sync may be used, or you may use identity-based authentication over SMB.
A common pattern for lifting and shifting line-of-business (LOB) applications that expect an SMB file share to Azure is to use an Azure file share as an alternative for running a dedicated Windows file server in an Azure VM. One important consideration for successfully migrating a line-of-business application to use an Azure file share is that many line-of-business applications run under the context of a dedicated service account with limited system permissions rather than the VM’s administrative account. Therefore, you must ensure that you mount/save the credentials for the Azure file share from the context of the service account rather than your administrative account.
Mount the Azure file share
The Azure portal provides you with a script that you can use to mount your file share directly to a host. We recommend using this provided script.
To get this script:
Navigate to the storage account that contains the file share you’d like to mount.
Select File shares.
Select the file share you’d like to mount.
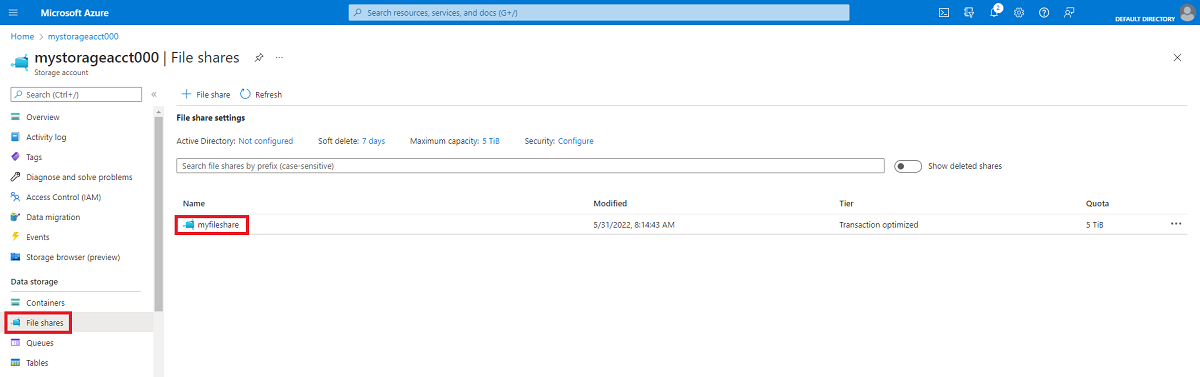
Select Connect.
Select the drive letter to mount the share to.
Copy the provided script.
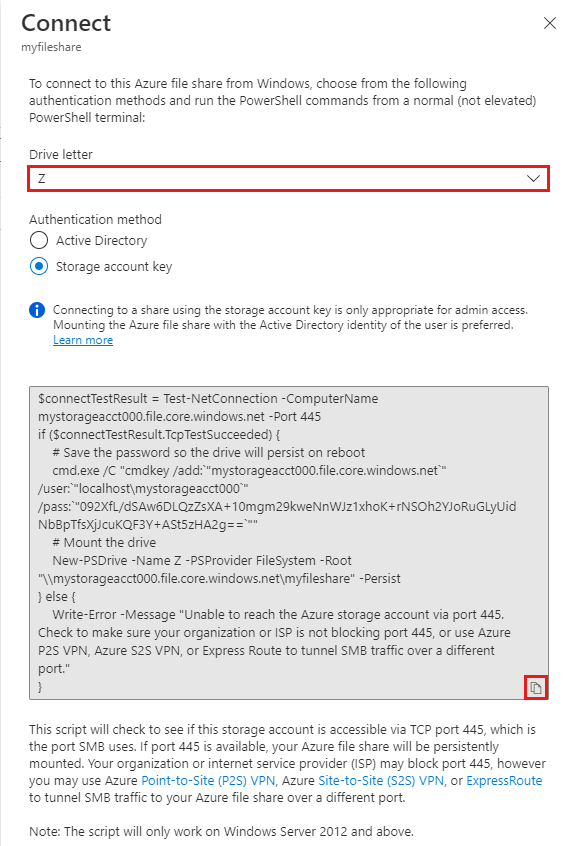
Paste the script into a shell on the host you’d like to mount the file share to, and run it.
You have now mounted your Azure file share.
Mount the Azure file share with File Explorer
Note that the following instructions are shown on Windows 10 and may differ slightly on older releases.
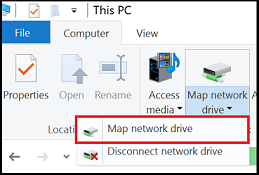
Open File Explorer. This can be done by opening from the Start Menu, or by pressing Win+E shortcut.
Navigate to This PC on the left-hand side of the window. This will change the menus available in the ribbon. Under the Computer menu, select Map network drive.
Select the drive letter and enter the UNC path, the UNC path format is \\ .file.core.windows.net\ . For example: \\anexampleaccountname.file.core.windows.net\example-share-name .

Use the storage account name prepended with AZURE\ as the username and a storage account key as the password.

Use Azure file share as desired.
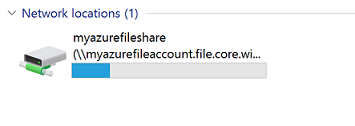
When you are ready to dismount the Azure file share, you can do so by right-clicking on the entry for the share under the Network locations in File Explorer and selecting Disconnect.
Accessing share snapshots from Windows
If you have taken a share snapshot, either manually or automatically through a script or service like Azure Backup, you can view previous versions of a share, a directory, or a particular file from file share on Windows. You can take a share snapshot using Azure PowerShell, Azure CLI, or the Azure portal.
List previous versions
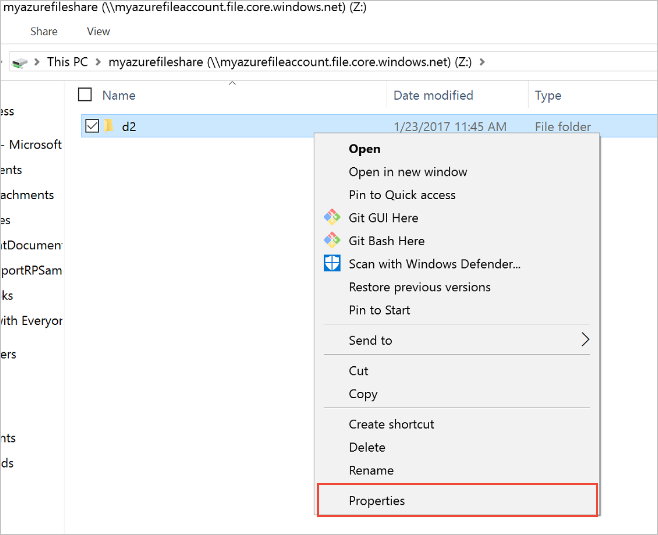
Browse to the item or parent item that needs to be restored. Double-click to go to the desired directory. Right-click and select Properties from the menu.
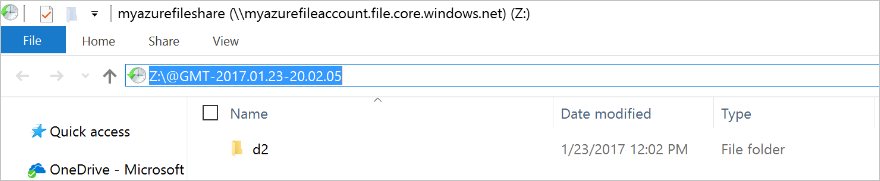
Select Previous Versions to see the list of share snapshots for this directory. The list might take a few seconds to load, depending on the network speed and the number of share snapshots in the directory.

You can select Open to open a particular snapshot.
Restore from a previous version
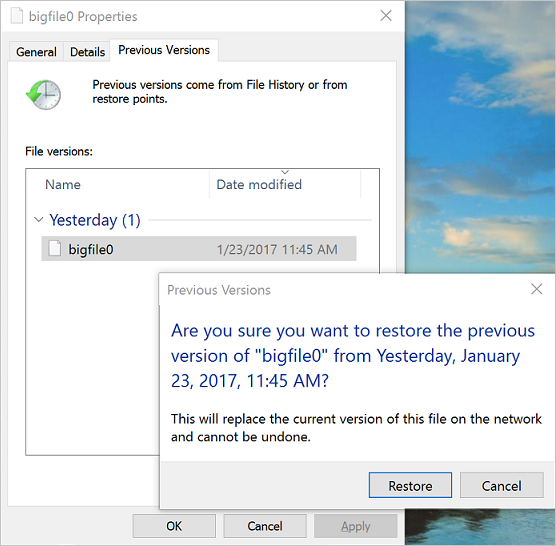
Select Restore to copy the contents of the entire directory recursively at the share snapshot creation time to the original location.
Securing Windows/Windows Server
In order to mount an Azure file share on Windows, port 445 must be accessible. Many organizations block port 445 because of the security risks inherent with SMB 1. SMB 1, also known as CIFS (Common Internet File System), is a legacy file system protocol included with Windows and Windows Server. SMB 1 is an outdated, inefficient, and most importantly insecure protocol. The good news is that Azure Files does not support SMB 1, and all supported versions of Windows and Windows Server make it possible to remove or disable SMB 1. We always strongly recommend removing or disabling the SMB 1 client and server in Windows before using Azure file shares in production.
The following table provides detailed information on the status of SMB 1 each version of Windows:
| Windows version | SMB 1 default status | Disable/Remove method |
|---|---|---|
| Windows Server 2019 | Disabled | Remove with Windows feature |
| Windows Server, versions 1709+ | Disabled | Remove with Windows feature |
| Windows 10, versions 1709+ | Disabled | Remove with Windows feature |
| Windows Server 2016 | Enabled | Remove with Windows feature |
| Windows 10, versions 1507, 1607, and 1703 | Enabled | Remove with Windows feature |
| Windows Server 2012 R2 | Enabled | Remove with Windows feature |
| Windows 8.1 | Enabled | Remove with Windows feature |
| Windows Server 2012 | Enabled | Disable with Registry |
| Windows Server 2008 R2 | Enabled | Disable with Registry |
| Windows 7 | Enabled | Disable with Registry |
Auditing SMB 1 usage
Applies to Windows Server 2019, Windows Server semi-annual channel (versions 1709 and 1803), Windows Server 2016, Windows 10 (versions 1507, 1607, 1703, 1709, and 1803), Windows Server 2012 R2, and Windows 8.1
Before removing SMB 1 in your environment, you may wish to audit SMB 1 usage to see if any clients will be broken by the change. If any requests are made against SMB shares with SMB 1, an audit event will be logged in the event log under Applications and Services Logs > Microsoft > Windows > SMBServer > Audit .
To enable auditing support on Windows Server 2012 R2 and Windows 8.1, install at least KB4022720.
To enable auditing, execute the following cmdlet from an elevated PowerShell session:
Removing SMB 1 from Windows Server
Applies to Windows Server 2019, Windows Server semi-annual channel (versions 1709 and 1803), Windows Server 2016, Windows Server 2012 R2
To remove SMB 1 from a Windows Server instance, execute the following cmdlet from an elevated PowerShell session:
To complete the removal process, restart your server.
Starting with Windows 10 and Windows Server version 1709, SMB 1 is not installed by default and has separate Windows features for the SMB 1 client and SMB 1 server. We always recommend leaving both the SMB 1 server ( FS-SMB1-SERVER ) and the SMB 1 client ( FS-SMB1-CLIENT ) uninstalled.
Removing SMB 1 from Windows client
Applies to Windows 10 (versions 1507, 1607, 1703, 1709, and 1803) and Windows 8.1
To remove SMB 1 from your Windows client, execute the following cmdlet from an elevated PowerShell session:
To complete the removal process, restart your PC.
Disabling SMB 1 on legacy versions of Windows/Windows Server
Applies to Windows Server 2012, Windows Server 2008 R2, and Windows 7
SMB 1 cannot be completely removed on legacy versions of Windows/Windows Server, but it can be disabled through the Registry. To disable SMB 1, create a new registry key SMB1 of type DWORD with a value of 0 under HKEY_LOCAL_MACHINE > SYSTEM > CurrentControlSet > Services > LanmanServer > Parameters .
You can easily accomplish this with the following PowerShell cmdlet as well:
After creating this registry key, you must restart your server to disable SMB 1.
SMB resources
Next steps
See these links for more information about Azure Files:
Ways to share an Access desktop database
There are several ways that you can share an Access database depending on your needs and resource availability. In this article, we’ll take a look at the options available, the benefits of each option, and resources for more information.
In this article
An overview of ways to share Access data
Database applications change and grow over time. Many factors impact needs and performance including the number of concurrent users, the network environment, throughput, latency, the size of the database, peak usage times, and expected growth rates. In short, if your database solution is successful, it probably needs to evolve. Fortunately, Access has an evolutionary path, from simple to advanced, that you can take over time to effectively scale your solution. The following table summarizes Access scenarios and workloads to help you choose that path.

Share a single database
This is the simplest option and has the least requirements, but also provides the least functionality. In this method, the database file is stored on a shared network drive, and all users share the database file simultaneously. Some limitations include reliability and availability if there are multiple simultaneous users changing data since all database objects are shared. This technique can also reduce performance as all the database objects are sent across the network.
This option might work for you if only a few people are expected to use the database at the same time and users don’t need to customize the design of the database. But this method is less secure than other methods of sharing a database, because each user has a full copy of the database file, increasing the risk of unauthorized access.
To share a database by using a shared folder:
In a home or small business environment, share a folder with specific people. For more information, see File sharing over a network in Windows 10.
Make sure that Access is set to open in shared mode on all of the users’ computers. This is the default setting, but you should check to be sure — if a user opens the database in exclusive mode, it will interfere with data availability.
Start Access and under File, click Options.
In the Access Options box, click Client Settings.
In the Advanced section, under Default open mode, select Shared, click OK, and then exit Access.
Copy the database file to the shared folder. After you copy the file, make sure that the file attributes are set to allow read/write access to the database file. Users must have read/write access to use the database.
On each user’s computer, create a shortcut to the database file. For more information, see Create a desktop shortcut for an Office program or file.
Share a split database
This is a good choice if you do not have a SharePoint site or a database server. You can share a split database over a Local Area Network (LAN). When you split a database, you reorganize it into two files — a back-end database that contains the data tables, and a front-end database that contains all the other database objects such as queries, forms, and reports. Each user interacts with the data by using a local copy of the front-end database.
The benefits of splitting a database include the following:
Improved performance Only the data is shared across the network not the tables, queries, forms, reports, macros and modules.
Greater availability Database transactions such as record edits are completed more quickly.
Enhanced security Users access the back-end database through linked tables; it is less likely that intruders can obtain unauthorized access to the data via the front-end database.
Improved reliability If a user encounters a problem and the database closes unexpectedly, any database file corruption is usually limited to the copy of the front-end database that the user had open.
Flexible development environment Each user can independently develop queries, forms, reports, and other database objects without affecting other users. You can also develop and distribute a new version of the front-end database without disrupting access to the data that is stored in the back-end database.
Share data on a SharePoint site
There are several ways to share Access data on a SharePoint site:
Linking The linking process connects to data in another program, so that you can view and edit the latest data both in SharePoint and in Access without creating and maintaining a copy of the data in Access. If you don’t want to copy a SharePoint list into your Access database, but instead want to run queries and generate reports based on the contents of that list, you can link to the data.
Moving When you move data from Access to a SharePoint site, you create lists on the SharePoint site that remain linked to tables in your database. The Export Tables to SharePoint Wizard helps you to move the data from all your tables at the same time and to maintain their relationships.
Warning Although you can save an Access database file to OneDrive or a SharePoint document library, we recommend that you avoid opening an Access database from these locations. The file may be downloaded locally for editing and then uploaded again once you save your changes to SharePoint. If more than one person opens the Access database from SharePoint, multiple copies of the database may get created and some unexpected behaviors may occur. This recommendation applies to all types of Access files including a single database, a split database, and the .accdb, .accdc, .accde, and .accdr file formats. For more information on deploying Access, see Deploy an Access application.
Share data by using a database server
You can use Access with a database server product such as SQL Server to share your database. This method offers you many benefits, but does require additional software — a database server product.
This method is similar to splitting a database because the tables are stored on the network, and each user has a local copy of an Access database file that contains links to the tables, along with queries, forms, reports, and other database objects. Benefits of this sharing method depends on the database server software that you use, but generally include user accounts and selective access to data, excellent data availability, and good integrated data management tools. Moreover, most database server software works well with earlier versions of Access, so not all your users must use the same version. Only tables are shared. For more information, see Migrate an Access database to SQL Server, Import or link to data in an SQL Server database, and Link to or import data from an Azure SQL Server Database.
Benefits of sharing a database by using a database server
High performance and scalability In many situations, a database server offers better performance than an Access database file alone. Many database server products also provide support for very large, terabyte-sized databases, approximately 500 times the current limit for an Access database file (two gigabytes). Database server products generally work very efficiently by processing queries in parallel (using multiple native threads within a single process to handle user requests) and minimizing additional memory requirements when more users are added.
Increased availability Most database server products allow you to back up your database while it is in use. Consequently, you do not have to force users to exit the database to back up data. Moreover, database server products usually handle concurrent editing and record-locking very efficiently.
Improved security No database can be made completely secure. However, database server products offer robust security that will help protect your data from unauthorized use. Most database server products offer account-based security, allowing you to specify who can see which tables. Even in the event that the Access front-end is improperly obtained, unauthorized use of data is prevented by account-based security.
Automatic recoverability In case of system failure (such as an operating system crash or power outage), some database server products have automatic recovery mechanisms that recover a database to the last state of consistency in a matter of minutes, with no database administrator intervention.
Server-based processing Using Access in a client/server configuration helps reduce network traffic by processing database queries on the server before sending results to the client. Having the server do the processing is usually more efficient, especially when working with large data sets.
Azure SQL Server In addition to the benefits of SQL Server, offers dynamic scalability with no downtime, intelligent optimization, global scalability and availability, elimination of hardware costs, and reduced administration.


