- Locate and view your connected device on your computer
- View your device in the Finder
- View your device in iTunes
- If your computer doesn’t recognize your iPhone, iPad, or iPod
- If you use a Mac
- If you use a Windows PC
- If you downloaded iTunes from the Microsoft Store
- If you downloaded iTunes from Apple
- If your device still isn’t recognized
- If you don’t see the Apple Mobile Device USB Driver or you see Unknown Device:
- If you see the Apple Mobile Device USB driver with an error symbol:
- Use iTunes to sync your iPhone, iPad, or iPod with your computer
- What you can sync with iTunes
- Sync or remove content using iTunes
- Sync your content using Wi-Fi
- iPod Access for Windows
- Softonic review
- Copy MP3 files from your iPod to hard drive
- Changes
- Use the Finder to sync your iPhone, iPad, or iPod with your computer
- What can you sync with the Finder
- Sync or remove content using the Finder
- Sync your content using Wi-Fi
Locate and view your connected device on your computer
After you connect your iPhone, iPad, or iPod to your computer, you can view it and access its settings in the Finder or iTunes.
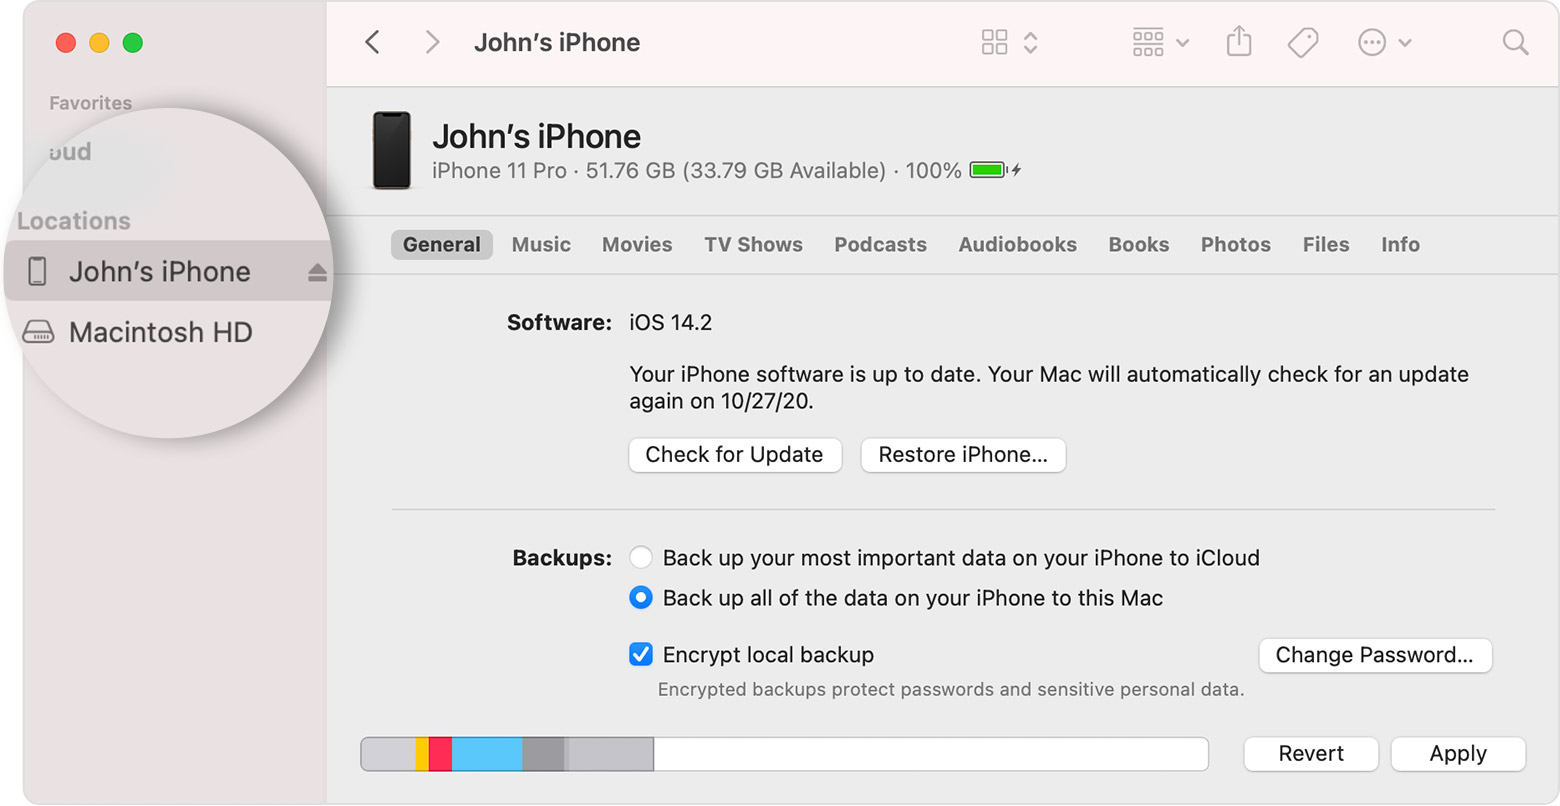
View your device in the Finder
Starting with macOS Catalina, your devices appear in the sidebar of the Finder. Click the device to select it.
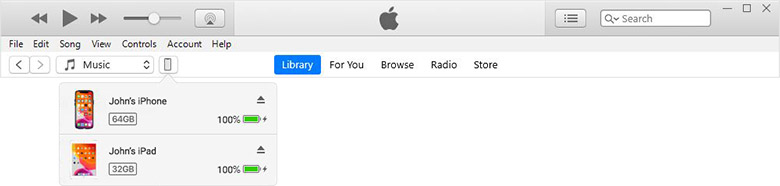
View your device in iTunes
Make sure that you have the latest version of iTunes. If you’re using Windows or macOS Mojave or earlier, your device will show in the upper-left corner of the iTunes window. If you don’t see your device on your computer, learn what to do.

If you have multiple devices connected to your computer, click the device icon, then choose your device from the menu.
Information about products not manufactured by Apple, or independent websites not controlled or tested by Apple, is provided without recommendation or endorsement. Apple assumes no responsibility with regard to the selection, performance, or use of third-party websites or products. Apple makes no representations regarding third-party website accuracy or reliability. Contact the vendor for additional information.
If your computer doesn’t recognize your iPhone, iPad, or iPod
If you connect your device to your computer with a USB cable and your computer doesn’t recognize your iPhone, iPad, or iPod, get help.
If your computer doesn’t recognize your connected device, you might see an unknown error or a «0xE» error. If you do, follow these steps and try to connect your device again after each step:
- Make sure that your iOS or iPadOS device is unlocked and on the Home screen.
- Check that you have the latest software on your Mac or Windows PC. If you’re using iTunes, make sure you have the latest version.
- Make sure that your device is turned on.
- If you see a Trust this Computer alert, unlock your device and tap Trust.
- Unplug all USB accessories from your computer except for your device. Try each USB port to see if one works. Then try a different Apple USB cable.*
- Restart your computer.
- Restart your device:
- iPhone
- iPad
- iPod touch
- Try connecting your device to another computer. If you have the same issue on another computer, contact Apple Support.
For more help, follow the steps below for your Mac or Windows PC.
If you use a Mac
- Connect your iOS or iPadOS device and make sure that it’s unlocked and on the Home screen.
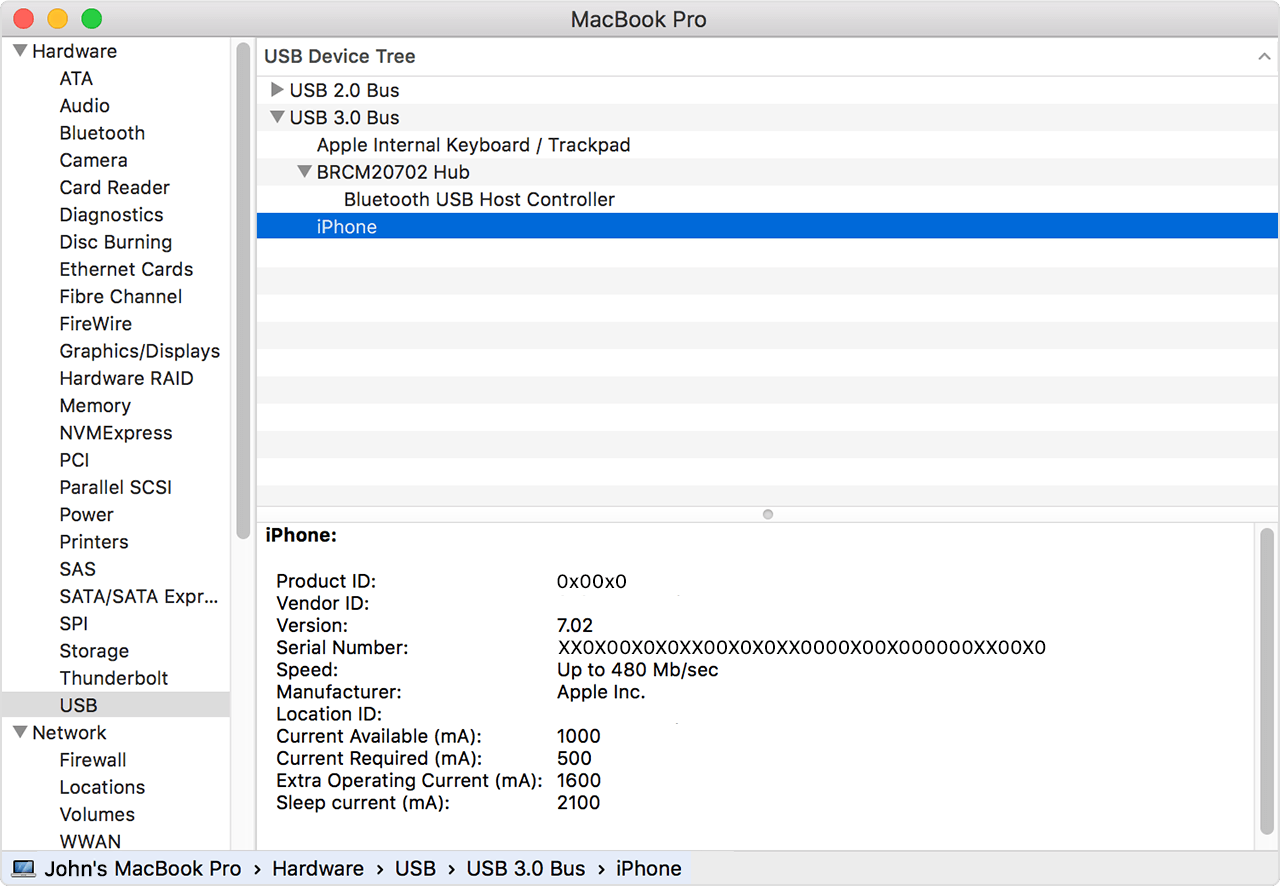
- On your Mac, hold down the Option key, click the Apple menu, and choose System Information or System Report.
- From the list on the left, select USB.
- If you see your iPhone, iPad, or iPod under USB Device Tree, get the latest macOS or install the latest updates. If you don’t see your device or still need help, contact Apple Support.


If you use a Windows PC
The steps differ depending on if you downloaded iTunes from the Microsoft Store or from Apple.
If you downloaded iTunes from the Microsoft Store
Follow these steps to reinstall the Apple Mobile Device USB driver:
- Disconnect your device from your computer.
- Unlock your iOS or iPadOS device and go to the Home screen. Then reconnect your device. If iTunes opens, close it.
- Click and hold (or right-click) the Start button, then choose Device Manager.
- Locate and expand the Portable Devices section.
- Look for your connected device (such as Apple iPhone), then right-click on the device name and choose Update driver.
- Select «Search automatically for updated driver software.»
- After the software installs, go to Settings > Update & Security > Windows Update and verify that no other updates are available.
- Open iTunes.

If you downloaded iTunes from Apple
Follow these steps to reinstall the Apple Mobile Device USB driver:
- Disconnect your device from your computer.
- Unlock your iOS or iPadOS device and go to the Home screen. Then reconnect your device. If iTunes opens, close it.
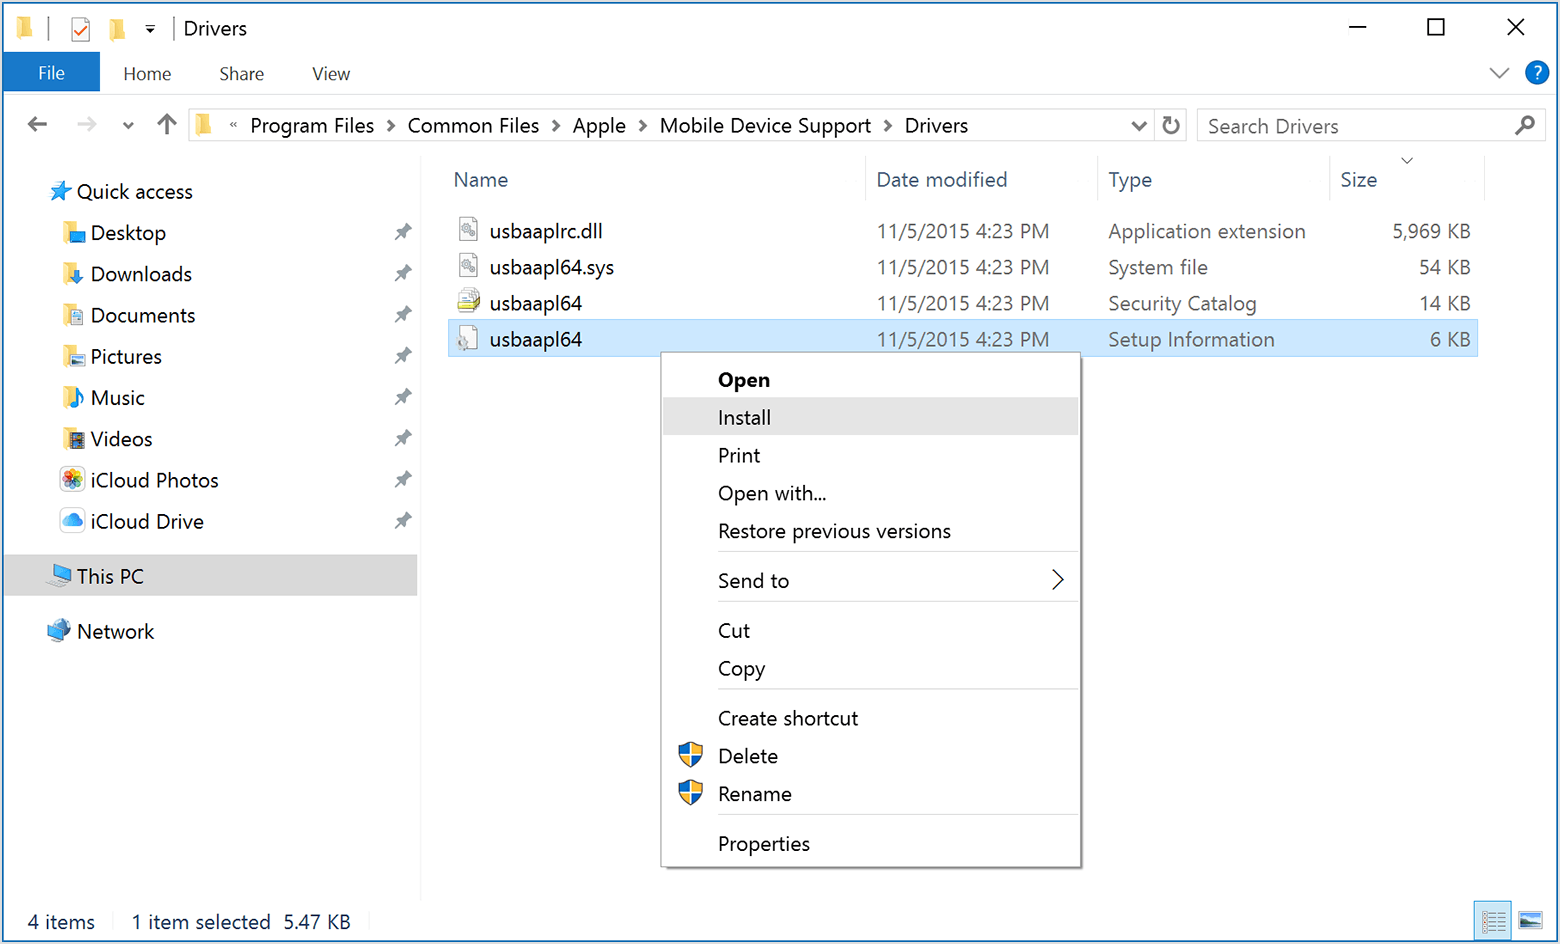
- Press the Windows and R key on your keyboard to open the Run command.
- In the Run window, enter:
%ProgramFiles%\Common Files\Apple\Mobile Device Support\Drivers - Click OK.
- Right-click on the usbaapl64.inf or usbaapl.inf file and choose Install.
You might see other files that start with usbaapl64 or usbaapl . Make sure to install the file that ends in .inf. If you’re not sure which file to install, right-click a blank area in the File Explorer Window, click View, then click Details to find the correct file type. You want to install the Setup Information file. - Disconnect your device from your computer, then restart your computer.
- Reconnect your device and open iTunes.
If your device still isn’t recognized
Check Device Manager to see if the Apple Mobile Device USB driver is installed. Follow these steps to open Device Manager:
- Press the Windows and R key on your keyboard to open the Run command.
- In the Run window, enter devmgmt.msc , then click OK. Device Manager should open.
- Locate and expand the Universal Serial Bus controllers section.
- Look for the Apple Mobile Device USB driver.
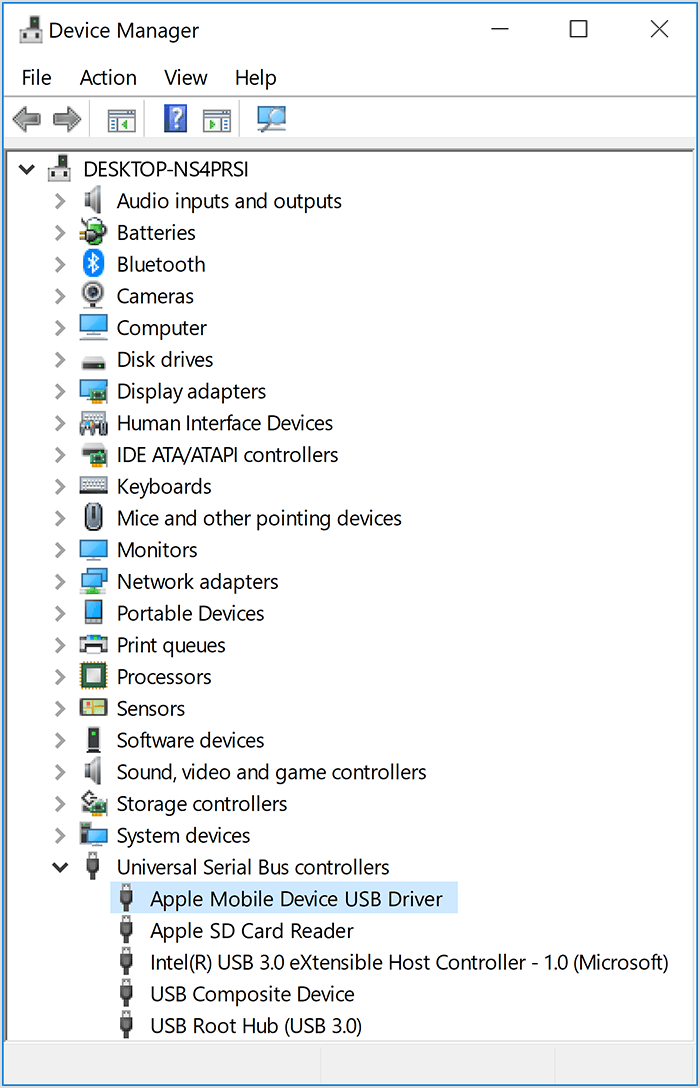
If you don’t see the Apple Mobile Device USB Driver or you see Unknown Device:
- Connect your device to your computer with a different USB cable.
- Connect your device to a different computer. If you have the same issue on another computer, contact Apple Support.
If you see the Apple Mobile Device USB driver with an error symbol:
If you see , , or next to the Apple Mobile Device USB driver, follow these steps:
Information about products not manufactured by Apple, or independent websites not controlled or tested by Apple, is provided without recommendation or endorsement. Apple assumes no responsibility with regard to the selection, performance, or use of third-party websites or products. Apple makes no representations regarding third-party website accuracy or reliability. Contact the vendor for additional information.
Use iTunes to sync your iPhone, iPad, or iPod with your computer
Learn how to sync music, movies, and more using iTunes on your Mac or PC.
If you’re using macOS Mojave or earlier or a Windows PC, use iTunes to sync content to your devices. Before you use iTunes to sync content to your iOS or iPadOS device, consider using iCloud, Apple Music, or similar services to keep content from your Mac or PC in the cloud. This way, you can access your music, photos, and more on your devices when you aren’t near your computer. Learn more about using Apple Music or iCloud Photos instead of iTunes.
If you use iCloud or other services like Apple Music to keep your content up-to-date across all of your devices, some syncing features through iTunes might be turned off.
What you can sync with iTunes
- Albums, songs, playlists, movies, TV shows, podcasts, and audiobooks.
- Photos and videos.
- Contacts and calendars.
iTunes features might vary by country or region.
Sync or remove content using iTunes
- Open iTunes and connect your device to your computer with a USB cable.
- Click the device icon in the upper-left corner of the iTunes window. Learn what to do if you don’t see the icon.
- From the list under Settings on the left side of the iTunes window, click the type of content that you want to sync or remove. * To turn syncing on for a content type, select the checkbox next to Sync.
- Select the checkbox next to each item that you want to sync.
- Click the Apply button in the lower-right corner of the window. If syncing doesn’t start automatically, click the Sync button.

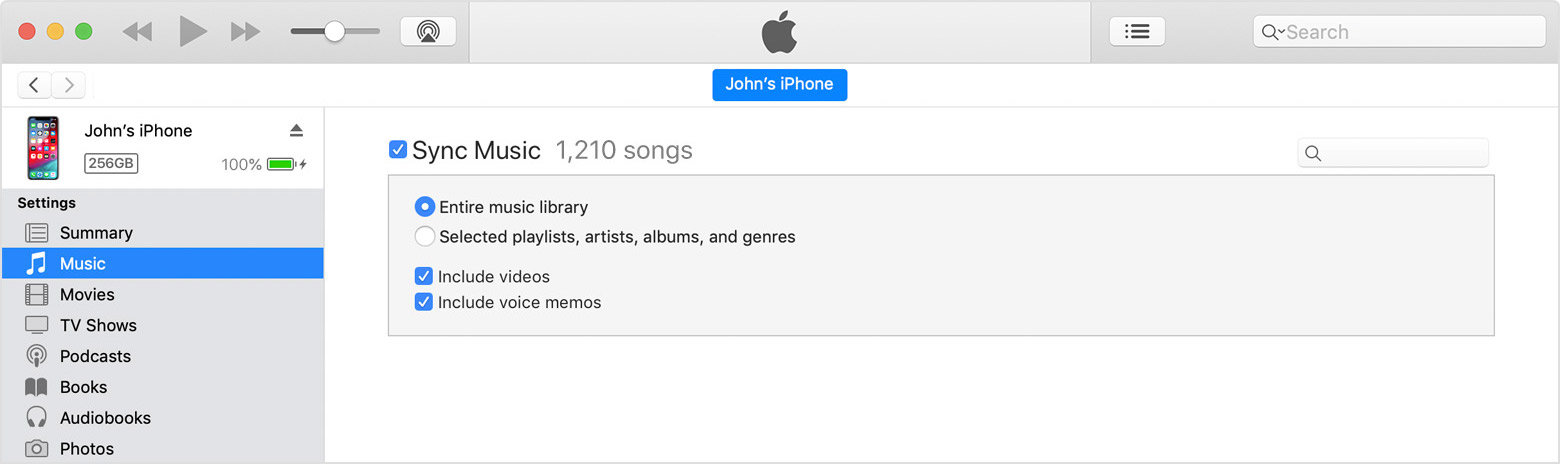
* You can only sync your device with one iTunes library at a time. If you see a message that your device is synced with another iTunes library, your device was previously connected to another computer. If you click «Erase and Sync» in that message, all content of the selected type on your device will be erased and replaced with content from this computer.
Sync your content using Wi-Fi
After you set up syncing with iTunes using USB, you can set up iTunes to sync to your device with Wi-Fi instead of USB.
- Connect your device to your computer with a USB cable, then open iTunes and select your device. Learn what to do if your device doesn’t appear on your computer.
- Click Summary on the left side of the iTunes window.
- Select «Sync with this [device] over Wi-Fi.»
- Click Apply.
When the computer and the device are on the same Wi-Fi network, the device appears in iTunes. The device syncs automatically whenever it’s plugged in to power and iTunes is open on the computer.
iPod Access for Windows
Softonic review
Copy MP3 files from your iPod to hard drive
Have you ever needed to retrieve a song on your computer that is stored on your iPod or iPhone?
If so, then you’ll know that iTunes won’t do it. iPod Access solves this problem by allowing you to select individual songs, movies, podcasts and playlists to be moved back into iTunes or an external hard drive. There are several features and modes which allow you to do this namely Force Manual Mode, iTunes Integration, Duplicate Song Checking, Preserve MetaData, Track Organization and integration with the iTunes Music Store.
Force Manual Mode prevents that problem that all iPod owners dread — the moment when iTunes erases all of your data on your iPod. iPod Access detects iPods in Auto-Update mode and instantly gives you the option to switch to Manual Mode. However, note that this option does not work for iPod Shuffles or iPhones.
iTunes Integration means that iPod Access transfers your songs, movies, podcasts and playlists directly into iTunes on your computer. Duplicate Song Checking is self explanatory and Preserve MetaData means that added extras, along with track name, artist and album are embedded in the song file on your iPod.
Note that as the name suggests, iPod Access is only really suitable for iPods and not iPod Shuffles or iPhones although it does work to a limited extent with both. You’ll also need to make sure you have the latest iPod firmware 1.2 installed plus QuickTime 7.2 or higher.
iPod Access adds a ton of new functionality to the way you manage and access your iPod and should make the life easier for any iPod owner.
Fixed crash in registration on 10.3.9 PantherImproved error handling
Changes
Fixed crash in registration on 10.3.9 PantherImproved error handling
Use the Finder to sync your iPhone, iPad, or iPod with your computer
Starting with macOS Catalina, syncing with the Finder is similar to syncing with iTunes. Learn how to sync your content to your device.
Before you use the Finder to sync content to your iOS or iPadOS device, consider using iCloud, Apple Music, or similar services to keep content from your Mac or PC in the cloud. This way, you can access your music, photos, and more on your devices when you aren’t near your computer. Learn more about using Apple Music or iCloud Photos instead of the Finder.
If you use iCloud or other services like Apple Music to keep your content up to date across all of your devices, some syncing features through the Finder might be turned off.
What can you sync with the Finder
- Albums, songs, playlists, movies, TV shows, podcasts, books, and audiobooks.
- Photos and videos.
- Contacts and calendars.
Sync or remove content using the Finder
- Open a Finder window and connect your device to your computer using a USB cable. If you connect your device to your computer with a USB cable and your computer doesn’t recognize your iPhone, iPad, or iPod, learn what to do.
- Your device appears in the sidebar of the Finder window. Click the device to select it.
- If prompted, trust your device.
- Select the type of content that you want to sync or remove. To turn syncing on for a content type, select the checkbox next to Sync.
- Select the checkbox next to each item that you want to sync.
- Click the Apply button in the lower-right corner of the window. If syncing doesn’t start automatically, click the Sync button.
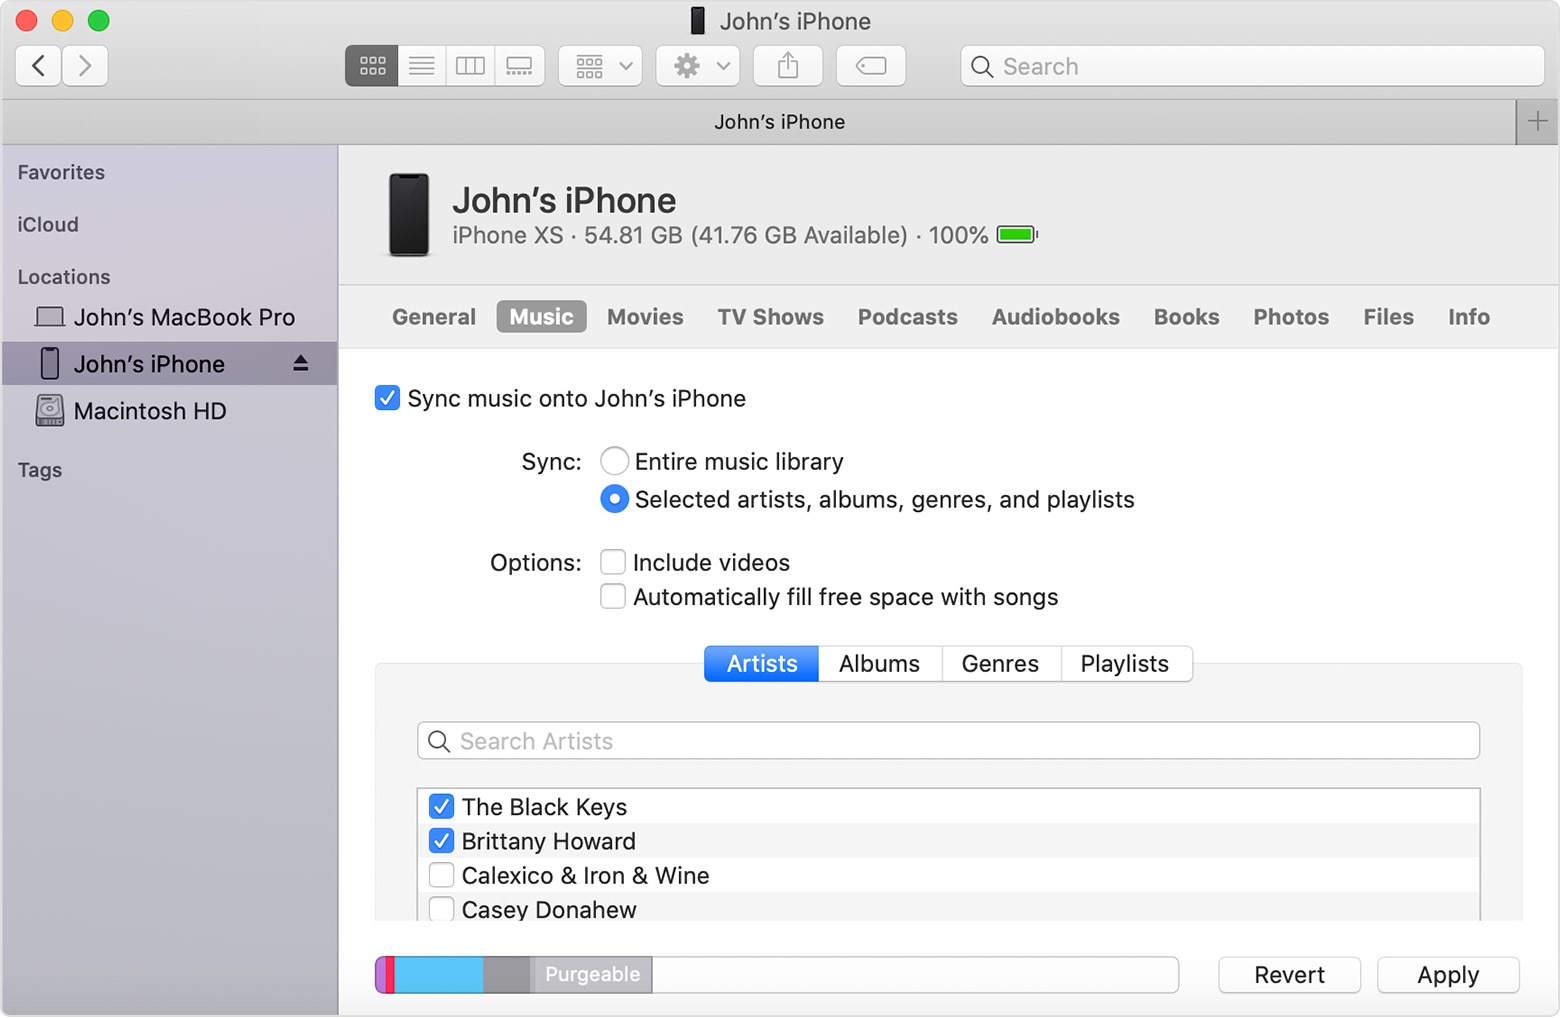
* You can only sync your device with one Apple Music or Apple TV library at a time. If you see a message that your device is synced with another Apple Music or Apple TV library, your device was previously connected to another computer. If you click «Erase and Sync» in that message, all content of the selected type on your device will be erased and replaced with content from this computer.
Sync your content using Wi-Fi
After you set up syncing with the Finder using USB, you can set up the Finder to sync to your device with Wi-Fi instead of USB.
- Connect your device to your computer with a USB cable, then open a Finder window and select your device.
- Select “Show this [device] when on Wi-Fi.»
- Click Apply.
When the computer and the device are on the same Wi-Fi network, the device appears in the Finder. The device syncs automatically whenever it’s plugged in to power.


