- Access Linux filesystems in Windows and WSL 2
- Getting started
- Accessing these files with File Explorer
- Limitations
- Give us your feedback!
- Как использовать файловые системы Linux внутри Windows 10 с помощью WSL 2
- Подготовка
- Доступ к файлам через «Проводник»
- Ограничения
- How to access Windows Subsystem for Linux files on Windows 10
- Access Windows Subsystem for Linux files on Windows
- 1] Using File Explorer inside WSL Terminal
- 2] Launching the root from File Explorer
- Related Posts
- Windows Subsystem for Linux has no installed distributions
- Failed to Fork error with Ubuntu on Windows 10
- How to run .sh or Shell Script file in Windows 10
- [email protected]
- How to Access Linux Partitions in Windows
- Choosing The Right Software for Linux Partitions
- Using DiskInternals Linux Reader
- Read & Write Access With Ext2Fsd
- Safely Accessing Your Linux Files On Windows
- Access Linux Files from Windows using Ext2Fsd
- How to Access and Read Linux Files from Windows
Access Linux filesystems in Windows and WSL 2
September 10th, 2020
Starting with Windows Insiders preview build 20211, WSL 2 will be offering a new feature: wsl —mount . This new parameter allows a physical disk to be attached and mounted inside WSL 2, which enables you to access filesystems that aren’t natively supported by Windows (such as ext4).
So, if you’re dual booting with Windows & Linux using different disks, you can now access your Linux files from Windows!
Getting started
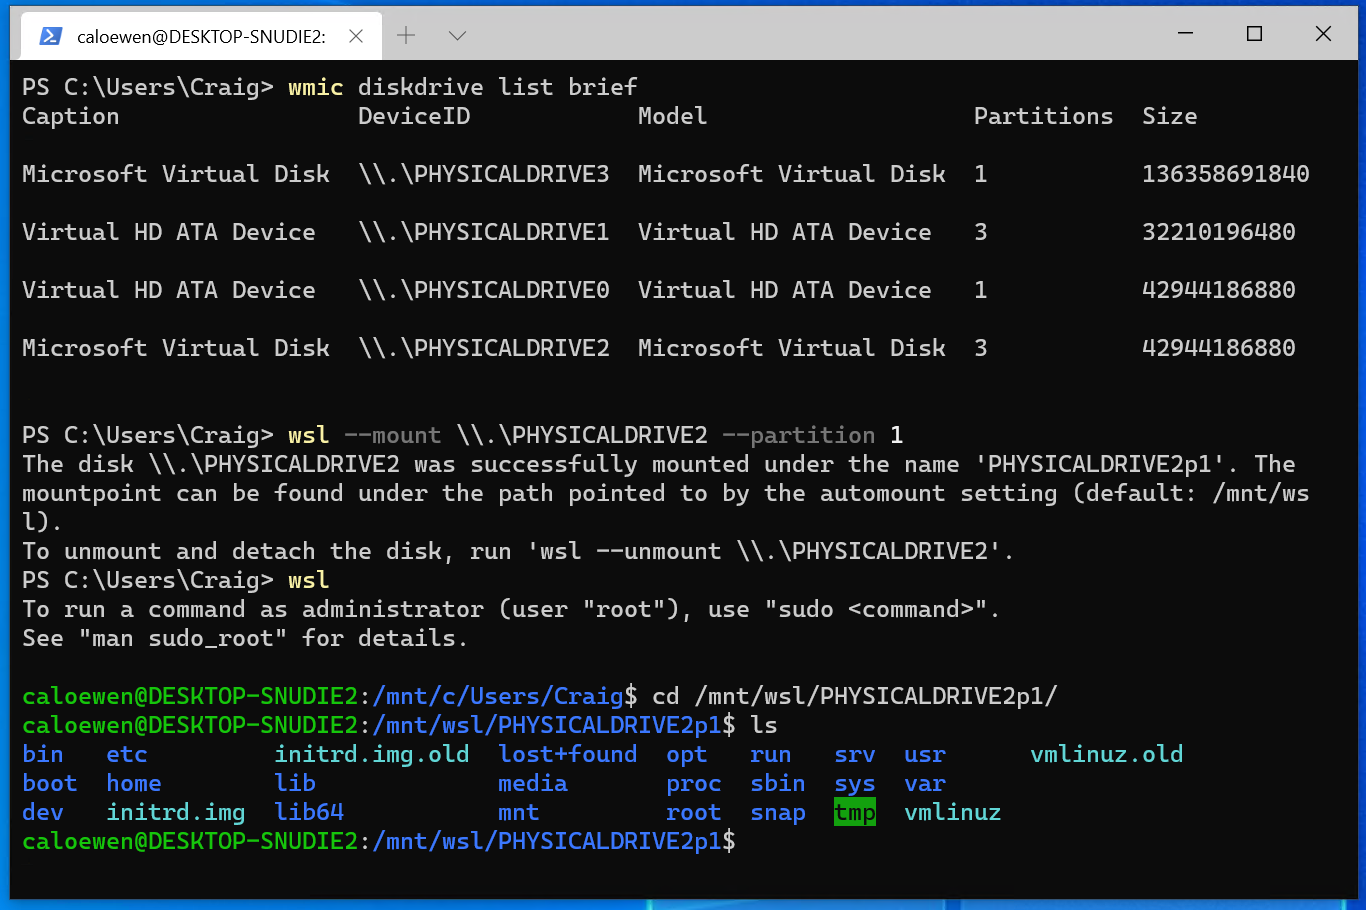
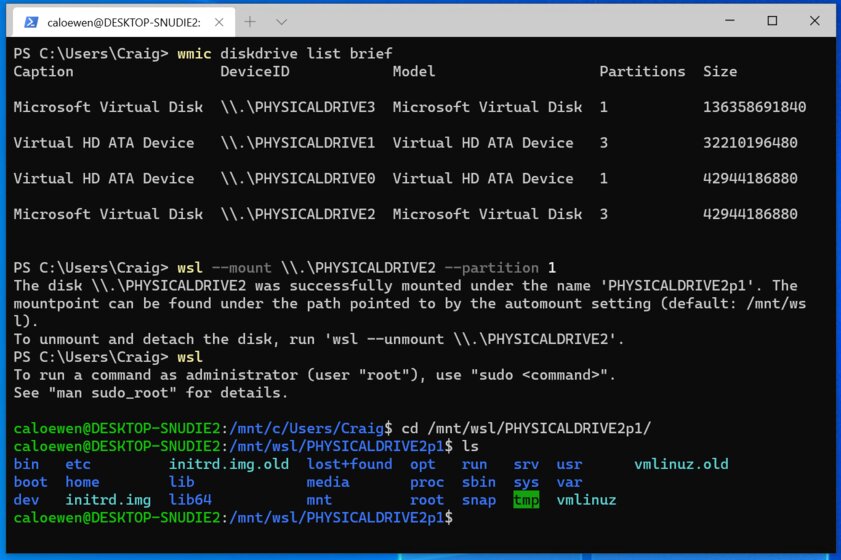
To mount a disk, open a PowerShell window with administrator privileges and run:
To list the available disks in Windows, run:
To unmount and detach the disk from WSL 2, run
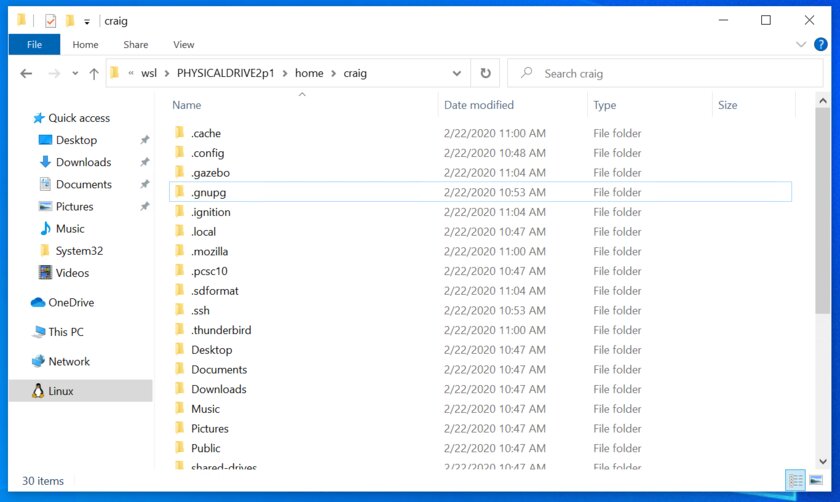
The disks paths are available under the ‘DeviceID’ columns. Usually under the \\.\\\.\PHYSICALDRIVE* format. Below is an example of mounting a specific partition of a given hard disk into WSL and browsing its files.
Accessing these files with File Explorer
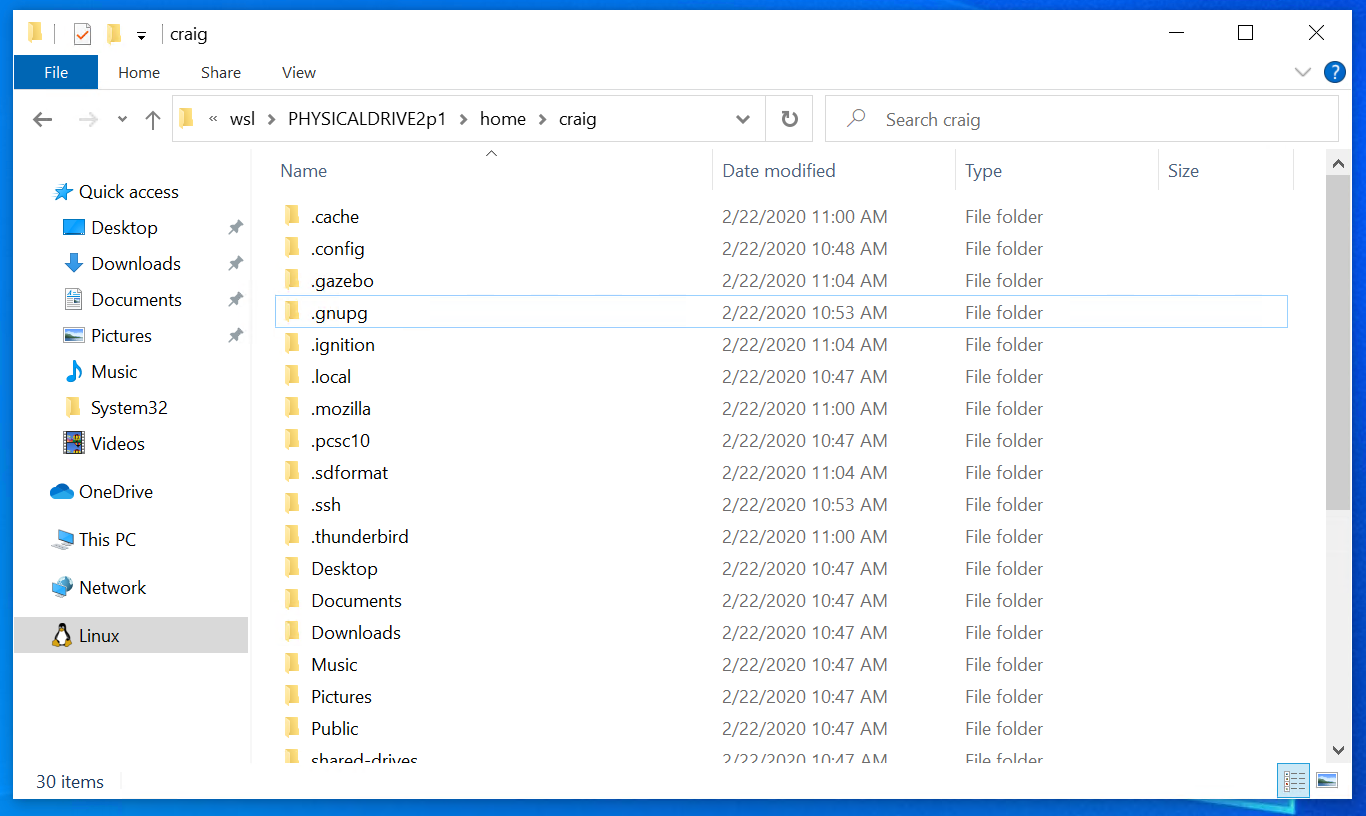
Once mounted, it’s also possible to access these disks through the Windows explorer by navigating to \wsl$ and then to the mount folder.
Limitations
By default, wsl —mount attempts to mount the disk as ext4. To specify a filesystem, or for more advanced scenarios, check out Mount a disk in WSL 2.
Also please note that this feature comes with the limitation that only physical disks can be attached to WSL 2. At this time, it’s not possible to attach a single partition. More details on the limitations here.
Give us your feedback!
If you run into any issues, or have feedback for our team please file an issue on our Github , and if you have general questions about WSL you can find all of our team members that are on Twitter on this twitter list.
Как использовать файловые системы Linux внутри Windows 10 с помощью WSL 2
Свежая инсайдерская сборка Windows 10 с индексом «20211» позволяет монтировать физические диски внутри WSL 2, тем самым открывая возможность получить доступ к файловым системам, не поддерживающимся Windows нативно (например, ext4). Если вы используете две системы параллельно на разных дисках, то теперь вы сможете получать доступ к файлам Linux из под Windows.
Подготовка
Для монтирования диска, необходимо открыть PowerShell с привилегиями администратора и выполнить следующую команду:
Для отображения всех доступных дисков надо выполнить:
wmic diskdrive list brief
Демонтировать диск из WSL 2 можно командой
Пути к дискам можно узнать в колонке DeviceID. Обычно он представлен в виде \\.\\\.\PHYSICALDRIVE*.
Доступ к файлам через «Проводник»
Как только диск смонтирован, к нему можно получить доступ через «Проводник», перейдя по пути \wsl$ и смонтировав папку.
Ограничения
По стандарту wsl —mount пытается смонтировать диск как ext4. Для того, чтобы указать другую файловую систему, необходимо использовать команду
Список всех доступных файловых систем можно узнать, введя
Также важно отметить, что только целые физические диски могут быть смонтированы в WSL 2. На текущий момент невозможно присоединить только один раздел. Кроме того, хотя и есть поддержка дисков USB, устройства USB Flash не могут подключаться к WSL 2.
Внимание: Это перевод статьи из блога Microsoft.
How to access Windows Subsystem for Linux files on Windows 10
Microsoft added the support for Windows Subsystem for Linux (WSL) on Windows 10 back with the Windows 10 v1607. It made it possible for users to install various Linux distros like Ubuntu, SUSE Linux, Kali Linux and more on Windows 10 devices. In the feature update, v1903, not only is WSL getting a real Kernel, but the ability to access Linux files on Windows 10 using File Explorer will also be present.

Access Windows Subsystem for Linux files on Windows
There are two methods to access Windows Subsystem for Linux files using File Explorer on Windows 10:
- Opening File Explorer from the WSL Terminal.
- Launching the root from File Explorer.
1] Using File Explorer inside WSL Terminal
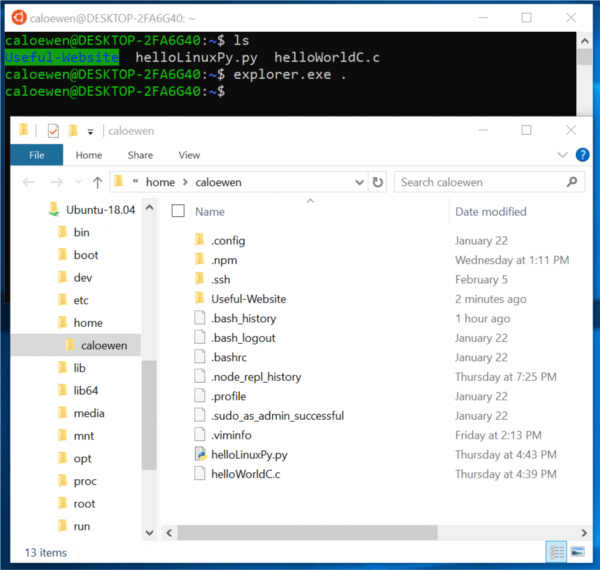
- Open WSL terminal.
- Navigate the root directory or top folder inside of the Terminal.
- Type in explorer.exe and hit Enter to open that location inside of the File Explorer.
2] Launching the root from File Explorer
This is a relatively straight forward method.
- Launch the File Explorer.
- Type in Linux and hit Enter in the address bar of the File Explorer.
- It will mount the storage for the Linux distros installed on your computer.
- The files are visible in the File Explorer.
After you access these files within the File Explorer, you can use programs installed on your computer to execute them normally. And any modification that you make will be visible inside the Terminal window.
WSL has proven to be a boon for all the developers who had to dual boot a Linux flavor to get them needs with the Terminal done.
Date: May 23, 2019 Tags: WSL
Related Posts
Windows Subsystem for Linux has no installed distributions
Failed to Fork error with Ubuntu on Windows 10
How to run .sh or Shell Script file in Windows 10
[email protected]
Ayush has been a Windows enthusiast since the day he got his first PC with Windows 98SE. He is an active Windows Insider since Day 1 and is now a Windows Insider MVP. He has been testing pre-release services on his Windows 10 PC, Lumia, and Android devices.
How to Access Linux Partitions in Windows
For those who need access to both operating systems
If you have a Linux distribution sitting alongside Windows on your PC, you’ll have no problem accessing your Windows drive. NTFS, the default Windows file system, is well supported, and most Linux distros will be able to mount NTFS drives with ease.
The same can’t be said for Windows users, however. Common Linux file systems like Ext4 aren’t supported. If you want to access Linux partitions in Windows, you’ll need to install some additional software to do the job.
Choosing The Right Software for Linux Partitions
There are several software options for Windows users looking to access their files on Linux. For many years, Ext2Fsd has been the go-to option, allowing you to read and write to your Linux file systems within Windows itself.
Unfortunately, Ext2Fsd hasn’t been updated since 2017, and the penultimate release, 0.68, had a “critical bug” that could corrupt your data on Ext4 drives with 64-bit mode enabled. The site for Ext2Fsd has gone down, and it’s unclear whether Ext2Fsd 0.69 fixed this bug.
It’s still an option if you need write access to your Linux drive, but given the risks, it isn’t our main recommendation if you have a 64-bit Ext4 Linux partition. Make sure you back up any critical data first and use only the most recent, 0.69 release of Ext2Fsd.
As an alternative, we recommend DiskInternals Linux Reader. It lets you access files from the most common Linux file systems. Unlike Ext2fs, it doesn’t do this through Windows Explorer, but through its own file manager. It’s also free for you to use.
It won’t let you write files to your Linux drive directly, but you can save any files you need to edit to your Windows drive. A similar, open-source alternative, Ext2read, is also available for you to use, with many of the same features. You don’t need to install Ext2read, as it comes as a portable .exe file.
Using DiskInternals Linux Reader
DiskInternals Linux Reader is freeware, so you don’t have to pay to download and use it.
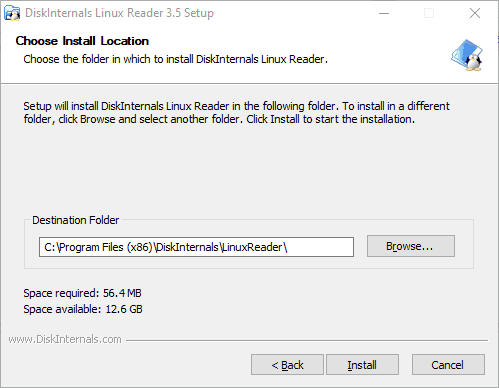
To begin, you’ll need to download the Linux Reader installer. Open the installer, accept the terms, confirm your installation location and click Install.
Once the installation is complete, make sure the Run DiskInternals Linux Reader checkbox is checked, and then click Finish.
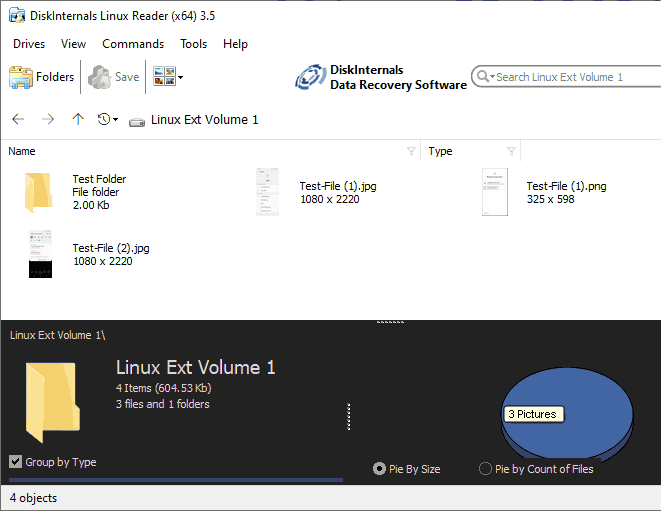
The Linux Reader client is well designed and has some similarities in design to the Windows File Explorer. You’ll see a list of your drives, including any removable storage like USB flash drives or SD cards.

Find your Linux partition, under either Hard Disk Drives or Drives with Removable Storage.
You can either double-click to view your files, or right-click and select Open Partition from the drop-down menu instead.
You’ll see a split-screen, with the top half showing files and folders on your Linux drive. As we’ve mentioned already, you can’t make any changes to the drive directly. You’ll need to copy the files to your Windows drive, or to another Windows-suitable partition.
To do this, select the files and folders you want to copy. Right-click the selected files and click Save.
In the Export Wizard, you’ll see the option to save files is already selected.
Click Next.
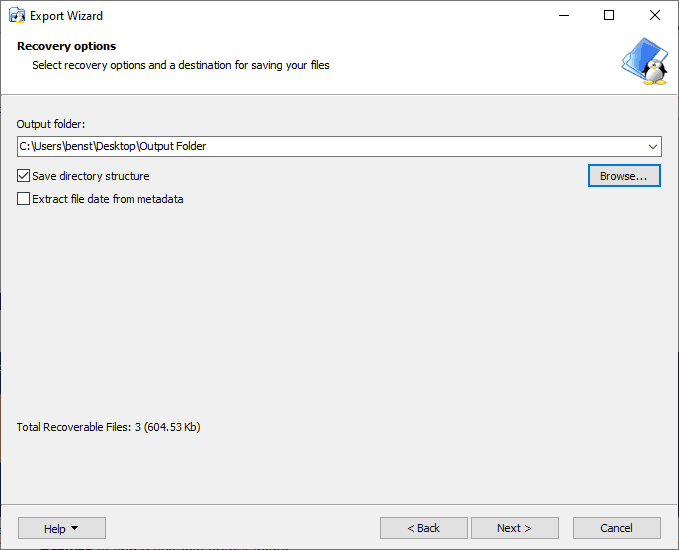
Choose the location to save your files and folders. You can type the location yourself, or click Browse to find a suitable output folder before clicking Next.
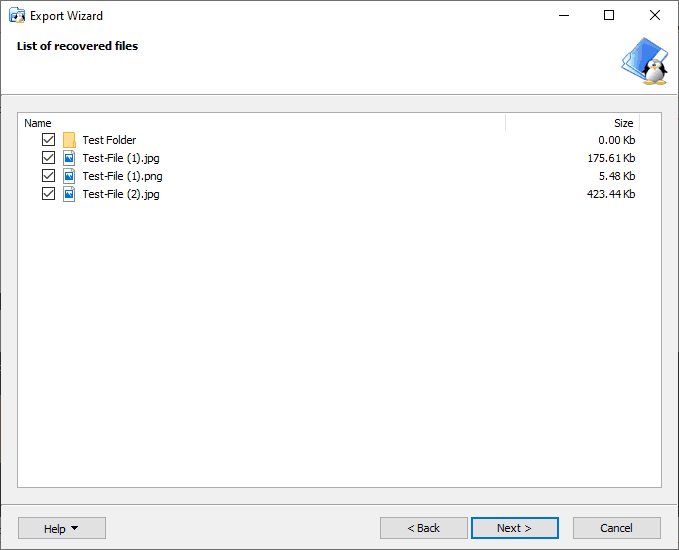
You’ll see a final list of your chosen files and folders. If you want to remove any files or folders before the copying process begins, uncheck the checkbox next to any items.
Click Next to proceed.
Once completed, you’ll see a final confirmation, confirming the number of files and folders copied, as well as the save location. Click Finish to close the Export Wizard.

While DiskInternals Linux Reader doesn’t allow you to modify files or folders directly, you can use it to quickly access any essential Linux files. You can then transfer these back to your Linux drive when you’re running Linux or, if you’re willing to take the risk, you can use Ext2Fsd instead.
Read & Write Access With Ext2Fsd
Ext2Fsd, as we mentioned previously, is the only option for users who need to make changes to files or folders on their Linux drive directly from within Windows. Once it’s installed, you can access your drive from within Windows File Explorer as normal. Ext2Fsd 0.69 is recommended, especially for users with Ext4 64-bit Linux partitions.
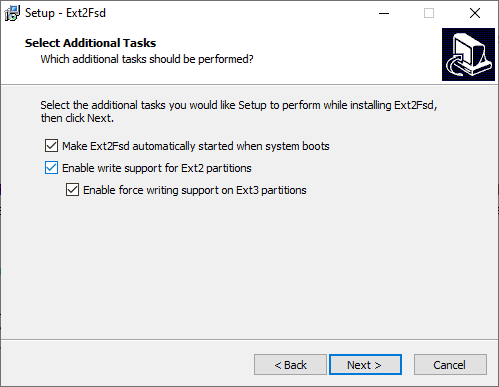
To start, download the Ext2Fsd installer file and begin the installation. Accept the terms and installation location, and make sure that under Select Additional Tasks, all the checkboxes are checked.
Once the installer is completed, you’ll be asked to restart your PC. Safely close any essential programs and click Finish to reboot.
Once you’ve rebooted, see if you spot your drive in File Explorer and double-click to open it. If you don’t see it, open the Ext2 Volume Manager, right-click your drive, and click Assign Drive Letter.
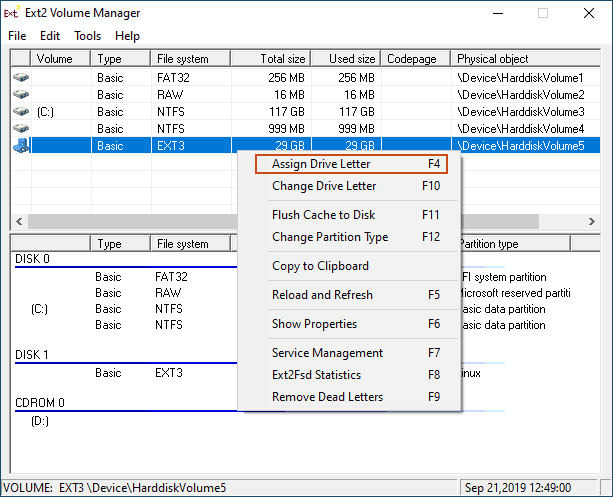
As soon as a drive letter is assigned to your drive, you should be able to see it in File Explorer. You’ll be able to create, copy, move, or delete files as you would any other drive, but given the risks, don’t use this for critical data unless you’re certain you have a backup available.
Safely Accessing Your Linux Files On Windows
The safest method for accessing Linux files or folders is to use a read-only option like DiskInternals Linux Reader. With software like this, the chances of corrupting your files are zero.
If you absolutely need to edit files or folders on your Linux drive, Ext2Fsd will allow you to do it, but take care to avoid risks by using the most recent version, and only on a drive with non-critical files.
If you want to avoid this problem in the future, consider having a “pooled” Linux partition drive (formatted as NTFS) to share your files across both systems, or sync your files to Google Drive instead.
Ben Stockton is a freelance technology writer based in the United Kingdom. In a past life, Ben was a college lecturer in the UK, training teens and adults. Since leaving the classroom, Ben has taken his teaching experience and applied it to writing tech how-to guides and tutorials, specialising in Linux, Windows, and Android. He has a degree in History and a postgraduate qualification in Computing. Read Ben’s Full Bio
Access Linux Files from Windows using Ext2Fsd
Accessing your Linux Files from Windows. Reading Ext3 and Ext2 partitions from Windows can be accomplished using a few different methods, as previously outlined in (How to access Linux files from Windows). However, one of the easiest methods to read and use Linux files from Windows is by using a tool called Ext2Fsd.
This tool ships with the drivers necessary for Windows to detect and mount an Ext2 or Ext3 File System as read only or read/write. Additionally, Ext2Fsd comes with a Volume Manager and many other useful tools like mke2fs.exe (allowing you to actually create an ext2 formatted partition from windows). Installation is simple and straight forward.
Ext2Fsd – Ext2 Ex3 Volume Manager

Here we are shown accessing Linux files on USB from Windows. Notice how Windows Explorer is displaying the contents of a freshly formatted USB Flash Drive. This device uses an Ext2 filesystem. The entire Linux File System is now readable from Windows. Though nothing has been stored there yet.

How to Access and Read Linux Files from Windows
- Download and install Ext2Fsd.
- Ensure you enable Read and Write Support for Ext2 and Ext3.

- Then reboot your computer to allow the changes to take effect.

If all went smoothly, you should now have full read and write access to your Ext2 or ext3 filesystems. Finally, being able to read or use Linux files from Windows.
Access Linux Files from Windows using Ext2Fsd published under Using and Configuring Linux


