- Как связать Access с MySQL
- Доступ к БД mySQL из Microsoft Access
- Материал из 1GbWiki.
- [править] Общий вид
- [править] Инструкция
- Accessing MySQL Databases from Windows
- Windows Applications for accessing MySQL
- The mysql program
- MySQL Workbench
- Using MySQL Workbench
- How to Connect to MySQL from Windows Command Line
- PHP Code
- Starting MySQL from the Windows Command Line
- Step 1: How to Open a Windows Command Prompt
- Step 2: Verify MySQL is Running on Windows
- Step 3: Connect to a Local MySQL Server
- Step: 4 Create Windows Shortcut to Login to MySQL
Как связать Access с MySQL
В статье рассказывается как связать MS Access с базой данных MySQL, чтобы данные хранились не в файле mdb, а в таблицах MySQL.
1) Нужно поставить MySQL сервер, скачав по адресу mysql.com. Ставится легко, главное указать пароль к серверу и не забыть его.
2) Нужно установить ODBC driver, скачав по адресу mysql.com. Без него Access не сможет подключаться к MySQL.
3) Access умеет работать со связанными (linked) таблица, но они уже должны быть уже созданы! На рисунке видно что создана база данных (database) my_access с таблицей mytable1. В mytable1 созданы 2 поля id и FIO для примера. Создавать базу данных и таблицы можно любым доступным способом, я использовал MySQL Query Browser из mysql-gui-tools-5.0-r17-win32.msi. Этот этап называется проектированием базы данных и тут подробно расписывать не буду, это отдельная история. Смысл один! Нужно создать базу данных и нужные таблицы с нужными полями. 
4) Создание связей. Запустите Access и в нем создайте базу данных и сохранитесь. Не создавайте таблиц и что либо. Откройте меню Файл — Внешние данные — Связь с таблицами. В окне связь укажите ODBC Databases () как на рисунке 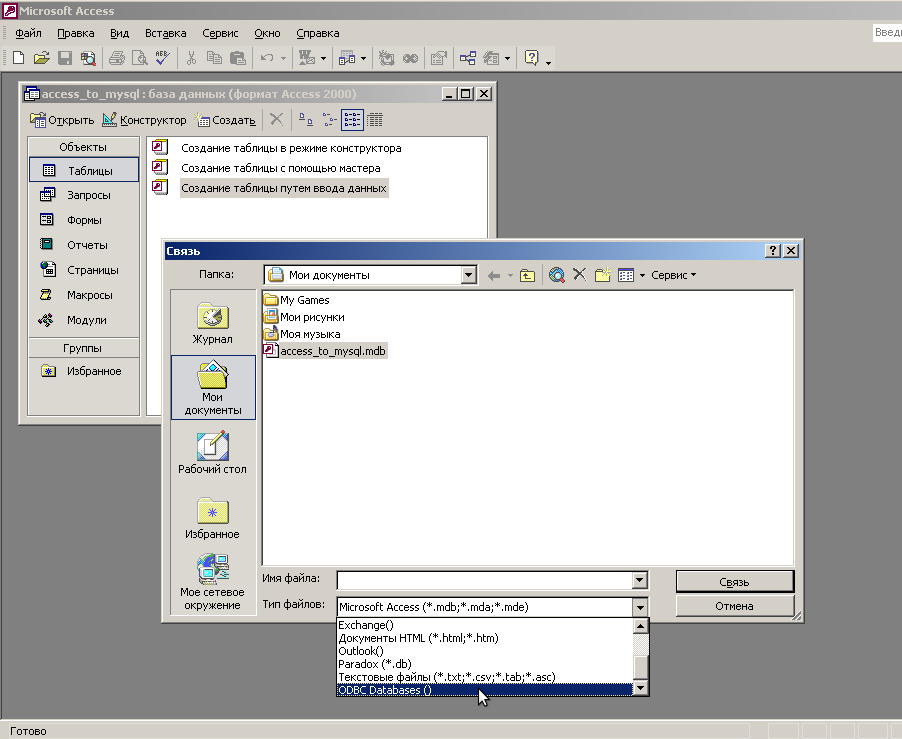
5) В появившемся окне Выбор источника данных переключитесь на закладку Источник данных компьютера и нажмите кнопку Создать. Выберите MySQL ODBC Driver как на рисунке. 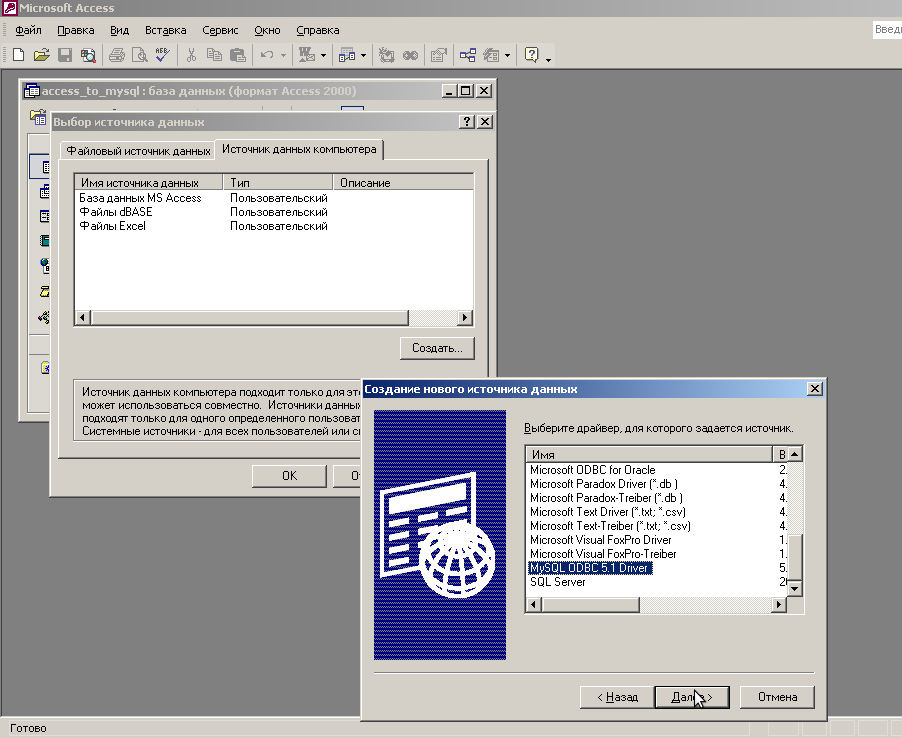
6) В окне от MySQL заполните поля Data Source Name, укажите Server — в это поле нужно вписать адрес сервера в сети, если Access и MySQL находятся на одном компьютере, то можно вписать localhost (это адрес 127.0.0.1). Если MySQL находится на другом компьютере, то нужно указать адрес того компьютера, для этого понадобится помощь администратора сети и/или баз данных. Укажите User и Password, Имя и Пароль для доступа к базам данных, эти данные должны быть запомнены при установке MySQL или выданы администратором. Обязательно укажите к какой базе данных подсоединятся (на примере my_access созданная на этапе 3. Нажмите кнопку Test для проверки правильности подключения, ответ должен быть успешным Connection successful. 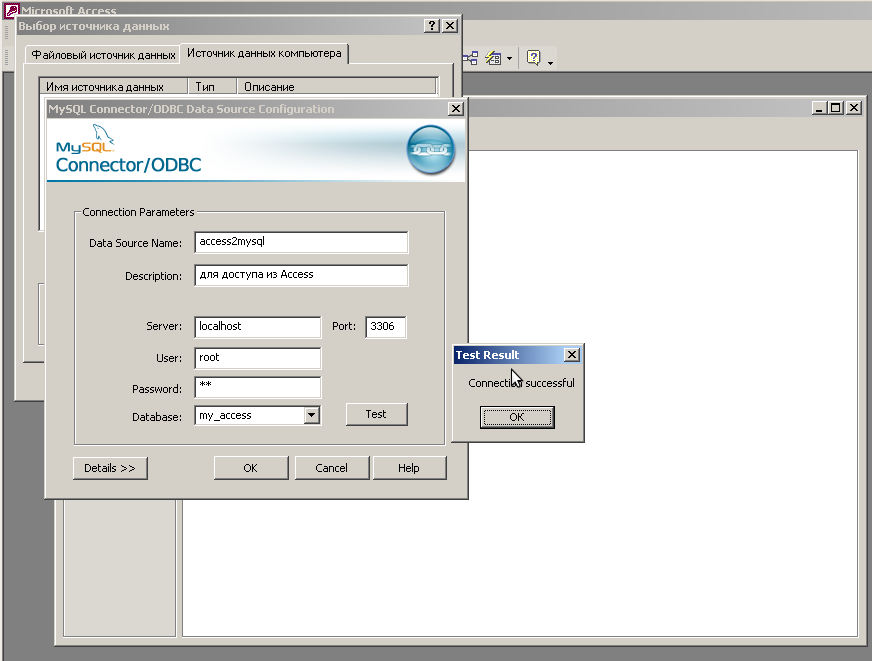
7) После указания параметров подключения вы вернетесь на этап Выбор источника данных. Выберите только что созданное соединение с MySQL (у меня это access2mysql), укажите таблицы для связи.
8) Можно работать со связанными таблицами как с обычными, только данные будут хранится не в файле mdb, а в базе данных MySQL. На рисунке показано, что введённые в таблицу mytable1 в Access, хранятся в MySQL и это показывает MySQL Query Browser 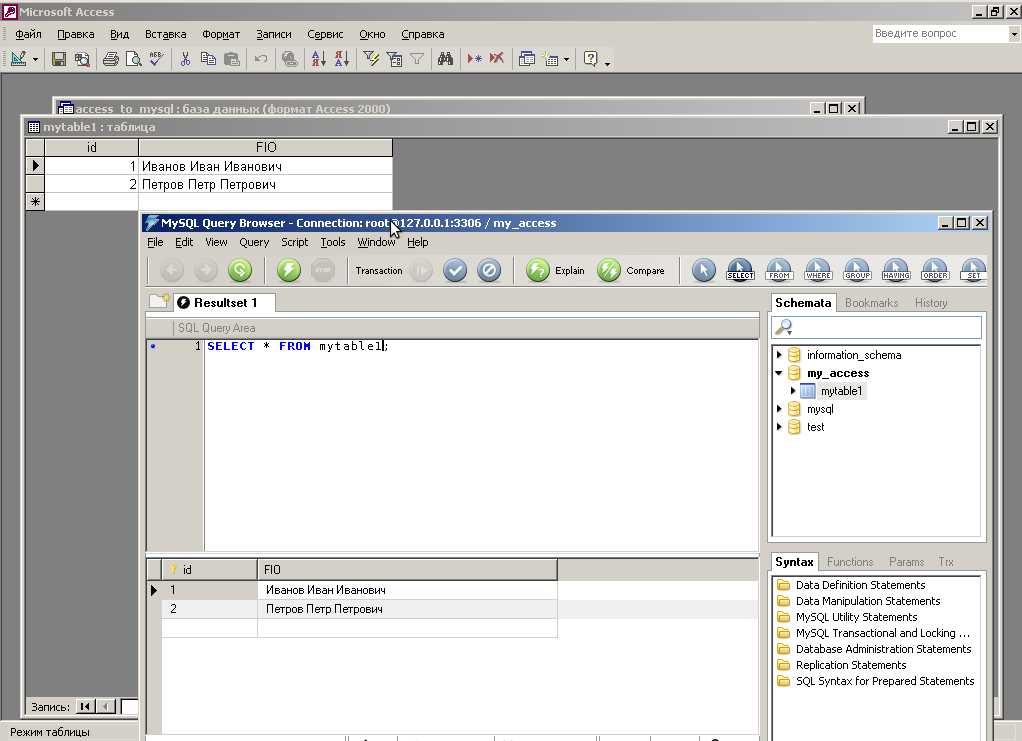
Доступ к БД mySQL из Microsoft Access
Материал из 1GbWiki.
Пошаговая иллюстрация процесса представлена для русской версии Microsoft Access 2007. Пробная 60-дневная версия продукта доступна на сайте производителя trymicrosoftoffice.com
Обращаем внимание, на необходимость воздержаться от работы описанным ниже способом с таблицами большого объёма — это может привести к неоправданной нагрузке на сервер хостинга и отключению БД службой поддержки.
[править] Общий вид
Microsoft Access умеет подключаться к внешним источникам данных через ODBC, что бы соедениться с mySQL необходимо установить ODBC-коннектор (драйвер) mySQL и указать его в параметрах соедининя для нового источника данных.
[править] Инструкция
1. Вам потребуется установить mySQL ODBC-коннектор, взять его можно с сайта производителя mySQL тут — http://dev.mysql.com/downloads/connector/odbc/3.51.html. Устанавливать какие-нибудь специфические параметры при установке не требуется, можно установить с параметрами по умолчанию.

2. В группе «Импорт» раздела ленты «Внешние данные» программы Access 2007 выберите пункт «Дополнительно» и «База данных ODBC».

3. Выберите вариант, в котором вы будете работать. Первый пункт позволит сделать копию баз данных mySQL в проекте Access, второй пункт (выбран на картинке) позволит вам вносить изменения в БД mySQL из Access.

4. Далее вам будет показан диалог выбора источника данных. Этот диалог не является частью программ Microsoft Office, но частью Windows. Нажмите кнопку «New» — создать новый источник данных ODBC.

5. Выберите в списке ODBC-драйвер mySQL и нажмите кнопку «Advanced» («Дополнительно»).

6. Вам нужно вставить строку соединения с дополнительными параметрами. Параметры базы данных (логин, пароль и т.п.) возьмите со страницы «пароли на ресурсы» личного кабинета, пример строки соединения возьмите из базы знаний хостинга — mySQL из .NET/ASP (ODBC клиент). Для корректной работы с русским языком бязательно добавьте параметр определяющий язык строковых переменных, например stmt=SET NAMES ‘cp1251’. Получившееся сочитание данных может представлять собой как одну строку (длинную) так и несколько строк разделённых символом ; (как на картинке). После формирования строки соединения нажмите Ok и Next («Дальше»). В ходе работы мастера вас могут несколько раз спрашивать пароль к БД в диалоге драйвера mySQL — вводите пароль и нажимайте «Ok», дополнительные параметры не указывайте.

7. Введите имя создаваемого вами соединения. Вы можете использовать любое произвольное имя.

8. Выберите созданное вами соединение и нажмите кнопку «Ok»

9. Вам будет предложено ввести пароль к БД. Введите пароль и нажмите «Ok». Не смущайтесь, что вас спрашивают пароль несмотря на то, что вы его уже, может быть, вводили — это нормально. Дополнительные параметры в этом окне лучше не изменять.

10. Выберите таблицы, с которыми вы хотите работать.

11. Всё, работа по соединению Access и mySQL завершена. Вы можете открыть таблицы представленные в поле «Все таблицы» приложения и .

12. . начать работать непосредственно с данными.
Accessing MySQL Databases from Windows
This Note gives information about accessing MySQL on Windows with the mysql command interface and from the MySQL Workbench application.
For information about the School’s MySQL database server and to learn about your MySQL account and database schema, see
Windows Applications for accessing MySQL
MySQL can be accessed from applications and programs on Windows. This Note describes accessing MySQL on Windows with the mysql command interface and from the MySQL Workbench application.
The mysql program
The mysql program is a terminal-based SQL command interface to MySQL.
To start MySQL open a Command Prompt and use the command below to connect to the School’s MySQL server.
The arguments are
- -h followed by the server host name (csmysql.cs.cf.ac.uk)
- -u followed by the account user name (use your MySQL username)
- -p which tells mysql to prompt for a password
- database the name of the database (use your database name).
Once mysql is running, you can type SQL statements and see the output in the terminal window.
MySQL Workbench
MySQL Workbench is a modeling tool that lets you design and generate MySQL databases graphically. It can also be used as an interface to execute SQL queries.
MySQL Workbench is available on the School’s Windows Laboratory workstations.
Using MySQL Workbench
MySQL Workbench is available via the Start menu in the School’s Windows Teaching Laboratories.

When MySQL Workbench starts, the initial window is divided into three panes.
- The top left pane is for connections to databases,
- the lower left pane is for data models,
- the right side pane is a list of shortcuts to MySQL functions and information.
There is also a menu bar across the top.

To begin with, we need to configure a new connection to the database we want to use.
In the Connections pane click on the ⊕ after MySQL Connections .

In the setup window, type a name that you want to give to the connection, for example, use your username and the server name, or a description like My Database .
In the Hostname field, enter the server name csmysql.cs.cf.ac.uk .
Select Standard TCP/IP as the Connection Method .
Enter your MySQL username in the Username field and the name of your database in the Schema field.
If you click on Store in Keychain , you will be prompted for your password. Otheriwse MySQL Workbench will prompt for it when you make the connection.

Click on OK , and the an icon for the new connection appears in the workspace.

To open the connection, double-click on the icon.
After obtaining your password, an SQL editor opens in a new tab and connects to the server.
The example here shows a connection to the sample MySQL database.
The left hand pane shows the database schema , including the tables that had been previously created.
To the right is an SQL query pane where you can type SQL commands. The results of executing the commands appear below in the result pane.

To run commands in the SQL query pane, click the execute icon  .
.
How to Connect to MySQL from Windows Command Line
PHP Code
- Home
- SysAdmin
- How to Connect to MySQL from Windows Command Line
MySQL is a popular and open-source relational database application. Therefore, many servers make use of MySQL. The way you access the database depends on the operating system from which you are working.
This guide walks you through using the Windows Command line to connect to a MySQL database.

Outlet Servers Starting at Only $30.00/mo
- A Windows-based system with an administrator account
- A local installation of MySQL
- Notepad text editor (optional)
Starting MySQL from the Windows Command Line
Step 1: How to Open a Windows Command Prompt
Start by opening the Run command box in Windows. Use the keyboard shortcut – hold the Windows (super) key and press the letter R (Win+R).
Then, type in cmd and press Enter. This command opens the Windows command line.

A black command line interface should launch, with white text and a cursor for you to type.

Step 2: Verify MySQL is Running on Windows
Next, run the command to display a list of all the services that are currently running. Enter the following in the command prompt:

If MySQL is not on the list, you can start it using the Services panel. Enter the following command:
A new window will launch and display the list of services available on your system. Scroll down to find MySQL, and check the status column. Left-click the MySQL service to highlight it, then right-click to open a context menu. Finally, left-click on start.
Step 3: Connect to a Local MySQL Server
First, start MySQL in Windows using the following command:
Replace with the username for your MySQL installation.
Enter mysql.exe –uroot –p , and MySQL will launch using the root user.
MySQL will prompt you for your password. Enter the password from the user account you specified with the –u tag, and you’ll connect to the MySQL server.

The command prompt changes to look like this:
Change to the MySQL folder, use the cd command:
The command prompt should change to mysql> letting you know you’re currently in the MySQL folder.
To list the contents of this folder:
This lists the contents of the current folder. One of the folders will display the version number of your MySQL installation.
For example, if you’ve installed MySQL 5.5, you should see a folder named “MySQL Server 5.5”.
High-Performance Dedicated Servers Starting at Only $ 199 $90.00/mo
Step: 4 Create Windows Shortcut to Login to MySQL
1. To create a shortcut in Windows, enter the following in the command line:
2. Open the Windows Notepad text editor with the command:
Replace –uroot with –u if you have a different username, and –ppasswor d with –p .
Also, make sure you change the path from MySQL Server X.X to the actual folder location.
3. Now, press Ctrl-S to launch a Save dialog.
4. Then, type “mysql.bat” in the name field, and change the location to your desktop (or another place that’s easy to find).
This creates a small Windows executable file that you can double-click to log into MySQL using the specified username and password.
With the help of this simple guide, you should be able to connect to a MySQL database using the Windows command prompt. Once you’ve logged into the MySQL server, the commands will be the same regardless of what kind of system you’re running on.
If you are searching for an alternative, terminal-based solution, try out using PostgreSQL from command line.


