- Permissions
- File Permissions
- chmod
- Directory Permissions
- Becoming the Superuser for a Short While
- Changing File Ownership
- Changing Group Ownership
- Further Reading
- Linux access rights and attributes
- Files
- Folders
- User, Group, Others
- SUID, SGID, Sticky Bit
- Files
- Folders
- Attributes
- Version
- Append only
- Immutable
- Secure deletion and undeletable
- Synchronous update
- File permissions and attributes
- Contents
- Viewing permissions
- Examples
- Changing permissions
- Text method
- Text method shortcuts
- Copying permissions
- Numeric method
- Bulk chmod
- Changing ownership
- Access Control Lists
- Umask
- File attributes
- chattr and lsattr
- Extended attributes
- User extended attributes
- Preserving extended attributes
- Tips and tricks
- Preserve root
Permissions
The Unix-like operating systems, such as Linux differ from other computing systems in that they are not only multitasking but also multi-user.
What exactly does this mean? It means that more than one user can be operating the computer at the same time. While a desktop or laptop computer only has one keyboard and monitor, it can still be used by more than one user. For example, if the computer is attached to a network, or the Internet, remote users can log in via ssh (secure shell) and operate the computer. In fact, remote users can execute graphical applications and have the output displayed on a remote computer. The X Window system supports this.
The multi-user capability of Unix-like systems is a feature that is deeply ingrained into the design of the operating system. If we remember the environment in which Unix was created, this makes perfect sense. Years ago before computers were «personal,» they were large, expensive, and centralized. A typical university computer system consisted of a large mainframe computer located in some building on campus and terminals were located throughout the campus, each connected to the large central computer. The computer would support many users at the same time.
In order to make this practical, a method had to be devised to protect the users from each other. After all, we wouldn’t want the actions of one user to crash the computer, nor would we allow one user to interfere with the files belonging to another user.
This lesson will cover the following commands:
- chmod — modify file access rights
- su — temporarily become the superuser
- sudo — temporarily become the superuser
- chown — change file ownership
- chgrp — change a file’s group ownership
File Permissions
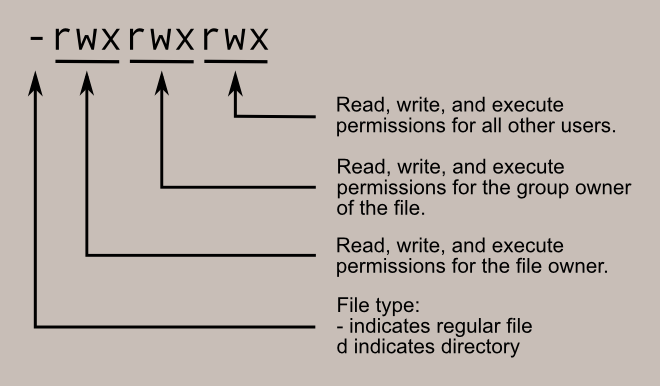
On a Linux system, each file and directory is assigned access rights for the owner of the file, the members of a group of related users, and everybody else. Rights can be assigned to read a file, to write a file, and to execute a file (i.e., run the file as a program).
To see the permission settings for a file, we can use the ls command. As an example, we will look at the bash program which is located in the /bin directory:
Here we can see:
- The file «/bin/bash» is owned by user «root»
- The superuser has the right to read, write, and execute this file
- The file is owned by the group «root»
- Members of the group «root» can also read and execute this file
- Everybody else can read and execute this file
In the diagram below, we see how the first portion of the listing is interpreted. It consists of a character indicating the file type, followed by three sets of three characters that convey the reading, writing and execution permission for the owner, group, and everybody else.
chmod
The chmod command is used to change the permissions of a file or directory. To use it, we specify the desired permission settings and the file or files that we wish to modify. There are two ways to specify the permissions. In this lesson we will focus on one of these, called the octal notation method.
It is easy to think of the permission settings as a series of bits (which is how the computer thinks about them). Here’s how it works:
Now, if we represent each of the three sets of permissions (owner, group, and other) as a single digit, we have a pretty convenient way of expressing the possible permissions settings. For example, if we wanted to set some_file to have read and write permission for the owner, but wanted to keep the file private from others, we would:
Here is a table of numbers that covers all the common settings. The ones beginning with «7» are used with programs (since they enable execution) and the rest are for other kinds of files.
| Value | Meaning |
| 777 | (rwxrwxrwx) No restrictions on permissions. Anybody may do anything. Generally not a desirable setting. |
| 755 | (rwxr-xr-x) The file’s owner may read, write, and execute the file. All others may read and execute the file. This setting is common for programs that are used by all users. |
| 700 | (rwx——) The file’s owner may read, write, and execute the file. Nobody else has any rights. This setting is useful for programs that only the owner may use and must be kept private from others. |
| 666 | (rw-rw-rw-) All users may read and write the file. |
| 644 | (rw-r—r—) The owner may read and write a file, while all others may only read the file. A common setting for data files that everybody may read, but only the owner may change. |
| 600 | (rw——-) The owner may read and write a file. All others have no rights. A common setting for data files that the owner wants to keep private. |
Directory Permissions
The chmod command can also be used to control the access permissions for directories. Again, we can use the octal notation to set permissions, but the meaning of the r, w, and x attributes is different:
- r — Allows the contents of the directory to be listed if the x attribute is also set.
- w — Allows files within the directory to be created, deleted, or renamed if the x attribute is also set.
- x — Allows a directory to be entered (i.e. cd dir ).
Here are some useful settings for directories:
| Value | Meaning |
|---|---|
| 777 | (rwxrwxrwx) No restrictions on permissions. Anybody may list files, create new files in the directory and delete files in the directory. Generally not a good setting. |
| 755 | (rwxr-xr-x) The directory owner has full access. All others may list the directory, but cannot create files nor delete them. This setting is common for directories that you wish to share with other users. |
| 700 | (rwx——) The directory owner has full access. Nobody else has any rights. This setting is useful for directories that only the owner may use and must be kept private from others. |
Becoming the Superuser for a Short While
It is often necessary to become the superuser to perform important system administration tasks, but as we know, we should not stay logged in as the superuser. In most distributions, there is a program that can give you temporary access to the superuser’s privileges. This program is called su (short for substitute user) and can be used in those cases when you need to be the superuser for a small number of tasks. To become the superuser, simply type the su command. You will be prompted for the superuser’s password:
After executing the su command, we have a new shell session as the superuser. To exit the superuser session, type exit and we will return to your previous session.
In most modern distributions, an alternate method is used. Rather than using su , these systems employ the sudo command instead. With sudo , one or more users are granted superuser privileges on an as needed basis. To execute a command as the superuser, the desired command is simply preceded with the sudo command. After the command is entered, the user is prompted for the their own password rather than the superuser’s:
In fact, modern distributions don’t even set the root account password thus making it impossible to log in as the root user. A root shell is still possible with sudo by using the «-i» option:
Changing File Ownership
We can change the owner of a file by using the chown command. Here’s an example: Suppose we wanted to change the owner of some_file from «me» to «you». We could:
Notice that in order to change the owner of a file, we must have superuser privileges. To do this, our example employed the sudo command to execute chown .
chown works the same way on directories as it does on files.
Changing Group Ownership
The group ownership of a file or directory may be changed with chgrp . This command is used like this:
In the example above, we changed the group ownership of some_file from its previous group to «new_group». We must be the owner of the file or directory to perform a chgrp .
Further Reading
- Chapter 9 of The Linux Command Line covers this topic in much more detail.
© 2000-2021, William E. Shotts, Jr. Verbatim copying and distribution of this entire article is permitted in any medium, provided this copyright notice is preserved.
Linux® is a registered trademark of Linus Torvalds.
Источник
Linux access rights and attributes
Files
Linux files have three important access rights for files:
- Read
- Write
- Execute
If you want to mark a file as executable, you can add the x-right:
When you want to mark a file as readable, you can dd the r-right:
You can remove rights in a similar way:
Now, often this is expressed numerically. Three bits determine if the file is readable (4), writable (2) or executable (1). Did you notice that all of them are powers of two?
Folders
rwx has a meaning for folders, too:
- Read: if that is missing, you can’t use ls in the directory.
- Write: you need this to create new files / folders in the direcotry
- x . like «enter»?: if that is missing, you can’t enter the directory.
User, Group, Others
The rights above can be set for the user who created the file (sometimes also called the owner). Then the group that owns the file and all others. This is the reason why you have three times the rights from above:
You might wonder what happens when you execute chmod +x filename . Does it set the execute-flag only for the user? Or for all three — user, group, others? Try and find out. You might want to remove all rights with chmod 000 filename before you start.
Did you know that you can search for file permissions with find /home/ -perm 777 ?
SUID, SGID, Sticky Bit
Files
Sometimes, you want to execute programs as root, although the user who started the execution isn’t root. Take passwd, the program that allows users to change passwords, for example:
Instead of «x» in the user-execution-row, it states «s». That means, you can execute it and it has the SUID-bit set. If «x» wasn’t set, the «S» would be in a capital letter. When you change your password, you need to edit /etc/shadow . This file has very limited access rights: -rw-r—— and is owned by «root» and group «shadow»:
The SGID (set group id) bit works similar to the SUID (set user id) bit. When you want to execute something with as the group of the file, you set the SGID bit.
The sticky bit seems to be used for programs to stick in memory after it was finished.
You can set the sticky bit like this:
Folders
- suid: is ignored on UNIX and Linux systems
- sgid: new files and subdirectories created within this folder inherit the folders group ID
- t: when the sticky bit is set, only owners may change the filename or delete files
The first column of ls -l tells you the type of the item:
- -: a file
- b: a block device
- c: a character device
- d: a directory
- l: a symbolic link
- p: pipe
- s: a socket
You can display quite a lot of information of a file with stat:
The content of the file is «Hello World.» (12 characters)
Attributes
According to the manpage of chattr:
The `c’, ‘s’, and `u’ attributes are not honored by the ext2 and ext3 filesystems as implemented in the current mainline Linux kernels. These attributes may be implemented in future versions of the ext2 and ext3 filesystems.
Version
I’ve just learned that you can give files version-attributes:
You can set the version like this:
Append only
This one is weird. Theoretically, it should allow me to append to a file, but not to change / delete anything in the file.
First of all, I had to use sudo to add this attribute:
Then, I had all permissions:
But I couldn’t append to the file with gedit. With bash, it worked fine:
So I guess I found another bug in gEdit.
Immutable
You can mark a file as immutable with sudo chattr +i testfile . It’s funny, you can’t see that with ls -l , you have to use lsattr . I guess if you manage to get root privileges and want to troll somebody, you could set this bit. I think this might take quite a while until you recognize it.
Secure deletion and undeletable
When secure deletion is set with chattr +s testfile the operating system overwrites the file with random data when it is deleted.
chattr +u testfile makes your file undeletable. This is strange. You can still delete the file with rm , but the system will not overwrite it. I’ve just asked a question on SE.
Synchronous update
when you set chattr +S testfile the file gets directly written to the HDD and not buffered by the kernel cache.
Источник
File permissions and attributes
File systems use permissions and attributes to regulate the level of interaction that system processes can have with files and directories.
Contents
Viewing permissions
Use the ls command’s -l option to view the permissions (or file mode) set for the contents of a directory, for example:
The first column is what we must focus on. Taking an example value of drwxrwxrwx+ , the meaning of each character is explained in the following tables:
| d | rwx | rwx | rwx | + |
| The file type, technically not part of its permissions. See info ls -n «What information is listed» for an explanation of the possible values. | The permissions that the owner has over the file, explained below. | The permissions that the group has over the file, explained below. | The permissions that all the other users have over the file, explained below. | A single character that specifies whether an alternate access method applies to the file. When this character is a space, there is no alternate access method. A . character indicates a file with a security context, but no other alternate access method. A file with any other combination of alternate access methods is marked with a + character, for example in the case of Access Control Lists. |
Each of the three permission triads ( rwx in the example above) can be made up of the following characters:
| Character | Effect on files | Effect on directories | |
|---|---|---|---|
| Read permission (first character) | — | The file cannot be read. | The directory’s contents cannot be shown. |
| r | The file can be read. | The directory’s contents can be shown. | |
| Write permission (second character) | — | The file cannot be modified. | The directory’s contents cannot be modified. |
| w | The file can be modified. | The directory’s contents can be modified (create new files or folders; rename or delete existing files or folders); requires the execute permission to be also set, otherwise this permission has no effect. | |
| Execute permission (third character) | — | The file cannot be executed. | The directory cannot be accessed with cd. |
| x | The file can be executed. | The directory can be accessed with cd; this is the only permission bit that in practice can be considered to be «inherited» from the ancestor directories, in fact if any folder in the path does not have the x bit set, the final file or folder cannot be accessed either, regardless of its permissions; see path_resolution(7) for more information. | |
| s | The setuid bit when found in the user triad; the setgid bit when found in the group triad; it is not found in the others triad; it also implies that x is set. | ||
| S | Same as s , but x is not set; rare on regular files, and useless on folders. | ||
| t | The sticky bit; it can only be found in the others triad; it also implies that x is set. | ||
| T | Same as t , but x is not set; rare on regular files, and useless on folders. | ||
See info Coreutils -n «Mode Structure» and chmod(1) for more details.
Examples
Let us see some examples to clarify:
Archie has full access to the Documents directory. He can list, create files and rename, delete any file in Documents, regardless of file permissions. His ability to access a file depends on the file’s permission.
Archie has full access except he can not create, rename, delete any file. He can list the files and (if file’s permission empowers) may access an existing file in Documents.
Archie can not do ‘ls’ in Documents but if he knows the name of an existing file then he may list, rename, delete or (if file’s permission empowers him) access it. Also, he is able to create new files.
Archie is only capable of (if file’s permission empowers him) access those files in Documents which he knows of. He can not list already existing files or create, rename, delete any of them.
You should keep in mind that we elaborate on directory permissions and it has nothing to do with the individual file permissions. When you create a new file it is the directory that changes. That is why you need write permission to the directory.
Let us look at another example, this time of a file, not a directory:
Here we can see the first letter is not d but — . So we know it is a file, not a directory. Next the owner’s permissions are rw- so the owner has the ability to read and write but not execute. This may seem odd that the owner does not have all three permissions, but the x permission is not needed as it is a text/data file, to be read by a text editor such as Gedit, EMACS, or software like R, and not an executable in its own right (if it contained something like python programming code then it very well could be). The group’s permissions are set to r— , so the group has the ability to read the file but not write/edit it in any way — it is essentially like setting something to read-only. We can see that the same permissions apply to everyone else as well.
Changing permissions
chmod is a command in Linux and other Unix-like operating systems that allows to change the permissions (or access mode) of a file or directory.
Text method
To change the permissions — or access mode — of a file, use the chmod command in a terminal. Below is the command’s general structure:
Where who is any from a range of letters, each signifying who is being given the permission. They are as follows:
- u : the user that owns the file.
- g : the user group that the file belongs to.
- o : the other users, i.e. everyone else.
- a : all of the above; use this instead of typing ugo .
The permissions are the same as discussed in #Viewing permissions ( r , w and x ).
Now have a look at some examples using this command. Suppose you became very protective of the Documents directory and wanted to deny everybody but yourself, permissions to read, write, and execute (or in this case search/look) in it:
Before: drwxr-xr-x 6 archie users 4096 Jul 5 17:37 Documents
After: drwx—— 6 archie users 4096 Jul 6 17:32 Documents
Here, because you want to deny permissions, you do not put any letters after the = where permissions would be entered. Now you can see that only the owner’s permissions are rwx and all other permissions are — .
This can be reverted with:
Before: drwx—— 6 archie users 4096 Jul 6 17:32 Documents
After: drwxr-xr-x 6 archie users 4096 Jul 6 17:32 Documents
In the next example, you want to grant read and execute permissions to the group, and other users, so you put the letters for the permissions ( r and x ) after the = , with no spaces.
You can simplify this to put more than one who letter in the same command, e.g:
Now let us consider a second example, suppose you want to change a foobar file so that you have read and write permissions, and fellow users in the group users who may be colleagues working on foobar , can also read and write to it, but other users can only read it:
Before: -rw-r—r— 1 archie users 5120 Jun 27 08:28 foobar
After: -rw-rw-r— 1 archie users 5120 Jun 27 08:28 foobar
This is exactly like the first example, but with a file, not a directory, and you grant write permission (just so as to give an example of granting every permission).
Text method shortcuts
The chmod command lets add and subtract permissions from an existing set using + or — instead of = . This is different from the above commands, which essentially re-write the permissions (e.g. to change a permission from r— to rw- , you still need to include r as well as w after the = in the chmod command invocation. If you missed out r , it would take away the r permission as they are being re-written with the = . Using + and — avoids this by adding or taking away from the current set of permissions).
Let us try this + and — method with the previous example of adding write permissions to the group:
Before: -rw-r—r— 1 archie users 5120 Jun 27 08:28 foobar
After: -rw-rw-r— 1 archie users 5120 Jun 27 08:28 foobar
Another example, denying write permissions to all (a):
Before: -rw-rw-r— 1 archie users 5120 Jun 27 08:28 foobar
After: -r—r—r— 1 archie users 5120 Jun 27 08:28 foobar
A different shortcut is the special X mode: this is not an actual file mode, but it is often used in conjunction with the -R option to set the executable bit only for directories, and leave it unchanged for regular files, for example:
Copying permissions
It is possible to tell chmod to copy the permissions from one class, say the owner, and give those same permissions to group or even all. To do this, instead of putting r , w , or x after the = , put another who letter. e.g:
Before: -rw-r—r— 1 archie users 5120 Jun 27 08:28 foobar
After: -rw-rw-r— 1 archie users 5120 Jun 27 08:28 foobar
This command essentially translates to «change the permissions of group ( g= ), to be the same as the owning user ( =u ). Note that you cannot copy a set of permissions as well as grant new ones e.g.:
In that case chmod throw an error.
Numeric method
chmod can also set permissions using numbers.
Using numbers is another method which allows you to edit the permissions for all three owner, group, and others at the same time, as well as the setuid, setgid, and sticky bits. This basic structure of the code is this:
Where xxx is a 3-digit number where each digit can be anything from 0 to 7. The first digit applies to permissions for owner, the second digit applies to permissions for group, and the third digit applies to permissions for all others.
In this number notation, the values r , w , and x have their own number value:
To come up with a 3-digit number you need to consider what permissions you want owner, group, and all others to have, and then total their values up. For example, if you want to grant the owner of a directory read write and execution permissions, and you want group and everyone else to have just read and execute permissions, you would come up with the numerical values like so:
This is the equivalent of using the following:
To view the existing permissions of a file or directory in numeric form, use the stat(1) command:
Where the %a option specifies output in numeric form.
Most folders and directories are set to 755 to allow reading, writing and execution to the owner, but deny writing to everyone else, and files are normally 644 to allow reading and writing for the owner but just reading for everyone else; refer to the last note on the lack of x permissions with non executable files: it is the same thing here.
To see this in action with examples consider the previous example that has been used but with this numerical method applied instead:
Before: -rw-r—r— 1 archie users 5120 Jun 27 08:28 foobar
After: -rw-rw-r— 1 archie users 5120 Jun 27 08:28 foobar
If this were an executable the number would be 774 if you wanted to grant executable permission to the owner and group. Alternatively if you wanted everyone to only have read permission the number would be 444 . Treating r as 4, w as 2, and x as 1 is probably the easiest way to work out the numerical values for using chmod xxx filename , but there is also a binary method, where each permission has a binary number, and then that is in turn converted to a number. It is a bit more convoluted, but here included for completeness.
Consider this permission set:
If you put a 1 under each permission granted, and a 0 for every one not granted, the result would be something like this:
You can then convert these binary numbers:
The value of the above would therefore be 775.
Consider we wanted to remove the writable permission from group:
The value would therefore be 755 and you would use chmod 755 filename to remove the writable permission. You will notice you get the same three digit number no matter which method you use. Whether you use text or numbers will depend on personal preference and typing speed. When you want to restore a directory or file to default permissions e.g. read and write (and execute) permission to the owner but deny write permission to everyone else, it may be faster to use chmod 755/644 filename . However if you are changing the permissions to something out of the norm, it may be simpler and quicker to use the text method as opposed to trying to convert it to numbers, which may lead to a mistake. It could be argued that there is not any real significant difference in the speed of either method for a user that only needs to use chmod on occasion.
You can also use the numeric method to set the setuid , setgid , and sticky bits by using four digits.
For example, chmod 2777 filename will set read/write/executable bits for everyone and also enable the setgid bit.
Bulk chmod
Generally directories and files should not have the same permissions. If it is necessary to bulk modify a directory tree, use find to selectively modify one or the other.
To chmod only directories to 755:
To chmod only files to 644:
Changing ownership
chown changes the owner of a file or directory, which is quicker and easier than altering the permissions in some cases.
Consider the following example, making a new partition with GParted for backup data. Gparted does this all as root so everything belongs to root by default. This is all well and good but when it comes to writing data to the mounted partition, permission is denied for regular users.
As you can see the device in /dev is owned by root, as is the mount location ( /media/Backup ). To change the owner of the mount location one can do the following:
Before: drwxr-xr-x 5 root root 4096 Jul 6 16:01 Backup
After: drwxr-xr-x 5 archie root 4096 Jul 6 16:01 Backup
Now the partition can have data written to it by the new owner, archie, without altering the permissions (as the owner triad already had rwx permissions).
Access Control Lists
Access Control Lists provides an additional, more flexible permission mechanism for file systems by allowing to set permissions for any user or group to any file.
Umask
The umask utility is used to control the file-creation mode mask, which determines the initial value of file permission bits for newly created files.
File attributes
Apart from the file mode bits that control user and group read, write and execute permissions, several file systems support file attributes that enable further customization of allowable file operations. This section describes some of these attributes and how to work with them.
chattr and lsattr
For ext2 and ext3 file systems, the e2fsprogs package contains the programs lsattr and chattr that list and change a file’s attributes, respectively. Though some are not honored by all file systems, the available attributes are:
- a : append only
- c : compressed
- d : no dump
- e : extent format
- i : immutable
- j : data journalling
- s : secure deletion
- t : no tail-merging
- u : undeletable
- A : no atime updates
- C : no copy on write
- D : synchronous directory updates
- S : synchronous updates
- T : top of directory hierarchy
For example, if you want to set the immutable bit on some file, use the following command:
To remove an attribute on a file just change + to — .
Extended attributes
From xattr(7) : «Extended attributes are name:value pairs associated permanently with files and directories». There are four extended attribute classes: security, system, trusted and user.
Extended attributes are also used to set Capabilities.
User extended attributes
User extended attributes can be used to store arbitrary information about a file. To create one:
Use getfattr to display extended attributes:
Finally, to remove an extended attribute:
Preserving extended attributes
| Command | Required flag |
|---|---|
| cp | —preserve=mode,ownership,timestamps,xattr |
| mv | preserves by default 1 |
| tar | —xattrs for creation and —xattrs-include=’*’ for extraction |
| bsdtar | -p for extraction |
| rsync | —xattrs |
- mv silently discards extended attributes when the target file system does not support them.
To preserve extended attributes with text editors you need to configure them to truncate files on saving instead of using rename(2) .[1]
Tips and tricks
Preserve root
Use the —preserve-root flag to prevent chmod from acting recursively on / . This can, for example, prevent one from removing the executable bit systemwide and thus breaking the system. To use this flag every time, set it within an alias. See also [2].
Источник


