- How to Enter the BIOS on a Windows 10 PC
- How to access BIOS on a Windows 7/Windows 10 PC
- How to get into BIOS in Windows 7 and Windows 10
- 1. Access BIOS on a HP device
- 2. Access BIOS on a Dell device
- Run a System Scan to discover potential errors
- 3. Access BIOS on an Asus device
- 4. Access BIOS on an Acer device
- 5. Access BIOS on Windows 10
- 6. Access BIOS on Windows 7
- How to Access Windows 10 BIOS in 6 Easy Steps
- How to enter Windows 10 BIOS
- Windows 10 BIOS
- How to access BIOS Windows 10
- 1. Open ‘Settings.’
- 2. Select ‘Update & security.’
- 3. Under the ‘Recovery’ tab, choose ‘Restart now.’
- 4. Select ‘Troubleshoot.’
- 5. Click on ‘Advanced options.’
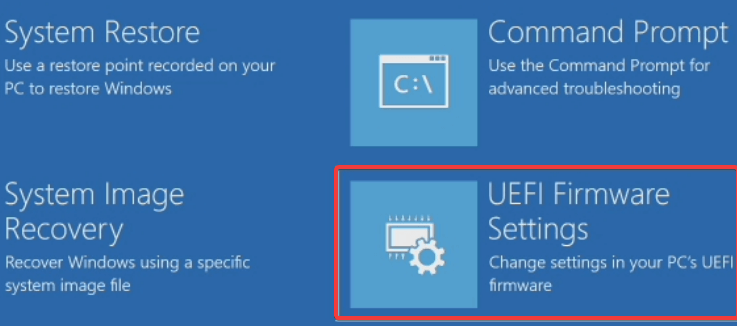
- 6. Select ‘UEFI Firmware Settings.’
- How do you rate Windows 10?
- How to Access UEFI BIOS Setup in Windows 8/10 New PCs
- Method 1: Access UEFI BIOS Setup with Hot Key
- Method 2: Access UEFI BIOS by PC Settings
- Method 3: Access UEFI BIOS by Command Prompt
- Method 4: Enter UEFI BIOS by Holding down Shift While Choosing Restart
How to Enter the BIOS on a Windows 10 PC
Windows 10 gives you a lot of options you can configure directly within the operating system, but on every laptop or desktop, there are some settings you can only change in the BIOS (basic input/output system). The BIOS is the software that is built into your computer’s motherboard and controls everything from the boot order of your drives to preboot security options to whether the Fn key on your keyboard activates a function key or a media control.
Unfortunately, because the BIOS is a pre-boot environment, you can’t access it directly from within Windows. On some older computers or those deliberately set to boot slowly, you can hit a function key such as F1 or F2 at power-on to enter the BIOS.

However, most computers made in the past four years boot Windows 10 too quickly to listen for a key press at startup. To access your BIOS on a Windows 10 PC, you must follow these steps.
How to Enter the BIOS on a Windows 10 PC
1. Navigate to settings. You can get there by clicking the gear icon on the Start menu.
2. Select Update & security.
3. Select Recovery from the left menu.
4. Click Restart Now under Advanced startup. The computer will reboot to a special menu.
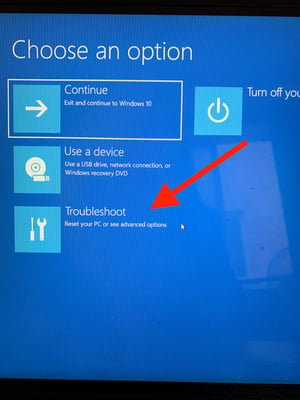
5. Click Troubleshoot.
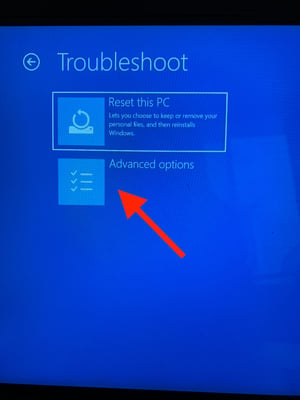
6. Click Advanced options.
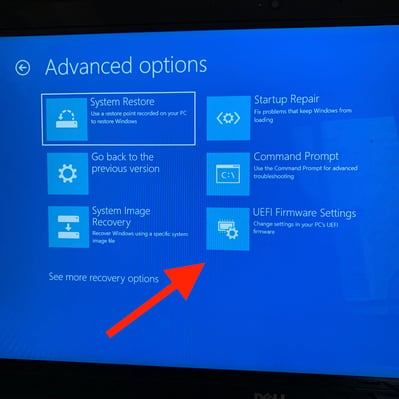
7. Select UEFI Firmware Settings. If you don’t see this icon, then press Startup Settings, instead. When your PC is restarting, tap F1 (or F2) to access the BIOS.
8. Click Restart.
Your system will restart and take you to the BIOS.
How to access BIOS on a Windows 7/Windows 10 PC

- Accessing the BIOS in Windows 10 is a must if you want to change the boot settings for instance.
- BIOS is an acronym for Basic Input/Output System and it’s a software tool installed in a ROM chip on your motherboard .
- In this article we explain how you can access BIOS on devices from several brands including HP, Dell, Asus, Acer.
- Read all our guide as you will also learn what you can do to access BIOS from Windows 10.

- Download Restoro PC Repair Tool that comes with Patented Technologies (patent available here).
- Click Start Scan to find Windows issues that could be causing PC problems.
- Click Repair All to fix issues affecting your computer’s security and performance
- Restoro has been downloaded by 0 readers this month.
BIOS which stands for Basic Input Output System is basically a ROM chip that contains instructions needed to perform hardware initialization operation during the boot-up process.
The BIOS section is also where you get a host of options to change the way the computer boots up along with a few other security and power settings as well.
All of this also makes it quite necessary to access the BIOS section just in case you need to tinker with the hardware setting or the default booting process.
Accessing BIOS also becomes imperative when you need to extract the most out of your existing hardware setup.
However, notwithstanding how critical it can be to have access to BIOS, that often isn’t the case. And the reasons might be varied, of both software and hardware origin.
Mentioned here are steps to reach BIOS on some of the most well known Windows PC brands like HP, Dell, Asus, and Acer.
How to get into BIOS in Windows 7 and Windows 10
- Access BIOS on a HP device
- Access BIOS on a Dell computer
- Access BIOS on a Asus PC
- Access BIOS on a Acer device
- Access BIOS on Windows 10
- Access BIOS on Windows 7
1. Access BIOS on a HP device

Turn off the PC, wait for a few seconds and re-start it. When the first screen come on, start pressing F10 repeatedly until the BIOS screen is displayed.
This applies to PCs that came pre-installed with Windows, which is devices manufactured in 2006 or later.
For PCs built before 2006, press F1 repeatedly during the booting process to get into BIOS.
2. Access BIOS on a Dell device

Turn off the PC and restart it again after waiting for a few seconds. When the first screen id displayed, press F2 continuously until the BIOS screen is displayed.
Run a System Scan to discover potential errors


Another method will be to start pressing F2 the moment the keyboard has been activated.
Note: Dell cautioned against pressing and holding down the F2 button as this might lead the system to interpret it as a stuck key. Instead, press F2 repeatedly.
3. Access BIOS on an Asus device
Turn off the PC, wait for a few seconds. Press and hold on to the F2 button and then click on the power button once. Continue holding on to the power button until the BIOS screen is displayed.
4. Access BIOS on an Acer device
The process is similar as on an Asus PC. Press and hold on to the F2 button and click on the power button. Continue holding on to the F2 button until the BIOS section is reached.
5. Access BIOS on Windows 10
- Go to Settings and select Update & Security.
- In the Update & Security page, select Recovery from the list of options on the left panel.
- Under Advanced start-up, select Restart now (This will re-boot the PC to launch a special set of menu options).

- Select Troubleshoot and select Advanced options.
- From the list of Advanced options provided, select UEFI Firmware Settings.
- You will next be led to the UEFI Firmware settings page.
- Click on the Restart button there.
- The PC re-starts and will launch BIOS.

Since Windows 10 is inherently designed to boot faster, that leaves virtually no scope for keypresses such as the F1 or F2 to register any response.
Fortunately, Microsoft has ensured there is a more foolproof means of accessing BIOS from right within Windows 10 though you surely have to restart the PC before getting to it.
6. Access BIOS on Windows 7

Getting into BIOS in Windows 7 can be a bit tricky in that you got to have your timing right. You have time before Windows loads completely to access BIOS.
If you miss the slot, you will have to begin all over again by rebooting your PC. Also, different manufacturers assign different keyboard buttons as the hotkey for accessing BIOS.
If you’re still running Windows 7, you need to know that Microsoft pulled its support for this OS and they no longer issue any updates for it. Therefore, using it can be risky for your system security.
You should update your PC to the last version of Windows 10 and perform any necessary updates for your safety.
We hope this guide helped to access your BIOS settings on your computer and if you have any suggestions, write a line in the comments section below.
How to Access Windows 10 BIOS in 6 Easy Steps
January 11, 2019
by Holly Hunt

Share
Share
Windows 10 offers many personalization options, but if you want to change something integral like how your computer turns on, you’ll have to do so in the BIOS.
What are the BIOS, you ask? BIOS stands for basic input/output system, and it controls the behind-the-scenes functions of your laptop, such as pre-boot security options, what the fn key does, and boot order of your drives. In short, BIOS is connected to the motherboard of your computer and controls most everything.
While they are plenty of customizable options you can achieve from the front-end of Windows 10, only BIOS can change certain settings.
How to enter Windows 10 BIOS
- In ‘Settings,’ select ‘Update & security.’
- Select ‘Recovery.’
- Choose ‘Restart now.’
- After your computer restarts, select ‘Troubleshoot’ from the menu that appears.
- Click ‘Advanced options,’ then choose ‘UEFI Firmware Settings.’
Accessing BIOS on Windows 10 is not the most intuitive process. This article will take you through it step-by-step, with photos.
Windows 10 BIOS
The BIOS used to be accessible on older devices by hitting F1 or F2 as the computer powered on. If you own a device that’s been made in the past four years, it probably turns on too fast to hit a key in time. That’s where this guide picks up.
Another important note: newer devices typically contain a newer version of BIOS called User Extensible Firmware Interface (UEFI). UEFI is expected to completely replace BIOS eventually.
Now, let’s dive into how to get to your Windows 10 BIOS.
How to access BIOS Windows 10
You can access BIOS through the front-end of your Windows 10 device. Here’s how:
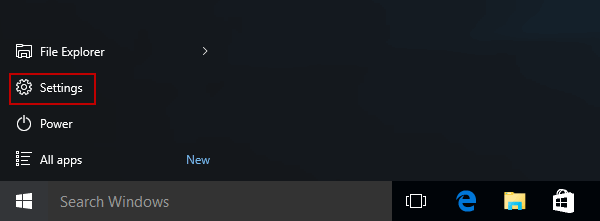
1. Open ‘Settings.’
You’ll find ‘Settings’ under the Windows start menu in the bottom left corner.
-1.png?width=259&name=Screenshot%20(21)-1.png)
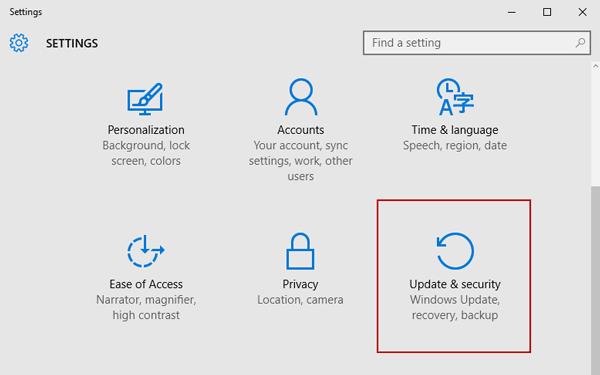
2. Select ‘Update & security.’
This is the last option on the page.
.png?width=737&name=Screenshot%20(32).png)
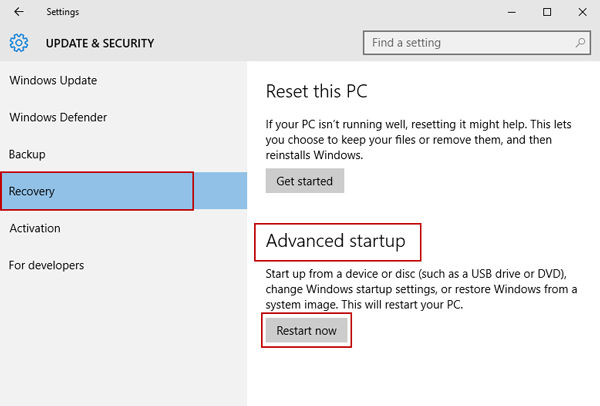
3. Under the ‘Recovery’ tab, choose ‘Restart now.’
In ‘Update & security,’ choose ‘Recovery’ from the sidebar menu.
.png?width=1556&name=Screenshot%20(33).png)
There will be a button to ‘Restart now.’ Once you click on this, it will restart your computer right away. So be prepared for that — have anything of importance saved and closed.
4. Select ‘Troubleshoot.’
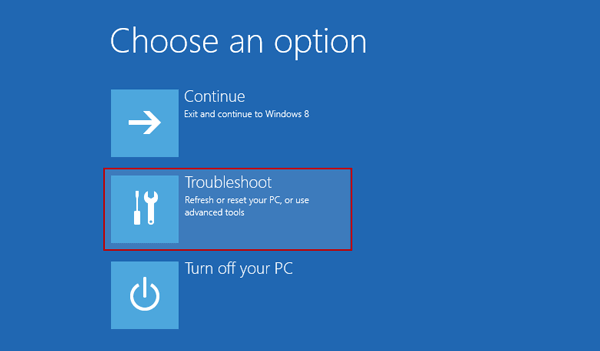
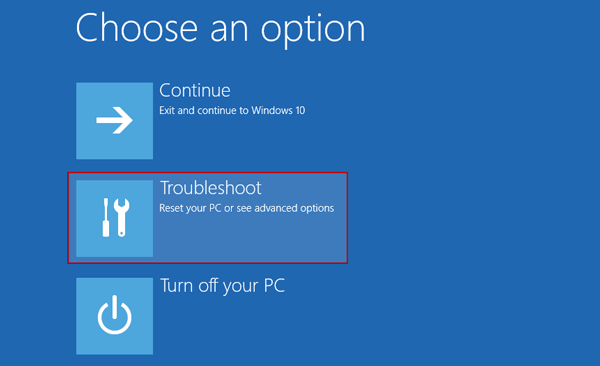
After your computer restarts, a new screen will appear in place of the typical login screen. From this menu, choose ‘Troubleshoot.’
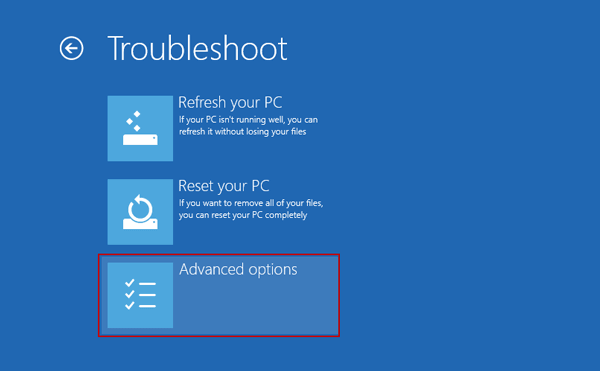
5. Click on ‘Advanced options.’
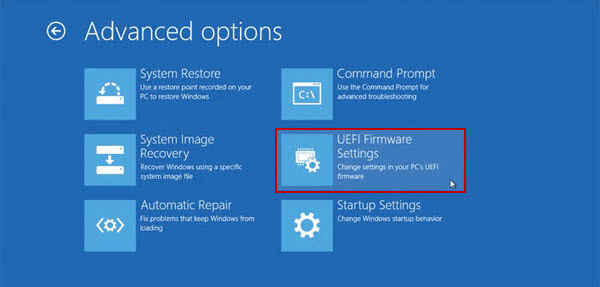
6. Select ‘UEFI Firmware Settings.’
It’s the last option on the menu.
Once you click on this, you’ll be inside your BIOS, or UEFI. From there, you can make specific changes on how your computer starts, when security software runs, and more. Exercise caution when poking around in the Windows 10 BIOS, however. Any changes you make can have unexpected repercussions if not made correctly.
How do you rate Windows 10?
Review Windows 10 and join hundreds of thousands of software users sharing their insights on G2. You’ll make your voice heard and help your peers in the process.

Want to know more Windows 10 tips and tricks? Check out these articles:

Holly is a manager on the content marketing team. An avid reader and writer, Holly graduated from the University of Missouri with a dual major in Journalism and English. She firmly believes in the power of content and is constantly seeking ways to better engage and delight readers.
How to Access UEFI BIOS Setup in Windows 8/10 New PCs
UEFI (Unified Extensible Firmware Interface) is a standard firmware interface for new PCs pre-installed with Windows 8/10, which is designed to replace BIOS (basic input/output system).
If your computer has not been installed with Windows 8 and 10, just need to follow traditional method to boot computer from USB device or CD-ROM. If not, how can you enter UEFI BIOS settings to set new Windows 8/10 computer boot from USB/CD-ROM?
Please see following four methods. They will help you access UEFI BIOS Setup screen (sometimes called BIOS Setup Utility or Boot Options screen) when computer is accessible or locked.
Method 1: Access UEFI BIOS Setup with Hot Key
If the computer system has a pre-UEFI BIOS, and you want to access UEFI BIOS Setup with high speed, you can enter BIOS setup or UEFI firmware via this traditional method, hot key. Boot PC and just tap hot key at computer logo while system is starting up to access the UEFI system setup.
However, computer taken with pre-UEFI BIOS boots fast, maybe you often miss the trick to press hot key. So if it couldn’t help you after several tries, please go on and follow other three methods below.
Method 2: Access UEFI BIOS by PC Settings
The process to access UEFI BIOS Setup by PC settings in Windows 8 is similar to Windows 10. The biggest difference is how to enter Advanced startup.
Windows 8/8.1: Settings Change PC Settings General Advanced startup Restart Now Troubleshoot Advanced options UEFI Firmware Settings Restart
Windows 10: Start Settings Update & Security Recovery Advanced startup Restart now Troubleshoot Advanced options UEFI Firmware Settings Restart
Step 1: Enter Windows 8/10 Advanced startup option.
1. Access Windows 8 Advanced startup option:
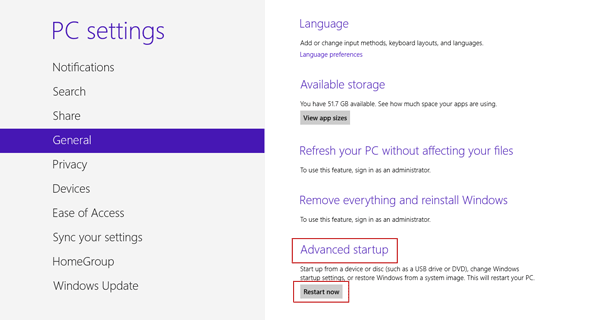
In Windows 8, you can move your mouse to the upper-right side of window and choose Settings.

Then click Change PC Settings at the computer bottom below Settings. Following, in the opening PC settings window, select General and you can see Advanced startup.
2. Enter Windows 10 Advanced startup option:
In Windows 10, click Start menu and choose Settings.
Then in Settings window, choose Update & security.
When go to new window «UPDATE & SECURITY», click Recovery on the left panel and you can see Advanced startup at the right side.
Step 2: Click Restart now under Advanced startup option.
Step 3: Choose Troubleshoot in several options.
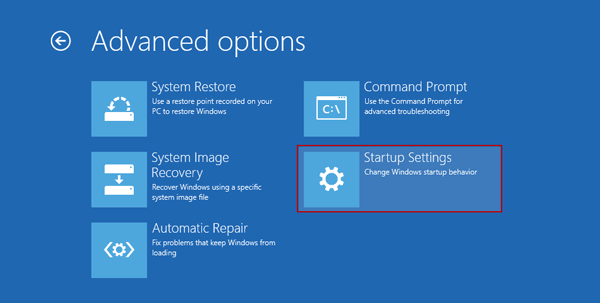
Step 4: Select Advanced options in Troubleshoot.
Step 5: In Advanced options window, you will see UEFI Firmware Settings. Just click it.
Step 6: Restart to access UEFI BIOS Setup and change UEFI firmware settings.

Method 3: Access UEFI BIOS by Command Prompt
With this method, you will access UEFI BIOS Setup easily with one command and several clicks.
1. No matter you are in computer desktop or not, press Win + X to access menu and select Command Prompt (Admin) in menu.

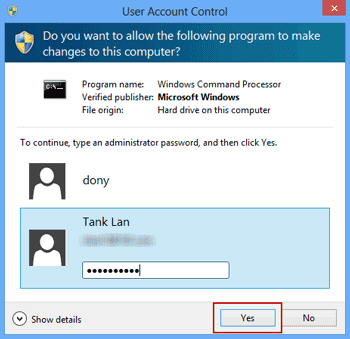
2. While there is a dialog popping up to ask you whether allow Command Prompt to make changes to this computer, type an administrator password and click Yes.
3. Type the following command and press Enter.

shutdown.exe /r /o

A message displays in the middle of the screen warning you that you are about to be signed off. Windows 8/10 will reboot automatically in less than a minute. If all above works normally, you would access Advanced startup options and you are available to choose Troubleshoot. Next steps will be the same to Method 2 (Step 3 — 6).
Method 4: Enter UEFI BIOS by Holding down Shift While Choosing Restart
This method even works if you haven’t signed into Windows 8/10 at all, as long as you’re on the login screen and can access the restart menu.
Compared to above two methods, this is a faster way to access UEFI bios options menu.
Step 1: Just simply find the Shut down or Restart button on login screen, and hold down the Shift key while you click on Restart.

Step 2: Once you’ve done this, instead of fully rebooting, the blue boot options menu displays. In order to use the advanced tools, click Troubleshoot. Then you can choose to access Advanced options.
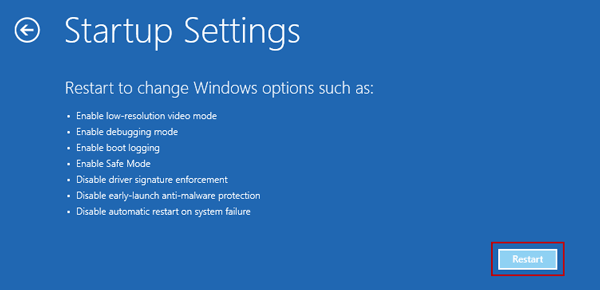
Step 3: В All of the options are available on the Advanced options menu. To change how Windows 8/10 starts up, click Startup Settings now.
Step 4: Now several options shows and they will be available when Windows restarts next time. So click Restart to reboot Windows system and access to these options.
Step 5: Press F10 to get more options.
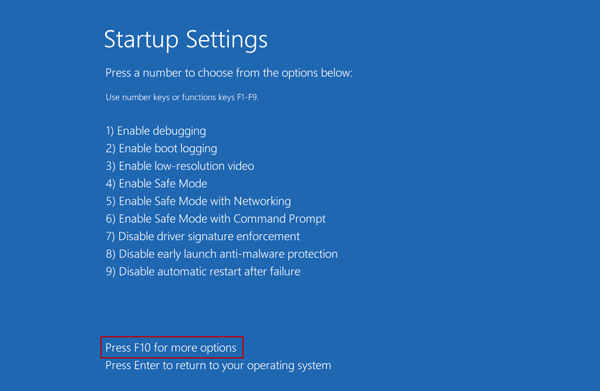
If you want listing options are available for you now, just need to select the option by using the number or the function keys F1-F9. If you don’t want to use any of these options, you can boot normally by pressing Enter.
Step 6: Press F1 to launch recovery environment.
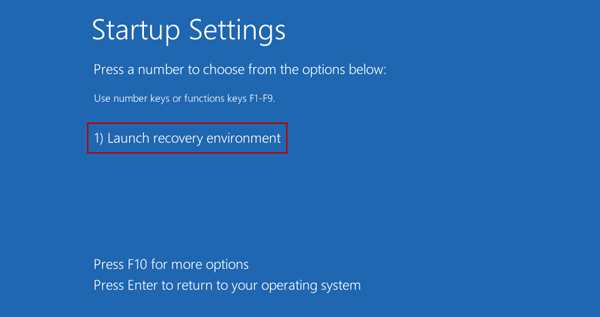
Launch recovery environment is the extra option accessed by pressing F10. To return to the other options, press F10 again.
While you have successfully accessed UEFI BIOS Setup screen, navigate to Boot option in BIOS setup utility interface, and choose USB drive or CD/DVD-ROM as first boot device, even though the way to set USB drive or CD-ROM as first boot device is different for different kinds of brand computer.


