- Setting up a Share Using Windows ACLs
- Namespaces
- Page actions
- Contents
- Introduction
- Preparing the Host
- File System Support
- Samba Extended ACL Support
- Enable Extended ACL Support on a Unix domain member
- Granting the SeDiskOperatorPrivilege Privilege
- Adding a Share
- Setting Share Permissions and ACLs
- Setting ACLs on a Folder
- File System ACLs in the Back End
- Mounting and mapping shares between Windows and Linux with Samba
- More Linux resources
- How to create a Samba share that is writable from Windows without 777 permissions?
- 4 Answers 4
Setting up a Share Using Windows ACLs
Namespaces
Page actions
Contents
Introduction
Extended access control lists (ACL) enable you to set permissions on shares, files, and directories using Windows ACLs and applications. Samba supports shares using extended ACLs on:
- Domain members
- Active Directory (AD) domain controllers (DC)
- NT4 primary domain controller (PDC)
- NT4 backup domain controllers (BDC)
- Standalone hosts
Preparing the Host
You need to set up Samba before you are able to create a share. Depending on what type of Samba server you require, see:
File System Support
The file system, the share will be created on, must support:
- user and system xattr name spaces.
- extended access control lists (ACL).
For further details, see File system support.
Samba Extended ACL Support
To create a share with extended access control list (ACL) support, the smbd service must have been built with ACL support enabled. A Samba host working as an Active Directory (AD) domain controller (DC), is always enabled with extended ACL support.
To verify if Samba has been built with ACL support, enter:
If no output is displayed:
- Samba was built using the —with-acl-support=no parameter.
- The Samba configure script was unable to locate the required libraries for ACL support. For details, see Package Dependencies Required to Build Samba.
Enable Extended ACL Support on a Unix domain member
Ideally you have a system that supports NFS4 ACLs. The following example is for systems like Linux, where you don’t have those kind of ACLs. To configure shares using extended access control lists (ACL) on a Unix domain member, you must enable the support in the smb.conf file. To enable extended ACL support globally, add the following settings to the [global] section of your smb.conf file:
 | On a Samba Active Directory (AD) domain controller (DC), extended ACL support is automatically enabled globally. You must not enable the support manually. |
Alternatively, to enable extended ACL support only for a specific share, add the parameters to the share’s section.
For further details about the parameters, see the smb.conf(5) man page.
Granting the SeDiskOperatorPrivilege Privilege
Only users and groups having the SeDiskOperatorPrivilege privilege granted can configure share permissions.
| Only users or groups that are known to Unix can be used. This means that if you use the winbind ‘ad’ backend on Unix domain members, you must add a uidNumber attribute to users, or a gidNumber to groups in AD. |
| If you use the winbind ‘ad’ backend on Unix domain members and you add a gidNumber attribute to the Domain Admins group in AD, you will break the mapping in idmap.ldb . Domain Admins is mapped as ID_TYPE_BOTH in idmap.ldb , this is to allow the group to own files in Sysvol on a Samba AD DC. It is suggested you create a new AD group ( Unix Admins for instance), give this group a gidNumber attribute and add it to the Administrators group and then, on Unix, use the group wherever you would normally use Domain Admins . |
To grant the privilege to the Unix Admins group, enter:
| It is recommended to grant the privilege to a group instead of individual accounts. This enables you to add and revoke the privilege by updating the group membership. |
To list all users and groups having the SeDiskOperatorPrivilege privilege granted, enter:
| You need to grant the SeDiskOperatorPrivilege privilege on the Samba server that holds the share. |
Adding a Share
To share the /srv/samba/Demo/ directory using the Demo share name:
- As the root user, create the directory:
- To enable accounts other than the domain user Administrator to set permissions on Windows, grant Full control ( rwx ) to the user or group you granted the SeDiskOperatorPrivilege privilege. For example (if using the ‘ad’ backend):
- Otherwise for any other backend:
- Add the [Demo] share definition to your smb.conf file:
Further share-specific settings and file system permissions are set using the Windows utilities.
| Do not set ANY additional share parameters, such as force user or valid users . Adding them to the share definition can prevent you from configuring or using the share. |
It is recommended that you add this line to your share:
This will make Samba ignore the system ACL’s
- Reload the Samba configuration:
Setting Share Permissions and ACLs
When you configure a share with extended access control lists (ACL) support, you set the share permissions using Windows utilities instead of adding parameters to the share section in the smb.conf file.
To set permissions and ACLs on the Demo share:
- Log on to a Windows host using an account that has the SeDiskOperatorPrivilege privilege granted. e.g. SAMDOM\Administrator or SAMDOM\john where john is a member of Unix Admins .
- Click Start , enter Computer Management , and start the application.
- Select Action / Connect to another computer .
- Enter the name of the Samba host and click OK to connect the console to the host.
- Open the System Tools / Shared Folders / Shares menu entry.
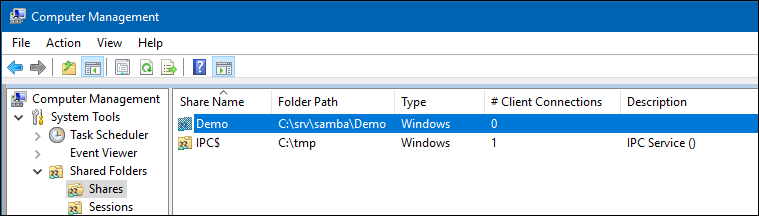
- Right-click to the share and select Properties .
- Select the Share Permissions tab and check the share permissions, you need to see Everyone . For example:
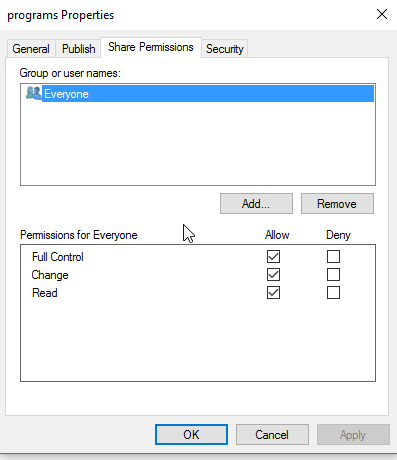
| If the permissions are as above, you do not need to change anything, if not, change it to just allow Everyone : Full Control, Change and Read . You should only need to make changes to the Security tab. |
Samba stores the share tab permissions in the /usr/local/samba/var/locks/share_info.tdb database.
- Select the Security tab.
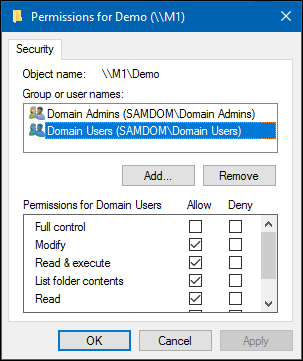
- Click the Edit button and set the file system ACLs on the share’s root directory. For example:
 For details about using the SYSTEM account on a Samba share see The SYSTEM Account. For details where the ACLs are stored, see File System ACLs in the Back End.
- Click the Add button.
- Click Advanced button
- Click Find Now
- Select a user or group from the list, Domain Users for instance.
- Click OK
- Click OK
- Select permissions to grant, Full control for instance.
- A windows security box should open, asking if you want to continue, Click Yes
- If you check the list of Group or user names , you should find Domain Users listed
- Click OK to close the Permissions for Demo window.
- Click OK to store the updated settings.
For further details about configuring share permissions and ACLs, see the Windows documentation.
Setting ACLs on a Folder
To set file system permissions on a folder located on a share that uses extended access control lists (ACL):
- Log on to a Windows host using an account that has Full control on the folder you want to modify the file system ACLs.
- Navigate to the folder.
- Right-click to the folder and select Properties .
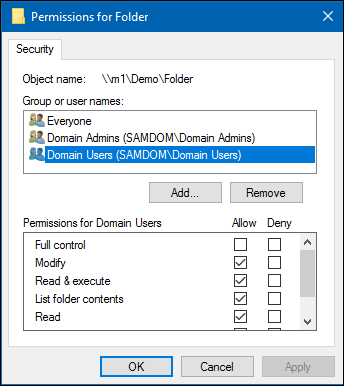
- Select the Security tab and click the Edit button.
- Set the permission. For example:
 For details about using the SYSTEM account on a Samba share see The SYSTEM Account. For details where the ACLs are stored, see File System ACLs in the Back End.
- Click OK to close the Permissions for Folder window.
- Click OK to store the updated settings.
For further details about setting ACLs, see the Windows documentation.
File System ACLs in the Back End
Samba stores the file system permissions in extended file system access control lists (ACL) and in an extended attribute. For example:
- To list the extended ACLs of the /srv/samba/Demo/ directory, enter:
- To list the security.NTACL extended attribute of the /srv/samba/Demo/ directory, enter:
The previous example of file system ACLs and the extended attribute is mapped to the following Windows ACLs:
Mounting and mapping shares between Windows and Linux with Samba

More Linux resources
In my previous article, Interoperability: Getting started with Samba, I covered installing and configuring Samba shares on a Linux server. The real power of Samba comes when Windows clients can communicate with Linux file servers. In this article, I will cover how you can access Samba shares from both Linux and Windows clients.
Install the Samba client packages
To access Samba share from Linux clients we need to install a few Samba client packages.
On the client machine, install the samba-common and samba-client packages.
Check for available shares
Let’s check if we can access our shares from the server. We can use either the hostname or ip address of the server. If you use the hostname , make sure DNS is working.
Create a directory that we can use as our mount point. I’m going to create a directory under /mnt , but you can use any directory you would like to. You may need to configure SELinux on that directory.
Now, mount the share.
Now that we’ve mounted our share, we can check the mounts with the following command:
Let’s make that directory mount persistently so it can withstand a reboot. Using the text editor of your choice, edit the /etc/fstab file. You can do this in multiple ways, but I’m going to demonstrate two ways to mount the Samba share at boot in /etc/fstab .
The first option provides a username and password for the Samba user in the fstab .
The other option is to create a credential file. You can call this file anything, but I would like to call it cred . I would like to place credentials files in the home directory of the user. In our demonstration it will be /home/user/.cred .
The _netdev option is important since we are mounting a network device. Clients may hang during the boot process if the system encounters any difficulties with the network.
Now create that .cred file inside the user’s home directory.
Next, add the Samba user’s username and password.
Finally, mount all filesystems.
Access a share from a Windows client
I will be using Windows 10 as my client machine with a workgroup called SAMBA . We need to create a local user account on the Windows machine that matches the username and password of the Samba user account we created in my previous article. Although account creation is not necessary, this will make things simpler when accessing the share.
Like I mentioned above, this step is optional and you can skip it completely. Although there are multiple approaches to adding a new local user on a Windows machine, for the simplicity of this article I will be using PowerShell. Launch PowerShell as an administrator and issue following commands:
Now that we have created a new local user account matching the Samba user account, we can log in to Windows with our newly created user account.
Access a share from Windows Explorer
To access the Samba share from Windows Explorer, start typing the IP address to our share in the search area. I am using the hostname of the Samba server. In my case, it is centos . You can also access the share by using the IP address of the Samba server.

You might be prompted to enter the username and password to access the share if you skipped the local user creation process. If you get prompted for credentials, enter the Samba username and password we created in the previous article.
You will need to enter the Samba share path every time you want to access the share. There is a better way to access the share by mapping a drive to Samba share in Windows.
Mapping a drive to a Samba share
To map a drive to the Samba share, open PowerShell and issue following command:

Accessing a Samba share on Linux and Windows is easy. With this basic setup, you will be able to access file shares from client machines in your network. With somewhat more configuration, you can deploy Samba shares in a domain environment. Samba can do more than file share. If you would like to learn more about Samba, read this article about Windows and Linux interoperability. This is a basic set up, but you can do so much more with Samba.
[ Want to test your sysadmin skills? Take a skills assessment today. ]
How to create a Samba share that is writable from Windows without 777 permissions?
I have a path on a Linux machine (Debian 8) which I want to share with Samba 4 to Windows computers (Win7 and 8 in a domain). In my smb.conf I did the following:
I have perfect read access from Windows. But in order to have write access, I need to do chmod -R 777 /path/to/share in order to be able to write to it from Windows.
What I want is write access from Windows after I provide the Linux credentials of the Linux owner of /path/to/share .
I already tried:
Then Windows asks for credentials, but no matter what I enter, it’s always denied.
What is the correct way to gain write access to Samba shares from a Windows domain computer without granting 777 permissions?

4 Answers 4
I recommend to create a dedicated user for that share and specify it in force user (see docs).
Create a user ( shareuser for example) and set the owner of everything in the share folder to that user:
Then add force user and permission mask settings in smb.conf :
Note that guest ok is a synonym for public .

In the share settings in smb.conf , you’ll need to specify the names of users and/or groups that are allowed to write to the share, using a write list = . line.
Then you’ll need to use the smbpasswd command to set up a password to authenticate my_linux_username for Samba:
This step is necessary because the standard system passwords in /etc/shadow are hashed in algorithms that are incompatible with the password hash algorithms used in the SMB protocol. When a client sends a SMB authentication packet, it includes a hashed password. It can only be compared to another password hash that uses the same algorithm.
(Very, very old instructions from the previous millennium may recommend disabling password encryption in Samba, and using certain registry hacks to allow Windows to emit unencrypted passwords to the network. This advice is obsolete: those registry hacks may no longer work in current versions of Windows, and allow anyone who can monitor your network traffic to trivially capture your password.)
There’s one more thing you may have to do client-side. When your Windows client system is joined to an Active Directory domain and you’re logged in with an AD account, it automatically prefixes all unqualified usernames with the name of the AD domain of the user, i.e. you will be authenticating as AD_DOMAIN\your_username , not just your_username .
If you are logged in with a local account (or your client system is not joined to an AD domain), Windows may automatically prefix the username with the client hostname unless you specify another domain name.
To successfully log in to a stand-alone Samba server from a stand-alone Windows client, you may have to specify your username as SAMBA_SERVER_HOSTNAME\your_username .
Otherwise Samba will see the username as WINDOWS_CLIENT_HOSTNAME\your_username , conclude that it has no way to verify any users belonging to domain named WINDOWS_CLIENT_HOSTNAME , and will reject the login.
(Newer versions of Samba may have a built-in check for this specific situation, and they might allow you access nevertheless. But this is basically how SMB authentication works «under the hood», and if you need to deal with old versions of Samba, it might be useful still.)


