- How to Block a Program From Connecting to the Internet in Windows 10
- Windows 10 Apps can’t access the Internet but desktop apps can
- Replies (29)
- Network and Internet Settings in Windows 10
- Network and Internet Settings in Windows 10
- 1. Status
- 2. WiFi
- 3. Ethernet
- 4. Dial-Up
- 5. VPN
- 6. Airplane Mode
- 7. Mobile Hotspot
- 8. Data Usage
- 9. Proxy
- How to Block a Program from Accessing the Internet in Windows 10
- How to block a program from accessing the Internet on Windows 10
- Windows 10 Laptop keeps Disconnecting from internet? Apply these solutions
- Fix Internet Disconnect Frequently After Windows 10 Upgrade
- Run The Network Troubleshooter
- Update Network Adapter Drivers in Windows 10
- Roll Back Driver
- Update Network Adapter Driver
- Re-Install Network Adapter Driver
- Reset TCP/IP and Winsock in Windows 10
- Reset Network Configuration
- Check Power Management Issues
How to Block a Program From Connecting to the Internet in Windows 10
By Rami Tabari 06 July 2019
While you may want most programs on your laptop to be connected, there are occasions when you’ll need to know how to stop Windows 10 apps from connecting to the internet — for example, if you want to prevent automatic updates of a particular app, or block ads on an app that works perfectly fine offline. Whatever your intention, here’s the best way to block programs from connecting to the internet in Windows 10.
How to Block a Program From Connecting to the Internet in Windows 10
1. Type «Windows Defender Firewall» into the Windows 10 search bar and click on the first result.

2. Look toward the left hand-side of the app and click on Advanced Settings.
3. Once the Advanced Security app is open, click on Outbound Rules, located on the left side.
4. Now click on New Rule, which will appear on the right-hand side.
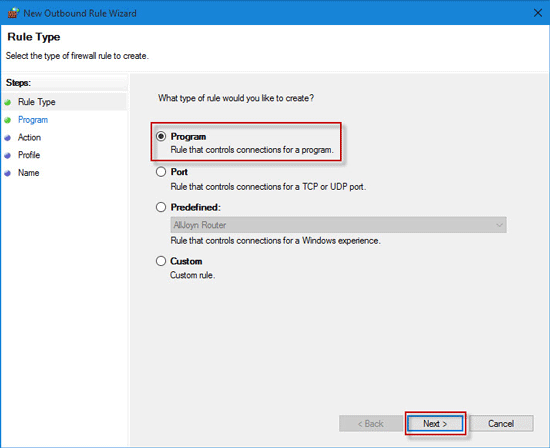
5. The New Outbound Rule Wizard will open; select Program and continue.
6. You’ll have to click This Program Path and hit Browse to select the program you want to block.
7. In the next screen, simply select Block The Connection.
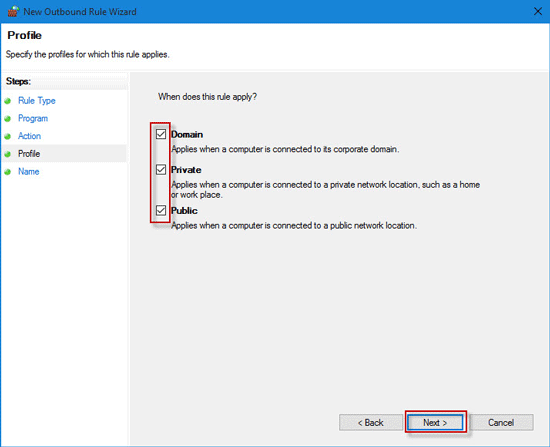
8. You’ll be asked when you want this rule to apply. If they’re not all selected already, click Domain, Private and Public.
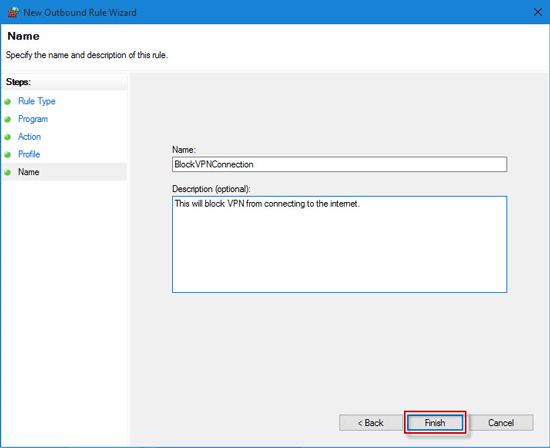
9. All you have to do now is name the rule, add a description if you want, and hit Finish.
Now you know how to block programs from connecting to the internet in Windows 10. If you’re looking for other helpful tips, take a tour through our Windows 10 guide , as well as our numerous Out of the Box Tips to use when you buy a laptop.
Windows 10 Apps can’t access the Internet but desktop apps can
Just had the joy of upgrading to Windows 10. All my desktop applications (IE desktop, Chrome, TeamSpeak, Games, etc. ) work as expected. However, every Win10 app cannot access the Internet. So Cortana doesn’t connect to the Internet, Edge can’t connect to the Internet, Activation can’t connect to the Internet, Windows Update can’t connect to the Interent, etc.
This is blowing my mind because I have access to the Internet. I’m writing this question on the same Win10 PC in Chrome.
Any help would be greatly appreciated.
Replies (29)
* Please try a lower page number.
* Please enter only numbers.
* Please try a lower page number.
* Please enter only numbers.
![]()
Thank you for posting your question on Microsoft community.
I would like to know some information about the issue so that we could help you better.
Where there any changes made to the computer prior to the issue?
Is the computer connected to the Internet using a wired connection or a wireless connection?
Do you get any error message or error code when you open the apps?
I appreciate you for providing details about the issue and your efforts towards resolving it.
This issue may occur due to corrupt app files or settings.
I would suggest you to run Windows store apps troubleshooter and check if it helps. Please follow these steps:
a. Type troubleshooting in the search box on taskbar.
b. Click troubleshooting in the search results.
c. Click «View all» and then click «Windows Store Apps«.
d. Click «Next» and follow on-screen instructions.
Please also run Internet connections troubleshooter and check. Please follow these steps:
a. Type troubleshooting in the search box on taskbar.
b. Click troubleshooting in the search results.
c. Click «View all» and then click «Internet Connections«.
d. Click «Next» and follow on-screen instructions.
I hope this information helps.
Please do let us know if you need any further assistance.
Network and Internet Settings in Windows 10
Windows 10 brings the entire Settings options under one hood. We have already taken a look at the Windows 10 Personalization Settings, Privacy Settings, Devices Settings, and the Update and Security settings. In this post, we will learn about the Network and Internet Settings in Windows 10.
The new and the latest version of the Network and Internet Settings in Windows 10 include quite a lot of features such as mobile hotspot, automatic proxy setup, manual proxy setup, airplane mode, and so on. You will also be able to access the Network Reset feature that can help you reinstall Network adapters and reset Networking Components to original settings.
To open these settings, click on Start menu > Settings > Network and Internet.
Network and Internet Settings in Windows 10
In the Network and Internet Settings in Windows 10, you will see the following tabs –
- Status
- WiFi
- Ethernet
- Dial-up
- VPN
- Airplane mode
- Mobile hotspot
- Data usage
- Proxy
Let us go through them in detail.
1. Status
This tab shows you the status of the network – whether you are connected to a network or not. You can change the connection properties where you can choose to connect to a network automatically when in range. You can choose your Network Profile as public or private.
Moreover, this tab allows you to view the available network adapters, change connection settings, change sharing options for different network profiles, and diagnose and fix network problems. You will be able to access the Network Reset feature that can help you re-install network adapters and reset networking components to original settings.
2. WiFi
Check for available networks and connect to the wireless network you want. You can also manage and add a new network.
Random Hardware Addresses when turned on, makes it difficult for people to track your location when you connect to different WiFi networks. You can turn on the Hotspot 2.0 Network feature to make yourself more secure and safe when connected to public WiFi hotspots.
You can also select the option of setting a Metered Connection which gives you more control over the data usage. Turning it ON makes your apps work differently so that they use less data. This is especially helpful for users having a limited data plan. You will also see the properties of your device.
This tab allows you to adjust the Wi-Fi Sense settings in Windows 10. Wi-Fi Sense is a feature in Windows 10 that allows you to connect to your friend’s shared Wi-Fi connections. That is, you and your friends may opt to share your or their Wi-Fi connections.
3. Ethernet
You can set and view Ethernet settings here. It also allows you to set it as a metered connection if you have a limited data plan.
4. Dial-Up
This tab allows you to choose and set up a new Dial-up connection or network with the following options –
- Set up broadband or dial-up connections to the Internet.
- Set up a new router or access point.
- Connect to a hidden network or create a new wireless profile.
- Set up a dial-up or VPN connection to your workplace.
5. VPN
To add a VPN connection, keep your VPN provider, connection name and server name or address details ready. Fill in the type of sign-in info, username, and password and click Save.
Under Advanced Options, turn on the following settings if desired –
- Allow VPN over metered networks
- Allow VPN while roaming
6. Airplane Mode
Airplane mode when turned on, stops all wireless communication, Bluetooth, WiFi networks, and cellular networks.
7. Mobile Hotspot
The Mobile Hotspot feature is a new one in the latest version of Windows 10 Settings which enables you to share your Internet connection with other devices. The users can choose to share their Internet connection over Wifi or Bluetooth. User can also set the Turn On Remotely feature to allow another device to turn on mobile hotspot.
8. Data Usage
This section allows you to check the data used in the last 30 days for both WiFi as well as Ethernet. You can also view usage per app which will give you detailed information on data used by various apps on your PC. Additional features include setting data limits and restricting background data to reduce data usage on WiFi.
9. Proxy
In this section, you can set your PC to detect the Proxy settings automatically. However, you can also adjust the settings manually by entering the IP address and the proxy port.
In this post, all the features and the importance of the Network and Internet Settings in Windows 10 have been covered. Hope this post was a helpful read!
Date: June 21, 2019 Tags: Network, Settings
How to Block a Program from Accessing the Internet in Windows 10
There are some situations in which you don’t want some programs in Windows 10 to connect to the internet. For example, some programs automatically update by itself when it’s connected to the internet. That may be not what you want. Then you can block the program. Now, this post will show you how to block a program from accessing the internet on Windows 10 computer.
How to block a program from accessing the Internet on Windows 10
This can be done through the Windows built-in Firewall. Steps are as follows.
Step 1: Open Control Panel, and go to the Windows Firewall. Make sure you’ve turned on Windows Firewall in Windows 10. If not, turn it on.
Step 2: Click the Allow an app or feature through Windows Firewall link on the left pane.
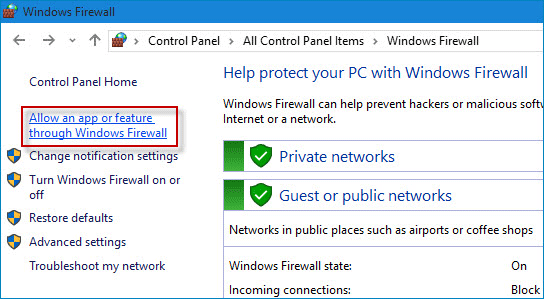
Step 3: On the Allowed apps page, click the Change settings button. Check whether the application you want to block from internet access is in the Allowed apps and features list. If it is, clear its checkbox so that internet connection for this program can be blocked.
![]()
If the program is not in the list, go back to the Windows Firewall window and do as follows to block it from accessing the internet.
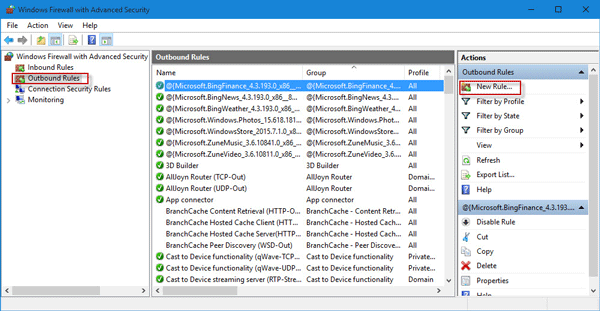
Step 4: Click the Advanced settings link on the left pane.

Step 5: After the Windows Firewall with Advanced Security window opens, click on Outbound Rules on the left-side pane and then click on New Rule on the right-side pane.
Step 6: After the New Outbound Rule Wizard dialog opens, select Program and click Next.
Step 7: Select This program path, and type the path to the target program (.exe) file you want to block from internet access or use the Browse button to select the program file.

Step 8: Select Block the connection and click Next.

Step 9: Keep the checkbox next to Domain, Private, and Public checked, and click Next.
Step 10: Finally, type a name and description for this new outbound rule for easier recognition, and click Finish.
Step 11 (Optional): Go back to the «Windows Firewall with Advanced Security» screen, and similarly you can create a new Inbound Rule to completely block the program from accessing the internet if you want.
Tips: Simply put, Outbound means the programs on your computer send data/request to a remote server on the internet, and Inbound means a remote server on the Internet sends data to your local computer.
Windows 10 Laptop keeps Disconnecting from internet? Apply these solutions
Did You notice WiFi/Ethernet connected but There is no internet connection on the laptop or computer keeps Disconnecting internet connection? Doing a System Restart work normally for flew minutes again Windows 10 Disconnect Internet Connection. This is ( Windows 10 Frequently Disconnect Internet Connection ) mostly because the Installed WiFi/Ethernet Driver is incompatible with the current windows version. Or the Driver became outdated, Corrupted, and not working properly.
Again some times Missing or corruption of Windows Socket API (winsock) inside Windows registry. Or a registry key related to winsock might get corrupted due to some viruses. Cause Windows 10 Frequently Disconnect Internet Connection issue. And Most of the time, WiFi says connected but no internet connection on the laptop and the internet keeps dropping from time to time. If you are also suffering from this problem, Here some applicable solutions to fix :
WiFi connection connects and Disconnects frequently.
Internet just keeps dropping and then connecting back on again
Fix Windows 10 Frequently Disconnect Internet Connection After Recent upgrade
What to do when WiFi says connected but my laptop has no internet access?
How to fix laptop connected to WiFi but no internet access Windows 10?
Why does my internet keep disconnecting and reconnecting on Windows 10 PC?
Fix Internet Disconnect Frequently After Windows 10 Upgrade
Windows 10 Frequently losing internet connection is a very common issue that is faced by the number of Windows computer users. Especially after recent windows, 10 Upgrade users report Wifi Frequently Disconnects. And it doesn’t matter which version of Windows 10 you are using. If you are also one of those Windows users whose computer keeps losing internet connection. Here some applicable solutions to fix this.
Note : Bellow Solutions are applicable to Fix Both WiFi and Ethernet connection Drop problems.
Run The Network Troubleshooter
Windows 10 Have built-in Network Adapter troubleshooter And Running this tool scan and fix basic Network and internet connection Related problems itself. So before performing any troubleshooting steps, we recommend To run the Network troubleshooter and let windows to fix the problem for you.
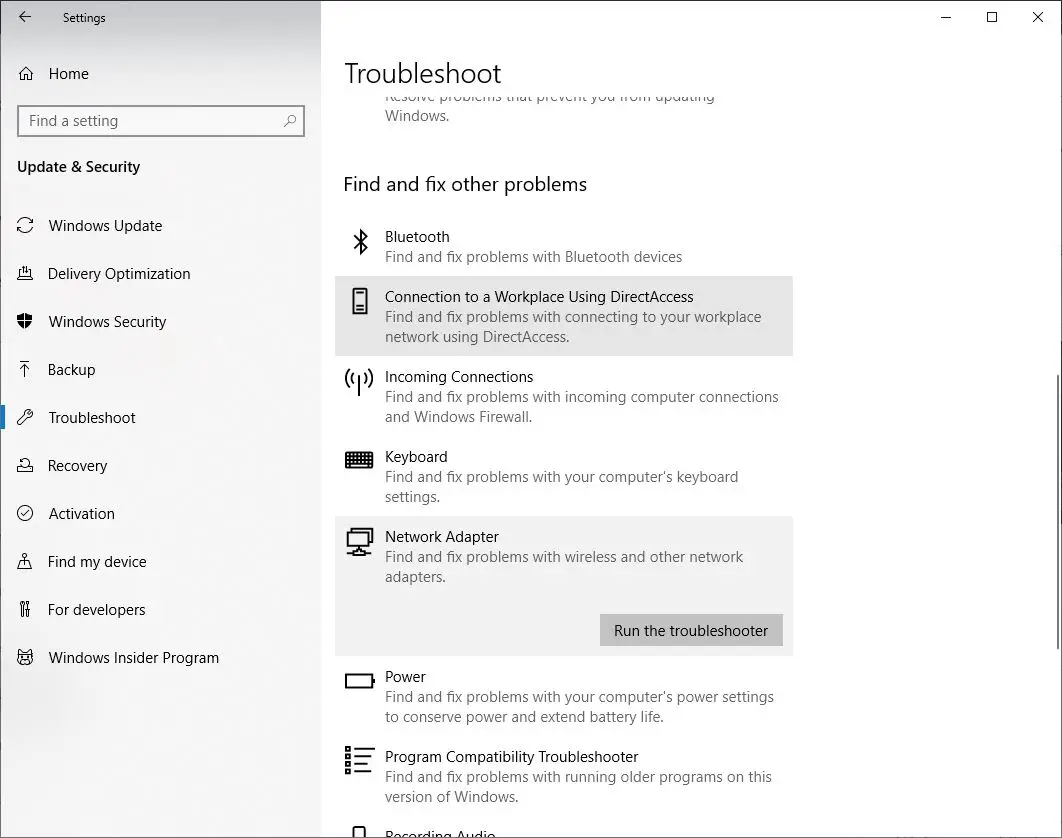
You Can Run the Tool From Settings -> Update & Security -> Troubleshoot. Then scroll down, under Find And fix other problems click on Network Adapter and click on Run the Troubleshooter.
Then follow on-screen instructions and let the troubleshooter to Check and fix the problems automatically for you. After That Restart windows to take a fresh restart and check Network & Internet connection working properly.
Update Network Adapter Drivers in Windows 10
If Running Network Adapter Troubleshooter Still having same is then Need to perform some manual troubleshooting to fix this issue. As discussed before corrupted, Incompatible Network Adapter driver mostly causes this ( Internet connection Frequently disconnects ) problem. So First try to Update, Rollback or Re-install the Network Adapter driver by following steps.
Note: Note If after the Recent Driver update the problem started then Try the Rollback driver option, Which reverts the current Driver to the previously installed version. Which Help To resolve the issue Also, Try to Update the Network Adapter Driver And re-install Network adapter driver.
Roll Back Driver
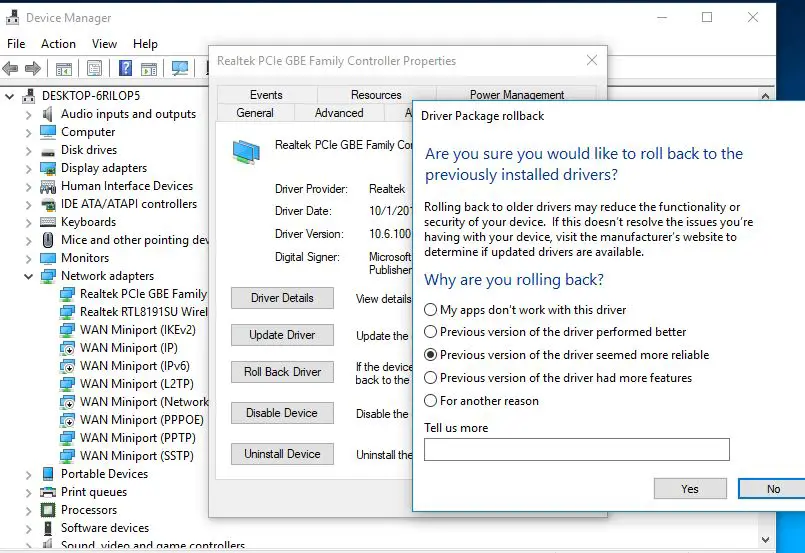
If you Notice After the Recent Network Driver update the problem started then the Perform Roll Back Driver option is very helpful. Which revert the current driver to the previously installed version. To Rollback Driver
- Open Device Manager by right click on the windows 10 start menu ( or you can press win + R, type devmgmg.msc hit the enter key ) and select the Device manager option.
- This will display all installed driver lists, expand Network adapters and double click on installed Ethernet / WiFi Adapter Driver.
- Move To the driver tab you will get the option Rollback driver, click on it.
- Select any reason when ask for why you roll back the driver and follow on-screen instruction.
- After That Restart windows and check Network / Internet connection working properly without drop / Disconnecting.
Note: Roll Back Driver option only applies if the problem started after recent driver update.
Update Network Adapter Driver
If the Windows 10 network drivers installed on your computer are outdated then it is possible that you keep losing internet connection on Windows 10 PC. To solve this inconvenient internet issue, you need to update the network adapter driver.
To update the Network adapter driver
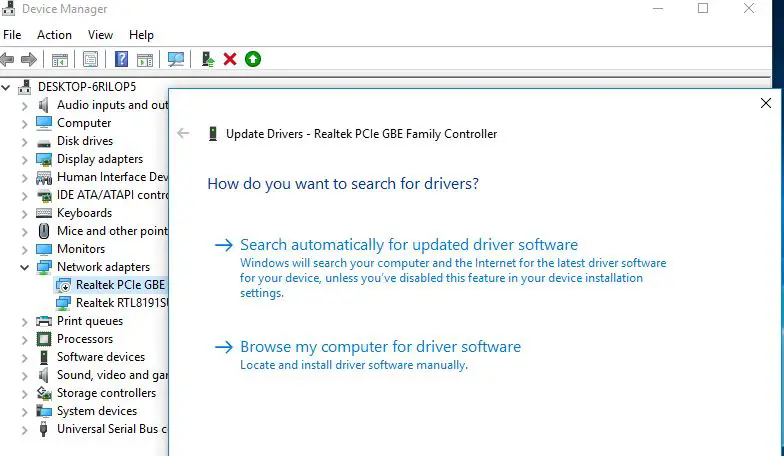
- Open Device Manager by press Win + R, type devmgmt.msc and hit enter.
- Then expend Network adapter, Right-click on the installed network adapter and select update driver.
- Select option Search Automatically for updated driver software and follow on screen instruction.
- This will check for the latest available network adapter Driver, If found any this will download and install it for you.
- After that restart windows and check Network And Internet frequently Disconnect Problem get fixed.
Re-Install Network Adapter Driver
If after performing Rollback or Update the network adapter Driver still having problems. Internet keeps disconnecting and reconnecting on Windows 10 PC. Then try to Reinstall The Network Adapter Driver by following below.
First, you need to download the Windows 10 network adapter drivers from your computer manufacturer’s website. You can follow these links:
After downloading the required network drivers, open Device Manager by typing device manager in the Windows 10 Search bar and then clicking OK. Expand the Network Adapters section and right-click on the network adapter which you are using on your computer then select uninstall Device.
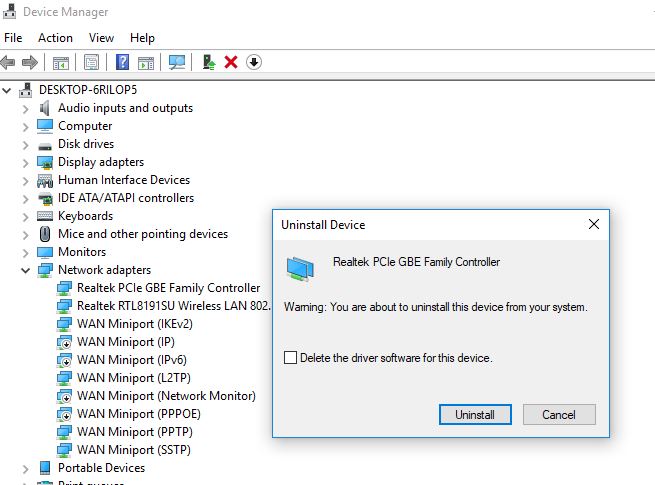
Now Restart the computer, On the next start windows automatically search and install the latest available Network driver. If Not installed then open Device manager -> Action -> scan for hardware changes.
Again Right click on new installed Device driver -> Update driver software. Then Select option Browse my computer for driver software option and you have to browse the drivers which you have downloaded from the manufacturer’s website. Once you have located the drivers, click on the Next button to proceed. After updating the network drivers, restart your Windows 10 computer and then connect to the WiFi network. Check Updating network adapter drivers should solve the Windows 10 losing internet connection problem.
In case, you are still not able to fix the issue WiFi connected but no internet connection on laptop or desktop computer even after updating the network drivers then follow the next steps.
Reset TCP/IP and Winsock in Windows 10
If after update the network Driver still having the same issue ( WiFi says connected to the internet but no internet connection on laptop or desktop computer). Then you can reset the Windows Socket API. Along with that, you have to reset both IPv4 and IPv6 protocols on your computer as well.
First, open the Command prompt as administrator, Then perform command bellow one by and one and hit the enter key to execute the command.
After all commands are executed successfully, now Restart windows to take changes effective. On the next login, check to connect to your Wi-Fi network. This time, you will be able to surf the internet properly without facing Windows 10 losing internet connection issue.
Reset Network Configuration
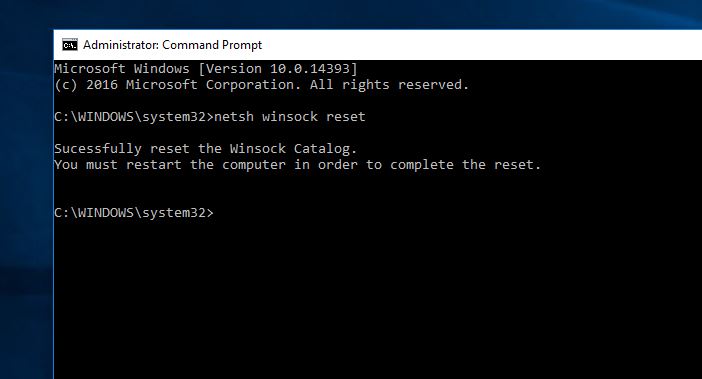
If the problem still exists, You can reset your connection settings by using some commands. It is very useful to troubleshoot any internet connectivity problems. Again open the command prompt as administrator and perform command bellow one by one, hit the enter key to execute the command.
netsh winsock reset
netsh int ip reset
ipconfig /release
ipconfig /renew
ipconfig /flushdns
Now, Check, If it helps to fix windows keeps disconnecting from Wi-Fi.
Check Power Management Issues
Some users suggested, it is quite possible that your computer is automatically turning OFF its WiFi Adapter in order to conserve power. Since this power-saving feature appears to be interfering with your WiFi Network, you are quite justified in Turning OFF this feature.
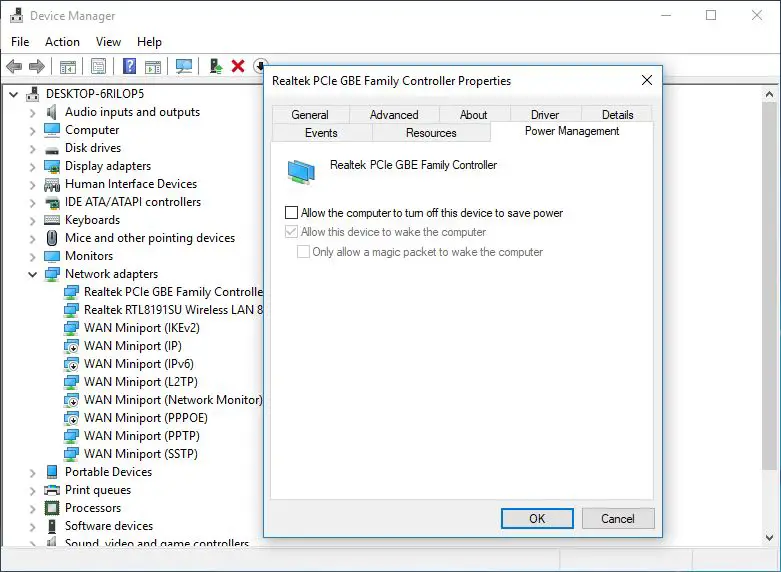
First Press Windows Key + R, then type devmgmt.msc and hit Enter. Expand Network adapters then right-click on your installed network adapter and select Properties. Then navigate to Power Management Tab and uncheck “Allow the computer to turn off this device to save power.“ Click ok, Apply and close Device manager.
Again open Control Panel -> Hardware and Sound -> Power Options -> change plan setting -> Change Advanced plan setting Expand Wireless Adapter Settings, then again expand Power Saving Mode. Next, you will see two modes, ‘On battery’ and ‘Plugged in.’ Change both of them to Maximum Performance.
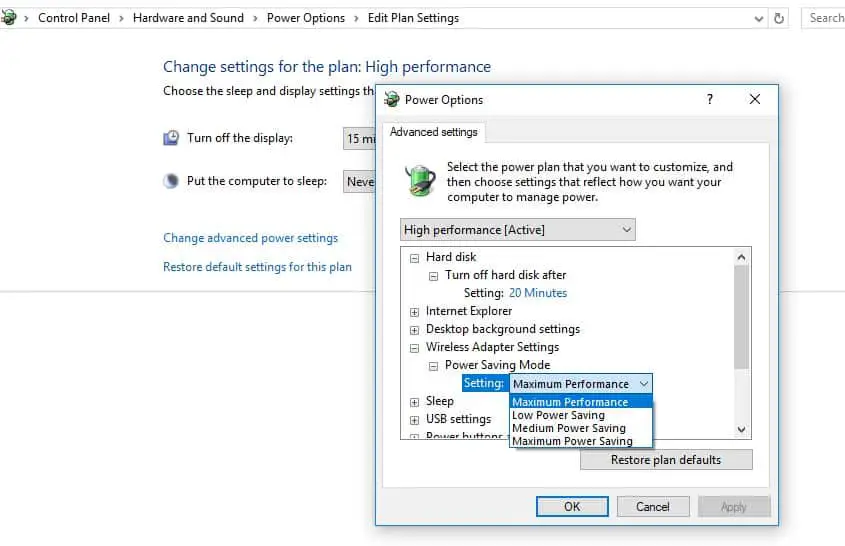
Click Apply followed by OK. Reboot your Windows to save changes. This would help to resolve the Internet / WiFi keeps disconnecting issue.
These are some most applicable solutions to fix Windows 10 Frequently Disconnect Internet Connection. Or WiFi connection connects and Disconnect frequently, the Internet just keeps dropping and then connecting back on again etc on windows 10 computer. I hope apply the above steps to resolve the Internet Disconnect and reconnect issue. Face any difficulty while apply the above steps or have any query, suggestion about this post feel free to discuss on the comments below.


