Acer C710: установка Windows 10
8000 рублей c доставкой). Покупал из США с доставкой посредником.
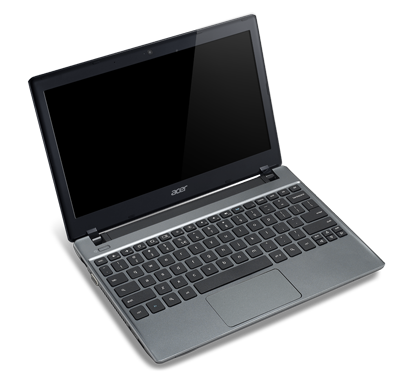
В отличии от выпущенных тогда хромбуков, в C710 процессор Intel (уже в то время появлялись первые ARM-хромбуки, на которых настольная Windows не установилась бы никогда) и имеется возможность апгрейда — есть два слота под оперативную память и HDD обычного ноутбучного размера (именно поэтому была выбрана данная модель).
BIOS’а как такового не было, но появлялись энтузиасты в интернете пытавшиеся установить на ноутбук отличную от ChromeOS операционною систему.
Наигравшись с ChromeOS, в дополнение была поставлена Ubuntu (ChrUbuntu) с возможностью переключения между системами, потом поставлен только Debian с предварительной перепрошивкой BIOS Coreboot SeaBIOS на котором и эксплуатировался ноутбук до последнего времени.
Пришли новогодние праздники и появилось время для экспериментов.
Поиски привели к инструкции по установке Windows 10 на сайте coolstar.org/chromebook

Реально можно получить кирпич, который не будет загружаться, правда у меня получилось вернуть в нормальное состояние.
Если вы рисковый и бесстрашный уверены в своих силах, то можно перейти к установке BIOS.
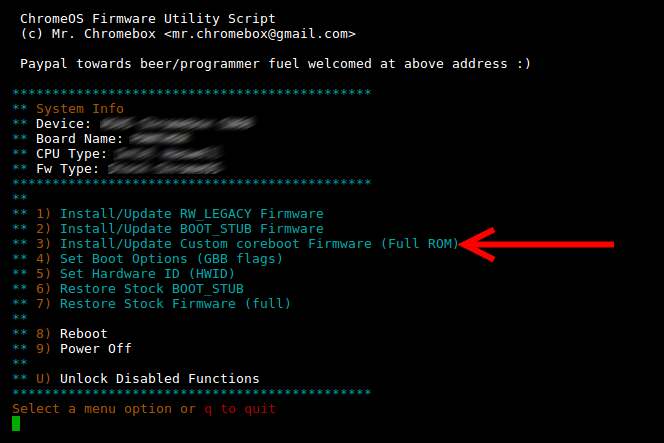
Установка BIOS
В терминале выполняем:
Выбираем 3-й пункт, нажимая цифру 3 на клавиатуре.
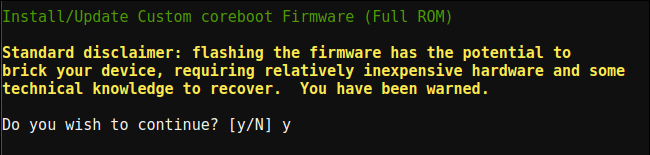
Нас предупреждают о возможных рисках окирпичить устройство, подтверждаем, что нас предупредили нажимая «y» на клавиатуре.
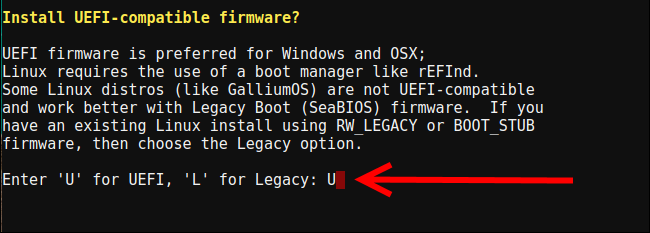
Дальше будет вопрос про UEFI или Legacy, выбираем UEFI, нажимая «U» на клавиатуре.
Ждем зеленой надписи об успешной установке.

Нажимаем Enter, q, Enter.
Запись загрузочной флешки
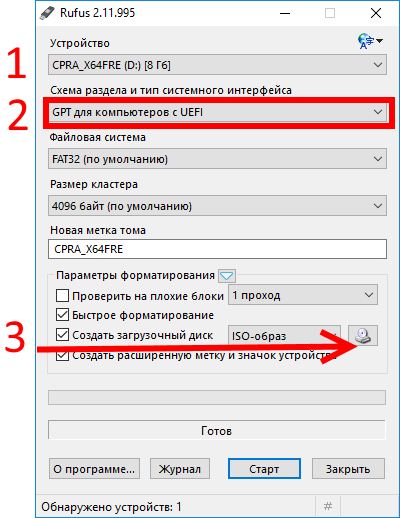
Находим компьютер с установленной Windows. Скачиваем последнюю версию программы Rufus с официального сайта. Находим образ Windows 10 x64. Вставляем флешку. Открываем Rufus, выбираем флешку, выбираем образ. «Схема раздела и тип системного интерфейса» выбираем «GPT для компьютеров с UEFI»! Нажимаем старт и ждём окончания процесса записи.
Установка Windows 10
Touchpad работать не будет, для удобства можно найти USB мышь и подключить к ноутбуку. Вставляем флешку в ноутбук, включаем его, нажимаем Esc. Выбираем пункт «Boot Manager».
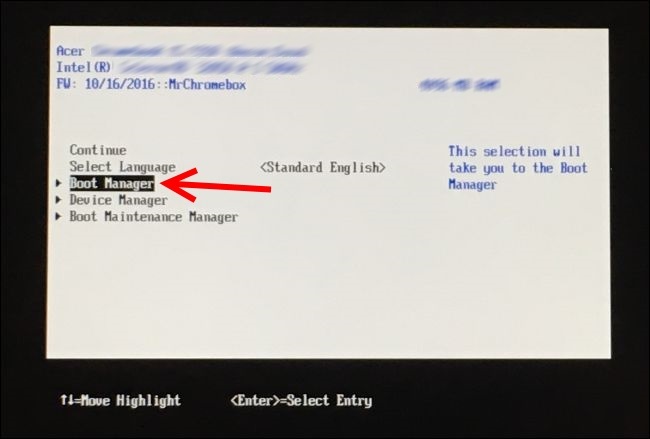
Дальше выбираем UEFI USB Flash. Устанавливаем Windows (в моем случае удалил все разделы и поставил на весь диск).
Установка драйверов
TouchPad
1. Touchpad будет работать только когда включен тестовый режим.
2. Иногда он не будет работать после сна/гибернации/перезагрузки, лечится это перезагрузкой (иногда может потребоваться неоднократная перезагрузка).
На текущий момент времени не удалось найти подписанной версии драйвера для touchpad’а, поэтому:
Запускаем командную строку от имени администратора: Пуск → Служебные → Windows → Командная строка → Правая кнопка → Дополнительно → Запуск от имени администратора.
Перезагружаем ноутбук. Скачиваем все файлы по этой ссылке. Запускаем и устанавливаем crostouchpad.4.0-2-installer.exe.
Неизвестные устройства в управлении компьютером
Открываем Пуск → Средства администрирования → Управление компьютером → Диспетчер устройств. Неизвестное устройство → Правая кнопка → Отключить.
Для каждого из двух оставшихся устройств с желтым восклицательным знаком Правая кнопка → Обновить драйверы → Автоматический поиск драйверов.
Одно из устройств поставится и будет работать нормально под именем «Intel® 7 Series/C216 Chipset Family Thermal Control — 1E24».
Распаковываем 200888.7z. Второе устройство → Правая кнопка → Обновить драйверы → Выполнить поиск драйверов на этом компьютере → Указываем путь к распакованному архиву → Далее. Ждем установки драйверов.
Устройство поставится и не будет запускаться под именем «Intel® Dynamic Platform and Thermal Framework Processor Participant Driver».
Запустить работу двух устройств из Диспетчера устройств не удалось, просто отключил не запускающееся.
Intel® Dynamic Platform and Thermal Framework Processor Participant Driver → Правая кнопка → Отключить.
Аудио
0007-64bit_Win7_Win8_Win81_Win10_R280.exe — запускаем и устанавливаем.
SD card reader
CardReader_Broadcom_16.0.2.8_W81x64_A.zip — запускаем и устанавливаем.
Windows 10 работает.
Работает аудио выход, HDMI, VGA, CardReader,web-камера, клавиатура, touchpad работает (только в тестовом режиме).
Работает субъективно быстрее чем комбинация “этот же ноутбук”/ChromeOS, “этот же ноутбук”/Debian, или “этот же ноутбук”/Ubuntu.
Работать с ноутбуком на коленях неприятно, AIDA64 показывает температуру диода PCH 79 °C, тоже самое было и на Linux’ах (возможно проблема только моего экземпляра).
Про автономность сложно говорить, аккумулятору три года, до этого ноутбук работал только от сети.
Для одновременно запущенных Chrome с десятком вкладок, FileZilla, синхронизации Яндекс.Диска (более 100 Гб) ноутбука хватает за глаза.
На выходе получили полноценный ноутбук (в отличии от ChromeOS) с полноценной Windows 10.
How to install Windows10 using a USB flash drive?
I got an Acer Aspire T3-715 desktop PC.
There are some reasons that I want to remove every thing on my this PC. And then install Windows 10 again as a «Brand new PC»
I mean to install via an USB drive. That you remove everything first completely, and then installing Windows 10 again on your PC. That removes all early error etc . . .
Someone those are Data Experts says that this method have to do after every 6 or 8 months. Because that gives you every time a brand new Windows, that removes/deletes all current error and all other things.
I bought this PC in october last year. It has already been in service center.
It is very difficult for me to pack this so big and heavy desktop PC and then send it to service.  The problem last time was that it took almost 5 to 6 minuts to come to the dekstop after you start up your PC.
I just want to remove all, and then install Windows again, that remove all eraly error and all other things. That I dont understand the reasons
Lastly, Is there any easy way to do that without any problem that cause trouble to you while doing that? Because it is very expencive to get help by an Data Expert.
Thanks for your all dear members reply! 
[edited to comply with guidelines]
Best Answer
1) download a windows 10 iso using Microsof tool:
http://go.microsoft.com/fwlink/?LinkId=691209
select the proper windows 10 version (the same installed on your laptop) and choose to save it as iso file when prompted
2) download Rufus:
http://rufus.akeo.ie/?locale=en_US
plug your USB flash drive, run Rufus then:
select ISO image from the dropdown menu near «Create a bootable disk»
click on the little icon on the right and browse to the windows 10 downloaded iso file
as Partitions scheme select «GPT partition scheme for UEFI»
as File system select «FAT32»
click on Start
wait until it finish, then uplug your USB flash drive
3) with the USB flash drive plugged to your PC, boot to BIOS pressin Del key
4) look if F12 boot menu is enabled, if not, enabled it
5) check if UEFI is the selected BIOS mode (no launchCSM)
6) press F10 to save and exit
7) reboot and press F12, choose the USB flash drive as bootable device
8) choose to do a custom installation and then delete everypartition on your main HDD/SSD
9) then continue with windows 10 installation
FAQ & Answers
1) download a windows 10 iso using Microsof tool:
http://go.microsoft.com/fwlink/?LinkId=691209
select the proper windows 10 version (the same installed on your laptop) and choose to save it as iso file when prompted
2) download Rufus:
http://rufus.akeo.ie/?locale=en_US
plug your USB flash drive, run Rufus then:
select ISO image from the dropdown menu near «Create a bootable disk»
click on the little icon on the right and browse to the windows 10 downloaded iso file
as Partitions scheme select «GPT partition scheme for UEFI»
as File system select «FAT32»
click on Start
wait until it finish, then uplug your USB flash drive
3) with the USB flash drive plugged to your PC, boot to BIOS pressin Del key
4) look if F12 boot menu is enabled, if not, enabled it
5) check if UEFI is the selected BIOS mode (no launchCSM)
6) press F10 to save and exit
7) reboot and press F12, choose the USB flash drive as bootable device
8) choose to do a custom installation and then delete everypartition on your main HDD/SSD
9) then continue with windows 10 installation
First of all many thanks for your kind reply.
But do you suggest me to do that or not yet?
Because my current this desktop PC is almost 6 month old.
The reason I want to do that is to delete all I already intalled, and then begin with a brand new Windows.
I am using desktop PC more than my laptop PC. Because I like to use desktop PC than laptop.
Lastly, as you are an Data Expert. Do you suggest me to do that?
[GUIDE] How to install Windows 10 cleanly
DISCLAIMER: This is by no means the best way to do it, just one I like. There are several other ways to go about solving problems without resorting to clean installing (like the Alt+F10 procedure Acer system ship with), but if you are willing to reinstall everything, or it just tickles your fancy; carry on.
- First things first, things we’ll need for the procedure:
— An 8GB+ USB stick, that’s where the installation files and drivers will reside.
— A Windows 10 image, or installation media. For the purpose of this guide I’m going to be using the official Media Creation Tool to download and copy the required files.
— Double Driver, it’s a little (and old) utility to handle drivers. We’ll be using it to make a backup of the ones the system has already, if one can access the system that is.
Acquiring the media:
Download and run the tool and proceed through its wizard style dialogs to create the bootable media. Have the USB flash drive inserted into the machine so it can copy it directly. Alternatively, download an ISO image and use something like Rufus to create a bootable USB stick later on  .
.
The architecture you’re looking for when asked in one of the steps should be set automatically, but it’s likely 64-bit.


After the process, that USB stick will contain Windows installation files, but we’ll be adding to it several things.
For one, depending on your system (whether it’s Intel based or AMD) you’ll want the storage drivers to be installed from the beginning of the procedure. For Intel they’re called Intel RST and can be downloaded either from the support page of your machine model or from Intel’s Download Center. As for AMD, traditionally their SATA implementation didn’t require specific drivers, but I don’t know how things are on Ryzen 3000 and 4000 systems yet.
By the way, if your system has an Optane module accelerator RST is going to be mandatory, but we’ll get there in the end. There are 2 packages, we’ll need them both. Extract the one for the installation in a folder inside the USB stick and copy the other one as is, I chose «drivers/RST» for simplicity:

Now is where Double Driver comes in handy if one has access to the original system. There are drivers that come already with Windows, and some components have inbox drivers present that then get overwritten by Windows Update. What we’re interested in are the WiFi (or Ethernet) ones, just in case the card was finicky and there were no drivers by default in a fresh Windows installation; I don’t know about you but I’d like to connect to the net after I’m done.
Open the program and you’ll see some drivers are selected by default, those are the ones that didn’t come with Windows. If you which one is your network adapter, you can select only that; but if you don’t keeping the defaults is fine too.
Choose to back them up in another folder inside the stick, Double Driver creates a folder structure so if you’re like me and used a «drivers» folder before just point to that:


And now the fun begins! Access the firmware settings of your machine by pressing F2 repeatedly when booting and ensure 2 things:
— The default SATA operation mode. If you have an Optane module it must be RST with Optane, AHCI is the older standard. NOTE: To access that setting you may need to press Ctrl+S in the Main tab.
— The boot menu is enabled. We’ll be booting from the USB stick instead, so that needs to be enabled.
— As for Legacy vs UEFI, it’s dealer’s choice. UEFI is more modern and the current standard to be fair and in newer systems there may not be any other option.

When the settings are right, save them and reboot. Then press F12 until the boot manager is presented and choose the USB stick that was just created:

You’ll be presented with the Windows installation in a possibly huge manner, don’t fret, it’s because at this point of the installation the graphical drivers aren’t installed yet.
If your machine came with Windows, the appropriate version will already be selected (actually, you may not even see the selection screen), otherwise you’ll be asked for the key. You don’t have to enter it now, it can be skipped.


Next order or business, custom install all the way. And now 2 things can happen:
— You see no drive, nowhere to install to: that happens if we need to load the driver we downloaded before (e.g. RST).
— You see the current partitions of the disk, which means an inbox driver is already provided.
In any case, this is the stage in which I like to load the storage driver, just click on «Load driver» and point to the drivers folder we had previously created. The appropriate driver, if any, will be selected automatically:


After you’re brought up to the previous window, delete every partition you see. Yep, that’s it, we want a clean install, so everything must go. Windows will create the appropriate set of partitions depending on the boot architecture (legacy or UEFI).
NOTE: Optane users are in for a treat, because Intel or Microsoft didn’t test things properly, the Optane configuration utility may throw an error later on about not being able to resize the last partition of the disk to create metadata. If that is your case, you’ll need to delete the last partition (the recovery one) and switch to a recovery in main partition scheme, or disable recovery altogether (which doesn’t sound right, does it?)
Then click on the empty space, and click «Next». The first stage of the Windows installation will begin and a reboot will come next. After a couple of reboots you’ll be presented by the OOBE, the out-of-the-box experience.
Now you have a series of choices and settings to go through. It’s pretty much a personal choice, but I like to not connect to the Internet just yet, I’d rather use a local account (at least at first). When you’re done you’ll be greeted with your new desktop:


Now is where we could deal with the Optane acceleration if your system has it, run the RST installation and enable Optane (or run into the error I mentioned earlier). I didn’t have any Optane module in my machine because I was already using an SSD so that’s what it reads.
NOTE: AMD users need nothing of this sort, they can skip to step 10.

If you weren’t presented with the option to connect to a WiFi network, and you have a laptop with a WiFi card, it’s likely that your card requires a driver that’s not provided by Windows. Here is where the Double Driver backup comes in handy.
Open the Device Manager (for example by typing it in the Start menu, or selecting it from the Win+X menu) and see if there’s any yellow triangle-labeled item on the list with a name similar to «Network adapter». Disregard the rest of the yellow triangles for now.
If there’s any, right click it and choose to update its drivers:


Browse to the «drivers» folder in the USB stick and let it do its thing, after that you should be able to connect to your network if you weren’t before.
Last but certainly not least, Windows Update. After you’re connected to the Internet run Windows Update. It will not only install the latest cumulative update but also drivers for those yellow triangle devices. You’ll need to reboot the machine most likely, but afterwards you’ll have a cleanly installed Windows 10 system on your machine!

A couple of things remain, first make sure there are no devices in the Device Manager that display a yellow triangle. If there are, those don’t have drivers available in Microsoft’s Catalog and you’ll need to download them from the support page or use one of those driver update utilities, like Driver Easy for example.
Another important thing for laptops is installing the app that controls keyboard shortcuts, which is called Quick Access in Acer systems. You can download it from your support page, but here’s a quick link just in case: v3.0.3010.
And that’s it, install anything you like at this point and enjoy your new system! Some apps I find useful would be FastStone Capture (paid), Hard Disk Sentinel (paid), HWiNFO, Macrium Reflect, MPC-BE, Notepad3, Paint.NET, Search Everything, Space Sniffer, SumatraPDF or Tresorit, for example. Give some a try, you may find one that suits you
By the way, activation, you should already be activated upon installing if your machine came with Windows preinstalled, but if you were activated with a digital license before, or if you entered a key during setup, you’d have been activated as soon as you connected to the Internet.


