- Acronis True Image for Mac — зачем и для кого?
- Зачем и для кого мы делали этот продукт?
- Ограничения
- Acronis True Image for Mac
- Backup Your Mac to an External Hard Drive
- Choosing an External Drive: Solid-State Drive (SSD) or Hard Disk Drive (HDD)
- Hard Disk Drives
- Solid State Drives
- Formatting an External Drive
- Backup with Time Machine
- Using an External Drive
- How to Choose a Backup Disk
- How to Back Up Using the Time Machine
- AirPort Time Capsule
- Advantages of Acronis True Image for Macs
- How to Backup a Mac to an External Hard Drive Using Acronis True Image
Acronis True Image for Mac — зачем и для кого?
Зачем и для кого мы делали этот продукт?
Выпуская Acronis True Image for Windows, мы последнее время все чаще сталкиваемся с запросами о поддержке Mac от наших клиентов. Оно и понятно с успехами Apple за последние несколько лет.

Да, в Mac OS X есть Time Machine, но если человек пользовался Acronis True Image, то, конечно, у него возникает желание иметь такое же решение и под Mac OS X. То есть первая группа наших клиентов ̶ это наши существующие клиенты со смешанным окружением.
Вторая группа клиентов ̶ это люди, которые не удовлетворены тем, как работает встроенная Time Machine. Давайте на этом остановимся подробнее.
Настройка Time Machine
Time Machine делает резервные копии раз в час, и это не так просто поменять. Да, большинству читающих этот пост и пользующихся Mac OS X это сделать не сложно, но простой пользователь с этим вряд ли быстро справится. Так что возможность четко распланировать резервное копирование – это плюс.
Инкрементальные копии файлов
Time Machine не очень хорошо делает инкрементные резервные копии. То есть они есть, но на файловом уровне. Если поменялся файл, то он весь целиком и будет сложен в резервную копию. Особенно болезненно это для виртуальных машин. По сути пользоваться TM в таком случае практически невозможно. Место, куда вы складываете свои копии, забивается очень быстро.
Поддержка виртуальных машин
Раз речь зашла о виртуальных машинах, мы поддерживаем резервное копирование виртуальной машины Parallels. То есть даже если у вас запущена виртуальная машина Parallels, резервная копия вашего диска будет содержать и ее, причем в консистентном состоянии. Из этой копии можно будет восстановить виртуальную машину без потери данных и «загрузочности». Почему только Parallels? Большей частью потому, что Parallels доминирует на рынке.
Резервное копирование в облако
Поддержка Облака. Мы умеет делать резервные копии в Облако. Да, первая копия займет время, лучше поставить ее на ночь, например. Но в последующем все будет значительно быстрее. Пользователи Mac OS X в среднем более мобильны, чем пользователи Windows, и потому иметь доступ к своим резервным копиям и, главное, продолжать эти копии делать в поездке, мы считаем очень важным.
Сжатие данных
Time Machine не сжимает данные при резервном копировании. Мы сжимаем.
Поддержка SMB
Мы умеем делать резервные копии на SMB шару (AFP, конечно, тоже). Для смешанного Windows–Mac окружения это тоже заметный плюс.
В итоге в текущем решении мы попытались сделать акцент на наиболее надежном хранении данных, учитывая интересы целевых пользователей. Используя Acronis True Image for Mac, можно достаточно эффективно соблюдать правило трех копий в разных местах (одна копия обязательно удаленная). Одна копия — у вас на машине, вторая — на локальном USB диске или NAS, третья — в Облаке.
Ограничения
Чтобы быть до конца честными, давайте поговорим о текущих ограничениях нашего продукта. Так как любая комерческая разработка ограничена во времени, у нас тоже были достаточно жесткие сроки. Потому было решено сделать минимально необходимый набор функциональности, чтобы выйти на рынок и начать получать обратную связь от пользователей. Дальше, уже ориентируясь на отзывы, можно планировать следующую версию продукта. Итак, какие у нас ограничения. Мы в текущем выпуске не поддерживаем:
• Bootcamp,
• Fusion Drives
• File Vault
В следующих версиях мы будем добавлять поддержку этих конфигураций, выстроив приоритеты на основе отзывов от пользвателей.
Небольшое лирическое отступление на тему «Почему резервная копия — это важно?»
Мне, наверное, по работе положено всех вокруг убеждать, что озаботиться вопросом резервных копий это важно. Но так уж вышло, что я и сам глубоко убежден в необходимости этим заниматься. К сожалению, именно в нашей культуре надежда на авось очень мощная. В нашем обществе отсуствуют очень полезные привычки, которые могли бы значительно упростить жизнь и сэкономить много времени. Чтобы не быть голословным, приведу недавний пример из своей жизни. Наверняка многие из вас подавали налоговые декларации на возврат налогов по ипотеке. Раньше, чтобы это сделать, надо было указать подвержденные доходы за период и сколько было уплачено процентов банку за тот же период (как правило год). Но, как я недавно обнаружил, теперь надо указывать количество уплаченных денег по процентам за весь период кредита, а не только за последний год. Казалось бы ерунда, но это если у вас сохранились документы, которые вы собирали подавая прошлые декларации, ну или сами декларации. А я их не сохранил, потому что в этом никогда не было необходимости. Теперь, судя по всему, получить нужные цифры можно только обратившись в налоговую. А это потраченное время и лишняя забота. Так что такие дела, резервная копия — всему голова.
Источник
Acronis True Image for Mac
User rating User Rating

Acronis True Image for Mac is a new, multi-platform edition of the trusted backup tool. The application can work with both local and cloud storage, and can be configured to backup your whole disk or just single files or folders. It brings faster disk imaging technologies, supports data migration and the ability to backup virtual machines.
Key features include:
- Full system image backup.
- Cloud backup to a secure online location.
- Easy and fast recovery.
- Personal key encryption technology that protects your backups.
- Data migration (PC).
- Parallels compatibility and virtual machine backup.
- Smart scheduling.
- Ease of use.
- Advanced backup modes.
- Support of most storage media.
- Full system restore from the cloud.
Although navigating around Acronis True Image for Mac is an easy and intuitive task, there are a number of small hiccups that need to be ironed out with this application. Not least of which is the application’s failed ability to work with all file systems. You can only work with certain ones, e.g. Mac OS Extended format (case-insensitive), FAT32, exFAT, and NTFS (read-only). It also struggles with generating backup images on Macs that have Bootcamp installed, or for that matter use Fusion Drive or File Vault 2. That having been said, the whole backup process is very simple to follow; just specify the source and destination location for the backup and Acronis True Image for Mac will take care of the rest.
As you would expect from a firm that has been making backup solutions for well over a decade, Acronis has hit the mark again with the latest edition of their renowned backup application, even with the file system flaw.
With Acronis True Image you can protect your Mac’s data should anything unfortunate happen. With a full system backup in place, you can keep all your data safe even if your computer is lost, stolen or damaged. You can backup locally or remotely to the cloud, and then access your data anytime and from anywhere you need.
Источник
Backup Your Mac to an External Hard Drive
Apple enthusiasts love the sleek design and easy user interface of the company’s devices. Yet setting up a backup of your Mac can be frustrating since most external hard drives must be formatted before being used. As you’ll see, however, knowing how to back up a Mac to an external hard drive doesn’t have to be intimidating.
Choosing an External Drive: Solid-State Drive (SSD) or Hard Disk Drive (HDD)
The first step in creating a backup for your Mac is choosing an external drive that enables the best data recovery option. Choosing between an SSD or HDD means taking a look at the pros and cons of each.
Hard Disk Drives
Pros: Storage capacity, price point
Cons: Physical damage, physical size, speed
If you’re looking to store a lot of data, then a traditional HDD might be the best option because larger capacities drives are more reasonably priced. HDDs use spinning disks to write data, however, which creates two different problems. First, the spinning disks are more likely to break down if dropped or handled roughly. Second, if you choose to fragment the information to protect your data recovery, the backup takes time.
Solid State Drives
Pros: Speed, size, malfunction rates, lifespan
Cons: Price point, storage size
If you’re looking to store 2 TB of data or less, an SSD offers tremendous value, boasting high speed, small size, and long lifespan. SSDs use flash memory which writes data to memory chips rather than spinning disks. While this technology makes them less likely to suffer physical damage, it also makes storing large amounts of data expensive. Additionally, although they are expected to have longer lifespans than HDDs, they are relatively new which means projections of their lifespan potential remains conjecture.

Formatting an External Drive
Copying the files from your Mac to an external drive allows you to save data on your own terms. Since most external hard drives are formatted for PCs, before the backup of your Mac begins you need to format the hard drive for macOS.
- Connect the hard drive to your Mac.
- Open Applications >Utilities >Disk Utility
- Find your external hard drive in the list of drives.
- Click «Erase» from the Disk Utility options. Confirm the action.
- A Format pop-up window will give you the opportunity to choose one of the following:
- Mac OS Extended (Journaled) uses Mac formatting to protect data integrity
- Mac OS Extended (Journaled, Encrypted) adds a password and partition encryption to the Mac format.
- Mac OS Extended (Case-sensitive, Journaled) makes case-sensitive folders and Mac format. («Backup» and «backup» will be two different files.)
- Mac OS Extended (Case-sensitive, Journaled, Encrypted) adds password and encryption protection to the partition while also including Mac formatting with case sensitive folder names.
- MS-DOS (FAT) allows you to use Windows volumes of 32 GB or less.
- ExFAT allows you to use Windows volumes over 32 GB
- Rename the new drive
- Under «Security Options» make sure to set the drive to write over past data three times or more.
- Erase and Confirm
Backup with Time Machine
Your Mac comes with Time Machine, Apple’s built-in backup feature. Learning how to use Time Machine’s features can help you create a backup for data recovery.
Using an External Drive
To set up Time Machine, you need to start by buying an external storage solution such as:
- An external hard drive that connects using the USB, FireWire, or Thunderbolt port on your Mac.
- Connecting the external hard drive to the USB port on an AirPort Extreme Base Station on your network
- An AirPort Time Capsule, Apple’s wireless router with network-attached storage, which you set up on your network
Time Machine will automatically suggest that you encrypt your backup when you connect the external drive.
How to Choose a Backup Disk
Time Machine should suggest a backup disk when you connect the drive to your Mac. However, if it does not do this automatically you can easily choose the disk.
- Go to the Time Machine menu
- Open Time Machine preferences or choose Apple menu >System Preferences >Time Machine
Once you have opened System Preferences, you can click «Select Backup Disk», «Select Disk,» or «Add or Remove Backup Disk.»
Select a backup disk from the list and then click «Use Disk.»
If you want to choose multiple disks for security or convenience, you can keep repeating these steps to add more disks such as one for home, work, or any other location necessary.

How to Back Up Using the Time Machine
After setting up Time Machine, the program automatically makes backups for you. These include continuous hourly backups over a 24-hour period. The program saves daily backups for a month and weekly backups for previous months. Once the disk is full, Time Machine automatically deletes the oldest backups.
Time Machine offers several ways for you to personalize your backups.
- To backup immediately, go to the Time Machine menu and click «Back Up Now.»
- To disable the automatic backups, open Time Machine preferences. For macOS Sierra or later, you can deselect Back Up Automatically. In OS X El Capitan or earlier, you need to turn off Time Machine. If you choose to turn off automatic backups, you can still manually back up your Mac using «Back Up Now.»
- To terminate an in-progress backup, go to the Time Machine menu and choose «Skip This Backup» or «Stop Backing Up.»
- To review the status of a backup, go to the Time Machine menu. The icons will tell you one of three statuses: Time Machine is backing up, idle until next automatic backup, or unable to complete the backup.
- To customize your backup, open Time Machine preferences from the Time Machine menu, click «Options,» then click + and select items you want to exclude.

AirPort Time Capsule
AirPort Time Capsule allows you to create automatic wireless backups without attaching an external backup drive. The setup assistant is built into iOS and the AirPort Utility for OS X, and once you set up Time Capsule, the backup disk will show up automatically in your Time Machine preferences.
- Open Time Machine
- Click Preferences
- Highlight «Data on AirPort Time Capsule» disk
- Click «Use Disk.»
Important: Apple announced in 2018 that it was discontinuing the AirPort series but would continue to support them for the next five years. With Apple’s cancellation of the AirPort router/NAS product line, finding a long-term data backup cloud solution is at the front of most Mac owners’ minds – and Acronis has the best alternative backup for Macs.
Advantages of Acronis True Image for Macs
Acronis True Image 2020 makes it easy to back up your entire Mac – allowing you to create a full image backup in just two clicks while delivering several powerful tools that Time Machine doesn’t.
- Device flexibility:Many Mac users are fully integrated into the Apple environment, using Apple’s mobile devices like iPhones and iPads in addition to their MacBooks and Mac desktops. Finding a single solution with the ability to back up all of your devices is increasingly important, which is why Acronis True Image is a great choice. In addition to backing up macOS, a single license of Acronis True Image supports an unlimited number of iOS mobile devices. It’s also worth noting that Acronis supports Windows and Android devices as well, making it a better solution for today’s multi-device, mixed-OS households. Time Machine only works with Macs, so if someone in your family swaps to an Android, their data won’t be protected like it could be with Acronis.
- Active disk cloning:Acronis True Image 2020 also allows you to clone an active Mac system disk without having to stop and reboot. That means you can connect a USB-c cable for a super-fast transfer of all your data to a new Mac machine, or make an exact bit-for-bit copy of your Mac on an external hard drive.
- All-in-one recovery tool:You can also use it to create an Acronis Survival Kit, an all-in-one recovery tool that puts everything you need to restore your system on one external hard drive, including boot media and all your backups.
- Cloud storage and features:A subscription to Acronis True Image also includes cloud storage, several powerful cloud-based features, and anywhere access to the data in your backup, which allows you to retrieve individual photos and files wherever you have an internet connection. Time Machine does not support cloud backups, which leaves your data at risk if a disaster damages both your original and local backup.
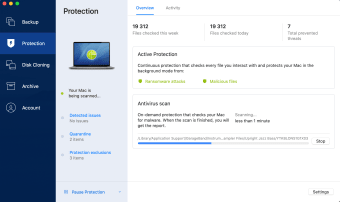
- AI-based anti-ransomware:Finally, while macOS machines have historically been immune from ransomware attacks, cybercriminals are increasingly targeting Macs. Acronis True Image 2020 is the only personal backup that includes an integrated defense against ransomware that uses artificial intelligence-based technology to detect and stop attacks in real time.
When it comes to Mac backup, clearly Acronis True Image beats Time Machine.

How to Backup a Mac to an External Hard Drive Using Acronis True Image
Acronis True Image 2020 enables a full Mac backup in just a few quick clicks.
- Open the Acronis True Image 2020 software and click «Back Up»
- Your whole Mac will be pre-selected as the source.
(If you want, you can specify a name for your backup.) - Click on Backup destination and select the external hard drive.
(You can also customize the scheduling, backup scheme, version controls and other options simply by clicking the gear icon.) - Once you’ve set the destination, click Backup and you’re done!
Источник


