- Acunetix Vulnerability Scanner Now Also on Linux
- Linux platform improves reliability, security and performance
- Benefits of Running Acunetix on Linux OS
- Take action and discover your vulnerabilities
- About Acunetix
- Acunetix, the Company
- Pen Testing
- Acunetix Free Manual Pen Testing Tools
- HTTP Security Testing Tools
- Basic Network Security Tools
- Advanced Web Security Tools
- Recommended Reading
- Installing Acunetix
- Minimum System Requirements
- Supported Browsers
- Networking PreRequisites
- Installation on Windows
- Installation on Linux
- Notes:
- Package Prerequisites
- SeLinux on CentOS 8, CentOS Stream, or RedHat 8
- Installation on MacOS Mojave and MacOS Catalina
- Activating your Acunetix Installation
- Language for Web Interface
- Time Zone
- Enable the AcuMonitor Service
- Enabling Additional Scanning Technologies
- Installing AcuSensor in your web application
- Installing Network Scanning (OpenVAS)
- Installing Malware Scanning
- Upgrading Acunetix
- Upgrading Acunetix for Windows
- Upgrading Acunetix for Linux
Acunetix Vulnerability Scanner Now Also on Linux
Linux platform improves reliability, security and performance
November 2018, London, UK – Acunetix, the pioneer in automated web application security software, has announced the release of Acunetix Vulnerability Scanner for Linux. Known to be reliable, cost effective and secure, Linux is the server operating system of choice for many large organisations including Facebook, Twitter and Google. Acunetix is one of the first commercial, automated web vulnerability scanners to be released for Linux.
“Following extensive customer research, it became clear to us that a number of customers and security community professionals preferred to run on Linux. Tech professionals have long chosen Linux for their servers and computers due to its robust security. However, in recent years, this open source operating system has become much more user-friendly. We are very proud to be one of the first commercial web vulnerability scanners to be released for Linux.”
Nicholas Sciberras, CTO
Acunetix is able to comprehensively and accurately scan all types of web applications, including those that rely heavily on JavaScript, such as SPAs (Single Page Applications. Version 12 launched in May this year and ships with a brand new, reengineered and rewritten scanning engine, making Acunetix the fastest scanning engine in the industry. Previously only available on Windows and Online, it is now also available on Linux.
Benefits of Running Acunetix on Linux OS
- Reliability and security: Linux is the operating system most often selected for servers that need close to 100% uptime. Using Linux increases the reliability needed for the thousands of operations required to scan a website.
- Cost-effectiveness: Acunetix customers can run the scanner in their own private cloud on either Amazon AWS, Digital Ocean or Google Cloud, for example.
- Performance: Linux requires less resources to run, resulting in extra resources to increase scanner performance.
Take action and discover your vulnerabilities
About Acunetix
User-friendly and competitively priced, Acunetix leads the market in automatic web security testing technology. Its industry-leading crawler fully supports HTML5, JavaScript and AJAX-heavy websites, enabling the auditing of complex, authenticated applications. Acunetix provides the only technology on the market that can automatically detect out-of-band vulnerabilities and is available both as an online and on-premises solution. Acunetix also includes integrated vulnerability management features to extend the enterprise’s ability to comprehensively manage, prioritise and control vulnerability threats – ordered by business criticality.
Acunetix, the Company
Founded in 2004 to combat the alarming rise in web application attacks, Acunetix is the market leader and a pioneer in automated web application security technology. From individual consultants to enterprises, penetration testers and security experts globally depend on Acunetix products and technologies. It is the tool of choice for many customers across sectors, including Government, Military, Education, Telecommunications, Banking, Finance, and E-Commerce sectors as well as many Fortune 500 companies such as the Pentagon, Harper Collins, Disney, Adobe and many more.
Get the latest content on web security
in your inbox each week.
Источник
Pen Testing

Acunetix Free Manual Pen Testing Tools
Acunetix Manual Tools is a free suite of penetration testing tools. These tools are not part of the Acunetix product and you need to download an installation package separately . Acunetix Manual Tools include 8 modules: HTTP Editor, Subdomain Scanner, Target Finder, Blind SQL Injector, HTTP Fuzzer, Authentication Tester, Web Services Editor, and HTTP Sniffer. Acunetix Manual Tools are free for private and commercial use but they are not an open-source project. Currently, they are only available for the Microsoft Windows operating system. The tools use a graphical interface only and do not support the command line. Penetration testers can use Acunetix Manual Tools with other tools such as the Metasploit exploitation framework, OWASP Zed Attack Proxy (ZAP), w3af audit framework, Wireshark, etc. to expand their knowledge about a particular security issue detected by an automated web vulnerability scanner or to find advanced security vulnerabilities that automated scanners cannot detect. A combination of automatic and manual tools is the best solution for a web application security testing framework. Automated scanners save a lot of time while manual tools let pen testers explore deeper.
HTTP Security Testing Tools
Several hacking tools in the Acunetix Manual Tools suite focus on HTTP requests and responses:
- The HTTP Editor is one of the most flexible and widely used modules. It lets you create, analyze, and edit client HTTP requests as well as inspect server responses. It also includes an encoding and decoding tool for content and URLs. This tool is useful when analyzing most vulnerabilities including SQL Injections (SQLi) and Cross-site scripting (XSS) . To learn how to use this tool, read our article: Getting Started with the Acunetix HTTP Editor .
- The HTTP Sniffer is an intercepting proxy that lets you analyze HTTP requests and responses and manually crawl the site structure. You can also use the HTTP Sniffer to analyze HTTP traffic, trap particular POST or GET requests, and change them manually or automatically to emulate a man-in-the-middle attack. To learn how to use this tool, read our article: Getting Started with the Acunetix HTTP Sniffer .
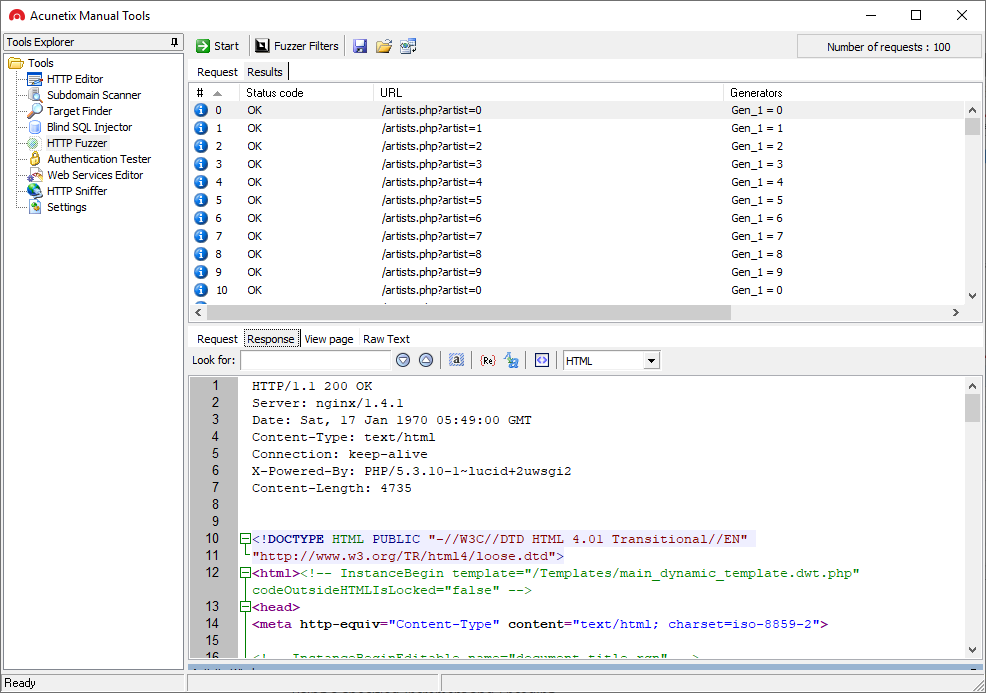
- The HTTP Fuzzer lets you simulate DoS malware by automatically sending a large number of HTTP requests including invalid, unexpected, and random data to a website. You can use it to test misconfigurations, input validation, and rate-limiting. To learn how to use this tool, read our article: Getting Started with the Acunetix HTTP Fuzzer .
Basic Network Security Tools
Some of the modules in the Acunetix Manual Tools cybersecurity suite are network protocol security tools:
- The Target Finder is a port scanner. It lets you run a brute-force port scan to discover web servers running on a given IP address or a range of IP addresses. To learn how to use this tool, read our article: Getting Started with the Acunetix Target Finder .
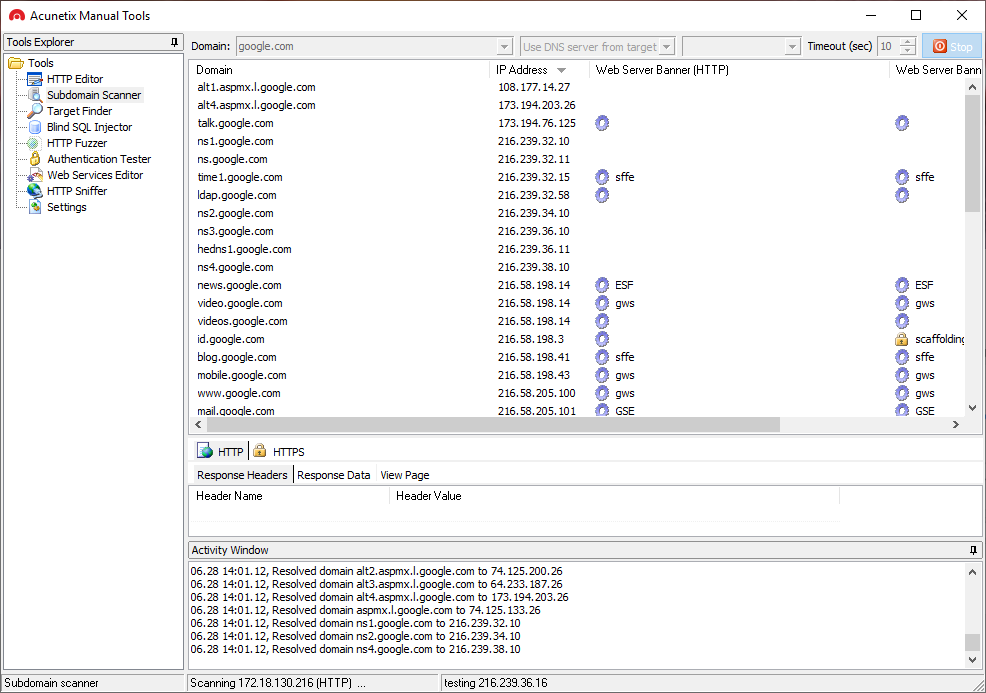
- The Subdomain Scanner lets you scan a top-level domain to discover subdomains configured in its hierarchy. It uses the target domain DNS server or any other DNS server specified. To learn how to use this tool, read our article: Getting Started with the Acunetix Subdomain Scanner .
While the functionality behind these simple network security tools is easily available in other tool suites such as Kali Linux or network security scanners like nmap, bundling them with more advanced tools helps penetration testers and ethical hackers find web application vulnerabilities faster.
Advanced Web Security Tools
Acunetix Manual Tools security testing software also includes modules for advanced vulnerability assessment:
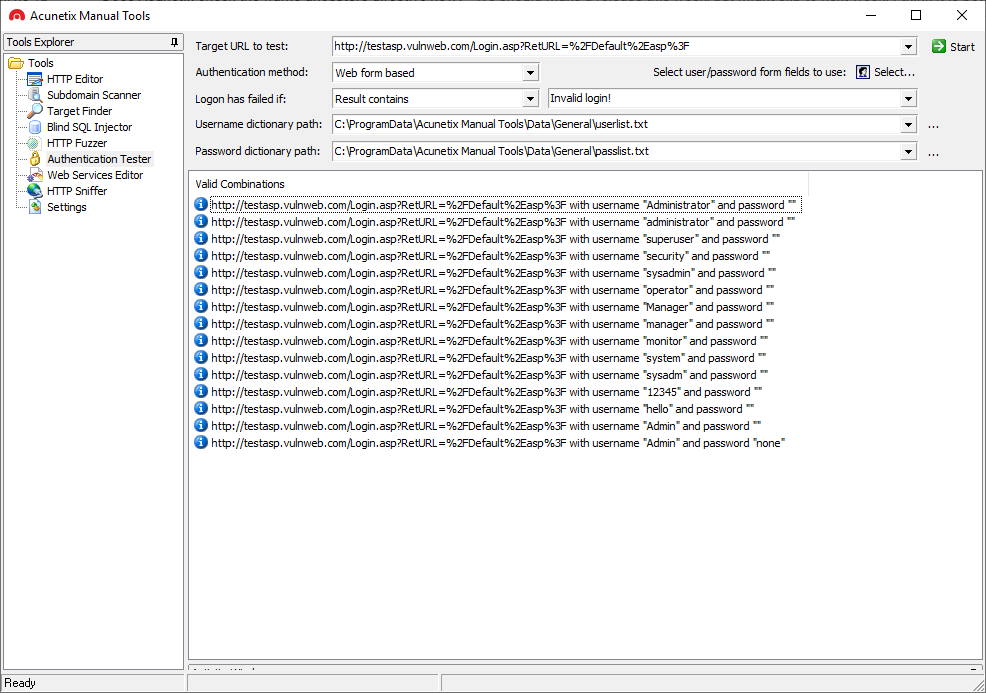
- The Authentication Tester lets you perform credential security assessment by attempting password cracking. It runs a dictionary attack against HTTP authentication or custom HTML forms. You can use the built-in dictionary or add your own. It is similar to John the Ripper but simpler. To learn how to use this tool, read our article: Getting Started with the Acunetix Authentication Tester .
- The Web Services Editor lets you import a WSDL file to analyze WSDL requests and responses. It has syntax highlighting for all languages so you can easily edit SOAP headers and customize manual attacks. To learn how to use this tool, read our article: Getting Started with the Acunetix Web Services Editor .
- The Blind SQL Injector lets you simulate Blind SQL Injection web application attacks against SQL database servers. Blind SQL Injection vulnerabilities are SQL Injections that do not give a clear response to the attacker. To learn how to use this tool, read our article: Getting Started with the Acunetix Blind SQL Injector .
Recommended Reading
Learn more about prominent vulnerabilities, keep up with recent product updates, and catch the latest news from Acunetix.
Источник
Installing Acunetix
Minimum System Requirements
- Supported Operating systems
- Microsoft Windows 8.1 or Windows 2012 R2 and later
- MacOS Catalina and MacOS Big Sur
- Ubuntu Desktop/Server 18.0.4 LTS or higher
- Suse Linux Enterprise Server 15
- openSUSE Leap 15.0 and 15.1
- Kali Linux versions 2019.1 and 2020.1
- CentOS 8 and CentOS Stream Server and Workstation (with SELinux disabled)
- RedHat 8 (with SELinux disabled)
- We are actively testing other Linux distributions. Please let us know if you have requests for specific distros.
- CPU: 64 bit processor
- System memory: minimum of 2 GB RAM
- Storage: 1 GB of available hard-disk space.
This does not include the storage required to save the scan results — this will depend on the level of usage of Acunetix.
Supported Browsers
The Acunetix User Interface is delivered through a web server. The supported browsers are:
If you encounter browser-related issues, please first ensure that you are running the latest version of one of the supported browsers before contacting support.
Networking PreRequisites
Installation on Windows
- Download the latest Windows version of Acunetix from the download location provided when you purchased the license.
- Double click the installation file to launch the Acunetix installation wizard and click Next when prompted.
- Review and accept the License Agreement.
- Provide credentials for the Administrative user account. These will be used to access and configure Acunetix.
- Configure how the Acunetix Web UI is accessed, and if remote UI access is allowed.
- Review the installation tasks, and click Install to start the installation.
- Setup will now copy all files and install the Acunetix services.
- Click Finish when ready.
Installation on Linux
- Download the latest Linux version of Acunetix from the download location provided when you purchased the license.
- Open a Terminal Window
- Use chmod to add executable permissions on the installation file
E.g. chmod +x acunetix_13.0.200205121_x64.sh - Run the installation
- E.g. sudo ./acunetix_13.0.200205121_x64.sh
- In case there are dependencies missing see the Notes section
- Review and accept the License Agreement.
- Configure the hostname which will be used to access the Acunetix UI
- Provide credentials for the Administrative user account. These will be used to access and configure Acunetix.
- Proceed with the installation.
Notes:
Package Prerequisites
The following packages need to be installed prior to installing Acunetix:
- On Ubuntu:
- sudo apt-get install libxdamage1 libgtk-3-0 libasound2 libnss3 libxss1 libx11-xcb1 libxcb-dri3-0 libgbm1 libdrm2 libxshmfence1
- On Suse Linux Enterprise Server or OpenSUSE Leap:
- sudo zypper install libXdamage1 libgtk-3-0 libasound2 mozilla-nss libX11-xcb1 libXss1
- On Red Hat Enterprise Linux 8 or CentOS 8 or CentOS Stream:
- sudo yum install libX11 libX11-devel gtk3 nss libXScrnSaver alsa-lib bzip2 mesa-libgbm
SeLinux on CentOS 8, CentOS Stream, or RedHat 8
SeLinux needs to be disabled if you are installing Acunetix on CentOS or RedHat.
- To disable SeLinux temporarily, open a Terminal window and run the following:
- sudo setenforce 0
- To disable SeLinux permanently:
- open a Terminal window
- run the command «sudo nano /etc/selinux/config»
- find the line that sets the «SELINUX» parameter and change the line to read «SELINUX=disabled»
- save the amended «/etc/selinux/config» file
- reboot the machine
Installation on MacOS Mojave and MacOS Catalina
- Download the latest MacOS version of Acunetix from the download location provided when you purchased the license.
- Double click the installation PKG file to launch the Acunetix installation wizard, and click «Continue» when prompted.
- Review and accept the License Agreement.
- You may be prompted for your MacOS password to complete parts of the installation.
- Provide credentials for the Acunetix Administrative user account. These will be used to access and configure Acunetix.
- Configure how the Acunetix Web UI is accessed, and click «Continue» to start the installation.
- Setup will now copy all files and install the Acunetix services; when the installation is completed, the default browser will be launched to allow access to the Acunetix UI, and the «Continue» button will become enabled in the installer.
- Click «Close» to exit the installer.
Activating your Acunetix Installation
After the installation, Acunetix needs to be activated using your license key. This can be done by logging into Acunetix using the web UI, which by default is running on https://localhost:3443. You will immediately be directed to the User Profile page, where you will need to update your contact details. Insert your License key and proceed with product activation.
Language for Web Interface
You can select from one of the available languages for the web interface from the User Profile page.
Time Zone
If you wish Acunetix to present date information in a Time Zone that is different from that of your operating system, you can select the desired timezone.
Enable the AcuMonitor Service
At this stage, you can also choose to register your installation with the AcuMonitor service. AcuMonitor is used to detect certain types of vulnerabilities, such Blind XSS, SSRF, XXE and other out of band vulnerabilities which can only be detected using an intermediary service. More information on AcuMonitor can be found at http://www.acunetix.com/vulnerability-scanner/acumonitor-blind-xss-detection/ .
Note: Product activation requires a connection to the internet.
Enabling Additional Scanning Technologies
You can enable additional scanning tools to achieve a more thorough evaluation of your Targets.
Installing AcuSensor in your web application
If you need to scan a .NET, JAVA or PHP web application, you should install Acunetix AcuSensor on your web application in order to improve the detection of vulnerabilities, get the line in the source code where vulnerabilities are located and decrease false positives.
Installing Network Scanning (OpenVAS)
Acunetix can be configured to use OpenVAS to perform network scans of the Targets configured in Acunetix.
Installing Malware Scanning
Acunetix can work in conjunction with AntiVirus engines to check for malware on your site. The default engine used is the Windows Defender AntiVirus service, with ClamAV being a viable alternative.
Upgrading Acunetix
Upgrading Acunetix for Windows
To upgrade from a previous MAJOR version of Acunetix:
- Close all instances of Acunetix
- Optionally backup the Acunetix data folder which includes the Acunetix database and other settings. These are all found in
- You can run the latest Acunetix installation directly on the machine running the previous version of Acunetix. The installation will detect the older version, and will proceed with upgrading it to the latest version. All your settings will be retained.
Upgrading Acunetix for Linux
To upgrade from a previous MAJOR version of Acunetix:
- Close all instances of Acunetix
- Optionally backup the Acunetix data folder which includes the Acunetix database and other settings. These are all found in /home/acunetix/.acunetix
- You can run the latest Acunetix installation directly on the machine running the previous version of Acunetix. The installation will detect the older version, and will proceed with upgrading it to the latest version. All your settings will be retained.
Источник


