- Создание учетной записи локального пользователя или администратора в Windows 10
- Accounts (Windows Configuration Designer reference)
- Applies to
- Azure
- ComputerAccount
- Users
- Create a local user or administrator account in Windows 10
- Add or remove accounts on your PC
- Add people to a home PC
- Add people to a work or school PC
- Add work or school accounts to your PC
- Add accounts used by apps
- Add people to a family group
- 5 способов добавить новую учетную запись в Windows 10
- Windows 10: добавление новой учетной записи пользователя
- Как создать пользователя в Windows 10 без учетной записи Microsoft?
- Как создать пользователя в Windows 10 через утилиту управления учетными записями?
- Как добавить пользователя в Windows 10 через групповые политики?
- Как добавить пользователя в Windows 10 через командную строку?
Создание учетной записи локального пользователя или администратора в Windows 10
Вы можете создать локализованную учетную запись пользователя (автономную учетную запись) для всех пользователей, которые часто используют ваш компьютер. Однако в большинстве случаев рекомендуется создать для всех пользователей компьютера учетные записи Майкрософт.
При необходимости учетная запись локального пользователя может иметь разрешения администратора; однако лучше по возможности просто создать учетную запись локального пользователя.
Внимание: Пользователь с учетной записью администратора может получить доступ ко всем данным в системе, а любые вредоносные программы, с которыми они сталкиваются, могут использовать разрешения администратора для потенциального заражения или повреждения любых файлов в системе. Предоставляйте этот уровень доступа только при абсолютной необходимости и только людям, которым вы доверяете.
При создании учетной записи помните, что выбор пароля и его сохранение являются очень важными шагами. Поскольку мы не знаем вашего пароля, если вы забудете или потеряете его, нам не удастся его восстановить для вас.
Если вы используете Windows 10 версии 1803 или более поздней, можно добавить секретные вопросы, как описано в шаге 4 раздела Создание учетной записи локального пользователя. С помощью ответов на секретные вопросы можно сбросить пароль к вашей локальной учетной записи Windows 10. Все еще не знаете, какая версия вам нужна? Проверьте, какая версия у вас сейчас.
Создание учетной записи локального пользователя
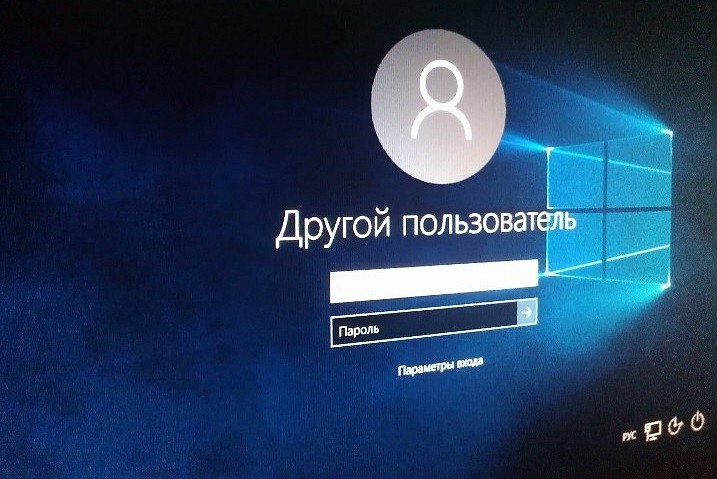
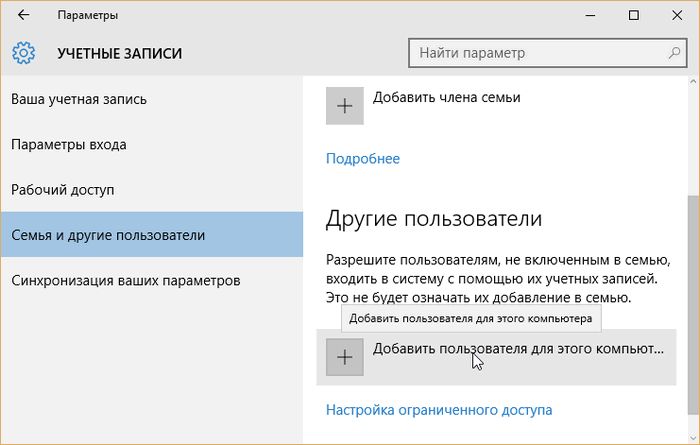
Выберите Пуск > Параметры > Учетные записи и щелкните Семья и другие пользователи.(В некоторых версиях Windows вы увидите пункт Другие пользователи.)
Выберите Добавить пользователя для этого компьютера.
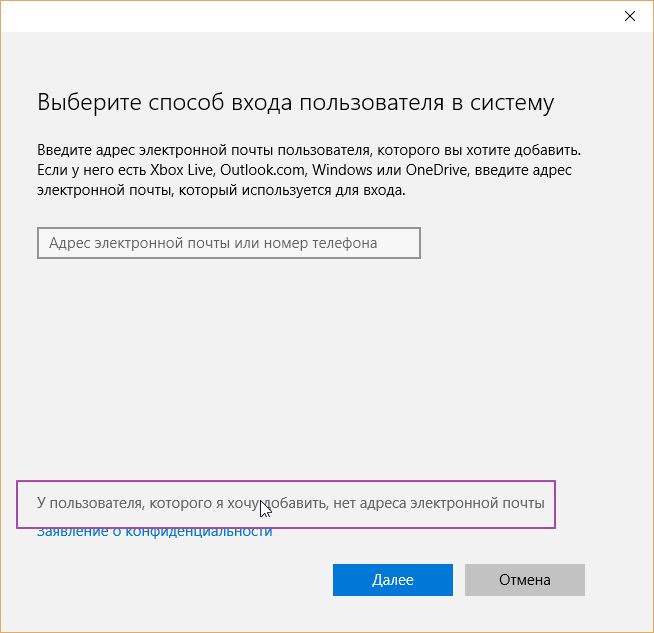
Выберите пункт У меня нет учетных данных этого пользователя и на следующей странице нажмите Добавить пользователя без учетной записи Майкрософт.
Введите имя пользователя, пароль, подсказку о пароле или выберите секретные вопросы, а затем нажмите Далее.
Изменение учетной записи локального пользователя на учетную запись администратора
Выберите Пуск > Параметры > Учетные записи .
В разделе Семья и другие пользователи щелкните имя владельца учетной записи и нажмите Изменить тип учетной записи.
Примечание: Если вы выбрали учетную запись, в которой указан адрес электронной почты или не помечено «Локализованная учетная запись», вы даете разрешения администратора для учетной записи Майкрософт, а не локальной учетной записи.
В разделе Тип учетной записи выберите Администратор, и нажмите OK.
Войдите в систему с новой учетной записью администратора.
Accounts (Windows Configuration Designer reference)
Use these settings to join a device to an Active Directory domain or an Azure Active Directory tenant, or to add local user accounts to the device.
Applies to
| Setting groups | Desktop editions | Mobile editions | Surface Hub | HoloLens | IoT Core |
|---|---|---|---|---|---|
| Azure | X | X | X | X | |
| ComputerAccount | X | X | X | ||
| Users | X | X | X |
Azure
The Azure > Authority and Azure > BPRT settings for bulk Azure Active Directory (Azure AD) enrollment can only be configured using one of the provisioning wizards. After you get a bulk token for Azure AD enrollment in a wizard, you can switch to the advanced editor to configure additional provisioning settings. For information about using the wizards, see:
ComputerAccount
Specifies the settings you can configure when joining a device to a domain, including the computer name and the account to use for joining the computer to the domain.
If you want to create a provisioning package that joins a device to Active Directory AND sets HideOobe , and you want to apply that package during OOBE, we also recommend setting the ComputerName and creating a local admin account in the provisioning package.
| Setting | Value | Description |
|---|---|---|
| Account | string | Account to use to join computer to domain |
| AccountOU | Enter the full path for the organizational unit. For example: OU=testOU,DC=domain,DC=Domain,DC=com. | Name of organizational unit for the computer account |
| ComputerName | On desktop PCs, this setting specifies the DNS hostname of the computer (Computer Name) up to 63 characters. Use %RAND:x% to generate x number of random digits in the name, where x must be a number less than 63. For domain-joined computers, the unique name must use %RAND:x% . Use %SERIAL% to generate the name with the computer’s serial number embedded. If the serial number exceeds the character limit, it will be truncated from the beginning of the sequence. The character restriction limit does not count the length of the macros, %RAND:x% and %SERIAL% . This setting is supported only in Windows 10, version 1803 and later. To change this setting in Windows 10, version 1709 and earlier releases, use the ComputerName setting under Accounts. | Specifies the name of the Windows device (computer name on PCs) |
| DomainName | string (cannot be empty) | Specify the name of the domain that the device will join |
| Password | string (cannot be empty) | Corresponds to the password of the user account that’s authorized to join the computer account to the domain. |
Users
Use these settings to add local user accounts to the device.
Create a local user or administrator account in Windows 10
You can create a local user account (an offline account) for anyone who will frequently use your PC. The best option in most cases, though, is for everyone who uses your PC to have a Microsoft account.
If needed, the local user account can have administrator permissions; however, it’s better to just create a local user account whenever possible.
Caution: A user with an administrator account can access anything on the system, and any malware they encounter can use the administrator permissions to potentially infect or damage any files on the system. Only grant that level of access when absolutely necessary and to people you trust.
As you create an account, remember that choosing a password and keeping it safe are essential steps. Because we don’t know your password, if you forget it or lose it, we can’t recover it for you.
If you’re using Windows 10, version 1803 and later, you can add security questions as you’ll see in step 4 under Create a local user account. With answers to your security questions, you can reset your Windows 10 local account password. Not sure which version you have? You can check your version.
Create a local user account
Select Start > Settings > Accounts and then select Family & other users. (In some versions of Windows you’ll see Other users.)
Select Add someone else to this PC.
Select I don’t have this person’s sign-in information, and on the next page, select Add a user without a Microsoft account.
Enter a user name, password, or password hint—or choose security questions—and then select Next.
Change a local user account to an administrator account
Select Start > Settings > Accounts .
Under Family & other users, select the account owner name (you should see «Local Account» below the name), then select Change account type.
Note: If you choose an account that shows an email address or doesn’t say «Local account», then you’re giving administrator permissions to a Microsoft account, not a local account.
Under Account type, select Administrator, and then select OK.
Sign in with the new administrator account.
Add or remove accounts on your PC
This article describes how to add or remove accounts on your PC. Having different accounts on a shared PC lets multiple people use the same device, all while giving everyone their own sign-in info, plus access to their own files, browser favorites, and desktop settings.
In addition, if you use the same PC for personal projects and work or school, you may want to add different accounts to your PC.
Note: If you have a new device, you may see an account named «defaultuser0″—this account is inactive and it won’t hurt your device or give anyone else access. If you want to remove it, you can restart your device and then sign in again.
Add people to a home PC
The best way to add someone to your PC is to have them sign in with a Microsoft account. Learn more about Microsoft accounts in Sign in with a Microsoft account.
On Windows 10 Home and Windows 10 Professional editions:
Select Start > Settings > Accounts > Family & other users.
Under Other users, select Add someone else to this PC.
Enter that person’s Microsoft account information and follow the prompts.
If you need to remove that person’s sign-in information from your PC:
Select Start > Settings > Accounts > Family & o ther users.
Select the person’s name or email address, then select Remove. Note that this will not delete the person’s Microsoft account, it will just remove their sign-in info from your PC.
Add people to a work or school PC
The best approach is for everyone who shares a PC at work or school to have their own Microsoft account. Learn more about Microsoft accounts in Sign in with a Microsoft account.
To add someone with an existing Microsoft account:
Select Start > Settings > Accounts > Other users (in some Windows editions, it may be labeled as Other people or Family & other users).
Under Work or school users, select Add a work or school user.
Enter that person’s user account, select the account type, and then select Add.
If you need to remove that person’s sign-in information from your PC:
Select Start > Settings > Accounts > O ther users.
Select the person’s name or email address, then select Remove.
Read the disclosure and select Delete account and data. Note that this will not delete the person’s Microsoft account, but it will remove their sign-in info and account data from your PC.
Add work or school accounts to your PC
If you’re using the same PC for both personal and school or business work, you may want to add various accounts to your PC to make it easier for you to get to the files, apps, and information associated with each account. When you access work or school, you’ll be connected to your organization’s domain and have access to its resources.
To add another account to your PC:
Select Start > Settings > Accounts > Access work or school .
Select Connect, then follow the prompts to add the accounts.
If you need to remove an account from your PC:
Select Start > Settings > Accounts > Access work or school .
Select the account you wish to remove, then select Disconnect.
Select Yes to confirm your actions. Note that this will not delete the account entirely, it will just remove access from your PC
Note: If an account is either the only account on the PC or the primary account on the PC, it can’t be removed.
Add accounts used by apps
To make signing in to your accounts easier and faster, you may want to add accounts for different apps.
To add an account used by apps to your PC:
Select Start > Settings > Accounts > Email & accounts .
To add an account used by email. calendar, or contacts, select Add an account under Accounts used by email, calendar, and contacts. For other apps, select Add a Microsoft account or Add a work or school account.
Follow the prompts to add the account.
To remove an account used by apps from your PC:
Select Start > Settings > Accounts > Email & accounts .
Select the account you wish to remove, then select Remove.
Select Yes to confirm your actions.
Add people to a family group
If you’ve added your family’s Microsoft accounts to your PC, you can set them up as a Microsoft family. It’s a free service that helps families stay connected and keep kids safer on Windows 10 and Xbox One devices, along with Android devices running Microsoft Launcher.
Note: If you have trouble adding a Microsoft account, see Microsoft account FAQ.
5 способов добавить новую учетную запись в Windows 10
Если вы хотите разрешить доступ к работе с вашим компьютером на Windows 10 нескольким пользователям, нужно добавить больше учетных записей в настройках системы. Вот пять способов, как это сделать.
Добавить учетные записи для других членов семьи в Windows 10 можно по-разному. Покажем пять различных способов, как добавить учетную запись в Windows 10.
Windows 10: добавление новой учетной записи пользователя
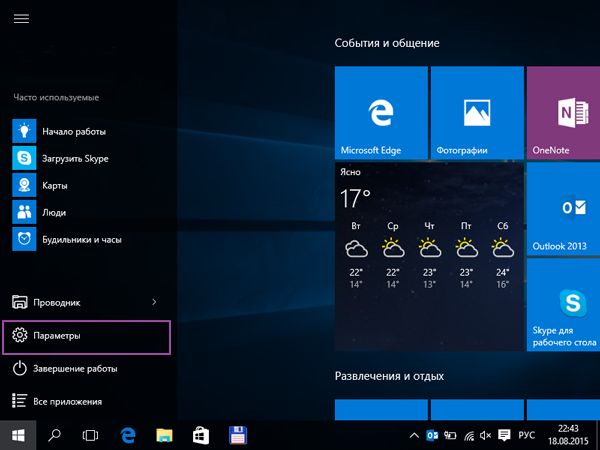
- Откройте меню «Пуск» в Windows 10 и выберите Параметры со значком шестеренки.
 Windows 10: параметры системы
 - Откройте категорию Учетные записи. Здесь вы можете настроить учетную запись Microsoft или локальную учетную запись.
 Windows 10: параметры системы
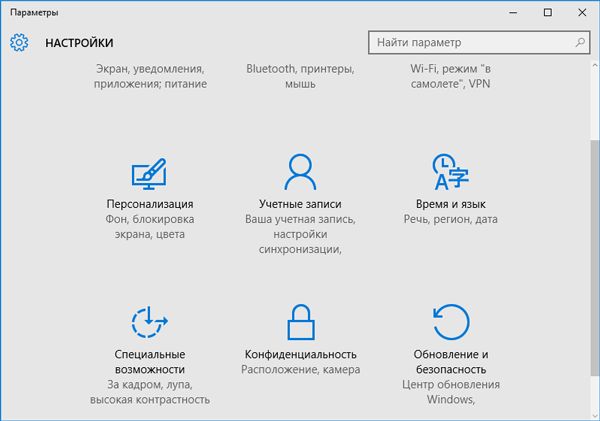 Настройка учетных записей в Windows 10
Перейдите к категории Семья и другие пользователи слева и нажмите Добавить пользователя для этого компьютера.
 Windows 10: добавление нового пользователя
Как создать пользователя в Windows 10 без учетной записи Microsoft?
Если же вам нужно создать пользователя в Windows 10 для человека без учетной записи Microsoft, выполните следующее:
- В окне выбора способа входа в систему нажмите У пользователя, которого я хочу добавить, нет адреса электронной почты. Windows 10: создание локального пользователя
- В следующем окне выберите один из двух вариантов, который вам наиболее удобен: либо создайте для человека учетную запись Microsoft, введя имя, пароль и выбрав страну, либо нажмите Добавить пользователя без учетной записи Microsoft. Windows 10: добавление пользователя без учетной записи Microsoft
- Откроется окно создания локальной учетной записи Windows 10. Введите имя, пароль, подтверждение и подсказку, нажмите Далее. Пользователь будет создан.
 Windows 10: создание локального пользователя
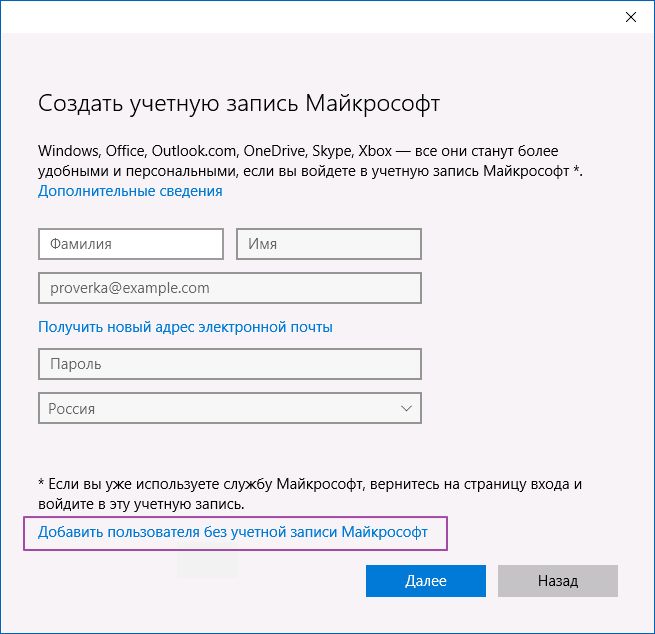 Windows 10: добавление пользователя без учетной записи Microsoft
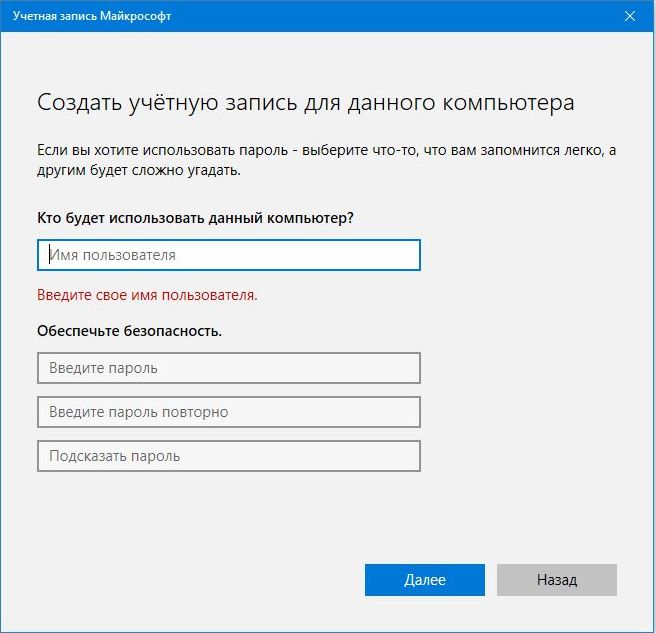 Windows 10: задать пароль локального пользователя
Как создать пользователя в Windows 10 через утилиту управления учетными записями?
Еще один способ добавления пользователя в Windows 10, которым мало кто пользуется. Заключается он в том, чтобы запустить утилиту управления учетными записями пользователей.
- Нажмите Win + R и в окне Выполнить введите: control userpasswords2 и нажмите Enter. Запуск управления учетными записями в Windows 10
- В отобразившемся окне нажимаем кнопку добавления нового пользователя.
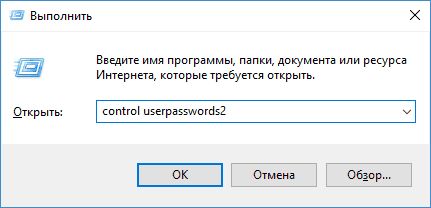 Запуск управления учетными записями в Windows 10
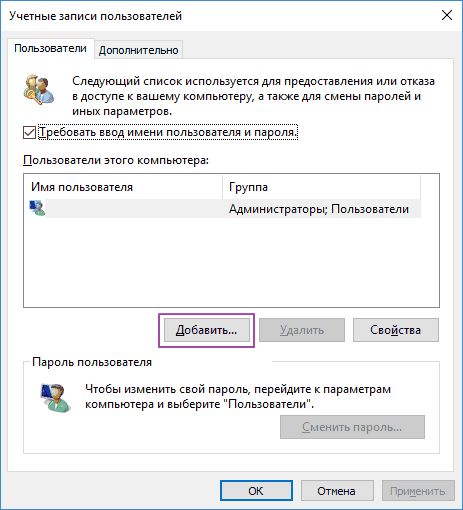 Добавление новой учетной записи в Windows 10
Дальнейшая процедура полностью аналогична тому, что описано выше — либо добавляем пользователя с учетной записью Microsoft, либо без.
Как добавить пользователя в Windows 10 через групповые политики?
Еще один способ создания учетной записи — использовать элемент управления «Локальные пользователи и группы».
- Нажмите клавиши Win+R, в окне Выполнить введите: lusrmgr.msc и нажмите Enter.
- Выберите Пользователи на панели слева, кликните правой кнопкой мыши списке пользователей и нажмите Новый пользователь. Создание пользователя через управление групповыми политиками в Windows 10
- Задайте параметры для нового пользователя.
 Создание пользователя через управление групповыми политиками в Windows 10
При использовании этого способа созданный пользователь будет локальным — то есть, он позволяет создать пользователя без учетной записи Microsoft.
Как добавить пользователя в Windows 10 через командную строку?
Последний способ создать пользователя — с помощью командной строки Windows 10. В этом случае новая учетная запись также будет локальной.
- Запустите командную строку от имени администратора (например, через меню правого клика по кнопке «Пуск»).
- Введите команду (если имя пользователя или пароль содержат пробелы, используйте кавычки):
3. Нажмите Enter. Пользователь с заданным именем и паролем будет добавлен.
Этот способ всегда сработает, если не добавляется пользователь в Windows 10 стандартными средствами — например, после неудачного обновления.


