- Install CLion
- System requirements
- Toolchain requirements
- Install using the Toolbox App
- Install the Toolbox App
- Install the Toolbox App
- Install the Toolbox App
- Standalone installation
- Silent installation on Windows
- Silent configuration file
- Install as a snap package on Linux
- Русские Блоги
- Ubuntu установить Clion + крэк + обычные операции
- Configure IDE settings
- Restore IDE settings
- Back up your settings and restore the defaults
- Как установить JetBrains CLion в Linux
- от sasza
- Установка пакета Snap
- Установка Flatpak
- Установка Arch Linux
- Стандартная установка Linux
Install CLion
CLion is a cross-platform IDE that provides consistent experience on Windows, macOS, and Linux (for setup on FreeBSD, refer to this instruction).
System requirements
| Requirement | Minimum | Recommended |
|---|---|---|
| RAM | 2 GB of free RAM | 8 GB of total system RAM |
| CPU | Any modern CPU | Multi-core CPU. CLion supports multithreading for different operations and processes making it faster the more CPU cores it can use. |
| Disk space | 2.5 GB and another 1 GB for caches | SSD drive with at least 5 GB of free space |
| Monitor resolution | 1024×768 | 1920×1080 |
| Operating system | Latest 64-bit version of Windows, macOS, or Linux (for example, Debian, Ubuntu, or RHEL) |
* CLion is not available for some Linux distributions, such as RHEL6/CentOS6, which do not include glibc version 2.14 required by JBR 11.
You do not need to install Java to run CLion because JetBrains Runtime is bundled with the IDE (based on JRE 11).
Toolchain requirements
In case of using MSVC compiler: Visual Studio 2013, 2015, 2017, or 2019
In case of using WSL: Windows 10 Fall Creators Update (least version 1709, build 16299.15)
Xcode command line developer tools (to install, use the xcode-select —install command)
In case of using custom CMake: version 2.8.11 or later
In case of using custom GDB: version 7.8.x-10.2 or later
Install using the Toolbox App
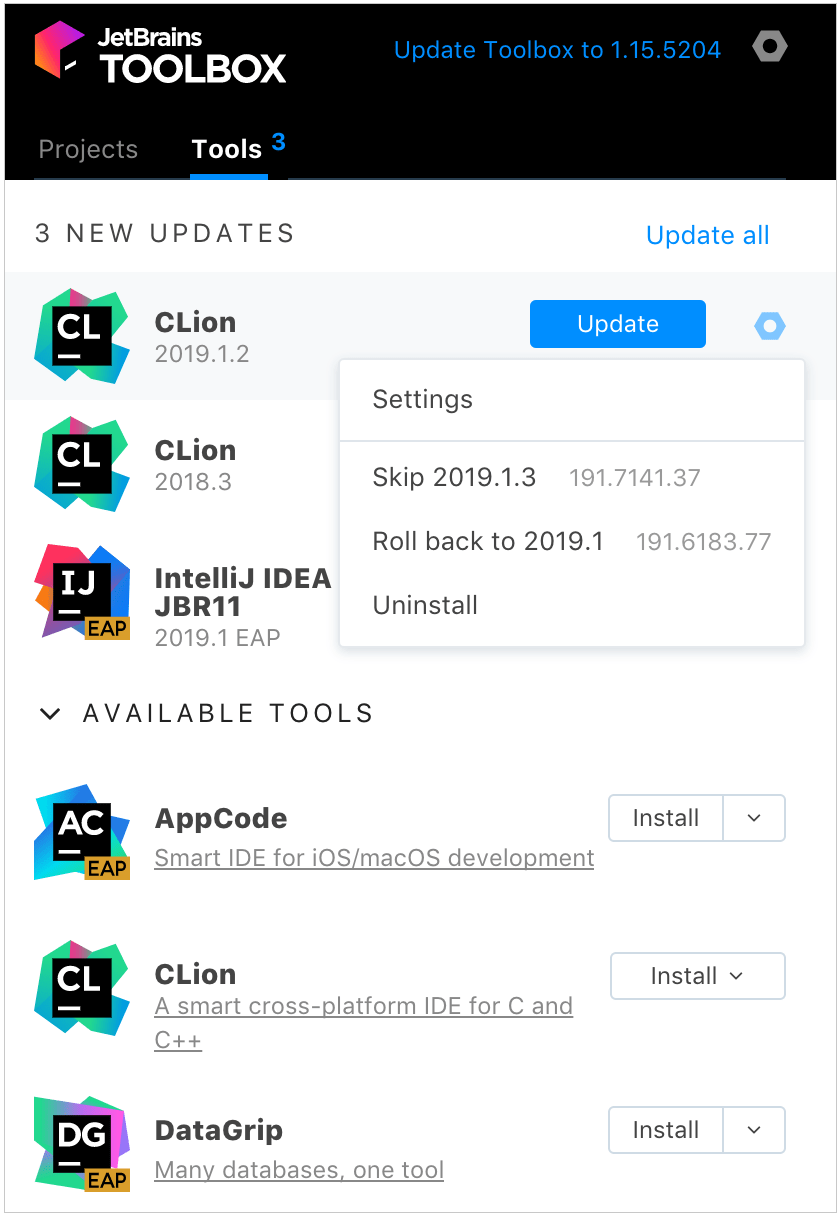
The JetBrains Toolbox App is the recommended tool to install JetBrains products. Use it to install and manage different products or several versions of the same product, including Early Access Program (EAP) and Nightly releases, update and roll back when necessary, and easily remove any tool. The Toolbox App maintains a list of all your projects to quickly open any project in the right IDE and version.
Install the Toolbox App
Download the installer .exe from the Toolbox App web page.
Run the installer and follow the wizard steps.
After you run the Toolbox App, click its icon in the notification area and select which product and version you want to install.
Log in to your JetBrains Account from the Toolbox App and it will automatically activate the available licenses for any IDE that you install.
Install the Toolbox App
Download the disk image .dmg from the Toolbox App web page.
There are separate disk images for Intel and Apple Silicon processors.
Mount the image and drag the JetBrains Toolbox app to the Applications folder.
After you run the Toolbox App, click its icon in the main menu and select which product and version you want to install.
Log in to your JetBrains Account from the Toolbox App and it will automatically activate the available licenses for any IDE that you install.
Install the Toolbox App
Download the tarball .tar.gz from the Toolbox App web page.
Extract the tarball to a directory that supports file execution.
For example, if the downloaded version is 1.17.7391, you can extract it to the recommended /opt directory using the following command:
Execute the jetbrains-toolbox binary from the extracted directory to run the Toolbox App and select which product and version you want to install. After you run the Toolbox App for the first time, it will automatically add the Toolbox App icon to the main menu.
Log in to your JetBrains Account from the Toolbox App and it will automatically activate the available licenses for any IDE that you install.
You can use this shell script that automatically downloads the tarball with the latest version of the Toolbox App, extracts it to the recommended /opt directory, and creates a symbolic link in the /usr/local/bin directory.
Standalone installation
You can install CLion manually and have the option to manage the location of every instance and all the configuration files. This is useful, for example, if you have a policy that requires specific install locations.
Run the installer and follow the wizard steps.
On the Installation Options step, you can configure the following:
Create a desktop shortcut for launching CLion.
Add the directory with CLion command-line launchers to the PATH environment variable to be able to run them from any working directory in the Command Prompt.
Add the Open Folder as Project action to the system context menu (when you right-click a folder).
Associate specific file extensions with CLion to open them with a double-click.
To run CLion, find it in the Windows Start menu or use the desktop shortcut. You can also run the launcher batch script or executable in the installation directory under bin .
Extract the archive to the desired folder.
To run CLion, use the launcher batch script or executable in the extracted directory under bin .
There are separate disk images for Intel and Apple Silicon processors.
Mount the image and drag the CLion app to the Applications folder.
Run the CLion app from the Applications directory, Launchpad, or Spotlight.
Unpack the downloaded CLion-*.tar.gz archive. The recommended extract directory is /opt :
Do not extract the tarball over an existing installation to avoid conflicts. Always extract to a clean directory.
Execute the CLion.sh from bin subdirectory to run CLion:
To create a desktop entry, do one of the following:
On the Welcome screen, click Configure | Create Desktop Entry
From the main menu, click Tools | Create Desktop Entry
When you run CLion for the first time, some steps are required to complete the installation, customize your instance, and start working with the IDE.
Silent installation on Windows
Silent installation is performed without any user interface. It can be used by network administrators to install CLion on a number of machines and avoid interrupting other users.
To perform silent install, run the installer with the following switches:
/S : Enable silent install
/CONFIG : Specify the path to the silent configuration file
/D : Specify the path to the installation directory
This parameter must be the last in the command line and it should not contain any quotes even if the path contains blank spaces.
To check for issues during the installation process, add the /LOG switch with the log file path and name between the /S and /D parameters. The installer will generate the specified log file. For example:
Silent configuration file
You can download the default silent configuration file for CLion at https://download.jetbrains.com/cpp/silent.config
The silent configuration file defines the options for installing CLion. With the default options, silent installation is performed only for the current user: mode=user . If you want to install CLion for all users, change the value of the installation mode option to mode=admin and run the installer as an administrator.
The default silent configuration file is unique for each JetBrains product. You can modify it to enable or disable various installation options as necessary.
It is possible to perform silent installation without the configuration file. In this case, omit the /CONFIG switch and run the installer as an administrator. Without the silent configuration file, the installer will ignore all additional options: it will not create desktop shortcuts, add associations, or update the PATH variable. However, it will still create a shortcut in the Start menu under JetBrains .
Install as a snap package on Linux
You can install CLion as a self-contained snap package. Since snaps update automatically, your CLion installation will always be up to date.
To use snaps, install and run the snapd service as described in the installation guide.
On Ubuntu 16.04 LTS and later, this service is pre-installed.
CLion is distributed via two channels:
The stable channel includes only stable versions. To install the latest stable release of CLion, run the following command:
The —classic option is required because the CLion snap requires full access to the system, like a traditionally packaged application.
The edge channel includes EAP builds. To install the latest EAP build of CLion, run the following command:
When the snap is installed, you can launch it by running the clion.sh command.
To list all installed snaps, you can run sudo snap list . For information about other snap commands, see the Snapcraft documentation.
Источник
Русские Блоги
Ubuntu установить Clion + крэк + обычные операции
0. Введение:
CLion — это кроссплатформенная IDE, разработанная для разработки C и C ++ на основе IntelliJ, и может использоваться в Windows, Linux и MacOS.
1. Скачать:
2. Распакуйте:
3. Скомпилируйте и установите:
Всегда идти вниз по умолчанию
4. Взломать активацию:
(1) Используйте код активации для активации
Когда необходимо активировать Clion, откройте Clion, и появится диалоговое окно Clion License Activation (вы также можете запустить после установки программного обеспечения, нажав на строку меню ⇒ help ⇒ regiser по очереди) Выберите код активации в диалоговом окне активации лицензии Clion, а затем вам необходимо получить регистрационный код;

(2) Получить регистрационный код
Откройте URL с помощью браузера:http://idea.lanyus.com/, Нажмите непосредственно, чтобы получить регистрационный код, скопируйте регистрационный код, вставьте его в поле ввода кода активации на интерфейсе регистрации, вам нужно добавить «0.0.0.0 account.jetbrains.com» в файл hosts, прежде чем нажимать ОК:
Откройте терминал: sudo gedit / etc / hosts
Добавьте «0.0.0.0 account.jetbrains.com» в открытый файл и сохраните его
Наконец, нажмите ОК, чтобы завершить трещину!

Общие операции:
Многострочные (отмена) комментарии: Ctrl + /
Код блока (отмена) комментариев: Ctrl + Shift + /
Передайте основные параметры функции:
Нажмите Run-> Edit Configurations-> Program arguments, введите основные параметры
CLion использует Git:
После создания Git-репозитория щелкните правой кнопкой мыши имя проекта и выберите Git-> Repositiries-> push in turn
Источник
Configure IDE settings
In CLion, you can configure the settings on two levels: the project level and globally.

Global settings apply to all projects of a specific installation, or version, of CLion. Such settings include IDE appearance (themes, color schemes, menus and toolbars), notification settings, the set of the installed and enabled plugins, debugger settings, code completion, and so on.
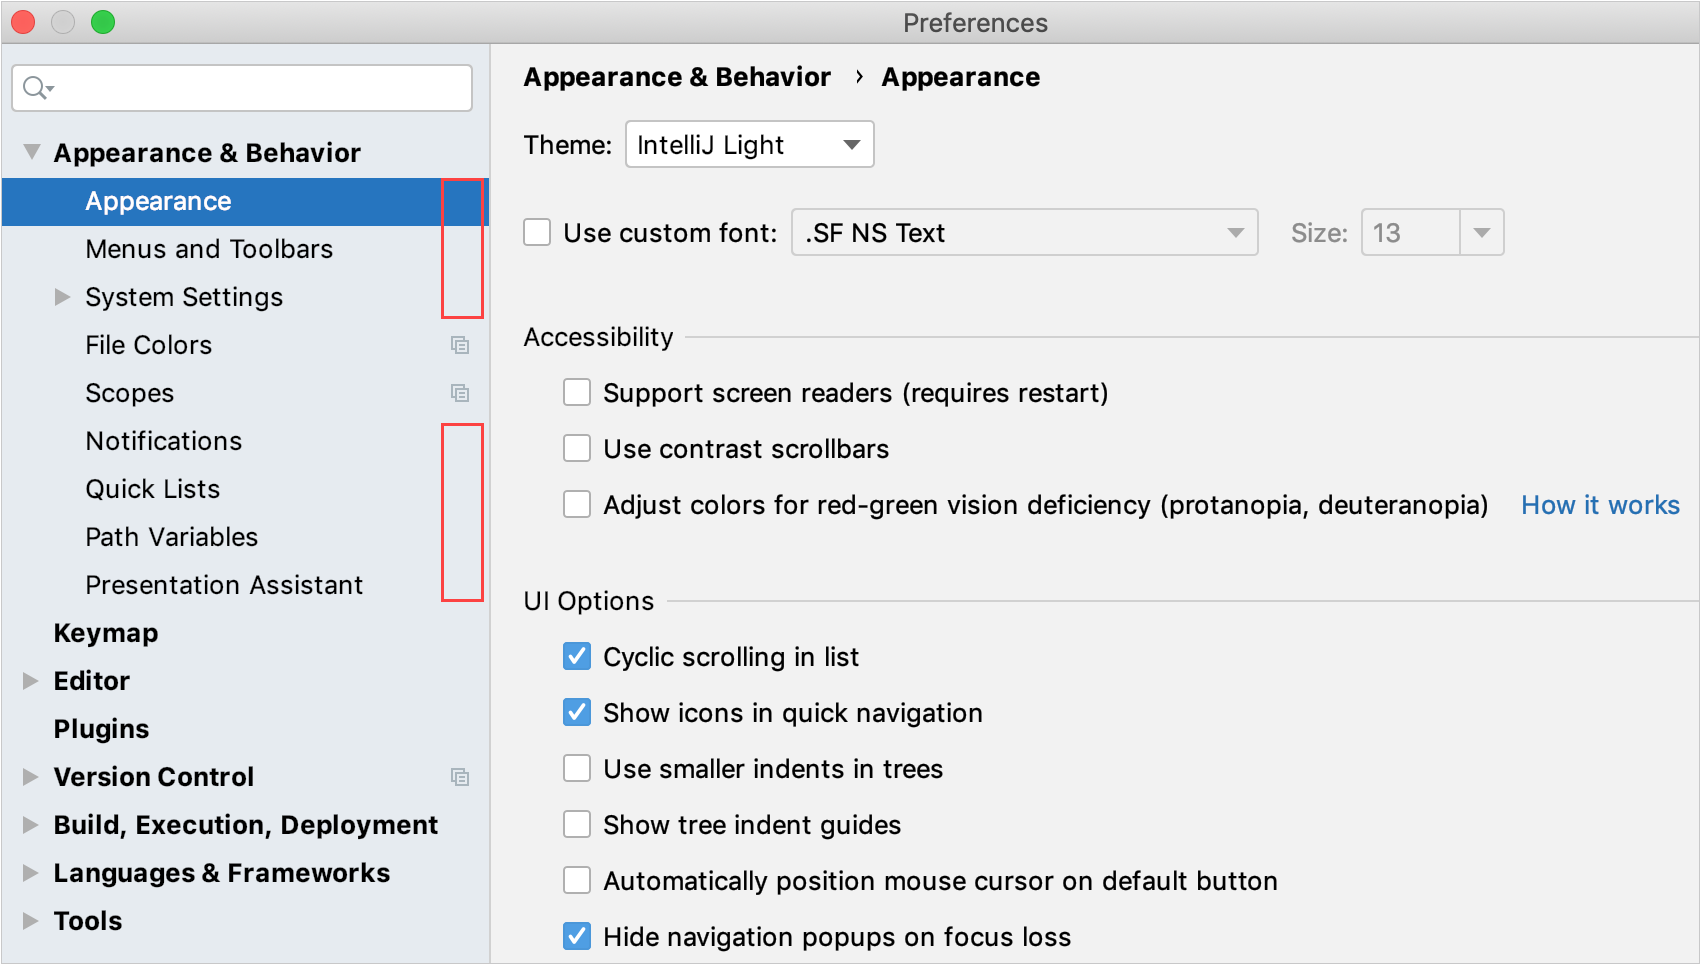
To configure your IDE, select CLion | Preferences for macOS or File | Settings for Windows and Linux. Alternatively, press Ctrl+Alt+S or click on the toolbar.
Settings that are NOT marked with the icon in the Settings/Preferences dialog are global and apply to all existing projects of the current CLion version.
Restore IDE settings
When you restore the default IDE settings, CLion backs up your configuration to a directory. You can always restore your settings from this backup.
Back up your settings and restore the defaults
From the main menu, select File | Manage IDE Settings | Restore Default Settings .
Alternatively, press Shift twice and type Restore default settings .
CLion shows a confirmation popup:

Click Restore and Restart . The IDE will be restarted with the default configuration.
When CLion restores the default IDE settings, it creates a backup directory with your configuration in:
-backup Example C:\Users\JohnS\AppData\Roaming\JetBrains\CLion2021.2-backup
Источник
Как установить JetBrains CLion в Linux
от sasza

JetBrains Clion — это кроссплатформенная IDE (интегрированная среда разработки) для языков программирования C и C ++. Он предлагает множество ценных функций, таких как генерация кода, анализ кода и т. Д.
В этом руководстве мы рассмотрим различные способы установки JetBrains CLion IDE в Linux. Для получения дополнительной информации о приложении щелкните здесь .
Установка пакета Snap
JetBrains CLion доступен в виде пакета Snap для тех, кто любит использовать Ubuntu Snap Store. Чтобы использовать CLion в качестве Snap, у вас должна быть настроена и установлена среда выполнения Snapd в вашей системе Linux.
Если вы используете Ubuntu, среда выполнения Snapd уже готова к работе. Однако, если вы используете Fedora, OpenSUSE, Arch Linux или что-то еще, вам необходимо заранее установить среду выполнения.
Настроить среду выполнения Snapd в Linux, чтобы вы могли устанавливать пакеты Snap, относительно просто. Для начала установите пакет «snapd» с помощью диспетчера пакетов вашей ОС Linux. После этого используйте Systemd, чтобы включить файл «snapd.socket».
Не можете понять, как настроить среду выполнения Snapd на вашем ПК с Linux? Это нормально! Мы можем помочь! Следуйте нашему подробному руководству о том, как настроить пакеты Snap, чтобы заставить его работать.
После настройки Snaps вы сможете быстро установить приложение JetBrains CLion на свой компьютер с Linux с помощью следующей команды мгновенной установки ниже.
Имейте в виду, что CLion устанавливается как Snap в «Классическом режиме». Для классического режима требуется AppArmor, и не каждая операционная система Linux поддерживает его. Если Snap сообщает вам, что вы не можете установить его правильно, попробуйте вместо этого инструкции по установке Flatpak.
Установка Flatpak
JetBrains CLion доступен как Flatpak в магазине приложений Flathub. Если вы хотите установить эту программу как Flatpak в вашей ОС Linux, вам сначала необходимо настроить среду выполнения Flatpak.
Настроить среду выполнения Flatpak в Linux очень просто. Для этого вам нужно только установить пакет «flatpak» в вашу систему с помощью менеджера пакетов. Если вам нужна помощь в настройке Flatpak на вашем ПК с Linux, следуйте нашему руководству по этому вопросу.
После того, как среда выполнения Flatpak запущена, следующим шагом будет включение магазина приложений Flathub. Flathub содержит пакет JetBrains CLion, поэтому этот шаг очень важен. Чтобы включить Flathub, используйте следующую команду удаленного добавления flatpak ниже.
Настроив магазин приложений Flathub, вы сможете установить CLion на свой компьютер с Linux. Используя приведенную ниже команду установки flatpak, заставьте приложение работать на вашем компьютере.
Установка Arch Linux
Как и все приложения JetBrains, для CLion доступен для установки пакет AUR. Имейте в виду, что эти пакеты, хотя и хороши, не получают официальной поддержки от JetBrains. Тем не менее, пакет CLion AUR загружается непосредственно с их веб-сайта, поэтому он не использует какой-либо модифицированный код.
Чтобы начать установку CLion в Arch Linux, вам необходимо установить пакеты «Git» и «Base-devel». Эти пакеты необходимы для взаимодействия с AUR.
После установки двух пакетов вы должны установить помощник Trizen AUR. Эта программа автоматизирует установку CLion, поэтому вам не придется делать все вручную.
Чтобы установить Trizen, последовательно введите следующие команды.
Наконец, установите JetBrains CLion на свой компьютер с Arch Linux, используя команду trizen -S.
Стандартная установка Linux

JetBrains CLion поставляется с универсальным установщиком для тех, кто в Linux не хочет использовать Snaps или Flatpak и не использует Arch Linux. Чтобы начать установку, перейдите на страницу загрузки CLion и нажмите синюю кнопку «Загрузить».
После загрузки используйте команду CD, чтобы переместить окно терминала в каталог «Загрузки». Затем с помощью команды tar распакуйте ранее загруженный файл JetBrains CLion TarGZ.
Внутри каталога «Downloads» используйте команду tar xvf, чтобы распаковать файл CLion TarGZ. Процесс распаковки должен занять всего пару секунд, так как файл не такой большой.
Когда процесс будет завершен, используйте команду CD, чтобы перейти в новую папку CLion, созданную командой tar после процесса распаковки.
Источник


