- Change a drive letter
- Изменение буквы диска Change a drive letter
- How to Change a Drive Letter
- Don’t like the letters assigned to your drives in Windows? Change them!
- Windows’ Disk Management Makes It Easy
- How to Change Drive Letters in Windows
- If You Have Programs Not on the Main Drive
- No Changes for the Operating System Drive
- Change, Don’t Switch
- Using the Command Prompt
- Assign Drive Letters to Folders in Windows
- Method 1: Use the subst DOS Command
- Method 2: Use the psubst Utility
- Method 3: Use a Graphical Tool
Change a drive letter
Applies To: Windows 10, Windows 8.1, Windows 7, Windows Server 2019, Windows Server 2016, Windows Server 2012 R2, Windows Server 2012
If you don’t like the drive letter assigned to a drive, or if you’ve got a drive that doesn’t yet have a drive letter, you can use Disk Management to change it. To instead to mount the drive in an empty folder so that it appears as just another folder, see Mount a drive in a folder.
If you change the drive letter of a drive where Windows or apps are installed, apps might have trouble running or finding that drive. For this reason we suggest that you don’t change the drive letter of a drive on which Windows or apps are installed.
Here’s how to change the drive letter:
Open Disk Management with administrator permissions. To do so, select and hold (or right-click) the Start button, and then select Disk Management.
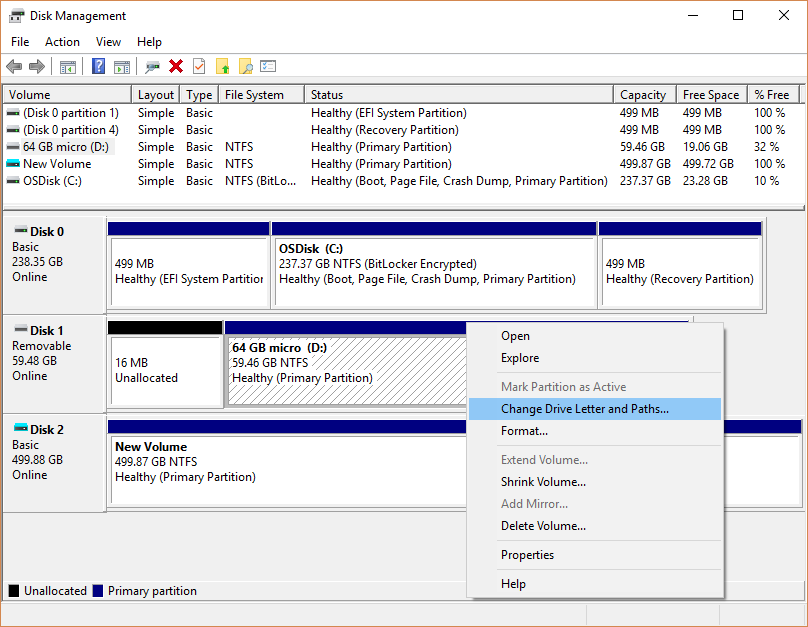
In Disk Management, select and hold (or right-click) the volume for which you want to change or add a drive letter, and then select Change Drive Letter and Paths.

If you don’t see the Change Drive Letter and Paths option or it’s grayed out, it’s possible the volume isn’t ready to receive a drive letter, which can be the case if the drive is unallocated and needs to be initialized. Or, maybe it’s not meant to be accessed, which is the case of EFI system partitions and recovery partitions. If you’ve confirmed that you have a formatted volume with a drive letter that you can access and you still can’t change it, unfortunately this topic probably can’t help you, so we suggest contacting Microsoft or the manufacturer of your PC for more help.
To change the drive letter, select Change. To add a drive letter if the drive doesn’t already have one, select Add.

Select the new drive letter, select OK, and then select Yes when prompted about how programs that rely on the drive letter might not run correctly.
Изменение буквы диска Change a drive letter
Относится к: Windows 10, Windows 8.1, Windows 7, Windows Server 2019, Windows Server 2016, Windows Server 2012 R2, Windows Server 2012. Applies To: Windows 10, Windows 8.1, Windows 7, Windows Server 2019, Windows Server 2016, Windows Server 2012 R2, Windows Server 2012
Если вас не устраивает буква, назначенная для диска, или у вас есть диск, который еще не получил букву диска, можно использовать управление дисками для ее изменения. If you don’t like the drive letter assigned to a drive, or if you’ve got a drive that doesn’t yet have a drive letter, you can use Disk Management to change it. Чтобы вместо этого подключить диск в пустой папке и он отображался как обычная папка, см. статью Назначение диску пути к папке точки подключения. To instead to mount the drive in an empty folder so that it appears as just another folder, see Mount a drive in a folder.
Если вы измените букву диска, где установлена система Windows или приложения, могут возникнуть проблемы при запуске и поиске этого диска. If you change the drive letter of a drive where Windows or apps are installed, apps might have trouble running or finding that drive. По этой причине не рекомендуется изменять букву диска, на котором установлена система Windows или приложения. For this reason we suggest that you don’t change the drive letter of a drive on which Windows or apps are installed.
Вот как изменить букву диска: Here’s how to change the drive letter:
Откройте модуль управления дисками с правами администратора. Open Disk Management with administrator permissions. Чтобы сделать это, щелкните и удерживайте (или щелкните правой кнопкой мыши) кнопку «Пуск», а затем выберите элемент Управление дисками. To do so, select and hold (or right-click) the Start button, and then select Disk Management.
В оснастке управления дисками выберите и удерживайте (или щелкните правой кнопкой мыши) том, для которого хотите изменить или добавить букву диска, а затем выберите команду Изменить букву или путь к диску. In Disk Management, select and hold (or right-click) the volume for which you want to change or add a drive letter, and then select Change Drive Letter and Paths.
Если вы не видите команду Изменить букву или путь диска или она недоступна, возможно, том еще не готов к назначению буквы диска; эта ситуация может возникнуть, если диск не распределен и должен быть инициализирован. If you don’t see the Change Drive Letter and Paths option or it’s grayed out, it’s possible the volume isn’t ready to receive a drive letter, which can be the case if the drive is unallocated and needs to be initialized. Возможно также, что он не предназначен для доступа; это относится к системным разделам EFI и разделам восстановления. Or, maybe it’s not meant to be accessed, which is the case of EFI system partitions and recovery partitions. Если вы убедились, что у вас есть отформатированный том с буквой диска, к которому можно получить доступ, но букву по-прежнему невозможно изменить, к сожалению, этот раздел, скорее всего, не поможет. Рекомендуем обратиться в корпорацию Майкрософт или к производителю своего ПК за дополнительными сведениями. If you’ve confirmed that you have a formatted volume with a drive letter that you can access and you still can’t change it, unfortunately this topic probably can’t help you, so we suggest contacting Microsoft or the manufacturer of your PC for more help.
Чтобы изменить букву диска, выберите Изменить. To change the drive letter, select Change. Чтобы добавить букву диска, если ее еще нет, выберите Добавить. To add a drive letter if the drive doesn’t already have one, select Add.

Выберите новую букву диска, затем нажмите ОК, а затем выберите Да при появлении уведомления о том, что программы, использующие букву диска, могут работать неправильно. Select the new drive letter, select OK, and then select Yes when prompted about how programs that rely on the drive letter might not run correctly.
How to Change a Drive Letter
Don’t like the letters assigned to your drives in Windows? Change them!
:max_bytes(150000):strip_icc()/tim-fisher-5820c8345f9b581c0b5a63cf.jpg)
:max_bytes(150000):strip_icc()/image-5e6611aebe974bb7886a24b5070c834f.jpg)
While they might seem set in stone, the letters assigned to your hard drives, optical drives, and USB based drives in Windows are very much not a fixed thing.
Maybe you’re using a new external hard drive and now you want to change the drive letter to G from the F it was assigned, or maybe you just like to keep your flash drives organized at the end of the alphabet.
Windows’ Disk Management Makes It Easy
Whatever the reason, the Disk Management tool in Windows makes changing drive letters surprisingly easy, even if you’ve never worked with your drives in any way before.
Changing drive letters in Windows usually takes less than a few minutes, at most.
Unfortunately, you can’t change the drive letter of the partition that Windows is installed onto. On most computers, this is usually the C drive.
These steps apply to Windows XP and newer versions of Windows. See What Version of Windows Do I Have? if you’re not sure which you’re running.
How to Change Drive Letters in Windows
Open Disk Management, the tool in Windows that lets you manage drive letters, among [many] other things.
:max_bytes(150000):strip_icc()/001_how-to-change-a-drive-letter-2626069-5bd20dce46e0fb0026c389c8.jpg)
In Windows 10 and Windows 8, Disk Management is also available from the Power User Menu (WIN+X keyboard shortcut) and is probably the quickest way to open it. You can also start Disk Management from the Command Prompt in any version of Windows, but starting it via Computer Management is probably best for most of you.
Locate from the list at the top, or from the map at the bottom, the drive you want to change the drive letter of.
If you’re not sure that the drive you’re looking at is really the one you want to change the drive letter for, you can right-click or tap-and-hold the drive and then choose Explore. If you need to, look through the folders to see if that’s the right drive.
Right-click or tap-and-hold the drive and choose Change Drive Letter and Paths.
:max_bytes(150000):strip_icc()/002_how-to-change-a-drive-letter-2626069-5bd20e7ec9e77c0058578d41.jpg)
Select Change.
:max_bytes(150000):strip_icc()/003_how-to-change-a-drive-letter-2626069-5bd20f6746e0fb0026c9f1ca.jpg)
If you’ve selected the primary drive by accident, some versions of Windows will display a message that reads Windows cannot modify the drive letter of your system volume or boot volume.
Choose the drive letter you want Windows to assign to this storage device by selecting it from the Assign the following drive letter drop-down box.
:max_bytes(150000):strip_icc()/004_how-to-change-a-drive-letter-2626069-5bd20ff046e0fb00510c300d.jpg)
You don’t need to worry if the drive letter is already being used by another drive because Windows hides any letters you can’t use.
Select OK.
Choose Yes to the Some programs that rely on drive letters might not run correctly. Do you want to continue? question.
:max_bytes(150000):strip_icc()/005_how-to-change-a-drive-letter-2626069-5bd21099c9e77c0026e33304.jpg)
If you have software installed to this drive, it might stop working properly after changing the drive letter. See details on this in the section below.
Once the drive letter change is complete, which usually only takes a second or two, you’re welcome to close any open Disk Management or other windows.
The drive letter is different from the volume label. You can change the volume label using similar steps.
If You Have Programs Not on the Main Drive
Changing drive letter assignments for drives that have software installed to them may cause the software to stop working. This isn’t quite as common with newer programs and apps but if you have an old program, especially if you’re still using Windows XP or Windows Vista, this is likely to be a problem.
Fortunately, most of us don’t have software installed to drives other than the primary drive (typically the C drive), but if you do, consider this your warning that you might need to reinstall the software after changing the drive letter.
No Changes for the Operating System Drive
You cannot change the drive letter of the drive that the Windows operating system is installed on. If you’d like Windows to exist on a drive other than C, or whatever it happens to be now, you can make that happen but you’ll have to complete a clean install of Windows to do it. Unless you have a pressing need to have Windows exist on a different drive letter, we don’t recommend going through all that trouble.
Change, Don’t Switch
There’s no built-in way to switch drive letters between two drives in Windows. Instead, use a drive letter that you don’t plan on using as a temporary «holding» letter during the drive letter change process.
For example, let’s say you’d like to swap Drive A for Drive B. Start by changing Drive A’s letter to one that you don’t plan on using (like X), then Drive B’s letter to Drive A’s original one, and finally Drive A’s letter to Drive B’s original one.
Using the Command Prompt
You can also change the drive letter from Command Prompt. It’s not as easy as using Disk Management and you can’t see right away which letters are available to choose, but it is completely doable with the diskpart command.
Assign Drive Letters to Folders in Windows
We’ll show you 3 different methods to try
If there are folders that you access frequently, this post shows you how to quickly access these folders in Windows Explorer without having to enter the full path to the folder. We will discuss three ways to map folders to drive letters.
Method 1: Use the subst DOS Command
First, we will use an old DOS command, called subst, that allows you to assign a drive letter to any folder in Windows.
For this example, we will assign a drive letter for the following folder: C:\Users\Lori Kaufman\Documents\My Work.
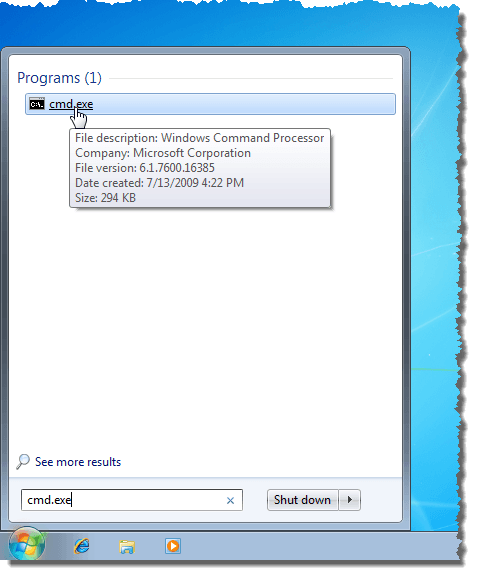
Open the Start menu and enter “cmd.exe” (without the quotes) in the Search programs and files box. Click cmd.exe in the results to open the command prompt window.
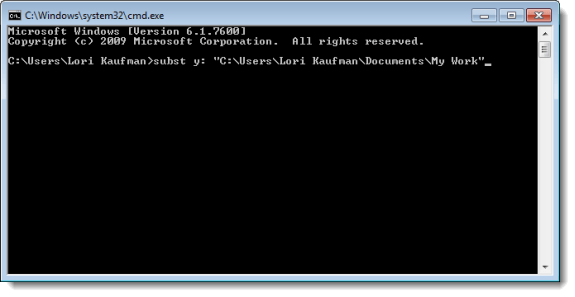
In the command prompt window, type the following command to associate drive “Y:” with the folder.
NOTE: If there are spaces in the path name, be sure to put quotes around the full path.
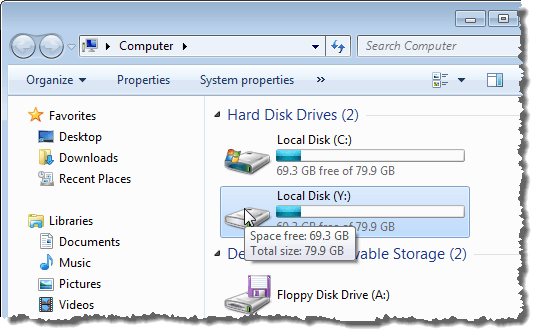
Now, when we open Windows Explorer, we see a new drive labeled Y: that will directly open the My Work folder.
Use this same process to assign different drive letters to all your frequently used directories. However, the subst command cannot be used with mapped network folders.
Method 2: Use the psubst Utility
A disadvantage of using the subst command is that these virtual drives are temporary and will be removed as soon as you shutdown or restart the computer or log off. However, you can solve this by using the free psubst utility, which operates like the subst command but it creates permanent virtual drives that are persistent even after rebooting your computer.
Download the psubst utility from
Method 3: Use a Graphical Tool
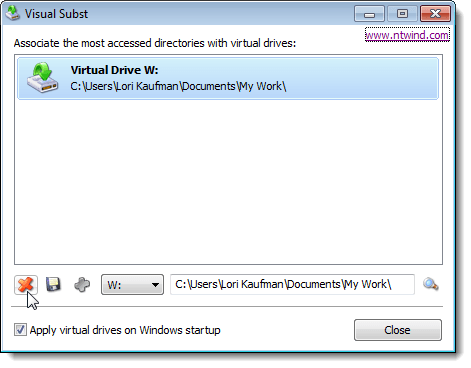
If you would rather use a graphical tool to map drive letters to folders, there is a free utility called, Visual Subst, that’s like a graphical version of the psubst utility.
Download Visual Subst from
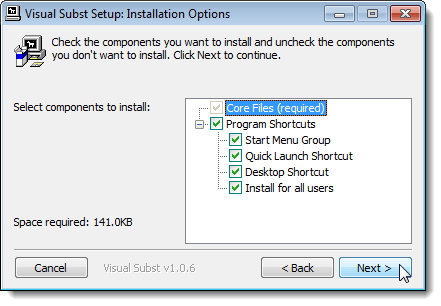
To install Visual Subst, double-click on the .exe file you downloaded.

On the Installation Options screen, select the check boxes for the Program Shortcuts you want to install and click Next.
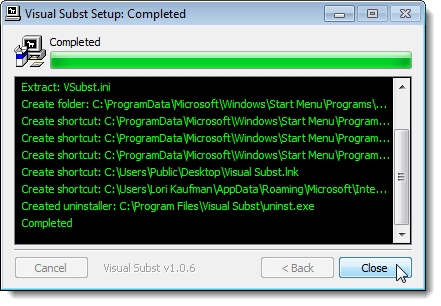
When the setup is completed, click Close. Double-click the shortcut to start the program. You can also start it from the Start menu.
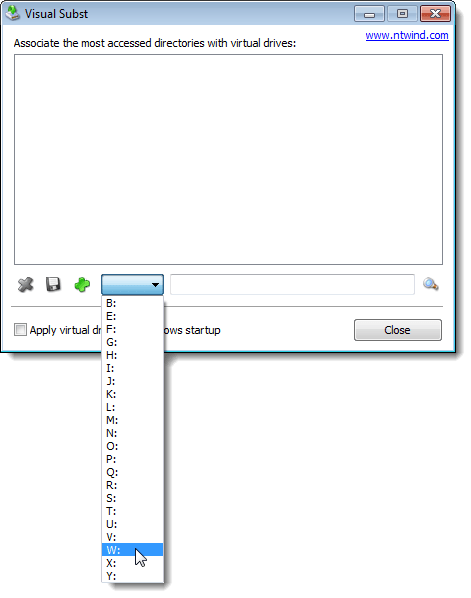
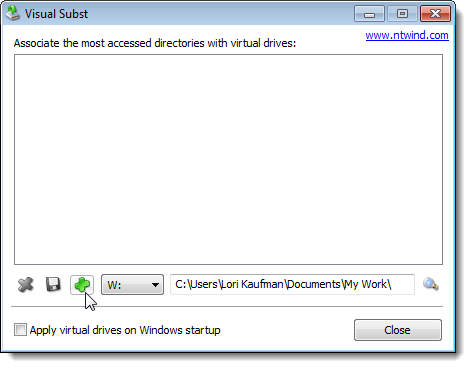
The main Visual Subst window displays. Select a desired drive letter from the drop-down list.
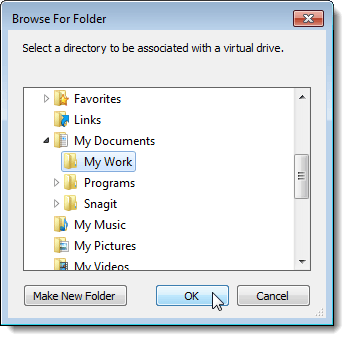
To select a folder to map to the selected drive letter, click the Browse button to the right of the edit box.
On the Browse For Folder dialog box, navigate to the folder you want to map, select it, and click OK.
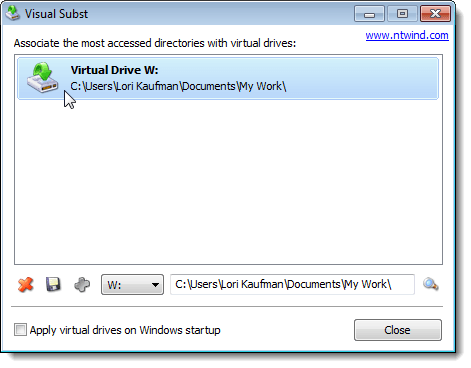
To map the selected folder to the selected drive letter, click the green plus button on the button bar to the left of the drive letter drop-down list.
The virtual drive is added to the list. Add more virtual drives by selecting a drive letter and a corresponding folder and adding it to the list as described above.
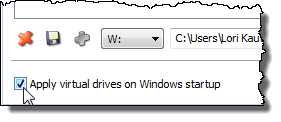
If you want the virtual drives you defined available automatically when you start Windows, select the Apply virtual drives on Windows startup check box so there is a check mark in the box.
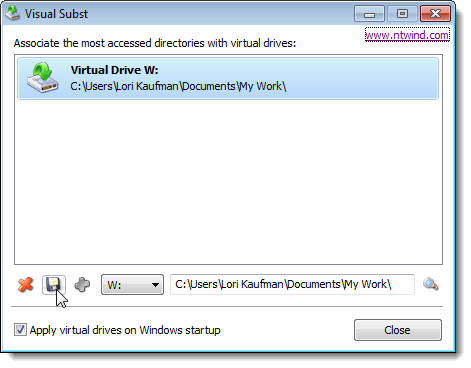
To save the settings for Visual Subst, click the floppy disk button on the button bar. A file with the .ini extension is saved in the same directory where Visual Subst was installed.
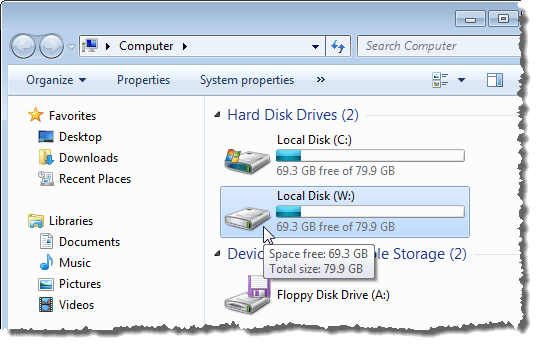
The mapped folders display as Hard Disk Drives in Windows Explorer.
If you want to remove the mapping for a folder, open Visual Subst again and select the virtual drive from the list. Click the red X button on the button bar.
Mapping folders to drive letters can save you a lot of time and Visual Subst makes adding virtual drives easy. Visual Subst works in Windows 2000, Windows XP, and later versions of Windows including Windows 7, 8 and 10. Enjoy!
Founder of Help Desk Geek and managing editor. He began blogging in 2007 and quit his job in 2010 to blog full-time. He has over 15 years of industry experience in IT and holds several technical certifications. Read Aseem’s Full Bio


