- Add a font
- Powerful apps for productivity, connection, and security
- Add a font
- Font Installation and Deletion
- How to Install the Fonts You Want in Windows 10
- How to Install Fonts in Windows 10
- How to Install Fonts in Windows 7
- Add fun new fonts in a flash
- Safely Add Fonts to Windows
- Unzip the Font File
- How to Install Fonts on Windows 7 From the Font Folder
- How to Install Fonts from File
- Uninstall Fonts
- How do I install fonts on my Windows PC?
- How do I install fonts on my Windows PC?
- Important!
- Windows 10
- Windows 8
- Windows 7
Add a font
Powerful apps for productivity, connection, and security
One way you can change the style of a document is by adding a new text font. To add a font to Word, download and install the font in Windows, where it will become available to all Office applications.
Fonts come as files, and there are many sites on the Internet where you can download free fonts, such as DaFont. You can also import font files from a CD, a DVD, or your organization’s network. TrueType (file extension .ttf) and OpenType (.otf) fonts both work fine.
Note: Before you download a font, make sure that you trust the source.
Add a font
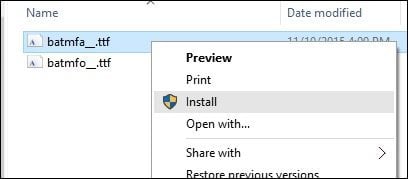
Download the font files. These often come compressed in .zip folders . In one .zip folder, you might find several variations on the same font, such as “light” and “heavy.” A .zip folder usually looks like this:

If the font files are zipped, unzip them by right-clicking the .zip folder and then clicking Extract. Now you’ll see the available TrueType and OpenType font files:

Right-click the fonts you want, and click Install.
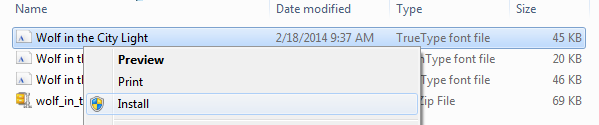
If you’re prompted to allow the program to make changes to your computer, and if you trust the source of the font, click Yes.
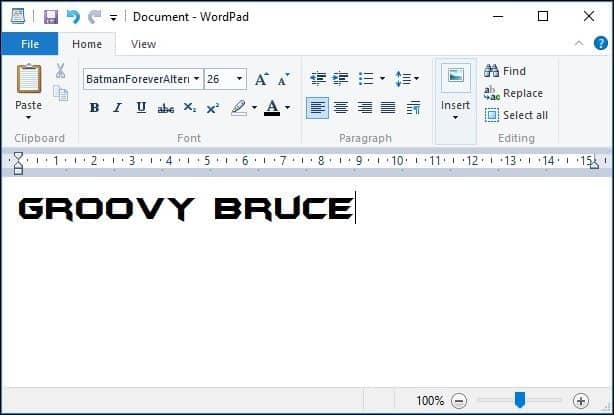
Your new fonts will appear in the fonts list in Word.
Here are two other ways to install and manage fonts:
All fonts are stored in the C:\Windows\Fonts folder. You can also add fonts by simply dragging font files from the extracted files folder into this folder. Windows will automatically install them. If you want to see what a font looks like, open the Fonts folder, right-click the font file, and then click Preview.
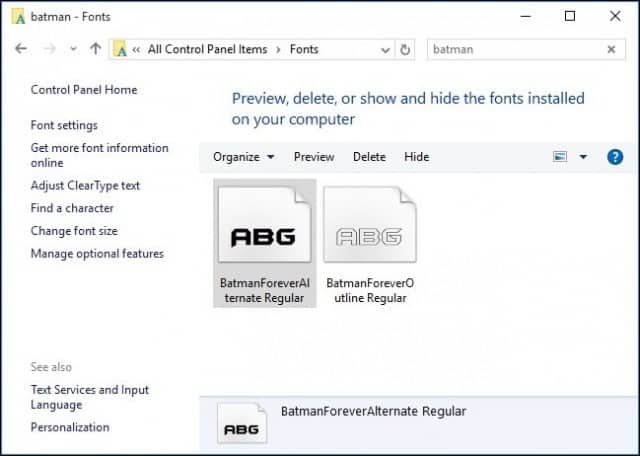
Another way to see your installed fonts is through Control Panel. In Windows 7 and Windows 10, go to Control Panel > Fonts. In Windows 8.1, go to Control Panel > Appearance and Personalization > Fonts.
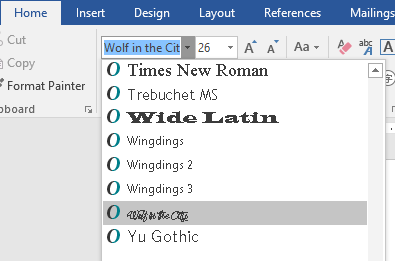
The next time you start Word, you’ll see the fonts you added in the Font list.
Font Installation and Deletion
An application can use a font to draw text only if that font is either resident on a specified device or installed in the system font table. The font table is an internal array that identifies all nondevice fonts that are available to an application. An application can retrieve the names of fonts currently installed on a device or stored in the internal font table by calling the EnumFontFamilies or ChooseFont functions.
To temporarily install a font, call AddFontResource or AddFontResourceEx. These functions load a font that is stored in a font-resource file. However, this is a temporary installation because after a reboot the font will not be present.
To install a font that will remain after the system is rebooted, use one of the following methods:
- Go to the Control Panel, click the Fonts icon, and select Install New Fonts from the File menu. The font is available to an application even before the reboot. However, in a terminal server situation the font is available for the current session but is not available for other sessions until after a reboot.
- Copy the font into the %windir%\fonts folder. Then, either go to the Control Panel and click the Fonts icon, or call AddFontResource or AddFontResourceEx. The font is available to an application even before the reboot. However, in a terminal server situation the font is available for the current session but is not available for other sessions until after a reboot. If you only copy the font into the %windir%\fonts folder, the font will be available only after the system is rebooted.
When an application finishes using an installed font, it must remove that font by calling the RemoveFontResource function.
A font installed from a location other than the %windir%\fonts folder cannot be modified when loaded in any active session, including session 0. Any attempt to change, replace, or delete will, therefore, be blocked. If modification to a font is necessary:
- Temporary fonts get loaded only in the current session. Before attempting any font modifications, call RemoveFontResource to force the current session to unload the font.
- Permanent fonts remain installed after reboot and are loaded by all created sessions. Call RemoveFontResource to force the current session to unload the font. Then, in the font registry key (HKEY_LOCAL_MACHINE\SOFTWARE\Microsoft\Windows NT\CurrentVersion\Fonts) find and remove the registry value associated with the font. Finally, reboot the machine to ensure the font isn’t loaded in any session. After reboot, proceed with your font modification/deletion.
Whenever an application calls the functions that add and delete font resources, it should also call the SendMessage function and send a WM_FONTCHANGE message to all top-level windows in the system. This message notifies other applications that the internal font table has been altered by an application that added or removed a font.
How to Install the Fonts You Want in Windows 10


Windows comes preloaded with a lot of stylish fonts, but they might not be what you are looking for. Thankfully Windows 10 makes it easy to install any font you desire. Here’s a look at how to install them.
How to Install Fonts in Windows 10
Once you have your font downloaded (these are often .ttf files) and available, just right-click it and click Install. That’s it! I know, uneventful.
To check if the font is installed, press Windows key+Q then type: fonts then hit Enter on your keyboard.
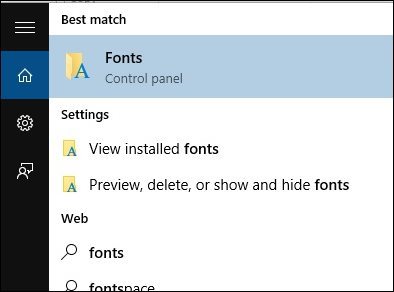
You should see your fonts listed in the Font Control Panel.
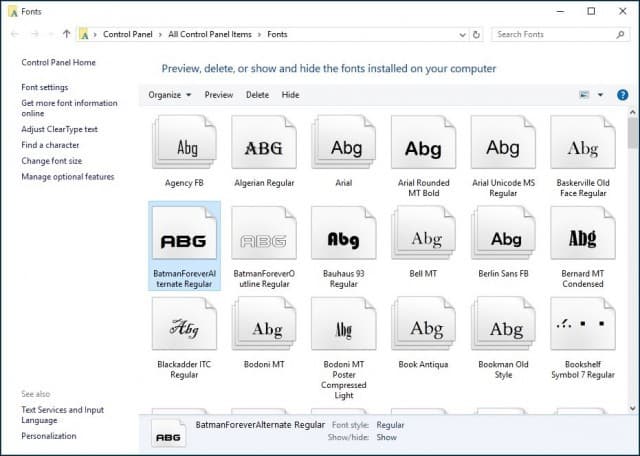
If you don’t see it and have a ton of them installed, just type in its name in the search box to find it.
That’s all there is to it. Now you can create stylish and unique documents with some of your favorite fonts not included in Windows 10 by default.
If you’re not on Windows 10 yet, check out our article on how to install fonts on Windows 8.1.
If you’re a graphics design enthusiast, before downloading a font, be sure to check out our article about the best and worst fonts for homemade designs.
How to Install Fonts in Windows 7
Add fun new fonts in a flash
:max_bytes(150000):strip_icc()/TriciaGoss-c6bcd4d050f744c2b13efbf760819c9d.jpg)
Windows 7 comes loaded with dozens of attractive and professional-looking fonts. However, there are even more unique, eye-catching and fun fonts available for download all over the internet. If you are creating a custom document, publication or some other design with text, using a new font can make it extra special. Better yet, when you discover how easy it is to add fonts to Windows, you can install all sorts of them.
As of January 2020, Microsoft is no longer supporting Windows 7. We recommend upgrading to Windows 10 to continue receiving security updates and technical support.
:max_bytes(150000):strip_icc()/adult-blur-businessman-927022-4e5401dbd45d46379b29501730db376a.jpg)
Learn how to install fonts on Windows 7 using a couple of methods as well as how to uninstall them if you change your mind.
Safely Add Fonts to Windows
» data-caption=»» data-expand=»300″ data-tracking-container=»true»/>
As with any type of file or software you download onto your computer, you want to be sure that any fonts you install are safe.
- Look for fonts on reputable websites or as part of curated lists on a website you trust.
- In addition, make sure you select the correct download button. Ads containing misleading graphics that resemble download buttons can trick you into installing something potentially dangerous.
A good place to find fonts that you know are safe is the Microsoft Typography Page. You’ll also find lots of information there about current and developing Microsoft fonts.
Unzip the Font File
:max_bytes(150000):strip_icc()/001-how-to-install-fonts-in-windows-7-b2daa01c29944da0adf00deeb774a3ce.jpg)
In most cases, new fonts will download to your computer as ZIP files. Before you can add fonts to Windows, you must unzip or extract them.
- Navigate to the font file you downloaded, which is likely in your Downloads folder.
- Right-click the folder and select Extract All.
- Choose the location where you want to save the unzipped font files and select Extract.
How to Install Fonts on Windows 7 From the Font Folder
:max_bytes(150000):strip_icc()/Capture-0aee1fafd0d74a63b38e21e42f8a58ad.JPG)
Fonts are stored in the Windows 7 fonts folder. Once you have downloaded new fonts, you can install them directly from this folder, as well.
- To access the folder quickly, press Start and select Run or press Windows key+R. Type (or paste) %windir%\fonts into the Open box and select OK.
- Go to the File menu and choose Install New Font.
- Navigate to the location where you saved the extracted font.
- Select the file you want to install (if there are more than one files for the font, choose the .ttf, .otf, or .fon file). If you want to install several fonts, press and hold the Ctrl key while selecting the files.
- Select Copy Fonts To Fonts Folder and choose OK.
How to Install Fonts from File
:max_bytes(150000):strip_icc()/002-how-to-install-fonts-in-windows-7-63777545d0e04b21b77473825a65ac31.jpg)
You can also install fonts in Windows 7 directly from the downloaded font file after you have unzipped it.
- Navigate to the font file you downloaded and extracted.
- Double-click the font file (if there are multiple files in the font folder, choose the .ttf, .otf, or .fon file).
- Select Install at the top of the window and wait a moment while the font is installed onto your computer.
Uninstall Fonts
:max_bytes(150000):strip_icc()/004-how-to-install-fonts-in-windows-7-1bb422f1dc1b41c9bf5fcd2f6d6b0ca0.jpg)
If you decide you don’t like a font after all, you can remove it from your computer.
- Navigate to the Fonts folder.
- Select the font you want to remove and press Delete (or select Delete from the File menu).
- Select Yes if a prompt window appears asking if you want to delete the font(s).
How do I install fonts on my Windows PC?
How do I install fonts on my Windows PC?
Important!
- Make sure you are installing the desktop fonts and not webfonts. Fonts purchased for @font-face embedding cannot be installed as a desktop font. If you purchased both, you may be looking in the wrong folder.
- Zipped folders MUST be unzipped. Some Windows operating systems allow you to peek inside a zipped folder. This does not mean it is actually unzipped.
Windows 10
- Unzip the folder containing the fonts first. Fonts cannot be installed if they are zipped.
- Right click on the font file and select Install.
- Search for Fonts in the search box by the start menu.
- Click on the Fonts (Control Panel) link to open the Fonts Manager
- Drag and Drop or Copy and Paste the unzipped fonts into the Fonts Manager to install.
Windows 8
- Unzip the folder containing the fonts first. Fonts cannot be installed if they are zipped.
- Right click on the font file and select Install.
- Go to search in the start menu.
- Search for Fonts in settings.
- Click on the Fonts Folder to open the Font folder.
- Drag and Drop or Copy and Paste the unzipped fonts files into the Fonts folder to install.
Windows 7
- Unzip the fonts first. Fonts cannot be installed if they are zipped.
- Right click the font file and select ‘Install.’


