- Что такое файл hosts. Как ограничить доступ к сайтам стандартными способами windows
- How to Edit the Hosts File in Windows 10
- Edit Your Windows 10 Host File as an Administrator
- An Easier Way to Edit the Hosts File in Windows 10
- How to Edit Your Hosts File in Windows 10
- What is a Hosts File?
- Why is a Hosts File Useful?
- Where is the Hosts File Located?
- What Does a Hosts File Contain?
- How Do I Edit my Hosts File?
- Conclusion
Что такое файл hosts. Как ограничить доступ к сайтам стандартными способами windows
Для чего нужен файл Hosts?
Предназначение этого системного файла — присвоение определенным адресам сайтов определенного IP.
Этот файл очень любят всякого рода вирусы и зловреды для того, чтобы прописать в него свои данные или попросту его заменить.
Результатом этих действий могут быть признаки «вставки» сайта в браузеры, который будет просить отправить смс при открытии браузера или блокировка различных сайтов, на усмотрение создателей вируса.
Где находится файл hosts в windows?
Для различных версий ОС Windows расположение файла hosts немного разное:
Причем окончание hosts, это уже и есть конечный файл, а не папка. У него нет расширения.
Как должен выглядеть правильный файл hosts?
«Содержимое» файла hosts так же немного отличается для разных версий windows, но не особо. В нем «написано» на английском языке для чего он нужен и как делать исключения с приведением одного примера. Все строчки, начинающиеся со знака # , означают что они закомментированы и не влияют на файл.
Содержание оригинального файла hosts для Windows XP:
# Copyright (c) 1993-2009 Microsoft Corp.
#
# This is a sample HOSTS file used by Microsoft TCP/IP for Windows.
#
# This file contains the mappings of IP addresses to host names. Each
# entry should be kept on an individual line. The IP address should
# be placed in the first column followed by the corresponding host name.
# The IP address and the host name should be separated by at least one
# space.
#
# Additionally, comments (such as these) may be inserted on individual
# lines or following the machine name denoted by a ‘#’ symbol.
#
# For example:
#
# 102.54.94.97 rhino.acme.com # source server
# 38.25.63.10 x.acme.com # x client host
# localhost name resolution is handled within DNS itself.
# 127.0.0.1 localhost
# ::1 localhost
Как Вы можете убедиться, в содержании файла host для разных версий windows, особых отличий нет.
Как открыть и изменить файл hosts?
Файл hosts можно открыть с помощью стандартного Блокнота Windows.
Вот здесь, наверное, самая интересная часть статьи.
Прежде всего нужно понять, а зачем вообще изменять этот файл? Да для того, чтобы запретить доступ к определенным сайтам. Таким образом, изменив данный файл и прописав в него адрес сайта, пользователь не сможет зайти на него ни через какой браузер.
Для того, чтобы изменить файл hosts, желательно открыть его от имени администратора (Как запустить файл или программу от имени администратора) щелкнув ПКМ на файле и выбрав «Запуск от имени администратора». Либо открыть таким образом Блокнот и уже в нём открыть файл.
Для быстроты действий можно просто нажать кнопку Пуск и выбрать пункт Выполнить (win+r) (Что делать, если в Пуск нет Выполнить) и ввести в строку:

В результате чего откроется этот файл в Блокноте.
Для того, чтобы заблокировать доступ к сайту (предположим, он будет test.ru ), нужно просто добавить строку с этим сайтом в самый низ:
# Copyright (c) 1993-1999 Microsoft Corp.
#
# This is a sample HOSTS file used by Microsoft TCP/IP for Windows.
#
# This file contains the mappings of IP addresses to host names. Each
# entry should be kept on an individual line. The IP address should
# be placed in the first column followed by the corresponding host name.
# The IP address and the host name should be separated by at least one
# space.
#
# Additionally, comments (such as these) may be inserted on individual
# lines or following the machine name denoted by a ‘#’ symbol.
#
# For example:
#
# 102.54.94.97 rhino.acme.com # source server
# 38.25.63.10 x.acme.com # x client host
# This HOSTS file created by Dr.Web Anti-rootkit API
# 127.0.0.1 localhost
# ::1 localhost
127.0.0.1 test.ru
Каждый новый сайт, который хотите заблокировать, нужно начинать с новой строки и прописывать, не забывая локальный IP адрес 127.0.0.1
Так же, для редактирования файла hosts, существует программа HOSTS EDITOR, скачать которую и почитать описание можно с официального сайта .
Принцип работы у неё заключается в том, что она помогает отредактировать файл hosts.
Из скрина ниже понятен принцип её работы, всё делается в пару кликов. Добавление осуществляется путем нажатия на + .
После редактирования не забудьте нажать на кнопку сохранения (2 кнопка «Save changes» слева от кнопки «+»).
Так же изменить этот файл можно и для хороших целей, например ускорить загрузку сайта.
Как это работает?
При заходе на сайт, Вы видите его доменное имя, которое имеет буквы. Но все сайты в интернете имеют IP адрес, а названия уже присваиваются с использованием DNS. Я не буду вдаваться в подробности этого процесса, статья не об этом. Но здесь нужно знать то, что файл hosts имеет приоритет при обращении к сайтам, и только после него идет запрос к DNS.
Для того, чтобы ускорить загрузку сайта, нужно знать его IP адрес и домен.
IP адрес сайта можно узнать с помощью различных сервисов, например этого или этого .
Домен — это название сайта.
Для примера, ускорим загрузку этого сайта, на котором Вы читаете статью, явно указав файлу IP адрес и домен.
Тогда добавляемая строчка будет:
Это ускоряет загрузку страницы в пару секунд, а иногда может дать доступ, если стандартными средствами Вы не можете зайти на сайт.
Ещё с можно перенаправить на другой сайт с помощью файла hosts.
Для этого нужно знать IP адрес сайта и его домен (как и в вышеописанном случае), тогда добавляемая строка будет такая:
И теперь, после ввода в адресную строку браузера сайта test.ru , Вы будете перенаправлены на сайт, указанный в IP адресе. В данном случае на сайт vindavoz.ru .
Если хотите почистить файл hosts, то можете это сделать, просто удалив содержимое и вставить в него оригинальный текст, из описания выше (под спойлерами).
Некоторые нюансы в файле hosts:
Таким образом Вы можете легко и бесплатно заблокировать доступ к сайтам в Windows путем правки файла hosts.
How to Edit the Hosts File in Windows 10


If you’re a regular groovyPost reader, you know that DNS translates domain names like groovyPost.com into IP addresses like 104.24.11.25. But did you know that there’s a file on your Windows 10 PC that can override that? It’s called your hosts file and lets you map specific domain names to an IP address of your choosing. Your HOSTS file only affects your computer, so you can use it to create custom URLs for IP addresses on your network, or you can use it to redirect certain websites.
As you can imagine, editing the HOSTS file can easily break your internet if it’s modified incorrectly or maliciously. So, it’s not particularly easy for a normal user to edit. This is a good thing. But if you want to purposefully change your HOSTS file, here’s how.
Edit Your Windows 10 Host File as an Administrator
The HOSTS file is normally stored in a plain text file in the Windows System folder and can be modified for a variety of use cases. One particular reason I edited the Host file in the past was to block certain websites when I imaged computers for a local high school. This was probably one of the best and easiest ways I could ensure students didn’t load any unauthorized websites such as Facebook or YouTube.
Editing your Windows Hosts file doesn’t have to feel like going down a rabbit hole. In Windows XP and earlier versions, the process was quite easy, just add an exception to your antivirus, open it in Notepad, make your changes then save it.
In Windows 10, if you try to edit your hosts file, you’ll probably be able to open it just fine, but when you go to save it, you’ll get an error:

Here’s how you can edit your hosts file without getting the “You don’t have permission to save in this location. Contact the administrator to obtain permission” error.
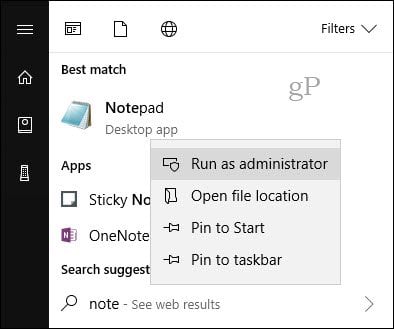
Hit the start menu or press the Windows key and start typing Notepad.
Right-click Notepad and choose Run as administrator.
In Notepad, click File then Open… In the File name field, paste the following path in:

Now you’ll be able to edit and save changes to your HOSTS file.
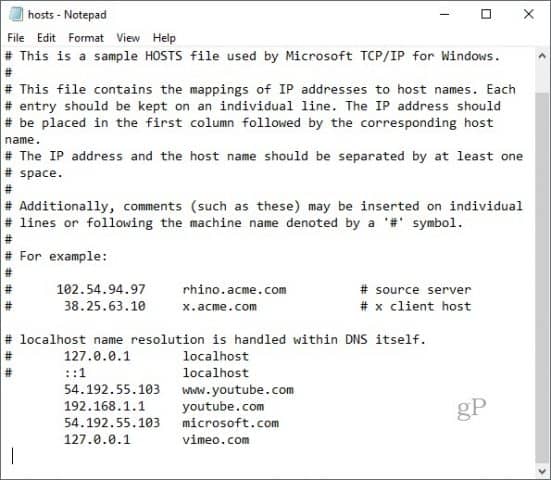
To map a domain, simply add a line based on the examples in the HOSTS file.
Start with the target IP address, then a space, then the domain name. If you want to block a website, redirect it to 127.0.0.1.
Don’t put in the # if you want it to take effect.
Also, remember that www.youtube.com is different than youtube.com.
You may need to restart your computer for the new HOSTS file to take effect.
An Easier Way to Edit the Hosts File in Windows 10
If you found that process a bit cumbersome, there’s a third-party utility you can use to modify your HOSTS file. I found a good one called Hosts File Editor by Scott Lerch. Let’s take a look and see how it works.
Now that you know the basics, here’s how you do it using the app, HOSTS File editor.
Download the 1 MB installer then proceed to set it up. Remember to choose the option just for yourself if you don’t want other users to have access to it.

Launch the app in Start > All apps—this will add the app to the Notification area where can launch the editor anytime you need to.

Hosts File Editor features a clean, easy to use interface. To begin using the program, populate the table with IP Addresses, Host Names, and a comment on the websites you want to manage. It’s not just limited to popular Internet websites, even devices on your home network with an IP address can be managed, so your Xbox, iPad, web cameras, or routers are much easier to block access to if needed.

When you are ready to block a website, check the box for the sites you want to prevent access to, click Save and that’s it.
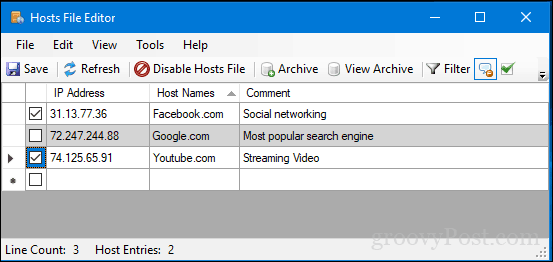
Another nice ease of use feature is the ability to simply right click the Hosts File Editor in the Notification area then click Disable Hosts File or make a quick edit. No need to go hunting or launch the command line anymore.

There are some other cool features included for power users and network administrators such as:
- Cut, copy, paste, duplicate, enable, disable and move one or more entries at a time.
- Filter and sort when there are a large number of host entries
- Archive and restore various hosts file configurations when switching between environments
- Automatically ping endpoints to check availability
So, there you have it, a quick and easy way to edit your Hosts File in Windows 10.
How to Edit Your Hosts File in Windows 10
What is a Hosts File?
The hosts file is a local plain text file that maps servers or hostnames to IP addresses. This file has been in use since the time of ARPANET. It was the original method to resolve hostnames to a specific IP address. The hosts file is usually the first process in the domain name resolution procedure. Here is an example of a hosts file entry.
We use the above code as an example since it almost always included in every hosts file. Another example would be similar to the following entry.
- The first section denotes the IP address where a request will be redirected to.
- The second section designates the location that we want to redirect a request from.
- The third section specifies a comment for the entry.
- Each entry is usually separated by a space or a tab.
We would add the above entry to our hosts file to associate the hostname (or domain name)В liquidweb.comВ with the IP addressВ 67.225.187.61. To provide a working example, let’s move on to the next section.
Why is a Hosts File Useful?
Let’s say we have just completed a migration to a new server. In order to see how our domains will look and operate on our new server before we move our DNS settings, we cannot just type in one of our current domain names as it will resolve to the old server we are moving away from (since we never move our DNS A records from the old server until we are sure the new site is working as expected).
So, to see how our domain will look on the new server, (without having to change our DNS records) we can simply modify our local hosts file to point the domain to the new servers IP. If our domain is liquidweb.com and the old IP is 67.225.187.61 and our new IP will be 72.30.35.10, we can temporarily comment out the current liquidweb.com entry (using a ‘#‘ symbol) and add an alternate entry which points to the new servers IP.
If we added the above entry to our hosts file, every time we open liquidweb.com in our browser, we will now be redirected to the 72.30.35.10 IP.
Where is the Hosts File Located?
The location of the hosts file will differ by operating system. The typical locations are noted below.
- Windows 10 — «C:\Windows\System32\drivers\etc\hosts»
- LinuxВ -В «/etc/hosts»
- Mac OSВ X -В «/private/etc/hosts»
What Does a Hosts File Contain?
A hosts file contains entries similar to the following information. Your entries may differ significantly.
How Do I Edit my Hosts File?
Our \etc\hosts file is only editable as a Windows administrator. В Here is a short video on how to edit a hosts file.
Here are the directions on how to modify your hosts file.
Step 1.
Click the Windows button and type Notepad in the search bar.
Step 2.
Right click on Notepad and then Run as Administrator.
Step 3.
You’ll be asked, “Do you want to allow this app to make changes to your device?”. Choose Yes.
Step 4.
In Notepad, choose File then Open.
Step 5.
Navigate to C:\Windows\System32\drivers\etc\hosts or click the address bar at the top and paste in the path and choose Enter.  If you don’t readily see the host file in the /etc directory then select All files from the File name: drop-down list, then click on the hosts file.
Step 6.
Add the appropriate IP and hostname at the end of your hosts’ file, select Save, and then close the file.
Step 7.
Finally, you will want to flush your DNS cache for your computer to recognize changes to the file. Click the Windows button and search command prompt.
Step 8.
Type the following command in the terminal and press Enter
Conclusion
Modifying a hosts file has many benefits which can significantly impact how you view your new domain or website. Using this method to view a site allows us to see how any new changes affect the layout and functionality of a domain.
Should you have any issues when modifying this file, our Support Teams are filled with experienced Linux technicians and talented system administrators who have an intimate knowledge of how to facilitate this modification. We are always available to answer any inquiries with issues related to this article, 24 hours a day, 7 days a week 365 days a year.
If you are a Fully Managed VPS server, Cloud Dedicated, VMWare Private Cloud, Private Parent server, Managed Cloud Servers, or a Dedicated server owner and you are uncomfortable with performing any of the steps outlined above, we can be reached via phone at 800.580.4985, or via a chat or support ticket to assist you with this process.


