- Создание, редактирование и удаление пользователей в Linux
- Создание
- Ключи (опции)
- How do I add a user in Linux without a home directory?
- useradd Command
- Without a Home Directory flag
- Create a user using the useradd Command
- Wrap Up
- How to Create Users Using Useradd Command in Linux
- Useradd Command and Syntax
- 1) How to Create a new user in Linux
- 2) Create a user with specific home directory
- 3) Creating a User with Specific User ID
- 4) Create User with Specific Login Shell
- 5) Create Specific Base Home Directory
- 6) Create a user with an expiry date
- 7) Creating a user and adding to multiple groups
- 8) Create Duplicate User ID
- 9) Create a User as System Account
- 10) Create a User without Home directory
- 11) Create a User with Password
- 12) Changing the default options
- 13) Create a User with custom comment
- Conclusion
- Linux add a user using command line tools
- Task: Add a user to the system
Создание, редактирование и удаление пользователей в Linux
В данной инструкции рассказывается о работе с пользователями Linux через терминал (с применением командной строки).
Создание
* опции не являются обязательными при создании пользователя.
* в данном примере создается учетная запись dmosk.
Для учетной записи стоит сразу создать пароль:
* после ввода, система попросит ввести пароль дважды.
Ключи (опции)
| Ключ | Описание и примеры |
|---|---|
| -b | Задает базовый каталог для домашнего каталога useradd dmosk -b /var/home |
| -c | Создает комментарий для описания учетной записи useradd dmosk -c «Пользователя для управления системой» |
| -d | Полный путь к домашнему каталогу пользователя useradd dmosk -d /home/newuser |
| -D | Позволяет показать или изменить настройки по умолчанию, которые будут применяться при последующем создании пользователей useradd dmosk -Ds /bin/bash |
| -e | Дата, после которой учетная запись устареет. useradd dmosk -e 2017-12-31 |
| -f | Число дней, после которого учетная запись с устаревшим паролем будет заблокирована useradd dmosk -f 0 |
| -g | Задает основную группу useradd dmosk -g altternativegroup |
| -G | Задает дополнительные группы useradd dmosk -G wheel |
| -k | Путь к источнику скелета (файлы с шаблонами для нового пользователя) useradd dmosk -k /var/skel |
| -m | При создании пользователя создать домашний каталог useradd dmosk -m |
| -M | Не создавать домашний каталог useradd dmosk -M |
| -N | Не создавать основную группу с таким же именем, как у пользователя useradd dmosk -N |
| -o | Разрешает создание учетной записи с повторяющимся UID useradd dmosk -u 15 -o |
| -p | Задает пароль useradd dmosk -p pass |
| -r | Системная учетная запись (без домашнего каталога и с идентификаторами в диапазоне SYS_UID_MIN — SYS_UID_MAX из файла /etc/login.defs) useradd dmosk -r |
| -R | Каталог, в который выполняется chroot useradd dmosk -R /var/chroot/home |
| -s | Путь до оболочки командной строки useradd dmosk -s /bin/csh |
| -u | Задает UID useradd dmosk -u 666 |
| -U | Имя группы будет таким же, как у пользователя useradd dmosk -U |
Актуальный список ключей можно получить командой useradd -h.
Источник
How do I add a user in Linux without a home directory?
useradd Command
The useradd is a command used for creating a user in any Linux-based operating system. It is a low-level or less secure command for creating a user because it only creates a user until we specify a flag.
This command does not automatically create a home directory until a -m flag is specified.
Without a Home Directory flag
Moreover, this command also provides a flag or option if you do not want to create a home directory of a user while creating a user.
-M for creating a user without a Home directory
–no-create-home is also used for not creating a home directory of a user
Let’s do some practical, create users using the useradd command and witness it.
Create a user using the useradd Command
To create a user using the useradd command, type the command given below:
In the above command, Ivan is the username, so provide your username at the place of Ivan.

You can witness in the screenshot attached; the user is created without asking for any password.
To create a password for this user, execute the command given below:
Type the new password you want to set for the user:
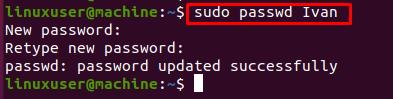
After successfully creating a user and setting its password, log in to the user profile using the command given below:

Type the recently created password for the newly created user:

You can see we are logged in to Ivan’s shell, and you can also witness that the user does not have the home directory.
Wrap Up
User management is an extremely responsible task for any Linux administrator. Due to the security reasons and privileges of the users, Linux administrators have to create some users without a home directory. This article provides to-the-point detail for creating a user without a home directory.
Источник
How to Create Users Using Useradd Command in Linux

In Linux and Unix-like operating systems, the most common command to create users is ‘useradd’ or ‘adduser’. As a system administrator, it often requires to add users, remove users, creating groups, and assign users.
There’s no difference between above mentioned two commands in feature-wise. The adduser command is friendlier and some Debian/Ubuntu administrators love using it. Useradd is binary compiled with the Linux system and work as a backend for adduser.
In this tutorial, we learn how to create users in Linux from the terminal using useradd command.
Useradd Command and Syntax
The following line shows the syntax for useradd command:
A user can be added simply by giving the username followed by the command. You should run useradd command either with root or sudo user privilege.
Let’s learn more about useradd command and its options.
1) How to Create a new user in Linux
As mentioned above, to create a new user we use useradd command.
The following command creates a new user named ‘bill’ and the second command sets the user (‘bill’) a new password.

This creates the user with Home directory as /home/bill and copies files from ‘/etc/skel’ directory to the user’s home directory.
This command adds an entry to the /etc/passwd, /etc/shadow, /etc/group and /etc/gshadow files.
Note: On Ubuntu and Debian related distribution useradd won’t create a default home directory unless you have to specify with options. Instead, Debian recommends using adduser command.
2) Create a user with specific home directory
To create a user with a specific home directory as the value for the user login use -d option. Make sure to create the base home directory using mkdir command before running command.
Let’s create the base home directory called ‘devops’:
Now the following command creates the user ‘bill’ and sets his home directory as ‘/devops/billhome’.
You may use a combination of both -m (create a home directory if doesn’t exist) and -d (set given path as the user’s login directory name) to create a user.
3) Creating a User with Specific User ID
By default when you create a user, it assigns next available UID defined in the login.defs file. But using -u option you can create a user with specific UID.
In the following example user bill is created with specific UID (3210).
The UID can be seen in the ‘/etc/passwd’ file as shown in the above output.
4) Create User with Specific Login Shell
Sometimes we need to create a user with a specific login shell (like ksh, tcsh, zsh, etc) or with no shell login (‘/sbin/nologin’).
We can specify login shell associated with user’s account with -s option as shown below:
You can verify login shell by grepping user name from /etc/passwd file:
5) Create Specific Base Home Directory
By default users home directories are located in ‘/home’ (variable in /etc/default/useradd )directory. By using -b option you can have a different base home directory for the new user.
The following command set ‘/mnt’ directory as the base directory and create a home directory of the user ‘bill’ as ‘/mnt/bill’.
6) Create a user with an expiry date
While creating a new user can you set an expiry date for the user account using -e option.
The following example set expiry date (format of the date is YYYY-MM-DD ) for the user ‘bill’.
This can be verified by checking in the last field of ‘/etc/shadow’ file. The last field (15879) shows the expiration date in terms of the number of days since Jan 1, 1970 the account is disabled.
More easy way to verify user expiry date is using chage command as shown below:
The -f option provides the number of days after a password expires until the account is permanently disabled. The value of 0 disables the account as soon as the password has expired.
As shown in the shadow file, the number of days is set to 20 (in the second last column).
7) Creating a user and adding to multiple groups
Each user in Linux should stay in one primary group and zero or more secondary groups (supplementary group).
A user’s primary group to which he belongs can be set with -g option. The group provided with this option must exist already.
The group can be checked with id command. The -G option is used to add a user to additional groups.
Let’s check how to create a user and assign to multiple groups. The command will create a new user named ‘bill’ with primary group ‘teams’ and secondary groups ‘admin’ and ‘apache’.
8) Create Duplicate User ID
The -o option allows to create a user account with a duplicate user (non-unique) ID. You must provide a UID number with -u option.
Check the following example:
Here we can see that there exist two accounts with 503 ID.
9) Create a User as System Account
Normally, the UIDs till 500 or 1000 are reserved for system accounts and are not allocated to normal users. With -r option, an account with ID in the range of system users is given to the user being created.
Here, the home directory for the user is not created. It must be created manually or provided with -m option.
10) Create a User without Home directory
If you wish not to create a home directory by itself, -M option can be given.
In the output of ls command, it can be seen that the home directory for bill user does not exist.
11) Create a User with Password
The user’s password is disabled by default. You can manually set the password using passwd command. But if you want to provide the password at the time of user creation, you can use -p option.
But the password provided here must be encrypted, as returned by crypt(3).
12) Changing the default options
When a user is added on a system, some values are taken as default, for example shell, base directory etc. The base directory is the directory where the users’ home directories reside. On most of the Linux systems, home directories of users reside in /home directory.
For example, user tom’s home directory will be ‘/home/tom’ by default. So /home will be his base directory. These default options are defined in ‘/etc/defaults/useradd’ file. These defaults can be viewed with -D option to useradd command:
The above command can be run by normal users (non root users) as well. The -D option is used not only for viewing defaults, but for changing the defaults as well.
13) Create a User with custom comment
We can provide full name or a short description about the user (a comment) while creating a user. You have to use -c option to add custom comments.
Let me show you an example:
This comment can be seen in the user’s entry in ‘/etc/passwd’ file.
Conclusion
In this tutorial, we learned how to create users in Linux and different options of useradd command. I hope you enjoyed reading and please leave your suggestions in the below comment section.
Источник
Linux add a user using command line tools
Q. How do I add a new user using command line tools? What are command line option recommended.
A. You need to use useradd command, which is responsible for creating a new user or update default new user information
The useradd command creates a new user account using the values specified on the command line and the default values from the system. The new user account will be entered into the system files (/etc/passwd) as needed, the home directory (/home/username) will be created, and initial files copied, depending on the command line options.
- No ads and tracking
- In-depth guides for developers and sysadmins at Opensourceflare✨
- Join my Patreon to support independent content creators and start reading latest guides:
- How to set up Redis sentinel cluster on Ubuntu or Debian Linux
- How To Set Up SSH Keys With YubiKey as two-factor authentication (U2F/FIDO2)
- How to set up Mariadb Galera cluster on Ubuntu or Debian Linux
- A podman tutorial for beginners – part I (run Linux containers without Docker and in daemonless mode)
- How to protect Linux against rogue USB devices using USBGuard
Join Patreon ➔
Task: Add a user to the system
Syntax is as follows for useradd command:
useradd
By default user account is locaked, you need to setup a new password:
passwd
For example add a new user called tom and set password to jerry:
# adduser tom
# passwd tom
If you want to add a user to group read how to add a user user to group
List of common options:
- -c comment: Add a comment for the user
- -d home-directory: Create a new home-directory
- -e yyyy-mm-dd: Date for the account to be disabled
- -f days: Number of days after the password expires until the account is disabled. (If 0 is specified, the account is disabled immediately after the password expires. If -1 is specified, the account is not be disabled after the password expires.)
- -g group-name: Primary Group name or group number for the user’s default group (group name must exist)
- -G group-list: List of secondary additional (other than default) group names or group numbers, separated by commas, of which the user is a member (group name must exist)
- -m: Create the home directory
- -M: Do not create the home directory
- -s: User’s login shell (default /bin/bash)
To read all command line option type following command:
$ man adduser
🐧 Get the latest tutorials on Linux, Open Source & DevOps via
Источник


