- How to Restore Missing Power Plan Options on Windows 10
- What Causes Power Options to go Missing?
- Solution 1: Restore Them Manually
- Command Prompt:
- Download the Files Yourself:
- Solution 2: Use the Following Registry Hack
- Solution 3: A Useful Workaround
- Solution 4: Check for the New Battery Slider
- Capacity add-ons
- View capacity add-ons in Power Platform admin center
- Allocate or change capacity in an environment
- Control who can allocate add-on capacity
- See also
- Microsoft PowerToys: служебные программы для настройки Windows 10 Microsoft PowerToys: Utilities to customize Windows 10
- Поддержка процессоров Processor support
- Текущий набор программ PowerToys Current PowerToy utilities
- Палитра Color Picker
- FancyZones Fancy Zones
- Надстройки проводника File Explorer add-ons
- Изменение размера изображений Image Resizer
- Диспетчер клавиатуры Keyboard Manager
- Расширенное переименование PowerRename
- Панель PowerToys PowerToys Run
- Подсказки по сочетаниям клавиш Shortcut Guide
- Пошаговое видеоруководство по средствам PowerToys PowerToys video walk-through
- Будущие программы PowerToys Future PowerToy utilities
- Экспериментальные программы PowerToys Experimental PowerToys
- Video Conference Mute (экспериментальная версия) Video Conference Mute (Experimental)
- Известные проблемы Known issues
- Участие в разработке PowerToys (с открытым кодом) Contribute to PowerToys (Open Source)
- Заметки о выпуске PowerToys PowerToys release notes
- История PowerToys PowerToys history
- Стратегия развития PowerToys PowerToys roadmap
How to Restore Missing Power Plan Options on Windows 10
On Windows 10, Power Options allows you to customize your Power Usage – as per requirements. Technically, a power plan is a set of hardware and system settings that defines how power is used and preserved by your computer. There are three built-in power plans: Balanced, Power Saver and High Performance. They can be customised for your system, or you can create new plans based on them.
What Causes Power Options to go Missing?
Many users have reported variations of missing power plans, such as only balance power plan is available and the high performance power plan is missing. This could be due to a system corruption or a Windows Update recently installed which may have modified the registry or tweaked the power options.
We have gathered some working solutions so make sure you try them out. Good luck!
Solution 1: Restore Them Manually
If a Windows Update or something else you did has removed the power plans from your computer, you can get to them by running commands which will recreate them and have them available on your computer the same way as they were before. There are two ways you can do this and it depends on what you prefer.
Command Prompt:
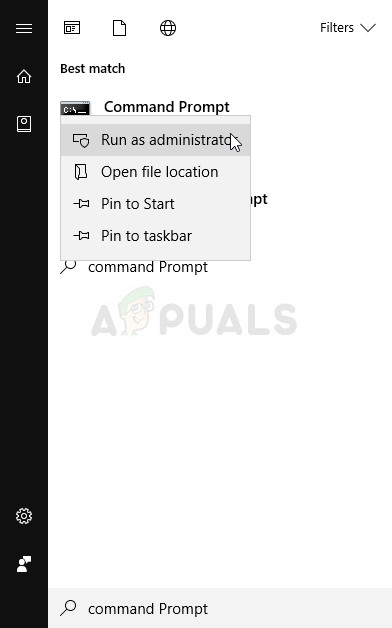
You can restore the missing power plan settings simply by running several commands in Command Prompt.
- Search for “Command Prompt” either right in the Start menu or by tapping the search button right next to it. Right-click on the first result which will appear at the top and select the “Run as administrator” option.
- Type in the following set of commands one after another and make sure you click Enter after typing each one and wait for the process to finish and display a “process successful” message:
Note: The last command can only work on Windows 10 versions after the 17101 build as it’s related to restoring the Ultimate Performance Power Plan available for the newest Windows 10 builds for workstations.
- Restart your computer and check to see if the power plans are back where they belong.
Download the Files Yourself:
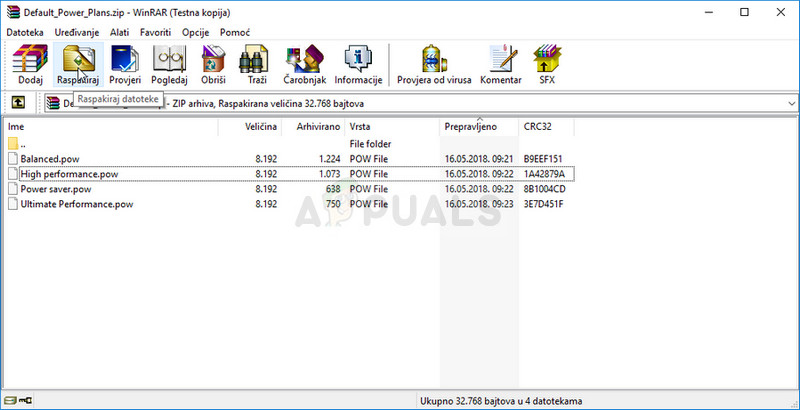
You can download the required files easily from a guide made by TenForums and it contains the “.pow” files which are used to represent a power plan.
- Click on this link in order to download the “.zip” file containing the power plans. Locate the file in your Downloads folder, right-click on it, and choose the Extract to option. Extract the files to any location but it’s best to keep it simple because of the following steps.
- Search for “Command Prompt” either right in the Start menu or by tapping the search button right next to it. Right-click on the first result which will appear at the top and select the “Run as administrator” option.
- Use the following command in order to install the required power plan:
- In this scenario, instead of “Full path of .pow file”, you will have to paste the correct path to the file, in the folder you have extracted the files to. Let’s say you want to install the “Power saver” plan which is also named that way in the folder.
- Navigate to the folder where the files are located, click the address navigation bar at the top and copy the address after it has been selected. Head back to Command Prompt and paste the address. If the files were, let’s say, in the Downloads folder within their own folder called Default_Power_Plans, the command should look like:
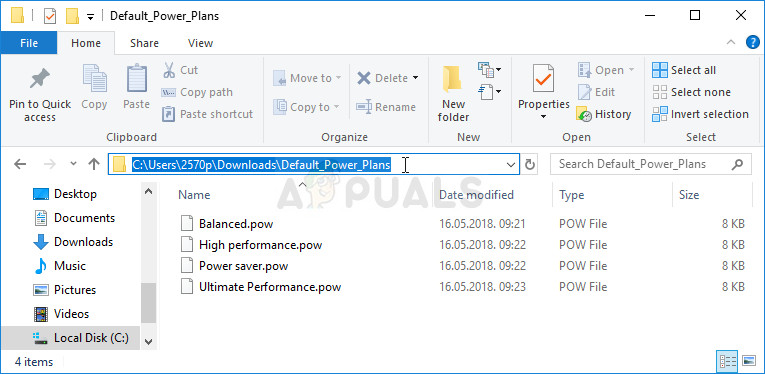
- Make sure you repeat the same process for all power plans you want to install and check to see if they have returned in Control Panel.
Solution 2: Use the Following Registry Hack
If a Windows Update has indeed hidden these options, it’s possible that Windows it trying to replace this feature or push it into the history by replacing it with other features. If you still wich to use this exact option, you can turn it on using the following registry hack.
Since you will have to edit a registry key, we recommend you check out this article we have made for you to safely backup your registry to prevent unwanted side effects which shouldn’t occur if you just follow the steps carefully.
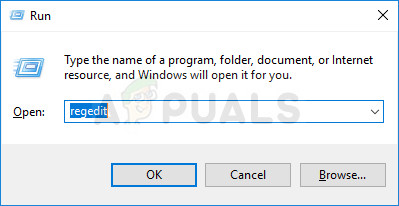
- Open the Registry Editor window by typing “regedit” in either the search bar, the Start menu, or the Run dialog box which can be accessed with the Windows Key + R key combination. Navigate to the following key in your registry by navigating at the left pane:
- Click on this key and try to locate an entry called CsEnabled at the right side of the window. If such option exists, right-click on it, and choose the Modify option from the context menu.
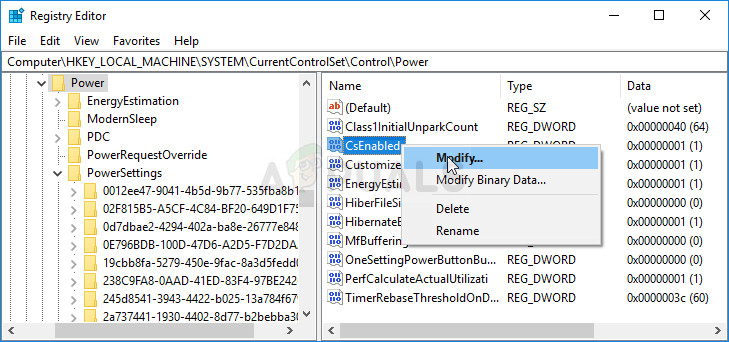
- In the Edit window, under the Value data section change the value from 1 to 0, and apply the changes you have made. Confirm any security dialogs which may appear during this process.
- You can now manually restart your computer by clicking Start menu >> Power button >> Restart and check to see if the problem is gone.
Note: If this didn’t work out for you, you can try adding an option to show these power plans individually for every power plan your computer knows about.
- Navigate to the following key in your registry by navigating at the left pane:
- You will be able to see plenty of weirdly named keys inside the PowerSettings key. Navigate to each one of these keys, right-click the right blank side of the, screen, and choose New >> DWORD (32bit) Value.
- Name each one of these values “Attributes” by right-clicking and choosing the Rename option. After that, right-click the newly created attributed value and choose the Modify option.

- Set the value to 2 under value data, keep the base in hexadecimal and click OK. Repeat the same process for each key in PowerSettings.
- Check to see if the problem is gone now.
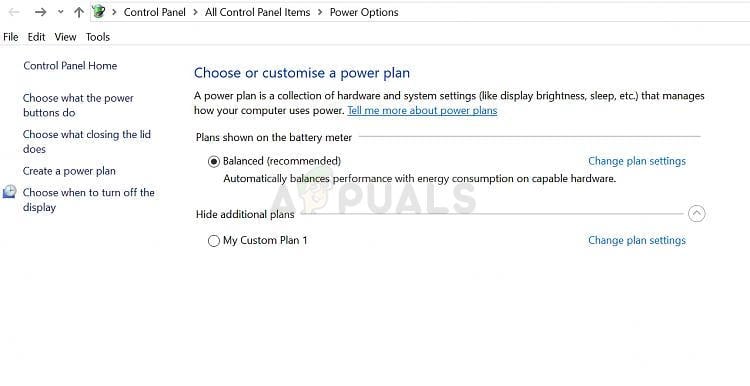
Solution 3: A Useful Workaround
This workaround can be used quite easily if you want to add the power option which is missing quite easily. Since a new build of Windows usually only leaves the Balanced power plan intact, you can add it (or any other default plan) easily by creating a new plan which is exactly the same as this one.
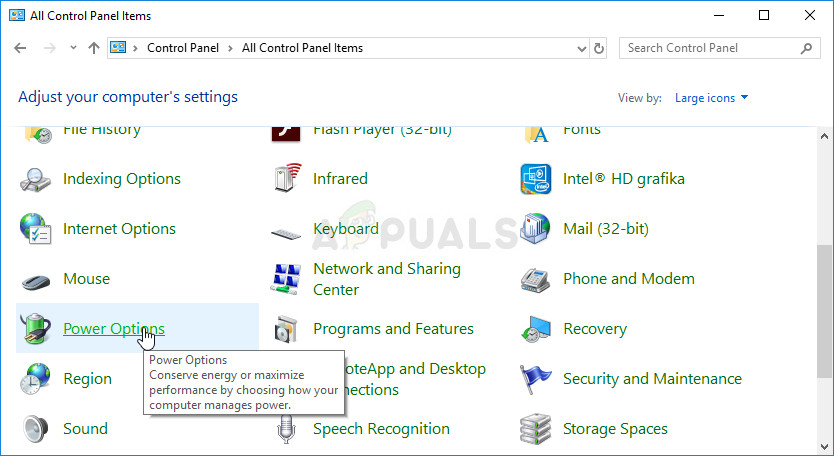
- Right-click on the battery icon located in the system tray or the lower right part of your screen, next to time and date, and click on Power Options.
- If you have removed this from the system tray, click on the Start menu and search for Control Panel. Change the View by option to Large icons and click on the Power Options button.
- At the left side of the window you should see several options displayed one under the other so click the Create a power plan option. You should see the Create a power plan window and a list of choices. Set the radio button to the power plan you wish to bring back.
- Under the Plan name, you can even name it the same way as it was originally named before clicking the Next button at the lower right part of the window.
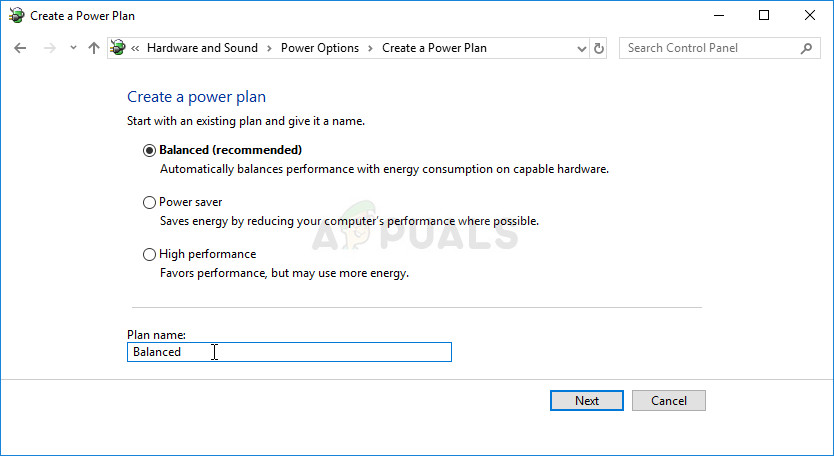
- You will some additional settings, such as Turn off the display, Put the computer to sleep and Adjust plan brightness. You can set them up now or later, before clicking Create.
- You will now have access to this power plan so make sure you select it when necessary.
Solution 4: Check for the New Battery Slider
From the latest build of Windows, it appears that the power options have now started to change for users who didn’t perform the steps above and everyone will get to see the new slider you can use to either set everything to high performance or to save battery life.
Also, these settings will now be managed through the Settings tool and not via Control Panel.
Capacity add-ons
If your organization has purchased capacity add-ons, you have to allocate that capacity to any environment where you want to use it. You also have to make sure that your users have access to those environments and have the correct permissions before they can use the products for which you’ve purchased a capacity add-on.
There are three stages for using capacity add-ons:
- Purchase: you buy individual capacity add-ons. For purchasing information, see the Power Apps and Power Automate Licensing Guide.
- Allocate: assign the purchased add-ons to an environment.
- Consume: once allocated, you can consume the capacity add-ons.
Consider purchasing Power Apps per app plans which allow individual users to run two applications and one portal. See About Power Apps per app plans.
View capacity add-ons in Power Platform admin center
If your organization has purchased capacity add-ons, an Add-ons tile appears on the Capacity screen in the Microsoft Power Platform admin center. Sign into the admin center, and select Resources > Capacity > Summary tab.
The Add-ons tile shows summary information about the capacity add-ons that your organization has.
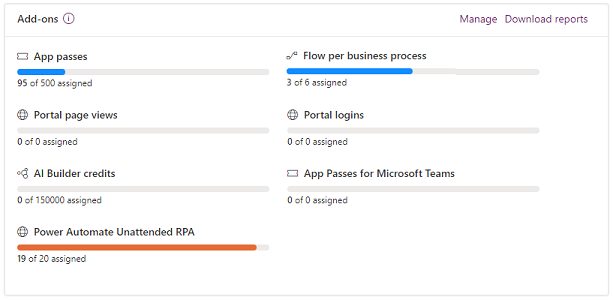
Each capacity has a usage gauge that shows how many units have been assigned compared to the available capacity. Capacities are measured in different ways depending on the product. For example, App passes are assigned individually, while AI Builder capacity is measured in credits. Refer to the product documentation for more information about metering.
Allocate or change capacity in an environment
To allocate capacity to an environment:
Select Resources > Capacity > Summary tab.
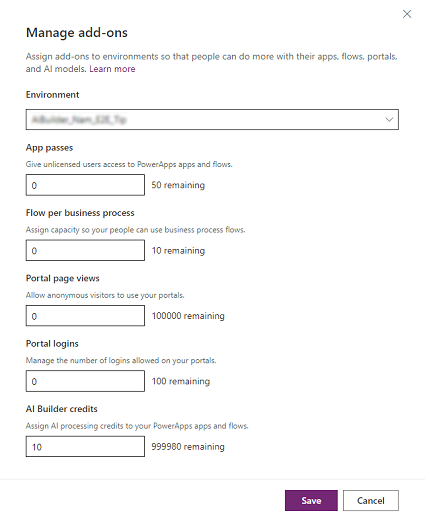
On the Summary tab view, do one of the following to open the Manage add-ons screen:
- Scroll down to the Add-ons tile, and then select Manage on the top-right corner of the Add-ons tile.
- Select the Add-ons tab. Select Assign to an environment in the upper-left menu bar.
- Select the Add-ons tab. Select an environment, and then select Manage add-ons in the upper-left menu bar.
You can also select Download reports to download usage reports for various capacities.
Select the environment where you want to add capacity from the Environment drop-down menu, and then allocate from your available capacity.
Some examples
- If you have 10 users who are going to be using 1 app each, you should assign 10 app passes to the app environment.
- If you want to create 5 flows in an environment which are going to be used for business process flows, assign a capacity of 5 for flow per business process.
- If a company has created a portal and anticipate 50,000 views of the portal, they should allocate 50,000 portal page views.
Control who can allocate add-on capacity
As an admin, you can restrict who can allocate add-on capacity to environments.
Sign in to the Power Platform admin center at https://admin.powerplatform.microsoft.com.
Select the Gear icon ( ) in the upper-right corner of the Power Platform site.
Select Power Platform settings.
Under Who can allocated add-on capacity to environments, select Only specific admins.
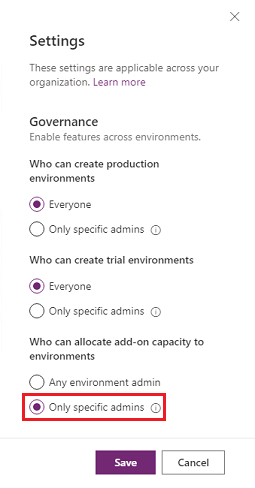
The following admins will be able to allocate add-on capacity in the Power Platform admin center:
- Global admins
- Dynamics 365 admins
- Power Platform admins
See also
Can you tell us about your documentation language preferences? Take a short survey.
The survey will take about seven minutes. No personal data is collected (privacy statement).
Microsoft PowerToys: служебные программы для настройки Windows 10 Microsoft PowerToys: Utilities to customize Windows 10
Microsoft PowerToys — это набор служебных программ, позволяющих опытным пользователям настроить и оптимизировать работу с Windows 10 для повышения производительности. Microsoft PowerToys is a set of utilities for power users to tune and streamline their Windows 10 experience for greater productivity.
Поддержка процессоров Processor support
- x64: поддерживается x64: Supported
- x86: в разработке (см. проблему № 602). x86: In development (see issue #602)
- ARM. в разработке (см. проблему № 490). ARM: In development (see issue #490)
Текущий набор программ PowerToys Current PowerToy utilities
Доступные сейчас служебные программы перечислены ниже. The currently available utilities include:
Палитра Color Picker
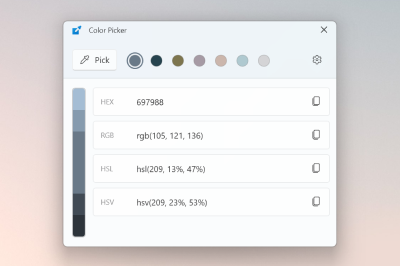
Цветоподборщик — это служебная программа для подбора цветов на уровне системы, которая активируется клавишами WIN + SHIFT + C . ColorPicker is a system-wide color picking utility activated with Win + Shift + C . Вы можете выбрать цвета из любого запущенного в данный момент приложения: средство выбора автоматически скопирует цвет в буфер обмена в настраиваемом формате. Pick colors from any currently running application, the picker automatically copies the color into your clipboard in a configurable format. «Цветоподборщик» также содержит редактор, в котором отображается журнал ранее подобранных цветов. Он позволяет точно настроить выбранный цвет и скопировать разные строковые представления. Color Picker also contains an editor that shows a history of previously picked colors, allows you to fine-tune the selected color and to copy different string representations. Этот код основан на средстве Color Picker, разработанном Мартином Хршаном (Martin Chrzan). This code is based on Martin Chrzan’s Color Picker.
FancyZones Fancy Zones

FancyZones — это диспетчер окон, который позволяет легко создавать сложные макеты окон и быстро размещать окна в этих макетах. FancyZones is a window manager that makes it easy to create complex window layouts and quickly position windows into those layouts.
Надстройки проводника File Explorer add-ons
Надстройки проводника позволяют включить в проводнике область предварительного просмотра для отображения значков SVG-файлов (.svg) и предварительного просмотра файлов Markdown (.md). File Explorer add-ons enable preview pane rendering in File Explorer to display SVG icons (.svg) and Markdown (.md) file previews. Чтобы включить область предварительного просмотра, выберите в проводнике вкладку «Вид» и щелкните «Область просмотра». To enable the preview pane, select the «View» tab in File Explorer, then select «Preview Pane».
Изменение размера изображений Image Resizer

Изменение размера изображений — это расширение оболочки Windows для быстрого изменения размера изображений. Image Resizer is a Windows Shell Extension for quickly resizing images. Просто щелкнув правой кнопкой мыши в проводнике, вы можете мгновенно изменить размер одного или нескольких изображений. With a simple right click from File Explorer, resize one or many images instantly. Этот код основан на средстве Image Resizer, разработанном Брайсом Лэмбсоном (Brice Lambson). This code is based on Brice Lambson’s Image Resizer.
Диспетчер клавиатуры Keyboard Manager

Диспетчер клавиатуры позволяет настроить клавиатуру для повышения производительности путем переназначения клавиш и создания собственных сочетаний клавиш. Keyboard Manager allows you to customize the keyboard to be more productive by remapping keys and creating your own keyboard shortcuts. Для работы с этой программой из набора PowerToys требуется Windows 10 1903 (сборка 18362) или более поздней версии. This PowerToy requires Windows 10 1903 (build 18362) or later.
Расширенное переименование PowerRename

Расширенное переименование позволяет выполнять массовое переименование, поиск и замену имен файлов. PowerRename enables you to perform bulk renaming, searching and replacing file names. Эта программа содержит дополнительные возможности, включая использование регулярных выражений, выбор определенных типов файлов, предварительный просмотр ожидаемых результатов и отмена изменений. It includes advanced features, such as using regular expressions, targeting specific file types, previewing expected results, and the ability to undo changes. Этот код основан на средстве SmartRename, разработанном Крисом Дэвисом (Chris Davis). This code is based on Chris Davis’s SmartRename.
Панель PowerToys PowerToys Run

Панель PowerToys может помочь мгновенно найти и запустить приложение: просто нажмите клавиши ALT + ПРОБЕЛ и начните вводить текст. PowerToys Run can help you search and launch your app instantly — just enter the shortcut Alt + Space and start typing. Это средство с открытым кодом, к которому можно добавлять дополнительные подключаемые модули. It is open source and modular for additional plugins. Теперь также доступен подключаемый модуль «Навигатор по окнам». Window Walker is now included as well. Для работы с этой программой из набора PowerToys требуется Windows 10 1903 (сборка 18362) или более поздней версии. This PowerToy requires Windows 10 1903 (build 18362) or later.
Подсказки по сочетаниям клавиш Shortcut Guide

Средство Подсказки по сочетаниям клавиш Windows появляется, когда пользователь удерживает клавишу Windows более одной секунды. При этом отображаются доступные сочетания клавиш для текущего состояния рабочего стола. Windows key shortcut guide appears when a user holds the Windows key down for more than one second and shows the available shortcuts for the current state of the desktop.
Пошаговое видеоруководство по средствам PowerToys PowerToys video walk-through
В этом видео руководитель программы по PowerToys Клинт Руткас (Clint Rutkas) рассказывает об установке и использовании различных доступных служебных программ, а также делится советами, информацией о том, как принять участие в разработке, и другими сведениями. In this video, Clint Rutkas (PM for PowerToys) walks through how to install and use the various utilities available, in addition to sharing some tips, info on how to contribute, and more.
Будущие программы PowerToys Future PowerToy utilities
Экспериментальные программы PowerToys Experimental PowerToys
Установите предварительную экспериментальную версию PowerToys, чтобы попробовать новейшие экспериментальные служебные программы: Install the pre-release experimental version of PowerToys to try the latest experimental utilities, including:
Video Conference Mute (экспериментальная версия) Video Conference Mute (Experimental)

Video Conference Mute — это быстрый способ одновременно отключить во время конференции микрофон и камеру с помощью клавиш ⊞ Windows + N независимо от того, какое приложение сейчас в фокусе. Video Conference Mute is a quick way to globally «mute» both your microphone and camera using ⊞ Win + N while on a conference call, regardless of the application that currently has focus. Этот компонент входит только в предварительную экспериментальную версию PowerToys, и для работы с ним требуется Windows 10 1903 (сборка 18362) или более поздней версии. This is only included in the pre-release/experimental version of PowerToys and requires Windows 10 1903 (build 18362) or later.
Известные проблемы Known issues
Вы можете найдите сведения об известных проблемах или сообщить о новой проблеме на вкладке Issues (Проблемы) репозитория PowerToys в GitHub. Search known issues or file a new issue in the Issues tab of the PowerToys repository on GitHub.
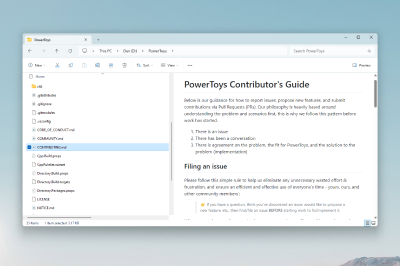
Участие в разработке PowerToys (с открытым кодом) Contribute to PowerToys (Open Source)
Мы приветствуем пользователей, участвующих в разработке PowerToys. PowerToys welcomes your contributions! Команда разработчиков PowerToys рада сотрудничать с сообществом опытных пользователей над созданием средств, которые помогут другим пользователям максимально эффективно работать с Windows. The PowerToys development team is excited to partner with the power user community to build tools that help users get the most out of Windows. Вы можете сделать следующее: There are a variety of ways to contribute:
Прежде чем приступать к работе над компонентом, который вы хотели бы добавить, ознакомьтесь с руководством для участников . Before starting work on a feature that you would like to contribute, read the Contributor’s Guide. Команда PowerToys будет рада сотрудничать с вами, чтобы найти оптимальный подход. Мы предоставим вам рекомендации и будем курировать вас на всех этапах разработки компонентов, а также поможем избежать ненужной или повторяющейся работы. The PowerToys team will be happy to work with you to figure out the best approach, provide guidance and mentorship throughout feature development, and help avoid any wasted or duplicate effort.
Заметки о выпуске PowerToys PowerToys release notes
Заметки о выпуске PowerToys приведены на странице установки в репозитории GitHub. PowerToys release notes are listed on the install page of the GitHub repo. Для справки вы также можете воспользоваться контрольным списком выпуска на вики-сайте PowerToys. For reference, you can also find the Release checklist on the PowerToys wiki.
История PowerToys PowerToys history
Это возрожденное решение, созданное на основе проекта PowerToys эпохи Windows 95, позволяет опытным пользователям повысить эффективность оболочки Windows 10 и настроить ее для индивидуального использования. Inspired by the Windows 95 era PowerToys project, this reboot provides power users with ways to squeeze more efficiency out of the Windows 10 shell and customize it for individual workflows. Здесь можно прочитать отличный обзор PowerToys в Windows 95. A great overview of the Windows 95 PowerToys can be found here.
Стратегия развития PowerToys PowerToys roadmap
PowerToys — это быстро развивающаяся команда разработчиков решений с открытым кодом, цель которой — предоставить опытным пользователям способы повышения эффективности оболочки Windows 10 и ее настройки для индивидуального использования. PowerToys is a rapid-incubation, open source team aimed at providing power users with ways to squeeze more efficiency out of the Windows 10 shell and customize it for individual workflows. Мы будем постоянно изучать, переопределять и корректировать рабочие приоритеты, чтобы повысить продуктивность наших пользователей. Work priorities will consistently be examined, reassessed, and adjusted with the aim of improving our users productivity.


