- How to add Python to the PATH variable in Mac
- PATH variable
- Добавить в python path mac os x
- 4 ответов
- patriciogonzalezvivo / PythonSetup.md
- This comment has been minimized.
- nok commented May 5, 2015
- This comment has been minimized.
- seamusdemora commented Oct 1, 2015
- This comment has been minimized.
- dimpase commented Dec 4, 2016
- This comment has been minimized.
- slhck commented Aug 1, 2017
- This comment has been minimized.
- CameronHudson8 commented May 19, 2018
- This comment has been minimized.
- ghost commented Jun 22, 2018
- This comment has been minimized.
- 1nk1 commented Aug 2, 2018 •
- This comment has been minimized.
- HansZhang commented Jul 30, 2019
- This comment has been minimized.
- eo1989 commented Oct 14, 2019
- This comment has been minimized.
- lazarillo commented Nov 7, 2019
- The right and wrong way to set up Python 3 on MacOS
- There are several ways to get started with Python 3 on macOS, but one way is better than the others.
- Subscribe now
- 1. Install pyenv
- 2. Install Python
- 3. Set your global default
- Success
- Understanding Python runtimes
- python_environment_xkcd.png
- What NOT to do
- Another thing not to try
- Use Python 3 as the macOS default
- Have Homebrew manage Python 3
- What if we still need Python 2?
- Don’t forget to update pip to pip3!
- Do it right from the start
How to add Python to the PATH variable in Mac
PATH variable
The PATH variable is a list of directories where each directory contains a UNIX executable file (or its alias) for a command/program.
When a command is entered in the terminal, it searches for an executable file with the same name as the entered command in the PATH variable. In the event that the required file is not found, the terminal will respond with an error message saying that the command was not found.
One way to overcome this error is to write the complete directory of the executable file (or its alias) instead of just entering the command name. This, however, is not a very user-friendly approach.
An easier way to avoid this error is to add the executable files’ directory to the PATH variable. This often needs to be done after installing Python.
The complete path of the Python (or Python3) UNIX executable can be added (for OS X 10.8 Mountain Lion and up) by:
Opening the Terminal and entering the command: sudo nano /etc/paths . Enter your password when prompted to do so.
A list of directories that are currently a part of the PATH variable will appear. Enter the path of the Python install directory at the end of this list.
Press control + X to quit and then Y to save the changes.
Python can now be used directly from the Terminal without having to write its location every time. Try executing the command python —version to output the default version of Python installed on your system.
Use python3 —version to find out the version of Python3.x.
Источник
Добавить в python path mac os x
добавляет dir к моему pythonpath
Если я печатаю sys.путь моего режиссера там.
затем я открываю новую команду и не больше.
но почему-то Python не может импортировать модули, которые я сохранил в этом реж.
что я делаю неправильно?
Я читал .профиль или. файл будет делать трюк.
должен ли я добавить:
чтобы заставить его работать?
4 ответов
модификации sys.path применяется только для жизни этого интерпретатора Python. Если вы хотите сделать это постоянно, вам нужно изменить PYTHONPATH переменные среды:
отметим, что PATH — это системный путь для исполняемых файлов, который полностью отделен.
* * вы можете написать выше в
/.bash_profile и источник его с помощью source
не уверен, почему решение Мэтью не сработало для меня (может быть, я использую OSX10.8 или, возможно, что-то связанное с macports). Но я добавил следующее в конец файла в
мой каталог теперь находится на pythonpath —
и я могу импортировать модули из этого каталога.
установка переменной среды $PYTHONPATH, похоже, не влияет на терминалы IPython IDE Spyder на Mac. Однако меню приложения Spyder содержит » PYTHONPATH manager.»Добавление моего пути здесь решило мою проблему. «PYTHONPATH manager» также сохраняется при перезапуске приложения.
это специфично для Mac, потому что установка переменной среды PYTHONPATH на моем ПК с Windows дает ожидаемое поведение (модули найдены) без использования PYTHONPATH менеджер в Спайдере.
ответ Мэтью работает для оболочки Python терминала, но он не работал для IDLE shell в моем случае, потому что многие версии python существовали до того, как Я заменил их все Python2.7.7. Как я решил проблему с холостыми.
Источник
patriciogonzalezvivo / PythonSetup.md
Install helpful modules
For QT integration you need to download QT SDK and then PyQT
After installing pyqt, Homebrew will prompt you to add the following to your .bash_profile:
Keep installing dependences for PyQT
Setting up Sublime
Edit Python paths.
- Sublime >> Preferences. >> Browse Packages.
- Click on Python/Python.sublime-build
Install PackageControl. The simplest method of installation is through the Sublime Text console. The console is accessed via the ctrl+ shortcut or the View > Show Console menu`. Once open, paste the appropriate Python code for your version of Sublime Text into the console.
- Modify the code to point to the right brew paths. Ex:
Python Autocompletion with SublimeCodeIntel
Once you install Package Control, restart ST2 and bring up the Command Palette (Command+Shift+P on OS X, Control+Shift+P on Linux/Windows). Select «Package Control: Install Package», wait while Package Control fetches the latest package list, then select SublimeCodeIntel when the list appears. The advantage of using this method is that Package Control will automatically keep SublimeCodeIntel up to date with the latest version.
This comment has been minimized.
Copy link Quote reply
nok commented May 5, 2015
because of https://github.com/Homebrew/homebrew-science/issues/1291#issuecomment-60704018 you should replace brew install gfortran with brew install gcc .
Happy coding,
Darius
This comment has been minimized.
Copy link Quote reply
seamusdemora commented Oct 1, 2015
I’ve read that gcc shouldn’t be installed if you also have Xcode installed.
This comment has been minimized.
Copy link Quote reply
dimpase commented Dec 4, 2016
Xcode does not provide any Fortran, so you really will need gfortran (and thus gcc) if you need it.
This comment has been minimized.
Copy link Quote reply
slhck commented Aug 1, 2017
As of now, this does not work anymore. On macOS with Homebrew you have to set the path as follows:
Otherwise the system python will come first. Check brew info python for the caveats.
This comment has been minimized.
Copy link Quote reply
CameronHudson8 commented May 19, 2018
After adding a path to
/.bash_profile, you have to run source
/.bash_profile in the terminal. Otherwise, the change doesn’t register.
This comment has been minimized.
Copy link Quote reply
ghost commented Jun 22, 2018
Hi, I have already Python 2.7 & 3.5 on my Mac. I have been writing python programs using the IDLE.
I now have need to install ‘Homebrew’ — I didn’t previously know about ‘Homebrew’ as I am new to programming.
When I try to install ‘Homebrew’ on the command line it fails.
When I run ‘brew doctor’ I get the following warnings:
Warning: «config» scripts exist outside your system or Homebrew directories.
./configure scripts often look for *-config scripts to determine if
software packages are installed, and what additional flags to use when
compiling and linking.
Having additional scripts in your path can confuse software installed via
Homebrew if the config script overrides a system or Homebrew provided
script of the same name. We found the following «config» scripts:
/Library/Frameworks/Python.framework/Versions/3.5/bin/python3.5m-config
/Library/Frameworks/Python.framework/Versions/3.5/bin/python3.5-config
/Library/Frameworks/Python.framework/Versions/3.5/bin/python3-config
/System/Library/Frameworks/Python.framework/Versions/2.7/bin/python2-config
/System/Library/Frameworks/Python.framework/Versions/2.7/bin/python2.7-config
/System/Library/Frameworks/Python.framework/Versions/2.7/bin/python-config
If I uninstall both versions of Python and then reinstall using ‘Homebrew’ I will lose months of work, is there another way around this?
This comment has been minimized.
Copy link Quote reply
1nk1 commented Aug 2, 2018 •
because of Homebrew/homebrew-science#1291 (comment) you should replace brew install gfortran with brew install gcc.
brew install gfortran
Error: No available formula for gfortran
GNU Fortran is now provided as part of GCC, and can be installed with:
brew install gcc
Happy coding,
Darius
Maybe you try this:
brew cask install gfortran
This comment has been minimized.
Copy link Quote reply
HansZhang commented Jul 30, 2019
As of now, this does not work anymore. On macOS with Homebrew you have to set the path as follows:
Otherwise the system python will come first. Check brew info python for the caveats.
you saved my day, thanks!
This comment has been minimized.
Copy link Quote reply
eo1989 commented Oct 14, 2019
I also have this problem. Not sure how to get around this without having to uninstall everything and reinstall all the data sci packages. I have a feeling miniconda/anaconda messed this up. Anyway I can get miniconda and homebrew to play nice together?
This comment has been minimized.
Copy link Quote reply
lazarillo commented Nov 7, 2019
What’s written below is a helpful way to install Python (+ others) on a Mac if you are doing analytics/data science.
FWIW, what is written by the OP is the «right way» for non-data scientists. If you are using Python for analytics, I recommend using Anaconda (specifically Miniconda) for as much as you can, instead of Pip.
There is nothing wrong with Pip, and in fact it contains far more Python packages than Conda. However, Conda (a) primarily focuses on numerical packages, (2) it can install things outside of Python (which is a real blessing when the Python package you are installing is «just a wrapper» around lower-level C or even FORTRAN packages, and (3) it does a fairly decent job of trying to find the minimally harmful clashes between versions of packages you have installed. Most data scientists, myself included, get kinda sloppy about this.
The «right way» to avoid clashes is to make a separate virtual environment for each different thing that you’re working on, but as data scientists, we’re often working with packages only as long as it takes us to realize we didn’t like the results. but we might like that package in the future. Hence, clutter.
Inevitably, conda will not have things that you want to install. In that case, fall back on pip , but be sure to go into a conda environment before running pip , so that you install into the same place you have put all of your Python packages installed from Conda.
Unfortunately for us analysts using Macs, we have to rely upon brew , pip , and conda for installs. (And sometimes just raw downloads: I have had trouble trying to use R with conda or virtualenv .) It’s a hassle, and it doesn’t always work out, but my priority order is conda , then pip , then brew , then raw download. brew should not be needed for any Python packages, nor should a raw download.
Источник
The right and wrong way to set up Python 3 on MacOS
There are several ways to get started with Python 3 on macOS, but one way is better than the others.
Subscribe now
Get the highlights in your inbox every week.
I’ve been dipping my toe back into Python development as I get ready to head to PyCon US. (If you’re headed there as well and want to share your Python story, let me know!) When I installed a module to tinker around with, I got a reminder that I needed to install Python 3 soon.
So, I did what any of us would do and googled around looking for a guide to update my development environment, which runs on Mac (the macOS operating system, formerly known as OS X). To my surprise, I found only a handful of StackOverflow posts, and they pointed me to partial solutions. Here’s the full story of how to set up your environment without breaking anything built into the macOS operating system.
1. Install pyenv
Moshe Zadka cautions that doing this wrong could result in an unreliable idea of which Python is running that depends too closely on shells loading aliases. I knew Moshe was familiar with Python, but what I didn’t know is that he is an author of many Python tutorials as well as an upcoming book on Python development on macOS. He helped 40 colleagues develop Python safely and consistently on macOS systems following one core principle:
«The basic premise of all Python development is to never use the system Python. You do not want the Mac OS X ‘default Python’ to be ‘python3.’ You want to never care about default Python.»
How do we stop caring about the default? Moshe recommends using pyenv to manage Python environments (for a deeper dive on configuring pyenv, see this article). This tool manages multiple versions of Python and is described as «simple, unobtrusive, and follows the Unix tradition of single-purpose tools that do one thing well.»
While other installation options are available, the easiest way to get started is with Homebrew:
2. Install Python
Now let’s install the latest Python version (3.7.3 as of this writing):
3. Set your global default
Now that Python 3 is installed through pyenv, we want to set it as our global default version for pyenv environments:
The power of pyenv comes from its control over our shell’s path. In order for it to work correctly, we need to add the following to our configuration file (.zshrc for me, possibly .bash_profile for you):
After that command, our dotfile (.zshrc for zsh or .bash_profile for Bash) should include these lines:
Now we know for certain that we’re using Python 3.7.3 and pip will update alongside it without any manual aliasing between versions. Using Moshe’s recommendation to use a version manager (pyenv) enables us to easily accept future upgrades without getting confused about which Python we are running at a given time.
Success
As you get comfortable with this workflow, you can use pyenv to manage multiple versions of Python. It’s also essential, for dependency management, to use virtual environments. I mention how to use the built in venv library in the article, and Moshe recommends virtualenvwrapper for managing virtual environments.
Understanding Python runtimes
Now that you have your Python versions fixed, it’s safe to explore why this problem confuses so many people.
The version of Python that ships with macOS is well out of date from what Python recommends using for development. Pondering Python runtimes can be comically challenging at times, as noted by XKCD.
python_environment_xkcd.png
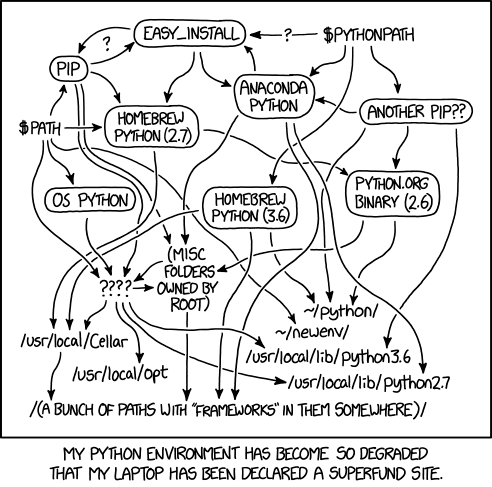
Many users have dozens of Python interpreters on their computer already, but have no idea how to manage them effectively. Too often, people just download the latest Python release, move it to their path, and call it a day (or use brew install python3, which would do something similar). This can cause breakages down the line in frustrating ways that can be difficult to troubleshoot.
What NOT to do
My first idea on how to make Python 3 the default Python on my system was to move the old version and add the new one:
The pattern followed what /usr/bin/ usually does between major releases of Python, but I quickly learned it was the wrong move:
Thankfully, macOS protected me from breaking something I don’t fully understand. Further research proves this is exactly what we shouldn’t do.
Another thing not to try
Use Python 3 as the macOS default
Python’s website has a macOS Python 3 installer we can download and use. If we use the package installation, a python3 fill will be available in /usr/local/bin/.
Aliasing is a must since the Python binary stored in /usr/bin/ can’t be changed. What’s nice about an alias is that it’s specific to our command-line shell. Since I use zsh by default, I put the following into the .zshrc file:
If you are using the default Bash shell, you can append this same text to your .bashrc:
This strategy works, but it isn’t ideal for making future updates to Python. It means we have to remember to check the website and download the new files since Python doesn’t include a command-line way to update.
Have Homebrew manage Python 3
The Homebrew project provides a free and open source package manager for macOS that many people rely on. It gives Apple users a power similar to apt-get or yum. If you are a Homebrew user, you may already have Python installed. To quickly check, run:
If Python shows up under the command, it’s installed. What version is it? Let’s check:
Okay, great! The Homebrew maintainers have updated the default Python bottle to point to the latest release. Since the Homebrew maintainers are more dependable at updating the release than most of us, we can use Homebrew’s version of Python 3 with the following command:
Now we want to point our alias (from above) to the copy of Python that Homebrew manages:
To make sure the path above points to where Homebrew installed Python in our environment, we can run brew info python and look for the path information.
This method, of using Homebrew to manage our Python environment, is a good starting place, and it made sense to me at the time.
What if we still need Python 2?
It makes sense for anyone new to Python to begin with Python 3. But those of us who still need Python 2—for example, to contribute to a Python project that’s only available in Python 2—can continue to use the default macOS Python binary available in /usr/bin/python:
Homebrew is so wonderful, it even offers a different formula for Python 2:
At any time, we can remove the aliases from our shell’s configuration file to go back to using the default copy of Python on the system.
Don’t forget to update pip to pip3!
The pip command is the default package manager specifically for Python packages. Although we changed our default Python command to be version 3, we have to alias our pip command separately if it’s on the previous version. First, we need to check what version we’re on:
To ensure we’re installing packages compatible with our new version of Python, we’ll use another alias to point to the compatible version of pip. Since we’re using Homebrew as our package manager in this situation, we know it installed pip3 when we installed Python 3. The default path should be the same as Python 3, but we can confirm this by asking the shell to find it:
Now that we know the location, we will add it to our shell configuration file, as we did before:
Last, we can confirm that running pip points to pip3 by opening a new shell or by resetting our current shell and seeing what we point to:
We can avoid using Homebrew to update pip, but that requires a much longer tutorial from the Python documentation.
Do it right from the start
If you are just getting started with Python development on a macOS, do the necessary configurations to make sure you’re using the right version of Python from the start. Installing Python 3, with or without Homebrew, and using alias will let you start coding, but it’s not a good strategy for the long run. Using pyenv as a simple version management solution to get you off to a good start.
This article was originally published in May 2019 and has been updated by the editor.
Источник


