- How to import and export the Internet Explorer Favorites folder to a 32-bit version of Windows
- INTRODUCTION
- More Information
- Export
- Internet Explorer 5
- Internet Explorer 6
- Internet Explorer 7
- Internet Explorer 8
- Import
- Import Favorites to Internet Explorer 6 and earlier
- Import Favorites to Internet Explorer 7
- Import Favorites to Internet Explorer 8
- Print or export favorites in Internet Explorer
- For Internet Explorer 6 and earlier versions
- For Internet Explorer 7 and for Internet Explorer 8
- References
- How to add or remove Favorites in Windows Registry
- Add or Remove Favorites in Registry in Windows 10
- 1] Add a Registry Key to Favorites
- 2] Export Registry Favorites
- 3] Merge Registry Favorites
- 4] Remove a Registry Key from Favorites
- Add Favorites in Photos in Windows 10
- How to access Favorites in Photos in Windows 10
- About Sergey Tkachenko
- 8 thoughts on “ Add Favorites in Photos in Windows 10 ”
How to import and export the Internet Explorer Favorites folder to a 32-bit version of Windows
INTRODUCTION
This article describes how to import and export the Windows Internet Explorer Favorites folder from a 16-bit version of Microsoft Windows to a 32-bit version of Microsoft Windows.
More Information
You cannot directly import and export the Internet Explorer Favorites folder between the versions of Internet Explorer that run on Microsoft Windows 3.1 or Microsoft Windows NT 3.51 and Microsoft Windows 95, Windows 98, Windows 98 Second Edition, and Windows Millennium Edition, or Windows NT 4.0, and Windows 2000. To transfer the Favorites folder between operating systems, you must export it to a Netscape Bookmark.htm file.
Export
Internet Explorer 5
To export the Favorites folder, follow these steps:
On the File menu, click Import and Export, and then click Next.
Click Export Favorites to Netscape, and then click Next.
Click Favorites, and then click Next.
Type the name of the file that you want to export the favorites to. The default file is C:\Bookmark.htm.
Click Next, and then click Finish.
Use the Bookmarks Converter tool to import the Bookmark.htm file into Internet Explorer on Windows 95, Windows 98, Windows 98 Second Edition, Windows Millennium Edition, Windows NT 4.0, or Windows 2000.
Internet Explorer 6
To export the Favorites folder, follow these steps:
Start Internet Explorer
On the File menu, click Import and Export, and then click Next.
Click Export Favorites and then click Next.
Click Favorites and then click Next.
Type the name of the file that you want to export the favorites to. By default, the export file is named Bookmark.htm.
Click Next and then click Finish.
Use the Bookmarks Converter tool to import the Bookmark.htm file into Internet Explorer on Windows 95, Windows 98, Windows 98 Second Edition, Windows Millennium Edition, Windows NT 4.0, or Windows 2000.
For more information about how to use the Bookmarks Converter tool to import the Bookmark.htm file into Internet Explorer, click the following article number to view the article in the Microsoft Knowledge Base:
152681 How to use Netscape Navigator bookmarks in Internet Explorer
Internet Explorer 7
To export the Favorites folder, follow these steps:
In Internet Explorer, click Add to Favorites, and then click Import and Export.
In the Import/Export Wizard, click Next.
Select Export Favorites, and then click Next.
Click Favorites and then click Next.
Select the Favorites folder that you want to export. If you want to export all Favorites, select the top level Favorites folder. Otherwise, select the individual folder that you want to export.
Note By default, Internet Explorer creates a Bookmark.htm file in your Documents folder. If you want to use a name other than Bookmark.htm, or if you want to store the exported Favorites in a folder other than the Documents folder, specify the new file and folder name.
Note If you already have a file that has the same name, Internet Explorer asks you to replace it. Click Yes to replace the file. Click No to provide a new file name.
Internet Explorer 8
To export the Favorites folder, follow these steps:
In Internet Explorer, click Favorites, click the down-arrow next to Add to Favorites, and then click Import and Export.
Click Export to a file, and then click Next.
Click to select the Favorites check box, and then click Next.
Select the Favorites folder that you want to export. If you want to export all Favorites, select the top level Favorites folder. Otherwise, select the individual folder that you want to export.
Note By default, Internet Explorer creates a Bookmark.htm file in your Documents folder. If you want to use a name other than Bookmark.htm, or if you want to store the exported Favorites in a folder other than the Documents folder, specify the new file and folder name.
Note If you already have a file that has the same name, Internet Explorer asks you to replace it. Click Yes to replace the file. Click No to provide a new file name.
Import
Import Favorites to Internet Explorer 6 and earlier
Use the Bookmarks Converter tool to import the Bookmark.htm file into Internet Explorer on Windows 95, Windows 98, Windows 98 Second Edition, Windows Millennium Edition, Windows NT 4.0, or Windows 2000.
Import Favorites to Internet Explorer 7
In Internet Explorer 7, click Add to Favorites , and then click Import and Export.
In the Import/Export Wizard, click Next.
Select Import Favorites, and then click Next.
Note By default, Internet Explorer creates a Bookmark.htm file in your Documents folder. However, you can import favorites that are saved under another name. To do this, click Browse, select a file or type a location and file name, and then click Next. Or, click Browse, and then click Next to accept the default.
Select the folder where you want to put the imported bookmarks, and then click Next.
Import Favorites to Internet Explorer 8
In Internet Explorer, click Favorites, click the down-arrow next to Add to Favorites, and then click Import and Export.
Click Import from a file, and then click Next.
Click to select the Favorites check box, and then click Next.
By default, Internet Explorer creates a Bookmark.htm file in your Documents folder. However, you can import favorites that are saved under another name. To do this, click Browse, select a file or type a location and file name, and then click Next.
Select the folder where you want to put the imported bookmarks, and then click Import.
Print or export favorites in Internet Explorer
To print a list of your favorites in Internet Explorer, export your favorites to a .htm file, and then print the .htm file. To do this, follow these steps.
For Internet Explorer 6 and earlier versions
Click Start, point to Programs, and then click Internet Explorer.
On the File menu, click Import and Export.
In the Import and Export Wizard, click Next.
Click Export Favorites, and then click Next.
Click Favorites, and then click Next.
Click Export to a File or Address, type c:\bookmark.htm in the Export to a File or Address box, and then click Next.
Click Finish, and then click OK.
Exit Internet Explorer.
Double-click My Computer, double-click drive C, and then double-click the Bookmark.htm file.
On the File menu, click Print, click to select the Print table of links check box, and then click OK.
Note If you do not want the printed list to contain the URL for each link, click to clear the Print table of links check box.
Exit Internet Explorer.
For Internet Explorer 7 and for Internet Explorer 8
To print your list of favorites, open Bookmark.htm in Internet Explorer and then click the Print button.
References
For more information, click the following article number to view the article in the Microsoft Knowledge Base:
184674 How Internet Explorer stores Web pages added to Favorites menu
How to add or remove Favorites in Windows Registry
Whenever we search for certain Windows 10 how to’s, many of them consist of editing, removing or adding new registries to the system. Computer geeks always try new things and changing Windows Registry is one of them. Today I will show you how to mark any Registry key as a favorite.
Windows systems rely on registry files since the release of Windows 3.11. The registry or Windows registry is a database of information, settings, and other values related to software and hardware installed on the system. When you install a new program, the installation creates a new Subkey in the registry. This subkey is very specific to that program, containing information like its location, version, and primary executable.
Add or Remove Favorites in Registry in Windows 10
If you are frequently editing some registry keys, then accessing them will be easier if you add them as Favorites. In this post we will take a look at the following topics:
- Add a Registry Key to Favorites
- Export Registry Favorites
- Merge Registry Favorites
- Remove a Registry Key from Favorites
1] Add a Registry Key to Favorites
Press Win + R keys. In the Run window, type regedit and hit enter.
Now search for the registry you want to mark as favorite.
Select the registry from the registry tree and click on Favorites on the menu bar. Now click on Add to Favorites.
Enter the name you wish to have for your favorite registry and click on OK.
Now to check if the registry is marked as favorite, click on Favorites again. Your recently added registry will be present in the list.
2] Export Registry Favorites
You can export your list of favorite registries to any location you wish. This step is helpful because when the computer is formatted or a clean installation is done, the system doesn’t retain the favorite registries. If you like to keep the changes of you made to any of the registries then exporting and saving somewhere safe is the best option for you.
Press Win + R keys. In the Run window, type regedit and hit enter.
Now navigate to the following registry:
It will contain every registry you have ever marked as a favorite.
In the registry tree section, right-click on Favorites and then click on Export.
Choose a location where you want to store all the favorite registries. Enter the name and click on Save. Do not change the branch path.
Place the saved file to any external drive or cloud storage for future use.
3] Merge Registry Favorites
Let’s just assume that you were successful in exporting the registries to a safer place and your system crashed, unfortunately. So, after a new installation, you want to merge the exported favorite registries? In this method, I will show you how to merge them.
Navigate to the folder where you saved it last. If it is on the external drive then connect it and open the folder where you saved it.
Right-click on the registry file and click on Merge or just double click on the file. If you get prompt by User Account Control (UAC) then click on OK.
Now you will receive two prompts. In the first one click on Yes and on the second one click on OK.
Now all the registries you edited and marked as favorites are back on your system. To make sure the registries are working as per your wish, restart your system once.
4] Remove a Registry Key from Favorites
Now if you want to remove any registry from the favorites then you can remove it very easily.
Press Win + R keys. In the Run window, type regedit and hit enter.
Go to the Menu bar and click on Favorites. Now click on Remove Favorite.
In the Remove Favorites dialog box, select the registry you wish to remove and click on OK.
To check if it is removed successfully or not, click on Favorites again and look for the registry you just removed.
In these small four methods, you can simply add and remove your favorite registries. Let us know in the comments below which registries you edit the most.
Add Favorites in Photos in Windows 10
The Photos app is a Universal (Metro) app which comes pre-installed in Windows 10. It is a Store app which is intended to replace Windows Photo Viewer, since Microsoft wants to make the whole user environment look and work the same on Windows 10 Mobile and Windows 10 for PCs. However, interested users can restore the classic desktop app, Windows Photo Viewer. With recent updates, you can mark an image as a favorite. The Photos app will create a new «Favorites» album for you.
The built-in Photos app allows viewing images and performing basic editing. Its tile is pinned to the Start menu. Also, the app is associated with most image file formats out of the box. Photos offers very basic functionality to view images from the user’s local drive or from the OneDrive cloud storage.
The Photos app automatically shows the photos and videos stored in the local Pictures folder along with files stored in OneDrive. The user can add a custom location to those folders. See
Note: At the moment of this writing, the Photos app which comes bundled with Windows 10 on Skip Ahead doesn’t allow adding an image to favorites if it is not stored in the This PC\Pictures or OneDrive\Pictures folders. This will be fixed eventually.
To add an image to favorites in Photos in Windows 10, do the following.
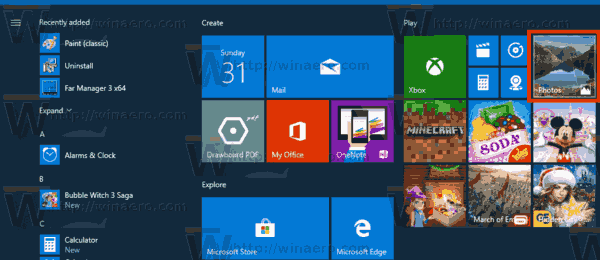
- Open Photos. Its tile is pinned to the Start menu by default.

- Open an image. As mentioned above, the image must be stored in the Pictures folder as of this writing.
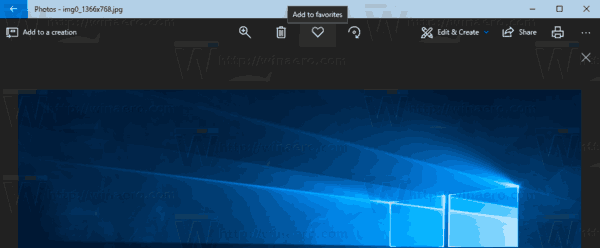
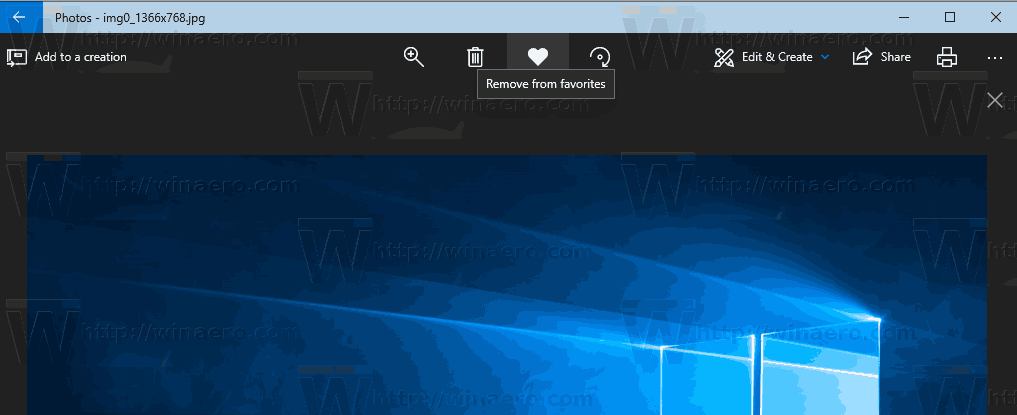
- Click on the heart icon on the toolbar at the top edge of the View page.
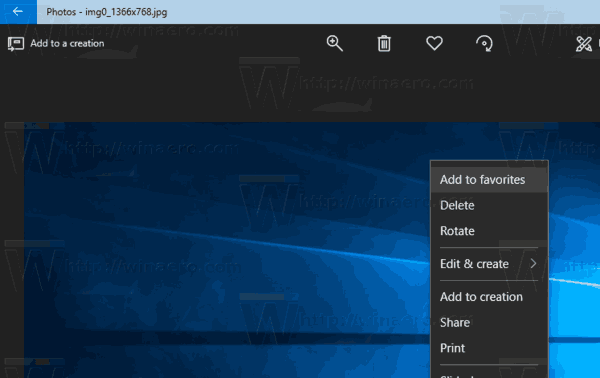
- Alternatively, yon can right-click on the image and select Add to favorites from the context menu.
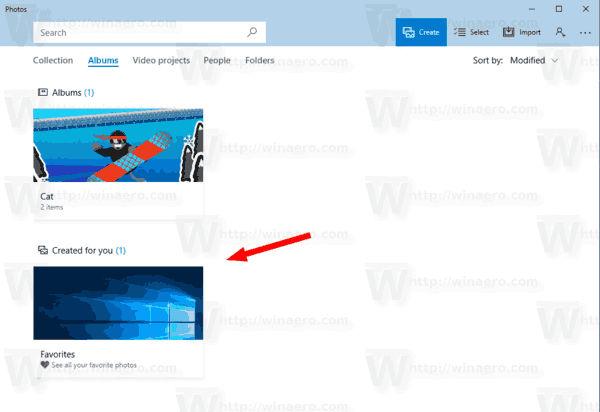
How to access Favorites in Photos in Windows 10
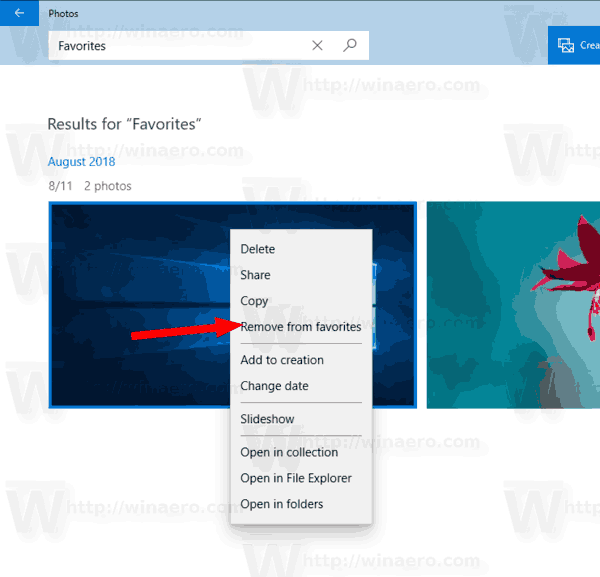
Favorites is a special album in the Photos app. It can be accessed from the main page of the app. Click on the Albums tab. You will see the Favorites album in the Created for you section.
From there, you can quickly remove the photos from Favorites. Open the album, right-click on the image and select Remove from favorites from the context menu.
Alternatively, you can open the image and click on the heart icon. This will remove the already added image from Favorites.
Winaero greatly relies on your support. You can help the site keep bringing you interesting and useful content and software by using these options:
Share this post
About Sergey Tkachenko
Sergey Tkachenko is a software developer from Russia who started Winaero back in 2011. On this blog, Sergey is writing about everything connected to Microsoft, Windows and popular software. Follow him on Telegram, Twitter, and YouTube.
8 thoughts on “ Add Favorites in Photos in Windows 10 ”
I can’t find the favorite album in my photos app, even though I already added some photos to favorite.
I have the same issue. Clicked some hearts to favorite my photos but now in the photos app there’s no favorites folder.
same. no favorites folder
The photos have to be in your pictures folder. Won’t work if they are in any other folder.
Thank you – it wasn’t working for me but my pictures were on my c drive in a folder, not in pictures. I had already spent hours marking favorites. I was able to copy and paste my folder to Pictures and it retained my faves and created the folder. Phew. Thanks!
Thanks! Save my day )
No favorites folder exists. Pictures are gone.
I was finally able to find the favorties folder in my photo app. Now how can I copy them into a folder in my pictures folders? This shouldn’t be this difficult!


