- Add user to group from command line (CMD)
- Add user to a group
- Few more examples:
- How to Configure a Domain User or Group
- How to Add a Domain User or Group
- How to Remove a Domain User or Group
- How to Set Permissions for a User or a Group
- Adding Users to the Local Admin Group via Group Policy
- Local Administrators Group in Active Directory Domain
- How to Add Domain Users to the Local Administrators via GPO Preferences?
- Managing Local Admins Group Using Restricted Groups
- Using GPO to Add a Single User to the Local Admin Group on a Specific Computer
Add user to group from command line (CMD)
Windows provides command line utilities to manager user groups. In this post, learn how to use the command net localgroup to add user to a group from command prompt’
Add user to a group
Run the steps below –
- Open elevated command prompt
- Run the below command
For example to add a user ‘John’ to administrators group, we can run the below command.
Few more examples:
To add a domain user to local users group:
This command should be run when the computer is connected to the network. Otherwise you will get the below error.
To add a domain user to local administrator group:
To add a user to remote desktop users group:
To add a user to debugger users group:
To add a user to Power users group:
This command works on all editions of Windows OS i.e Windows 2000, Windows XP, Windows Server 2003, Windows Vista and Windows 7. In Vista and Windows 7, even if you run the above command from administrator login you may still get access denied error like below.
The solution for this is to run the command from elevated administrator account. See How to open elevated administrator command prompt
When you run the ‘net localgroup’ command from elevated command prompt:
To list the users belonging to a particular group we can run the below command.
For example to list all the users belonging to administrators group we need to run the below command.
How to Configure a Domain User or Group
The deployment settings enable you to control which users or groups can access the MED-V workspace, as well as how long the MED-V workspace can be utilized and whether it can be used offline. You can also configure additional rules to control access between the MED-V workspace and the host.
All MED-V workspace permissions are configured in the Policy module, on the Deployment tab.
To allow users to utilize the MED-V workspace, you must first add domain users or groups to the MED-V workspace permissions. You can then set permissions for each user or group.
How to Add a Domain User or Group
To add a domain user or group
In the Users / Groups window, click Add.
In the Enter User or Group names dialog box, select domain users or groups by doing one of the following:
In the Enter User or Group names field, type a user or group that exists in the domain or as a local user or group on the computer. Then click Check Names to resolve it to the full existent name.
Click Find to open the standard Select Users or Groups dialog box. Then select domain users or groups.
Click OK.
The domain users or groups are added.
Note
Users from trusted domains should be added manually.
How to Remove a Domain User or Group
To remove a domain user or group
In the Users / Groups window, select a user or group.
Click Remove.
The user or group is deleted.
How to Set Permissions for a User or a Group
To set permissions for a user or a group
Click the user or group for which you are setting the permissions.
Configure the MED-V workspace properties as described in the following table.
On the Policy menu, select Commit.
Workspace Deployment Properties
Property Description General
Enable Workspace for
Select this check box to enable the MED-V workspace for this user or group.
Workspace expires on this date
Select this check box to assign an expiration date for the permissions set for this user or group.
When selected, the date box is enabled. Set the date, and permissions will expire at the end of the date specified.
Offline work is restricted to
Select this check box to assign a time period in which the policy must be refreshed for this user or group. When selected, the time period box is enabled. Set the number of days or hours, and at the end of the specified time period, the user or group will not be able to connect if the policy is not refreshed.
Workspace deletion options
Click to set the MED-V workspace deletion options. For more information, see How to Set MED-V Workspace Deletion Options.
Support clipboard between host and Workspace
Select this check box to enable copying and pasting between the host and the MED-V workspace.
Support file transfer between the host and Workspace
Select this check box to enable transferring files between the host and MED-V workspace. Select one of the following options from the File Transfer box:
Both—Enable transferring files between the host and the MED-V workspace.
Host to Workspace—Enable transferring files from the host to the MED-V workspace.
Workspace to Host—Enable transferring files from the MED-V workspace to the host.
Note
If a user without permissions attempts to transfer files, a window will appear prompting him to enter the credentials of a user with permissions to perform the file transfer.
Important
To support file transfer in Windows XP SP3, you must disable offline file synchronization by editing the registry as follows:
REG ADD HKLM\software\microsoft\windows\currentversion\netcache /V Enabled /T REG_DWORD /F /D 0
Click to set the advanced file transfer options. For more information, see How to Set Advanced File Transfer Options.
Enable printing to printers connected to the host
Select this check box to enable users to print from the MED-V workspace using the host printer.
Note
The printing is performed by the printers defined on the host.
Enable access to CD / DVD
Select this check box to allow access to a CD or DVD drive from this MED-V workspace.
Multiple Memberships
If the user is part of a group and permissions are applied to the user as well as to the group they are part of, all permissions are applied.
If the user is a member of two different groups, the least restrictive permissions are applied.
Adding Users to the Local Admin Group via Group Policy
You can use GPO (Group Policy) to add Active Directory users and groups to the local Administrators group on domain-joined servers and workstations. This allows you to grant local admin privileges on domain computers to technical support staff, HelpDesk team, specific users or other privileged accounts. In this article we’ll show how to manage members of the local Administrator group on domain computers using GPO.
Local Administrators Group in Active Directory Domain
When you joining a computer to an AD domain, the Domain Admins group is automatically added to the local Administrators group, and the Domain User group is added to the local Users group.
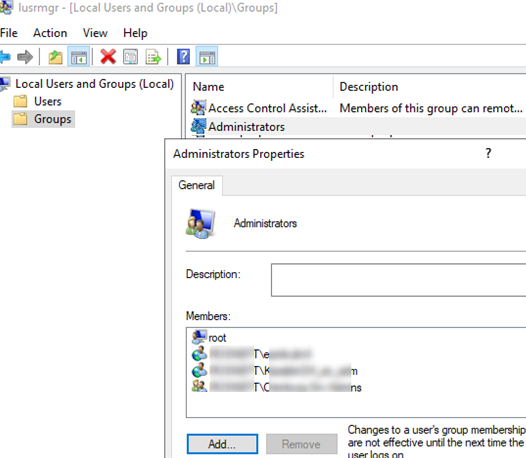
The easiest way to grant local admin privileges on a computer is to add a user or group to the local security group Administrators using the Local users and groups snap-in ( lusrmgr.msc ). However, this method is not convenient if there are a lot of computers and in some time unwanted people may stay the members of the privileged group. If you are using this method of granting local privileges, it is not convenient to control the members of the local admins group on each domain computer.
Microsoft recommends using the following groups to separate administrative privileges in an AD domain:
- Domain Admins are used only on domain controllers;
Suppose, you want to grant local administrator privileges on computers in the specific OU to the group of technical support and HelpDesk employees. Create a new security group in your domain using PowerShell and add the technical support accounts to it:
New-ADGroup munWKSAdmins -path ‘OU=Groups,OU=Munich,OU=DE,DC=woshub,DC=com’ -GroupScope Global –PassThru
Add-AdGroupMember -Identity munWKSAdmins -Members amuller, dbecker, kfisher
Open the domain Group Policy Management console ( GPMC.msc ), create a new policy (GPO) AddLocaAdmins and link it to the OU containing computers (in my example, it is ‘OU=Computers,OU=Munich,OU=DE,DC=woshub,DC=com’).
AD Group Policy provides two methods to manage local groups on domain computers. Let’s study them in turn:
- Local groups management using Group Policy Preferences;
- Restricted Groups.
How to Add Domain Users to the Local Administrators via GPO Preferences?
Group Policy Preferences (GPP) provide the most flexible and convenient way to grant local administrator privileges on domain computers through a GPO.
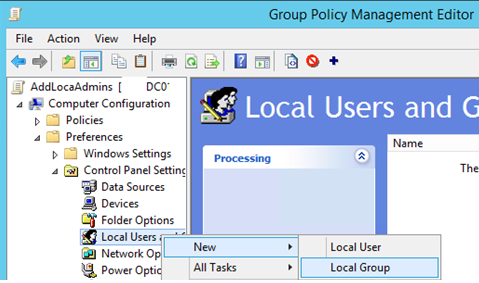
- Open the AddLocaAdmins GPO you created earlier in the Edit mode;
- Go to the following GPO section: Computer Configuration –> Preferences –> Control Panel Settings –> Local Users and Groups;
- Add a new rule (New ->Local Group);

- Select Update in the Action field (it is an important option!);
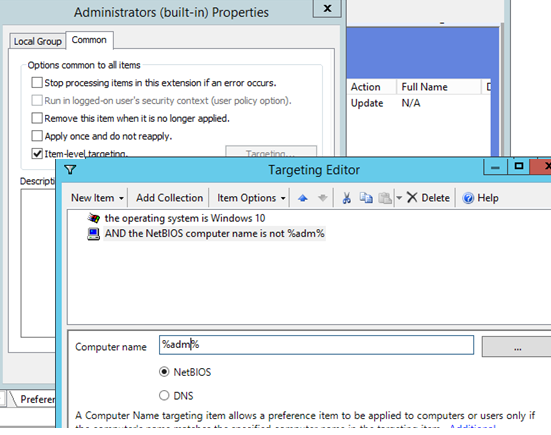
- In the Group Name dropdown list, select Administrators (Built-in). Even if this group has been renamed on the computer, the settings will be applied to the local Administrators group by its SID — S-1-5-32-544 ;
- Click the Add button and select the groups you want to add to the local administrators group (in our case, it is munWKSAdmins);
You can configure additional (granular) conditions for targeting the policy on the specific computers using the GPO WMI filters or Item-level Targeting.
In the second case, go to the Common tab and check the Item-level targeting. Click Targeting. Here you can specify the conditions when the policy will be applied. For example, I want the policy of adding administrator groups to be applied only to Windows 10 computers, which NetBIOS/DNS names don’t contain adm . You can use your own filtering options.
It is not recommended to add individual user accounts to this policy. It is better to use the domain security groups. In this case, to grant administrator privileges to another tech support employee, it is enough to add them to the domain group (you won’t need to edit the GPO).
Managing Local Admins Group Using Restricted Groups
The Restricted Groups policy also allows to add domain groups/users to the local security group on computers. It is an older method of granting local administrator privileges and is used less often now (it is less flexible than that the Group Policy Preferences method).
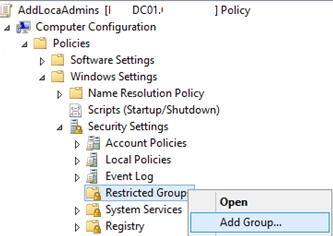
- Open a GPO in the editing mode;
- Expand the section Computer Configuration -> Policies -> Security Settings -> Restricted Groups;
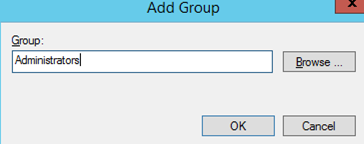
- Select Add Group in the context menu;
- In the next window, type Administrators and then click OK;
- Click Add in the Members of this group section and specify the group you want to add to the local admins;
- Save the changes, apply the policy to user computers and check the local Administrators group. It must contain only the group you have specified in the policy.

Using GPO to Add a Single User to the Local Admin Group on a Specific Computer
Sometimes you may need to grant a single user the administrator privileges on the specific computer. For example, you have several developers who need elevated privileges from time to time to test drivers, debug or install them on their computers. It is not advisable to add them to the group of workstation admins on all computers.
To grant local administrator privileges on the specific computer, you can use the following scheme:
Right in the GPO preference section (Computer Configuration –> Preferences –> Control Panel Settings –> Local Users and Groups) of AddLocalAdmins policy created earlier create a new entry for the Administrators group with the following settings:
- Action: Update
- Group Name: Administrators (Built-in)
- Description: “ Add amuller to the local administrators on the mun-dev-wsk21 computer ”
- Members: Add -> amuller
- In the Common ->Targeting tab, specify this rule: “ the NETBIOS computer name is mun—dev-wks24. ” It means that this policy will be applied only to the computer specified here.


Also, pay attention to the order in which groups are applied on the computer (the Order GPP column). Local group settings are applied from top to bottom (starting from the Order 1 policy).
The first GPP policy (with the “Delete all member users” and “Delete all member groups” settings as described above) removes all users/groups from the local administrator groups and adds the specified domain group. Then the additional computer-specific policies are applied that add the specified user to the local admins. If you want to change the membership order in your Administrators group, use the buttons on top of your GPO Editor console.


