- Configuring Windows Firewall Rules with PowerShell
- How to Manage Windows Firewall Network Profiles from PowerShell?
- How to Create, Edit or Remove Windows Firewall Rules with PowerShell?
- Listing Windows Firewall Rules with PowerShell
- Use PowerShell to Create New Windows Firewall Rules
- Enable firewall rules with Windows PowerShell
- Create a new firewall rule
- Deploy the rule to all my Windows Server 2012 and Windows 8 machines
- Verify that the changes took place
Configuring Windows Firewall Rules with PowerShell
This article gives the basics on how to manage settings and rules of built-in Windows Defender Firewall with Advanced Security using PowerShell. We’ll consider how to enable/disable the firewall for different network profiles, create or remove firewall rules and write a small PS script to get a convenient table showing the current set of active firewall rules.
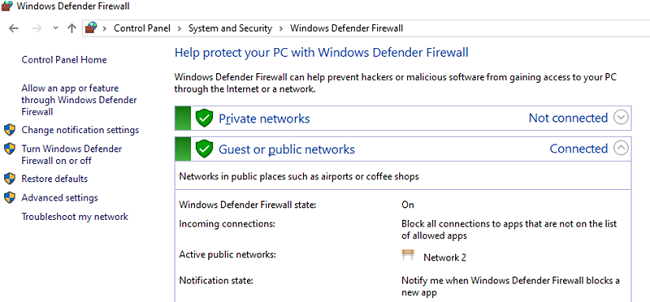
You can manage Windows Firewall settings from the graphic console: Control Panel -> System and Security -> Windows Defender Firewall. However, starting with Windows 8.1 (Windows Server 2012 R2) you can use the built-in NetSecurity PowerShell module to manage firewall.
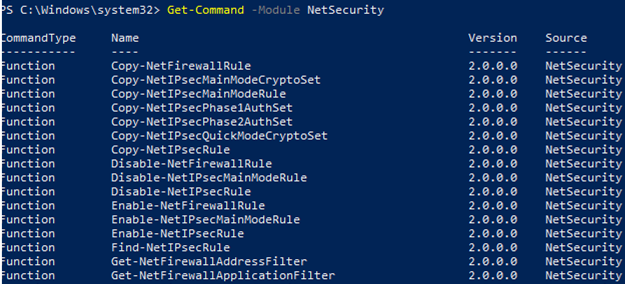
There are 85 commands available in the NetSecurity module on Windows 10. You can display the whole list:
Get-Command -Module NetSecurity
How to Manage Windows Firewall Network Profiles from PowerShell?
There are three types of network profiles in Windows Firewall:
- Domain – is applied to the computers in an Active Directory domain
- Private – home or corporate networks
- Public – public networks
Each network profile (location) may differ by the set of firewall rules used. By default, all network interfaces of a computer are protected by the firewall, and all three types of profiles are applied to them.
To enable all three network profiles: Domain, Public and Private, use this command:
Set-NetFirewallProfile -All -Enabled True
Or set the specific profile instead All:
Set-NetFirewallProfile -Profile Public -Enabled True
To disable the firewall for all three network location, use the command:
Set-NetFirewallProfile -All -Enabled False
Using the Set-NetFirewallProfile cmdlet, you can change profile options (a default action, logging, a path to and a size of a log file, notification settings, etc.).
You may know that in modern OS versions Windows Firewall is enabled for all profiles. All outbound connections are allowed and inbound ones are blocked (except allowed ones) in the profile settings.
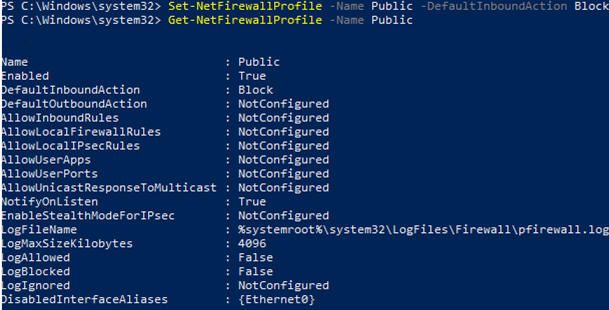
Let’s change the default action for the Public profile to block all inbound connections.
Set-NetFirewallProfile –Name Public –DefaultInboundAction Block
You can display the current profile settings as follows:
Get-NetFirewallProfile -Name Public
If you manage your Windows Firewall settings using GPO, you can display the current resulting profile settings as follows:
Get-NetFirewallProfile -policystore activestore
Make sure that all firewall settings are applied to all network interfaces of the computer.
Get-NetFirewallProfile -Name Public | fl DisabledInterfaceAliases
If all interfaces are protected, the command will return the following:

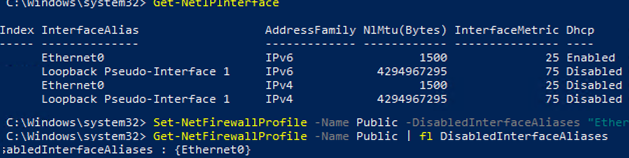
You can disable the specific interface profile (to display the list of interface names, use the Get-NetIPInterface):
Set-NetFirewallProfile -Name Public -DisabledInterfaceAliases «Ethernet0»
As you can see, Public profile is no longer applied to Ethernet0:
You can set network connection logging options at the profile level. By default, Windows Firewall logs are stored in %systemroot%\system32\LogFiles\Firewall, and the file size is 4MB. You can enable all connection logging and change the maximum file size:
Set-NetFireWallProfile -Profile Domain -LogBlocked True -LogMaxSize 20000 -LogFileName ‘%systemroot%\system32\LogFiles\Firewall\pfirewall.log’
How to Create, Edit or Remove Windows Firewall Rules with PowerShell?
There are 9 cmdlets to manage your firewall rules:
- New-NetFirewallRule
- Copy-NetFirewallRule
- Disable-NetFirewallRule
- Enable-NetFirewallRule
- Get-NetFirewallRule
- Remove-NetFirewallRule
- Rename-NetFirewallRule
- Set-NetFirewallRule
- Show-NetFirewallRule
Let’s consider some simple examples of how to open ports in Windows Firewall.
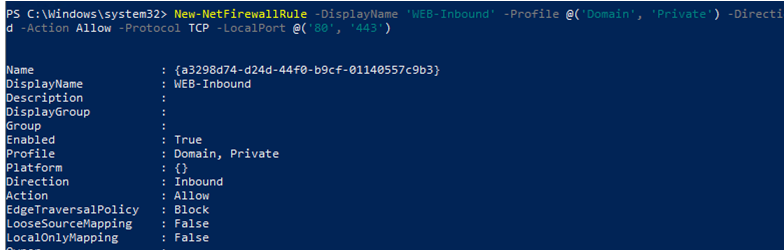
For example, if you want to allow inbound TCP connections to ports 80 and 443 for Domain and Private profiles, use this command:
New-NetFirewallRule -DisplayName ‘HTTP-Inbound’ -Profile @(‘Domain’, ‘Private’) -Direction Inbound -Action Allow -Protocol TCP -LocalPort @(’80’, ‘443’)
You can allow or block network access for an app. For example, you want to block outbound connections for Firefox:
New-NetFirewallRule -Program “C:\Program Files (x86)\Mozilla Firefox\firefox.exe” -Action Block -Profile Domain, Private -DisplayName “Block Firefox browser” -Description “Block Firefox browser” -Direction Outbound
To allow inbound RDP connection on port 3389 from one IP address only:
New-NetFirewallRule -DisplayName «AllowRDP» –RemoteAddress 192.168.2.200 -Direction Inbound -Protocol TCP –LocalPort 3389 -Action Allow
To allow ping (ICMP) for addresses from the specified IP subnet or IP range, use these commands:
$ips = @(«192.168.2.15-192.168.2.40», «192.168.100.15-192.168.100.200», ”10.1.0.0/16”)
New-NetFirewallRule -DisplayName «Allow inbound ICMPv4» -Direction Inbound -Protocol ICMPv4 -IcmpType 8 -RemoteAddress $ips -Action Allow
New-NetFirewallRule -DisplayName «Allow inbound ICMPv6» -Direction Inbound -Protocol ICMPv6 -IcmpType 8 -RemoteAddress $ips -Action Allow
In order to edit an existing firewall rule, the Set-NetFirewallRule cmdlet is used. For example, to allow inbound connections from the specified IP address for the rule created earlier:
Get-NetFirewallrule -DisplayName ‘HTTP-Inbound’ | Get-NetFirewallAddressFilter | Set-NetFirewallAddressFilter -RemoteAddress 192.168.1.10
If you want to add multiple IP addresses to a firewall rule, use this script:
$ips = @(«192.168.2.15», «192.168.2.17»,”192.168.100.15”)
Get-NetFirewallrule -DisplayName ‘WEB-Inbound’|Set-NetFirewallRule -RemoteAddress $ips
To display all IP addresses in a firewall rule:
Get-NetFirewallrule -DisplayName ‘Allow inbound ICMPv4’|Get-NetFirewallAddressFilter

You can enable/disable firewall rules using Disable-NetFirewallRule and Enable-NetFirewallRule cmdlets.
Disable-NetFirewallRule –DisplayName ‘WEB-Inbound’
To allow ICMP (ping), run this command:
Enable-NetFirewallRule -Name FPS-ICMP4-ERQ-In
To remove a firewall rule, the Remove-NetFirewallRule cmdlet is used.
Listing Windows Firewall Rules with PowerShell
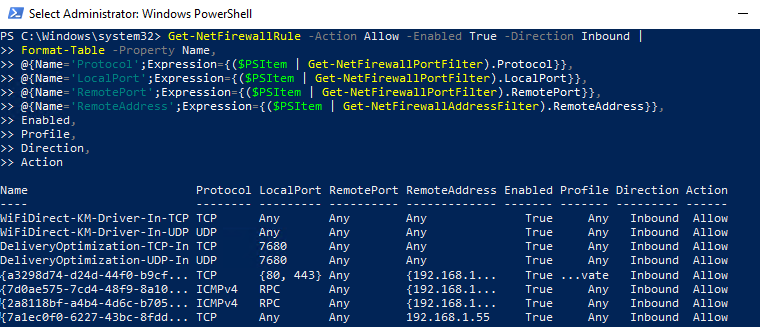
You can display the list of active firewall rules for your inbound traffic as follows:
If you want to display the list of outbound blocking rules:
Get-NetFirewallRule -Action Block -Enabled True -Direction Outbound
To display an app name in a rule:
Get-NetFirewallRule -Action Block -Enabled True -Direction Outbound | %

As you can see, the Get-NetFirewallRule cmdlet doesn’t show network ports and IP addresses for your firewall rules. To display the detailed information about allowed inbound (outbound) connections in a more convenient way showing the port numbers, use the following PowerShell script:
PowerShell provides ample opportunities to manage Windows Firewall rules from the command prompt. You can automatically run PowerShell scripts to open/close ports if certain events happen. In the next article, we’ll consider a simple PowerShell- and Windows Firewall-based solution to automatically block IP addresses trying to remotely brute-force passwords over RDP on your Windows VDS server.
Use PowerShell to Create New Windows Firewall Rules

November 13th, 2012
Summary: Microsoft Scripting Guy, Ed Wilson, shows how to use Windows PowerShell to create new Windows Firewall rules on local and remote systems.
Microsoft Scripting Guy, Ed Wilson, is here. Today, we are off to Europe. The Scripting Wife and I are actually on separate flights—it’s the way the airline miles worked out for the flight. Luckily, the Scripting Wife is an excellent traveler. When I was working in Vienna a few years ago, she flew into Frankfurt, hopped a train to Vienna, and navigated the local S-Bahn trains from the Ost-Bahnhoff to the hotel without incident.
Anyway, from Frankfurt, once we are all there, we hop a train to Dortmond, Germany, where we will meet with Klaus Schulte. Klaus, as you may know, was the winner of the Scripting Games, and he has written several guest Hey, Scripting Guy! Blog posts. Neither the Scripting Wife nor myself has been to Dortmond, and we are looking forward to hanging out with Klaus, taking pictures, and of course, talking about Windows PowerShell.
Enable firewall rules with Windows PowerShell
I know why we do it, but dude, I still like to use Ping to see if a computer is up or down. I know I can use Windows PowerShell and do something like Test-WSMan to see if WinRM works, but old habits die hard. By default, on certain profiles, and on certain versions of the operating system, the Ping command is disabled. It really makes life difficult in the early hours of the morning when I tend to forget these sorts of things. So, I like to explicitly ensure that Ping is permitted through Windows Firewall. Once I have done this, and a machine does not respond to Ping, I know I need to do something else.
Unfortunately, while I can use the Get-NetFireWallRule cmdlet to retrieve information about scope and status of a firewall rule, it does not display what the actual rule itself is or does. This means that, for example, I cannot use Get-NetFireWallRule to retrieve a firewall rule and use it as a pattern when it comes to creating a new rule. In addition, it means that I cannot use the GUI tool to create a new firewall rule, use the Get-NetFireWallRule cmdlet to obtain the actual rules themselves, and then use that to create a new rule. Get-NetFireWallRule is useful for auditing but not for system configuration.
Create a new firewall rule
To create a new firewall rule that permits the Ping command, I first import the NetSecurity module. Next, I use the New-NetFirewallRule cmdlet to create the new firewall rule. The problem with this is that I basically have to know what I am doing … specifically. If, for example, I do not know that a Ping is ICMPv4 protocol, and specifically ICMPType 8, then I have no chance of creating a new firewall rule. This is where the GUI tool is a bit more friendly—rather than having to look up the ICMPTypes, they are available through the ICMP type page. This is shown here.
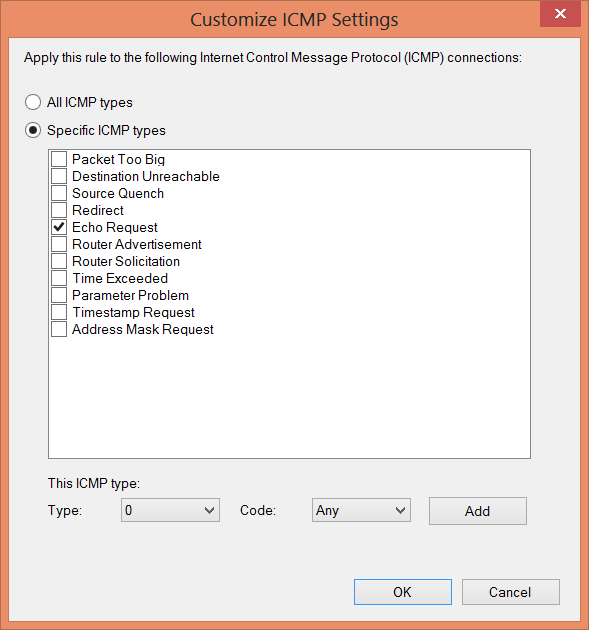
Here again, even the GUI tool does not actually list the ICMP type. So to get this information, I need to either already know it (Hey, I wrote a book on Network Monitoring and Analysis), or I need to look it up by using Ping.
I recommend using the Windows PowerShell cmdlet to create the firewall rule, and then inspecting the rule in the Windows Firewall with Advanced Security tool. Here is the rule I came up with to permit Ping on network interfaces with the ANY profile. (Note that I could use DOMAIN or PRIVATE profiles as well.)
New-NetFirewallRule -Name Allow_Ping -DisplayName “Allow Ping”`
-Description “Packet Internet Groper ICMPv4” `
-Protocol ICMPv4 -IcmpType 8 -Enabled True -Profile Any -Action Allow
Deploy the rule to all my Windows Server 2012 and Windows 8 machines
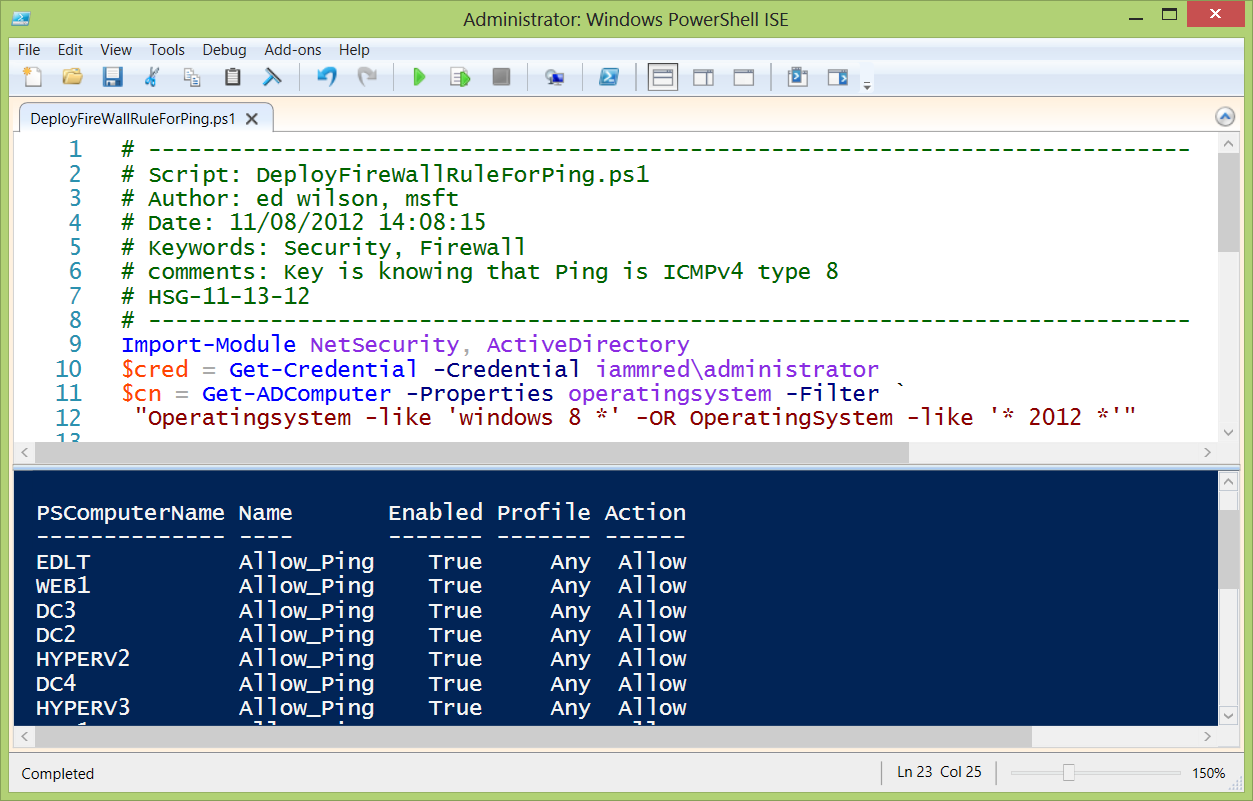
The first thing I need to do is to find all of my computers running Windows Server 2012 and Windows 8. I created a specific filter for the Get-ADComputer cmdlet that returns only these types of computers. I also specify Admin credentials to the Get-Credential cmdlet. This is shown here.
Import-Module NetSecurity, ActiveDirectory
$cred = Get-Credential -Credential iammred\administrator
$cn = Get-ADComputer -Properties operatingsystem -Filter `
“Operatingsystem -like ‘windows 8 *’ -OR OperatingSystem -like ‘* 2012 *’”
Now, I create a CIM session to each of these computers. When I do this, I specify the name of the computer and the credentials to use to make the connection. I do not worry if computers are offline when calling the command because it only connects with online machines. It simplifies the code. This appears here.
$CIM = New-CimSession -ComputerName $cn.name -Credential $cred
Next, I use the same New-NetFirewallRule command I used before—only this time I add that I want to use the CIM sessions in the $cim variable. Here is the code.
New-NetFirewallRule -Name Allow_Ping -DisplayName “Allow Ping”`
-Description “Packet Internet Groper ICMPv4” `
-Protocol ICMPv4 -IcmpType 8 -Enabled True -Profile Any -Action Allow `
Verify that the changes took place
Because I already have the CIM sessions in the $CIM variable, I can use that with the Get-NetFirewallRule cmdlet to verify that the remote servers and workstations have received the new firewall rule. This command is shown here.
Get-NetFirewallRule -DisplayName “Allow Ping” -CimSession $cim |
Select PSComputerName, name, enabled, profile, action |
The command and the associated output are shown here.
I also want to verify that the Pings themselves will take place. Now, remember that the Get-ADComputer command returned some computers that were offline. But the $CIM variable contains CIM sessions to each computer that is obviously online. Unfortunately, the Test-Connection cmdlet does not accept a CIM session object, but that does not matter because it does accept an array of computer names. With auto array expansion, I can get the computer names from the variable containing all of the CIM sessions easily. Here is the command to which I arrived.
Test-Connection -ComputerName $cim.computername -BufferSize 15 -Count 1
The command and associated output are shown here.
PS C:\> Test-Connection -ComputerName $cim.computername -BufferSize 15 -Count 1
Source Destination IPV4Address IPV6Address
EDLT DC2 192.168.0.102
EDLT DC3 192.168.0.103
EDLT DC4 192.168.0.104
EDLT EDLT 192.168.3.228 fe80::bd2d:5283:5572:5e77%19
EDLT HYPERV2 192.168.0.46
EDLT HYPERV3 192.168.0.43
EDLT SQL1 192.168.0.150
EDLT WDS1 192.168.0.152
EDLT WEB1 192.168.0.54
Sweet, it worked! Join me tomorrow when I will talk about more way-cool Windows PowerShell stuff.
I invite you to follow me on Twitter and Facebook. If you have any questions, send email to me at scripter@microsoft.com, or post your questions on the Official Scripting Guys Forum. See you tomorrow. Until then, peace.
Ed Wilson, Microsoft Scripting Guy


