- Create a Virtual Machine with Hyper-V
- Windows 10 Fall Creators Update (Windows 10 version 1709)
- Windows 10 Creators Update (Windows 10 version 1703)
- Before Windows 10 Creators Update (Windows 10 version 1607 and earlier)
- WIndow 10 new machine want to add Windows 7 dual boot
- Replies (4)
- Add windows to machines
- Answered by:
- Question
- Answers
Create a Virtual Machine with Hyper-V
Create a virtual machine and install its operating system.
We’ve been building new tools for creating virtual machines so the instructions have changed significantly over the past three releases.
Pick your operating system for the right set of instructions:
Let’s get started.
Windows 10 Fall Creators Update (Windows 10 version 1709)
In Fall Creators Update, Quick Create expanded to include a virtual machine gallery that can be launched independently from Hyper-V Manager.
To create a new virtual machine in Fall Creators Update:
Open Hyper-V Quick Create from the start menu.
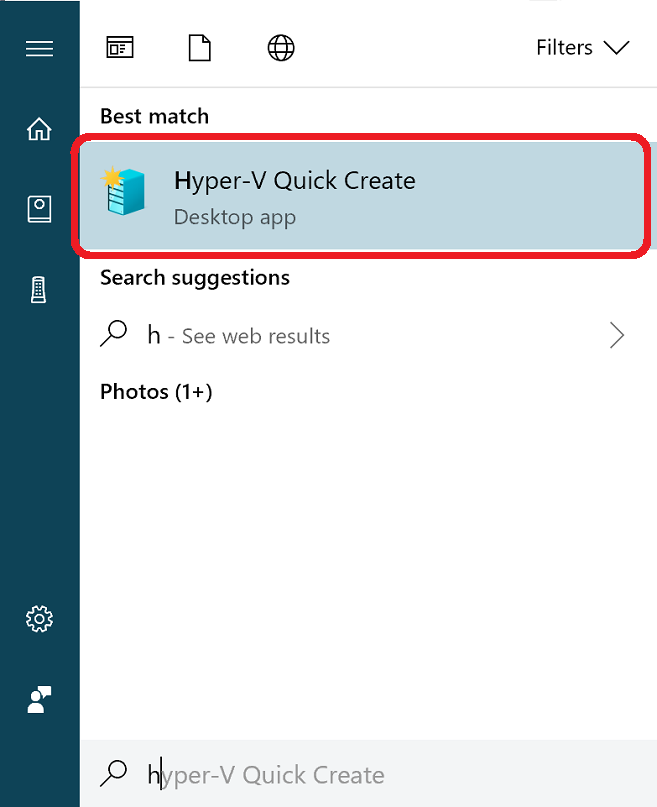
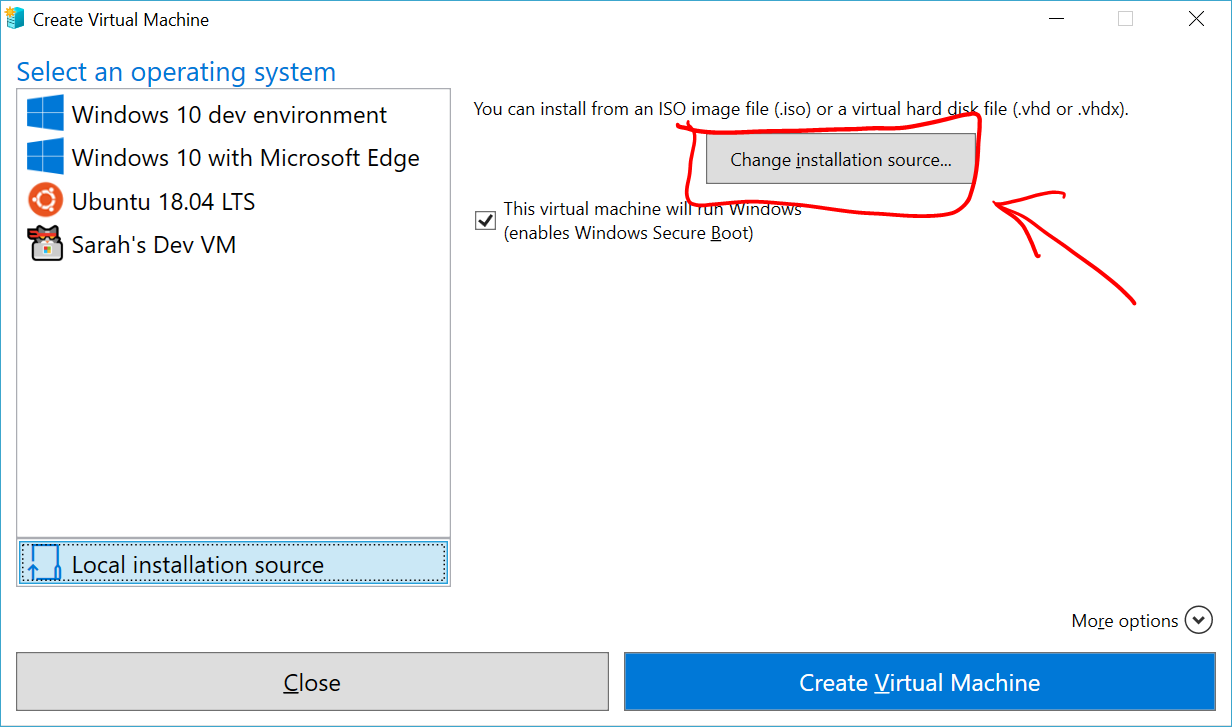
Select an operating system or choose your own by using a local installation source.

- If you want to use your own image to create the virtual machine, select Local Installation Source.
- Select Change Installation Source.

- Pick the .iso or .vhdx that you want to turn into a new virtual machine.
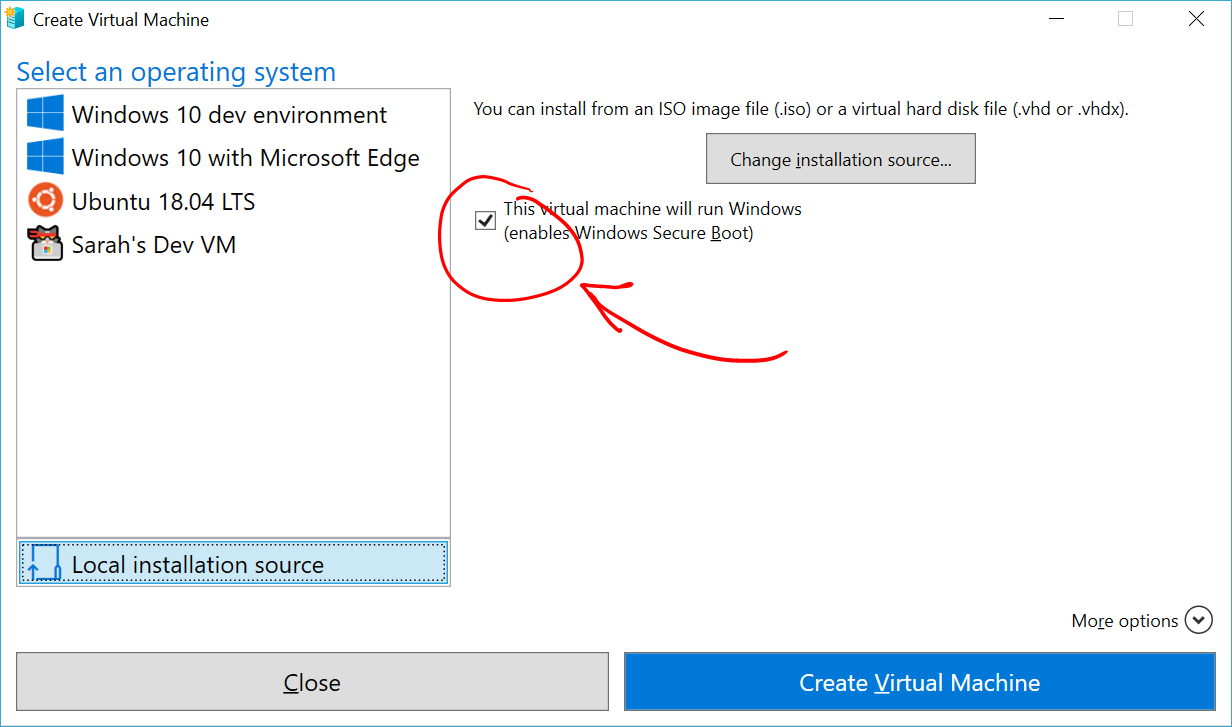
- If the image is a Linux image, deselect the Secure Boot option.
Select «Create Virtual Machine»
That’s it! Quick Create will take care of the rest.
Windows 10 Creators Update (Windows 10 version 1703)
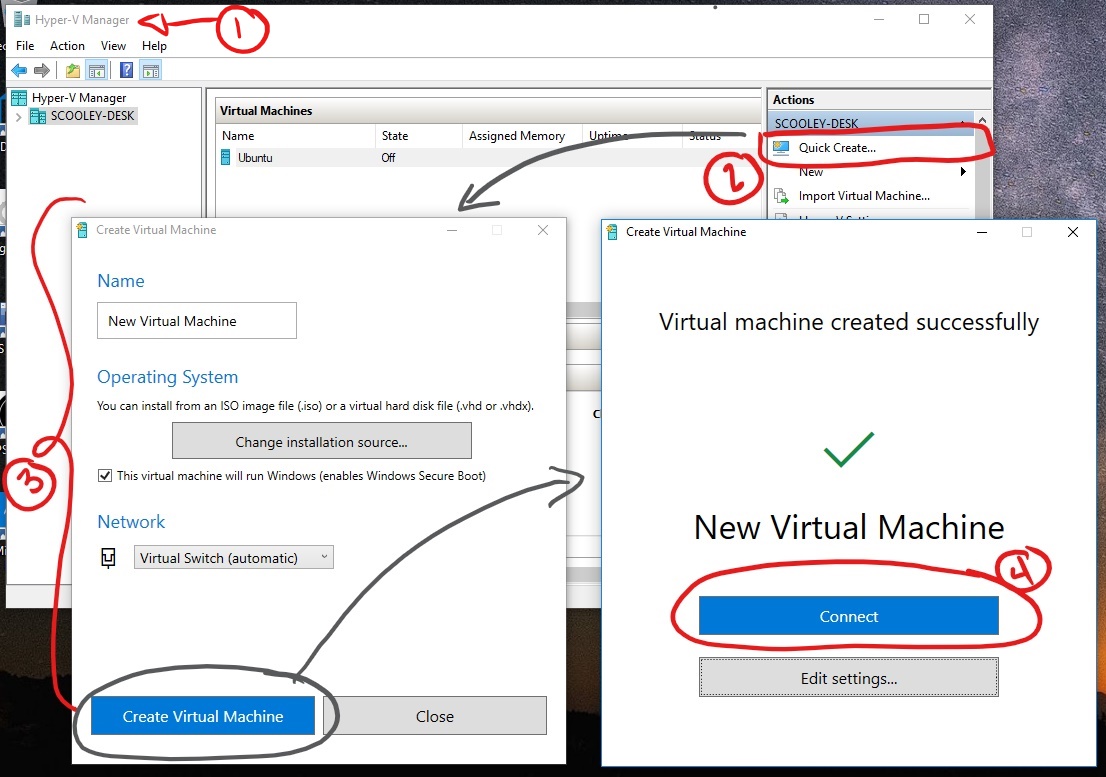
Open Hyper-V Manager from the start menu.
In Hyper-V Manager, Find Quick Create in the right hand Actions menu.
Customize your virtual machine.
- (optional) Give the virtual machine a name.
- Select the installation media for the virtual machine. You can install from a .iso or .vhdx file. If you are installing Windows in the virtual machine, you can enable Windows Secure Boot. Otherwise leave it unselected.
- Set up network. If you have an existing virtual switch, you can select in the network dropdown. If you have no existing switch, you will see a button to set up an automatic network, which will automatically configure a virtual network.
Click Connect to start your virtual machine. Don’t worry about editing the settings, you can go back and change them any time.
You may be prompted to вЂPress any key to boot from CD or DVD’. Go ahead and do so. As far as it knows, you’re installing from a CD.
Congratulations, you have a new virtual machine. Now you’re ready to install the operating system.
Your virtual machine should look something like this:

Note: Unless you’re running a volume-licensed version of Windows, you need a separate license for Windows running inside a virtual machine. The virtual machine’s operating system is independent of the host operating system.
Before Windows 10 Creators Update (Windows 10 version 1607 and earlier)
If you aren’t running Windows 10 Creators Update or later, follow these instructions using New Virtual Machine Wizard instead:
WIndow 10 new machine want to add Windows 7 dual boot
I just purchased a machine with WIndows 10 keep 10 installed and add a dual boot partition. Sorry i don’t have the exact error but i get a message indicating icompatible gui versions.
What is the procedure to add dual boot for W10? I see people adding 10 to an existing machine but not adding 7 or 8 to a 10 PC.
Replies (4)
You can’t easily add an earlier version of Windows to a newer PC in a dual-boot. The proper dual-boot procedure is to install Windows in order of release.
I would try you current app on Windows 10 if this is for compatibility reasons.
Was this reply helpful?
Sorry this didn’t help.
Great! Thanks for your feedback.
How satisfied are you with this reply?
Thanks for your feedback, it helps us improve the site.
How satisfied are you with this reply?
Thanks for your feedback.
Partitioning Windows Vista and Windows 7/8/8.1/10
In Windows 7 and later versions of Windows, partitioning is easier to do than Windows XP. Regardless of this, you might encounter problems when using Windows 7’s disk management to create it. If you do experience this, refer to the previous instructions about using EaseUs to create the partition instead. Anyway, here is how you create a partition in Windows 7 or later:

Open a Run command (Press Windows key + R) on your keyboard. Then type diskmgmt.msc then hit Enter on your keyboard.
Alternatively, you can click Start, right click Computer > click Manage > click Disk Management.
Windows 8/8.1 and Windows 10 users:
Press Windows key + X on your keyboard and click Disk Management.

Once Disk Management is open, select the C:\ or where your current version of Windows is installed.

Right click it and click Shrink menu.

Wait while Windows checks for available disk space.

Enter the amount you want to allocate. Depending on the architecture of Windows 10 you want to try. If you are using Windows 10 32 bit, you can allocate 16 GBs or 20 GBs if you using the 64 bit version. Another factor is disk space for applications, page file, drivers, accumulation data over time. So make sure you make consideration for these factors. My personal recommendation is to go with a minimum 60 to 100 GBs of space for Windows 10 testing.

The Disk Management window should display unallocated disk space.
Dynamic Volume Error Message
«Windows cannot be installed to this hard disk space. This partition contains one or more dynamic volumes that are not supported for installation»
Becareful what you are doing. I encountered this error last year when I was setting up partitions in anticipation of the Windows 10 Preview.
I tried both shrinking an existing partition and using a third party partitioning tool. I gave it a try and it made the system not able to boot. Luckily, I had a system image.
The issue is with the partitioning scheme of the drive. If you are using a computer where the manufacturer has several partitions, example:
G: Other partition
One of these partitions will need to be sacrificed in order to facilitate shrinking Local Disk C:\ where Windows is installed to create a logical volume with enough disk space to accomodate Windows 10.
As long as you do not sacrifice System, Local Disk (C:\) and Recovery, you should be able to shrink Drive C: and create enough space to dual boot. Here is an example:
Above I have a partition layout showing 5 separate partitions (why the manufacturer HP did this? I don’t know). One of these partitions turned out to be unnecessary, in this case the Tools partition which turns out to be blank. As long as you do not disturb the system partition, Local disk and recovery partitions, everything should be ok.
Right click the Tools partition and click Delete Volume,
Note: This might be different on your system make sure you observe carefully what you are doing.
The volume will now appear as Unallocated. Our next step is to merge back that unallocated free space with the partition to left of it.. Right click the volume and click the ‘Extend Volume’ option on the contextual menu, click ‘Yes’ when the warning appears.
A wizard will now begin that will guide through the steps to merge back the unallocated space with your system partition.
The wizard provides a simple procedure to merge back the unallocated space with the system drive. Once you have selected the space, click Next, at the end of the wizard, you will see the amount allocated
You can then go ahead and shrink C:\ Local disk to create enough space for your Windows 10 installation.
I do strongly recommend you create a system image in advance of doing this:
See links to resources about backing up by clicking the link for the respective version of Windows you are running: Windows XP, Windows Vista, Windows 7, Windows 8/8.1
Download and Prepare Windows 10 RTM ISO Media from Microsoft
If you will be installing the operating system for the first time, you will need your Windows product key (xxxxx-xxxxx-xxxxx-xxxxx-xxxxx). For more information about product keys and when they are required, visit the FAQ page.
Click HERE to download official ISO media for Windows 10 RTM from Microsoft.
You can also download the Windows 10 Enterprise 90 day trial at the following link:
32 vs 64 bit
The article references Windows 7, but the same principles apply to Windows 10.
Preparing the .ISO file for installation.
See instructions for burning .ISO files in Windows 7 or later:
You can also use the Microsoft USB/DVD Tool, which is recommended for Windows XP users.

For UEFI based systems
If your computer is UEFI based, these are normally systems that come pre-loaded with Windows 8 or later, you will need to prepare the ISO file for such a configuration or you will receive an error message during setup. The thumbdrive needs to be formatted as FAT32 and use the GPT partitioning scheme. To do this, you need to use Rufus, a small tool you can download for free.

Rufus — credit: Pete Batard/Akeo
After you have installed Rufus:
- Launch it
- Select ISO Image
- Point to the Windows 10 ISO file
- Check off Create a bootable disk using
- Select GPT partitioning for EUFI firmware as the Partition scheme
- Choose FAT32 NOT NTFS as the File system
- Make sure your USB thumbdrive in the Device list box
- Click Start
- Close when complete
Starting the installation.
The following describes the standard way to start the installation, especially if you are dual booting a 64 bit version of Windows 10 alongside a 32 bit version of Windows. Another way is to start the installation from within a runing version Windows and select the partition where you would like to install Windows 10. See below for further instructions how to do so.
To learn how to change your BIOS options to boot from the DVD drive, see the following tutorial:

Once your computer is set to boot from the DVD, you should see this option.
If you are installing from a thumb drive, see the following instructions how to prepare your computer to boot from one:

The Windows logo will appear on screen, this might be here for a while, as long as you see the indicater, everything should be ok.
The setup screen will eventually appear, select your time and currency format then click Next.
Click Install Now
Wait while setup starts up

Accept the End User License agreement and click Next

Click Custom install Windows only (advanced)

Click Next and wait while Windows 10 installs.
Add windows to machines
This forum has migrated to Microsoft Q&A. Visit Microsoft Q&A to post new questions.
Answered by:
![]()
Question
![]()
![]()
I am new to SCCM. I want to know how we could add machines (on intranet or on internet) as Devices in SCCM.
Is it required to have SCCM client installed on target machine that one want to add as device?
I am asking these questions as per information with me. Please do correct me if I am wrong in asking question.
If possible, please do share me link having step by step info do add machine as device in SCCM or kindly explain here.
Answers
![]()
![]()
I am new to SCCM. I want to know how we could add machines (on intranet or on internet) as Devices in SCCM.
Is it required to have SCCM client installed on target machine that one want to add as device?
First of all you need to understand two things over here. Discovery and Management of machines. To discover the machines and show it in your SCCM 2012 console (with Client = «NO») you need to enable discovery options available in CM 12. More details about discovery here.
Once the devices/machines have been discovered then you can manage (deploy apps, take inventory etc) those machines once you install SCCM client on those machines. I’m not pretty sure what you meant by Add as device?
![]()
![]()
At this point, I’d highly suggest you do some beginner’s self-research like reading TechNet, picking up a book, or reading one of the many blogs on the Internet.
To summarize the answers given below, fill in some gaps, and correct a couple of statements:
— To manage a Windows system in ConfigMgr it *must* have the client agent on it — there is no alternative regardless of whether it on the intranet or Internet. The client agent can be installed in a variety of ways per the TechNet page linked by Peter (http://technet.microsoft.com/en-us/library/gg712298.aspx).
— To install the client agent, a privileged account must be used at some point. When and where this is configured and used depends upon the client agent deployment method though. Ultimately, to install any non-per-user software in Windows, a local admin account *must* be used — that’s how Windows works and has nothing to do with ConfigMgr.
— You can «discover» systems using discovery (mainly from AD although it is possible to use SNMP and DHCP but these are rarely used). Simply discovering a system does not make it managed in any way though. As mentioned, the client agent must still be installed on the system for it to be managed. Discovery enables auto-client push from the site server though if you choose to use auto-client push.
— You can import resources using either their SMBIOS GUID or MAC address. This is similar to discovery but is a manual process. The intention of importing a device however is for use with Operating System Deployment (OSD) and not populating ConfigMgr with unknown, existing systems.
— ConfigMgr can absolutely manage system connected over the Internet. This takes a bit of additional configuration and planning and as mentioned, still requires the client agent to be installed.
— Site assignment has nothing to do with discovery or a system appearing in the console.
— The client agent *always* installs silently and in the background regardless of the method you choose to install it; there is no UI possible.


