- Install a printer in Windows 10
- Need more help?
- Add-Printer
- Syntax
- Description
- Examples
- Example 1: Add a printer to a local computer
- Example 2: Add a new network printer connection
- Parameters
- Share your network printer
- Share the printer on the primary PC
- Connect the shared printer to another PC
- Set up Sharing settings
- Find your PC name
Install a printer in Windows 10
When you connect a printer to your PC or add a new printer to your home network, you can usually start printing right away. Windows 10 supports most printers, so you probably won’t have to install special printer software. Additional printer drivers and support might be available if you update Windows 10.
Note: If your PC is running Windows 10 S, some printers might not work with it, or they might have limited functionality. For more info, see Device support on Windows 10 S.
If your printer is on and connected to the network, Windows should find it easily. Available printers can include all printers on a network, such as Bluetooth and wireless printers or printers that are plugged into another computer and shared on the network. You might need permission to install some printers.
Select the Start button, then select Settings > Devices > Printers & scanners.
Open Printers & scanners settings
Select Add a printer or scanner. Wait for it to find nearby printers, then choose the one you want to use, and select Add device.
If your printer isn’t in the list, select The printer that I want isn’t listed, and then follow the instructions to add it manually using one of the options.
If you use wireless access points, extenders or multiple wireless routers with separate SSIDs, you’ll need to ensure that you’re connected to the same network as the printer for your PC to find and install it.
If you have a new wireless printer that hasn’t been added to your home network, read the instructions that came with the printer, and check the printer manufacturer’s website to learn more and to get up-to-date software for your printer.
In most cases, all you have to do to set up a printer is to connect it to your PC. Simply plug the USB cable from your printer into an available USB port on your PC, and turn the printer on.
Select the Start button, then select Settings > Devices > Printers & scanners.
Open Printers & scanners settings
Select Add a printer or scanner. Wait for it to find nearby printers, then choose the one you want to use, and select Add device.
If your printer isn’t in the list, select The printer that I want isn’t listed, and then follow the instructions to add it manually using one of the options.
Need more help?
If you’re looking for help with a scanner, see Install and use a scanner in Windows 10.
If your printer appears «offline,» find out how you can Change a printer’s status to «online.»
If you’re having problems with your printer after updating to the latest version of Windows 10, see Fix printer problems after updating Windows 10. For driver issues, see the «Step 3: Update drivers» section of this page.
Add-Printer
Adds a printer to the specified computer.
Syntax
Description
The Add-Printer cmdlet adds a printer to a specified computer. You can add both local printers and connections to network-based printers.
You cannot use wildcard characters with Add-Printer. You can use Add-Printer in a Windows PowerShell remoting session.
You may need administrative credentials to run Add-Printer.
Examples
Example 1: Add a printer to a local computer
This command adds a printer with name mxdw2 to the local computer. The mxdw printer uses the Microsoft XPS Document Writer v4 driver and the portprompt: port.
The portprompt: port prompts for a file name to save the XPS document when printing to the XPS printer.
Example 2: Add a new network printer connection
This command adds a printer by specifying the name of a print server and a shared printer on that server.
Parameters
Runs the cmdlet as a background job. Use this parameter to run commands that take a long time to complete.
| Type: | SwitchParameter |
| Position: | Named |
| Default value: | None |
| Accept pipeline input: | False |
| Accept wildcard characters: | False |
Specifies the maximum size, in megabytes, of the branch office remote offline log file for this printer. You cannot specify this parameter for unshared queues or queues that do not have branch office enabled.
| Type: | UInt32 |
| Position: | Named |
| Default value: | None |
| Accept pipeline input: | False |
| Accept wildcard characters: | False |
Runs the cmdlet in a remote session or on a remote computer. Enter a computer name or a session object, such as the output of a New-CimSession or Get-CimSession cmdlet. The default is the current session on the local computer.
| Type: | CimSession [ ] |
| Aliases: | Session |
| Position: | Named |
| Default value: | None |
| Accept pipeline input: | False |
| Accept wildcard characters: | False |
Specifies the text to add to the Comment field for the specified printer.
| Type: | String |
| Position: | Named |
| Default value: | None |
| Accept pipeline input: | False |
| Accept wildcard characters: | False |
Specifies the name of the computer to which to add the printer.
| Type: | String |
| Aliases: | CN |
| Position: | Named |
| Default value: | None |
| Accept pipeline input: | False |
| Accept wildcard characters: | False |
Prompts you for confirmation before running the cmdlet.
| Type: | SwitchParameter |
| Aliases: | cf |
| Position: | Named |
| Default value: | False |
| Accept pipeline input: | False |
| Accept wildcard characters: | False |
Specifies the name of a shared printer to which to connect. This parameter is required.
| Type: | String |
| Position: | 0 |
| Default value: | None |
| Accept pipeline input: | False |
| Accept wildcard characters: | False |
Specifies the data type the printer uses to record print jobs.
| Type: | String |
| Position: | Named |
| Default value: | None |
| Accept pipeline input: | False |
| Accept wildcard characters: | False |
Specifies a URL for the directed discovery of a Web Services on Devices (WSD) printer to add to the specified computer.s
| Type: | String |
| Position: | Named |
| Default value: | None |
| Accept pipeline input: | False |
| Accept wildcard characters: | False |
Specifies the multicast UUID for device detection for the WSD port.
| Type: | String |
| Position: | Named |
| Default value: | None |
| Accept pipeline input: | False |
| Accept wildcard characters: | False |
Indicates that branch office remote logging is disabled. You cannot specify this parameter for unshared queues.
| Type: | SwitchParameter |
| Position: | Named |
| Default value: | None |
| Accept pipeline input: | False |
| Accept wildcard characters: | False |
Specifies the name of the printer driver for the printer.
| Type: | String |
| Position: | 1 |
| Default value: | None |
| Accept pipeline input: | False |
| Accept wildcard characters: | False |
Specifies whether the print jobs in the queue are kept.
| Type: | SwitchParameter |
| Position: | Named |
| Default value: | None |
| Accept pipeline input: | False |
| Accept wildcard characters: | False |
Specifies the location of the printer.
| Type: | String |
| Position: | Named |
| Default value: | None |
| Accept pipeline input: | False |
| Accept wildcard characters: | False |
Specifies the name of the printer to add.
| Type: | String |
| Position: | 0 |
| Default value: | None |
| Accept pipeline input: | True |
| Accept wildcard characters: | False |
Specifies the permissions for the printer as a Security Descriptor Definition Language (SDDL) string.
| Type: | String |
| Position: | Named |
| Default value: | None |
| Accept pipeline input: | False |
| Accept wildcard characters: | False |
Specifies the name of the port that is used or created for the printer.
| Type: | String |
| Position: | Named |
| Default value: | None |
| Accept pipeline input: | False |
| Accept wildcard characters: | False |
Specifies the name of the print processor used by the printer.
| Type: | String |
| Position: | Named |
| Default value: | None |
| Accept pipeline input: | False |
| Accept wildcard characters: | False |
Specifies the relative queue priority.
| Type: | UInt32 |
| Position: | Named |
| Default value: | None |
| Accept pipeline input: | False |
| Accept wildcard characters: | False |
Specifies whether the printer is published in the network directory service.
| Type: | SwitchParameter |
| Position: | Named |
| Default value: | None |
| Accept pipeline input: | False |
| Accept wildcard characters: | False |
Specifies the rendering mode for the printer. You can specify one of the following rendering modes:
- SSR, Service Side Rendering
- CSR. Client Side Rendering
- BranchOffice. Branch Office
| Type: | RenderingModeEnum |
| Accepted values: | SSR, CSR, BranchOffice |
| Position: | Named |
| Default value: | None |
| Accept pipeline input: | False |
| Accept wildcard characters: | False |
Specifies the path of and name of the separator page to be used by the printer.
| Type: | String |
| Position: | Named |
| Default value: | None |
| Accept pipeline input: | False |
| Accept wildcard characters: | False |
Indicates whether to share the printer on the network. You can determine the name by which the printer is shared by specifying ShareName. If ShareName is not specified, the name of the printer is used as the share name.
| Type: | SwitchParameter |
| Position: | Named |
| Default value: | None |
| Accept pipeline input: | False |
| Accept wildcard characters: | False |
Specifies the name by which to share the printer on the network. To share a printer, specify the Shared parameter.
| Type: | String |
| Position: | Named |
| Default value: | None |
| Accept pipeline input: | False |
| Accept wildcard characters: | False |
Specifies the starting time of printer availability.
| Type: | UInt32 |
| Position: | Named |
| Default value: | None |
| Accept pipeline input: | False |
| Accept wildcard characters: | False |
Specifies the maximum number of concurrent operations that can be established to run the cmdlet. If this parameter is omitted or a value of 0 is entered, then Windows PowerShellВ® calculates an optimum throttle limit for the cmdlet based on the number of CIM cmdlets that are running on the computer. The throttle limit applies only to the current cmdlet, not to the session or to the computer.
| Type: | Int32 |
| Position: | Named |
| Default value: | None |
| Accept pipeline input: | False |
| Accept wildcard characters: | False |
Specifies the ending time of printer availability.
| Type: | UInt32 |
| Position: | Named |
| Default value: | None |
| Accept pipeline input: | False |
| Accept wildcard characters: | False |
Shows what would happen if the cmdlet runs. The cmdlet is not run.
Share your network printer
In Windows 10, you can share your printer with many PCs on your network. To share a printer from the PC that the printer is connected to (the primary PC) with secondary PCs that the printer is not connected to, you must set up sharing settings for the printer, connect the printer to the primary PC (either wirelessly or by using a USB cable), and then turn on the printer. Also make sure the primary PC is turned on, connected to the printer, and connected to the network.
Note: When sharing a printer, make sure that sharing settings are set up on the primary and secondary PCs. Also, make sure you know the name of the primary PC. For more info, see the Set up Sharing settings and Find your PC name sections at the end of this topic.
Share the printer on the primary PC
There are two ways to share your printer: using Settings or Control Panel.
Share your printer using Settings
Select the Start button, then select Settings > Devices > Printers & scanners.
Choose the printer you want to share, then select Manage.
Select Printer Properties, then choose the Sharing tab.
On the Sharing tab, select Share this printer.
If you want, edit the share name of the printer. You’ll use this name to connect to the printer from a secondary PC.
Share your printer using Control Panel
In the search box on the taskbar, type control panel and then select Control Panel.
Under Hardware and Sound, select View devices and printers.
Select and hold (or right-click) the printer you want to share, select Printer properties, and then choose the Sharing tab.
On the Sharing tab, select Share this printer.
If you want, edit the share name of the printer. You’ll use this name to connect to the printer from a secondary PC.
Select the Start button, then select Settings > Devices > Printers & scanners.
Choose the printer you want to share, then select Manage.
Select Printer Properties, then choose the Sharing tab.
On the Sharing tab, select Share this printer.
If you want, edit the Share name of the printer. You’ll use this name to connect to the printer from a secondary PC.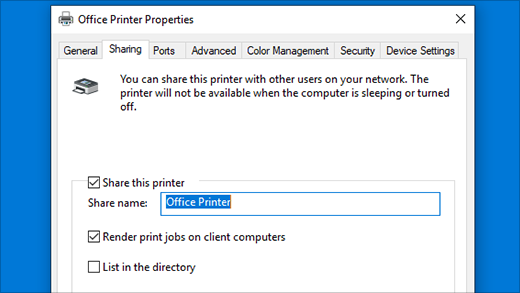
In the search box on the taskbar, type control panel and then select Control Panel.
Under Hardware and Sound, select View devices and printers.
Select and hold (or right-click) the printer you want to share, select Printer properties, and then choose the Sharing tab.
On the Sharing tab, select Share this printer.
If you want, edit the share name of the printer. You’ll use this name to connect to the printer from a secondary PC.
Connect the shared printer to another PC
There are two ways to connect a shared printer to another PC: using Settings or Control Panel.
Select the Start button, then select Settings > Devices > Printers & scanners.
Under Add printers & scanners, select Add a printer or scanner.
Choose the printer you want, and then select Add Device.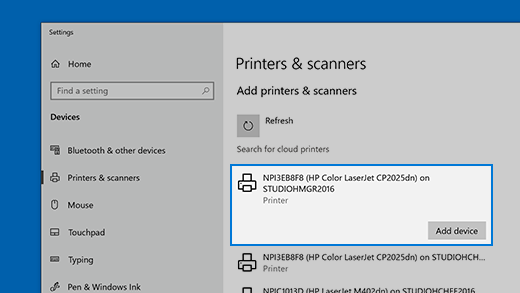
If you don’t see the printer you want, select The printer that I want isn’t listed.
In the Add printer dialog box, select Select a shared printer by name, and then enter the computer or device name of the primary PC and the share name of the printer using one of these formats:
When prompted to install the printer driver, select Next to complete the installation.
For more info about the computer or device name, see the Find your PC name section in this topic. By default, you need the user name and password of the primary PC to access the printer.
In the search box on the taskbar, type control panel and then select Control Panel.
Under Hardware and Sound, select View devices and printers, and then select Add a printer.
Select the printer you want, select Next. When prompted, install the printer driver.
If you don’t see the printer you want, select The printer that I want isn’t listed.
In the Add a device dialog box, select Select a shared printer by name, and then enter the computer or device name of the primary PC and the share name of the printer using one of these formats:
When prompted to install the printer driver, select Next to complete the installation.
For more info about the computer or device name, see the Find your PC name section in this topic. By default, you need the user name and password of the primary PC to access the printer.
Set up Sharing settings
The settings you use to share devices is often turned on by default. If not, follow the steps in this section to turn settings on using settings or Control Panel.
Select the Start button, then select Settings > Network & Internet > Wi-Fi.
Under Related settings, select Change advanced sharing options.
In the Advanced sharing settings dialog box, expand the Private section. Next, under Network discovery, select Turn on network discovery.
Under File and printer sharing, select Turn on file and printer sharing.
In the search box on the taskbar, type control panel and then select Control Panel.
Select Network and Internet > Network and Sharing Center > Change advanced sharing settings.
In the Advanced sharing settings dialog box, expand the Private section. Next, under Network discovery, select Turn on network discovery.
Under File and printer sharing, select Turn on file and printer sharing.
Find your PC name
You’ll need the name of your primary PC, also called the computer name or device name, to connect the secondary PC to the printer.
In the search box on the taskbar, type computer name.
Select View your PC name.
Under Device name, you’ll see the PC (computer) name.
In the search box on the taskbar, type control panel and then select Control Panel.
Select System and Security > System > See the name of this computer.
Under Computer name, you’ll see the PC (computer) name.


