- How to Create Custom Resolutions on Windows 7, 8 or 10
- Method 1: Setting a Custom Resolution on an Intel Based Graphics Card
- Method 2: Setting a Custom Resolution on a NVIDIA Based Graphics Card
- Method 3: Setting a Custom Resolution on an AMD Based Graphics Card
- How to use multiple monitors in Windows 10
- Video: Connecting a monitor
- Before you start
- Rearrange your displays
- Identify a display
- Detect a display
- Arrange your displays
- Change display options
- Change orientation
- Choose a display option
- Related topics
- How to enable a fake second display in Windows 10 as Windows 8.1? Not Virtual Desktop
- Replies (17)
- Add Screen Snip Context Menu In Windows 10
- About Sergey Tkachenko
- 2 thoughts on “ Add Screen Snip Context Menu In Windows 10 ”
How to Create Custom Resolutions on Windows 7, 8 or 10
Windows provides you with a preset list of standard screen resolutions for your display based on your graphics card or GPU and monitor hardware. You can easily change the screen resolution of of your display by switching to any of the presets provided by Windows. But what if you want to you a screen resolution that isn’t included in what has been given you?
Custom resolutions give you the flexibility to add virtually any screen resolution and refresh rate for your display. If you want to use a unique resolution that isn’t available in Windows preset list of resolutions, this guide will show you ways you can add any mode.
Note that not all computer manufacturers have custom modes enabled for their drivers, and older graphic drivers may not enable this feature. In this article, I’ll show you how to modify your screen resolution on Intel, AMD or NVIDIA graphics card using their native control software or a 3rd party software for those who don’t still don’t have the ability to customize their screen resolutions.
Method 1: Setting a Custom Resolution on an Intel Based Graphics Card
Before you continue, you need to check if your computer supports the custom graphics feature. This is described in the first three steps of this method. If you don’t meet this criteria, proceed to the 3rd method. The views might also be different on your computer, just follow closely and you’ll get it.
- Verify from here if you have the latest Intel Graphics Driver
- Open the Intel Graphics Driver properties windows by pressing Ctrl + Alt + F12 or right-clicking on the Windows desktop and selecting Graphics If prompted to select an application mode, select Advanced Mode and click OK.
- Under the Display tab, check if there is Custom Resolutions/Custom Modes and select it. If you’re prompted with a warning, click yes to continue.
The Custom Resolution/Modes feature was removed from the Intel HD Graphics Control Panel. You can still access it from C:\Windows\System32\CustomModeApp.exe
- Under “Basic Settings”, specify your preferred width, height and refresh rate in the boxes provided (e.g. 2400 x 1024).
- Click on Add and then Yes when prompted with a confirmation dialog.
- Click OK if you’re satisfied with the current resolution. To remove the custom resolution, click on Remove next to the custom resolution under “Remove Custom Resolution”.
Method 2: Setting a Custom Resolution on a NVIDIA Based Graphics Card
This method may vary with the version of graphics driver and graphics card but the concept remains the same. Also, make sure you have the latest NVIDIA Graphics Drivers.
- Go to the NVIDIA Display Properties by right-clicking on the Windows desktop on selecting NVIDIA Display.
- Under the Display category, select Change Resolution. Select the icon which represents the display you wish to affect and then click Customize. On the next window, click Create Custom Resolution. If this is the first time, accessing this feature, you will have to accept the End User Licence Agreement.
- Fill in the fields with your preferred values for the display. Here, you can change the Horizontal pixels (width), Vertical lines (height), Refresh rate, Color depth, and Scan type. Click the Test button for the display to check of the custom mode is supported. If it doesn’t test will fail and you cannot set a new custom resolution.
- You can go back to the Change Resolution page to select from your custom resolutions.
Method 3: Setting a Custom Resolution on an AMD Based Graphics Card
- Right-click on your Windows desktop and select AMD Catalyst Control Center. Go to Information > Software. Copy the 2D driver file path, you will need it later.
- Press Ctrl + R, type “regedit” and click OK.
- Go to the registry path as specified in the 2D driver file path
- In the “0000” folder, find a registry entry called DALNonStandardModesBCD1. Right-click and select edit and then enter the following values in order:
- The width of the resolution. E.g 1440 or 0780
- The height of the resolution. Eg. 1880 or 0240
- Type four zeros
- The refresh rate of your monitor. E.g. 0120 for 120Hz or 0060 for 60Hz.
If any of your values does not have up four digits, you have to proceed the values with 0.
- Click on OK and restart your computer. After this, you should be able to choose your custom resolution from the AMD Catalyst Control Center.
How to use multiple monitors in Windows 10
After you’ve connected your Windows 10 PC to external displays, you can adjust the settings for each one.
Video: Connecting a monitor
Here’s a video on the basics of connecting to an external monitor.

Before you start
Before changing settings for your external displays, make sure everything is connected properly. Here’s what you can do:
Make sure your cables are properly connected to your PC or dock.
Check for Windows updates. To check for updates, select Start > Settings > Updates & Security > Windows Update > Check for updates.
Tip: If you’re using a wireless display adapter, connect to an HDMI port on newer TVs, then wirelessly connect your PC to it. After connecting your wireless display adapter to your TV, go to your Windows 10 PC and select Start > Settings > System > Display, then select Connect to a wireless display.
Rearrange your displays
You’ll see this option when Windows detects more than one display. Each display will be numbered to help you identify them more easily.
Identify a display
To see which number corresponds to a display, select Start > Settings > System > Display > Rearrange your displays, then select Identify. A number appears on the screen of the display it’s assigned to.
Detect a display
If you connected another display and it isn’t showing in Settings, select Start > Settings > System > Display > Rearrange your displays, then select Detect.
Arrange your displays
If you have multiple displays, you can change how they’re arranged. This is helpful if you want your displays to match how they’re set up in your home or office. In Display settings, select and drag the display to where you want. Do this with all the displays you want to move. When you’re happy with the layout, select Apply. Test your new layout by moving your mouse pointer across the different displays to make sure it works like you expect.
Change display options
After you’re connected to your external displays, you can change settings like your resolution, screen layout, and more. To see available options, select Start > Settings > System > Display.
Change orientation
Windows will recommend an orientation for your screen. To change it in Display settings, go to Scale and Layout, then choose your preferred Display orientation. If you change the orientation of a monitor, you’ll also need to physically rotate the screen. For example, you’d rotate your external display to use it in portrait instead of landscape.
Choose a display option
To change what shows on your displays, press Windows logo key + P. Here’s what you can choose.
See things on one display only.
See the same thing on all your displays.
See your desktop across multiple screens. When you have displays extended, you can move items between the two screens.
See everything on the second display only.
Second screen only
Related topics
Simply Windows on Youtube — These videos are only available in English
How to enable a fake second display in Windows 10 as Windows 8.1? Not Virtual Desktop
I updated to Windows 10 on Jul 30 and discovered that Microsoft broke this method of adding a fake second monitor: Is there a way to fake a dual (second) monitor which I rely on for scaling some small programs to full screen with OBS. The «Detect» button in Control Panel seems to do nothing, and the «Detect» button in Settings simply says a display was not connected.
Is there any way to force Windows 10 to think there’s a display connected on VGA without extra hardware or paid software? I’m using a laptop with an NVIDIA 860M with HDMI, VGA, and DisplayPort out.
The «My display is not shown. » option in the NVIDIA Control Panel, which won’t let me add anything and only has options for televisions
SpaceDesk, which almost works except that my real display is bumped to #2, and requires a client to be connected
DemoForge Mirage/ZoneScreen, which also require a connected client and are somewhat unstable on recent versions of Windows
VirtualMonitor which I think is almost what I want, but isn’t compatible with Windows >7 and has some compatibility issues (?)
Note that I am not looking for Virtual Desktop software, and I don’t need anything as fancy as Matrox PowerDesk or Virtual Display Manager.
Replies (17)
* Please try a lower page number.
* Please enter only numbers.
* Please try a lower page number.
* Please enter only numbers.
Thank you for being part of Windows 10.
May I know how did you enabled the fake monitor using Windows 8.1?
Please reply to the question in order to assist you in a better way.
4 people found this reply helpful
Was this reply helpful?
Sorry this didn’t help.
Great! Thanks for your feedback.
How satisfied are you with this reply?
Thanks for your feedback, it helps us improve the site.
How satisfied are you with this reply?
Thanks for your feedback.
Thank you for assit
We say «fake» display but maybe is not the correct way to call this, anyway here is how to enable a virtual/fake display/monitor in Windows 8.1:
- Right click on the desktop, click ‘Screen Resolution’
- Click ‘Detect’ button on the next screen (when click on Detect, a new second monitor was shown on the right of the main display)
- Click ‘Another display not detected’ and under the multiple displays option select ‘Try to connect anyway on: VGA’
- Click ‘Apply’
With this very easy method and a program like TeamViewer you can use them to extend your desktop to other laptop/PC/WindowsTablet. in the same wireless network but now in windows 10 is imposible to do this. What many users I know and me want is to extend the desktop to other Windows 10 PC via wireless ad hoc, or innthe same LAN. It must to be an importand, basic and native funtion on the system but.
Now in Windows 10 when you make click on ‘Detect’ Button nothing happens, no other virtual display is shown, nothing. you just need to have 2 PCs, 1 with windows 8/8.1 and other with windows 10 and you will test this.
Other change, is now in Windows 10 when you go to Right click and go to Display settings, actually it goes to a «metro like» settings interface and not to the original in the control panel. Yes, I know going to ‘Appearance and personalization’ > ‘Adjust screen resolution» I can go to the «classic» Display settings as in Windows 8.1
Note 1: the funtion to create a fake display in windows 10 does not work niether going through Control Panel nor Desktop> Right Click > Resolution.
Note 2: We perfectly know we can buy a monitor but this is not the problem here. What we want is to give other use to a Windows 10 device, for example turn a surface on a temporal second display to extend my laptop desktop when needed, not to mirror/show the same, it is to extend the desktop that is a very different thing.
Add Screen Snip Context Menu In Windows 10
In this article, we will see how to add a useful Screen Snip command to the context menu of the Desktop in Windows 10. This will allow you to launch the new screen clipping experience with one click. Let’s see how it can be done.
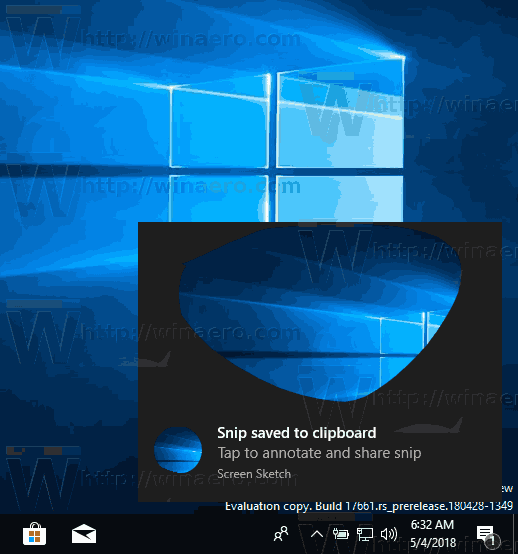
Starting with Windows 10 build 17661, currently referred to as «Redstone 5», Microsoft implemented a new option — screen snipping. A new Screen Snip feature has been added to Windows 10 to quickly snip and share a screenshot.
Using the new Screen Snip tool, you can capture a rectangle, snip a freeform area, or take a full screen capture, and copy it directly to the clipboard. Immediately after taking a snip you’ll now get a notification that will take you and your snip to the Screen Sketch app where you can annotate and share away. In the current implementation, other traditional tools available in the Snipping Tool (Delay, Window snip, and ink color, etc) are missing.
For reference, see the following article:
In our previous article, we learned that we can launch Screen Snip with a special ms-settings command:
See the article Create Screen Snip Shortcut in Windows 10 for reference. Let’s use this command to add the context menu.
In short, see the following example:
The tweak above adds the following context menu:
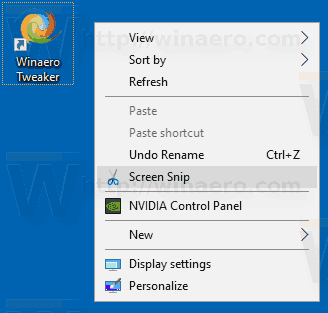
To add the Screen Snip context menu In Windows 10, do the following.
- Download the following Registry files in the zip archive: Download Registry Files.
- Extract them to any folder you like. You can place them right on the Desktop.
- Double click the «Add Screen Snip Context Menu.reg» file.
- The Screen Snip command is now available from the Desktop context menu.
The undo tweak is included for your convenience, so you can quickly remove the command when needed.
To save your time, you can use Winaero Tweaker. It comes with the following option:
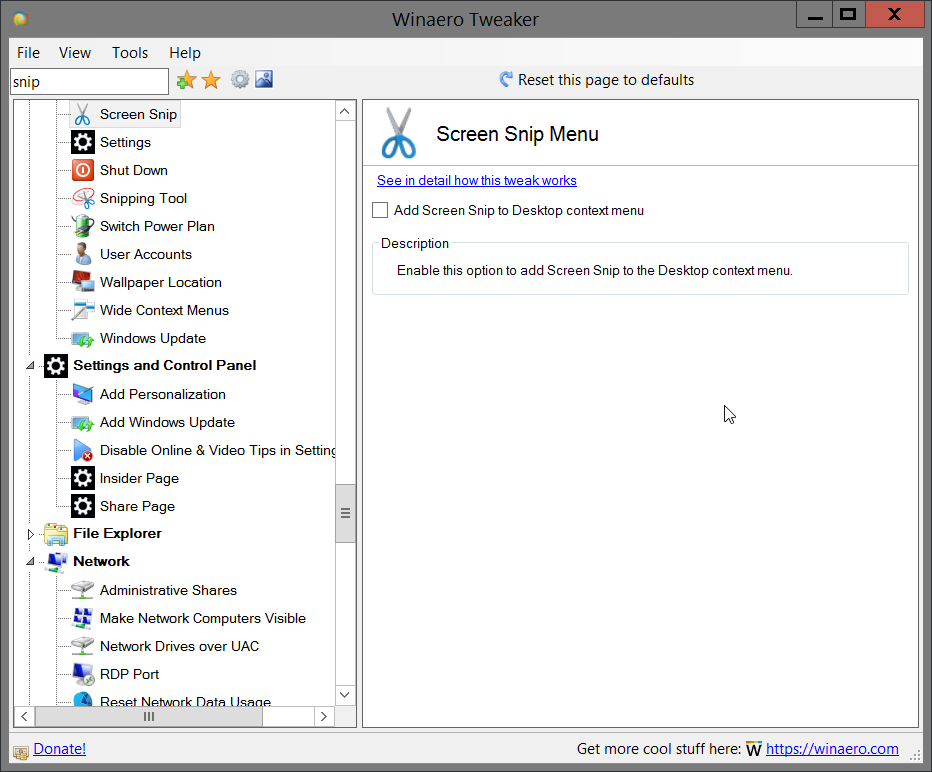
Turn on the option to add the context menu.
Winaero greatly relies on your support. You can help the site keep bringing you interesting and useful content and software by using these options:
Share this post
About Sergey Tkachenko
Sergey Tkachenko is a software developer from Russia who started Winaero back in 2011. On this blog, Sergey is writing about everything connected to Microsoft, Windows and popular software. Follow him on Telegram, Twitter, and YouTube.
2 thoughts on “ Add Screen Snip Context Menu In Windows 10 ”
For some odd reason this stopped working, I can take the screenshot, but then nothing happens 🙁
I find the same issue Phil reported: I am able to select an area, but there is no editor afterward, and the clip is not stored in clipboard.


