- Git SSH Windows — пошаговое руководство
- Генерация ключа SSH
- Добавление SSH-ключа в ssh-agent
- Добавление ключа SSH в учетную запись GitHub
- 4.3 Git на сервере — Генерация открытого SSH ключа
- Генерация открытого SSH ключа
- Generating a new SSH key and adding it to the ssh-agent
- In this article
- Generating a new SSH key
- Adding your SSH key to the ssh-agent
- Adding a new SSH key to your GitHub account
- how to add existing key to openssh on windows?
- 2 Answers 2
- Some background
- What you can do about this
Git SSH Windows — пошаговое руководство
Настроим пошагово Git SSH для Windows 10. Это позволит вам выполнять команды git без ввода пароля от своей учетной записи GitHub.
- Генерация ключа SSH.
- Добавление SSH-ключа в ssh-agent.
- Добавление ключа SSH в учетную запись GitHub.

Генерация ключа SSH
Откройте bash/терминал . Добавьте следующий текст, подставив свой адрес электронной почты GitHub .
Будет создан ключ ssh , используя e-mail в качестве метки.
Когда вам будет предложено «Введите файл, в котором вы хотите сохранить ключ», нажмите Enter . Это установит в местоположение по умолчанию.
Enter a file in which to save the key (/c/Users/you/.ssh/id_rsa):[Press enter]
Далее введите безопасную фразу-пароль дважды или просто нажмите Enter .
Enter passphrase (empty for no passphrase): [Type a passphrase]
Enter same passphrase again: [Type passphrase again]
Добавление SSH-ключа в ssh-agent
Чтобы запустить ssh-агент введите следующую команду.
На экране отобразится похожая строка.
Agent pid 31724
Добавим свой закрытый ключ SSH в ssh-agent . Если вы создали свой ключ с другим именем (или добавляете существующий ключ с другим именем), замените в команде id_rsa на имя вашего файла закрытого (приватного) ключа.
Ключ будет успешно добавлен в ssh-агент .
Добавление ключа SSH в учетную запись GitHub
Мы сгенерировали у себя на компьютере закрытый ключ SSH и добавили его в ssh-агент . Теперь нам необходимо добавить SSH ключ в учетную запись GitHub.
Сейчас нам необходимо скопировать SSH ключ в буфер обмена.
Способов есть несколько, но я же вам предлагаю следующее решения для Windows 10: введите команду ниже.
Прямо в терминале вы увидите содержимое необходимого файла с ключем. Скопируйте его в буфер.
Теперь зайдите на вашу страницу GitHub » Settings .

Перейдите во вкладку SSH and GPG keys и нажмите на кнопку New SSH key для добавления SSH ключа в вашу учетную запись GitHub.

В поле Title добавьте заголок для данного ключа. Например, если вы захотите настроить SSH доступ на нескольких устройствах, то вы будите понимать какой ключ принадлежит какому устройству.
В поле Key добавьте свой ssh-ключ, который вы скопировали в буфер обмена на предыдущем шаге.
Нажмите Add SSH key .

Для подтверждения вам потребуется ввести свой пароль от учетной записи GitHub .
На этом настройка SSH для вашего устройства завершена, теперь вы можете работать с git без ввода пароля от своей учетной записи.
Если вам понравилась данная статья, можете прочитать как настроить моментальную загрузку сайта на хостинг и синхронизацию файлов.
Надеюсь, вам понравилась данная информация. Если вам интересна тема web-разработки, то можете следить за выходом новых статей в Telegram.
4.3 Git на сервере — Генерация открытого SSH ключа
Генерация открытого SSH ключа
Как отмечалось ранее, многие Git-серверы используют аутентификацию по открытым SSH-ключам. Для того чтобы предоставить открытый ключ, каждый пользователь в системе должен его сгенерировать, если только этого уже не было сделано ранее. Этот процесс аналогичен во всех операционных системах. Сначала вам стоит убедиться, что у вас ещё нет ключа. По умолчанию пользовательские SSH ключи сохраняются в каталоге
/.ssh домашнем каталоге пользователя. Вы можете легко проверить наличие ключа перейдя в этот каталог и посмотрев его содержимое:
Ищите файл с именем id_dsa или id_rsa и соответствующий ему файл с расширением .pub . Файл с расширением .pub — это ваш открытый ключ, а второй файл — ваш приватный ключ. Если указанные файлы у вас отсутствуют (или даже нет каталога .ssh ), вы можете создать их используя программу ssh-keygen , которая входит в состав пакета SSH в системах Linux/Mac, а для Windows поставляется вместе с Git:
Сначала программа попросит указать расположение файла для сохранения ключа ( .ssh/id_rsa ), затем дважды ввести пароль для шифрования. Если вы не хотите вводить пароль каждый раз при использовании ключа, то можете оставить его пустым или использовать программу ssh-agent . Если вы решили использовать пароль для приватного ключа, то настоятельно рекомендуется использовать опцию -o , которая позволяет сохранить ключ в формате, более устойчивом ко взлому методом подбора, чем стандартный формат.
Теперь каждый пользователь должен отправить свой открытый ключ вам или тому, кто администрирует Git-сервер (подразумевается, что ваш SSH-сервер уже настроен на работу с открытыми ключами). Для этого достаточно скопировать содержимое файла с расширением .pub и отправить его по электронной почте. Открытый ключ выглядит примерно так:
Generating a new SSH key and adding it to the ssh-agent
After you’ve checked for existing SSH keys, you can generate a new SSH key to use for authentication, then add it to the ssh-agent.
In this article
If you don’t already have an SSH key, you must generate a new SSH key. If you’re unsure whether you already have an SSH key, check for existing keys.
If you don’t want to reenter your passphrase every time you use your SSH key, you can add your key to the SSH agent, which manages your SSH keys and remembers your passphrase.
Generating a new SSH key
Open Terminal Terminal Git Bash .
Paste the text below, substituting in your GitHub email address.
Note: If you are using a legacy system that doesn’t support the Ed25519 algorithm, use:
When you’re prompted to «Enter a file in which to save the key,» press Enter. This accepts the default file location.
At the prompt, type a secure passphrase. For more information, see «Working with SSH key passphrases».
Adding your SSH key to the ssh-agent
Before adding a new SSH key to the ssh-agent to manage your keys, you should have checked for existing SSH keys and generated a new SSH key. When adding your SSH key to the agent, use the default macOS ssh-add command, and not an application installed by macports, homebrew, or some other external source.
Start the ssh-agent in the background.
If you’re using macOS Sierra 10.12.2 or later, you will need to modify your
/.ssh/config file to automatically load keys into the ssh-agent and store passphrases in your keychain.
First, check to see if your
/.ssh/config file exists in the default location.
If the file doesn’t exist, create the file.
/.ssh/config file, then modify the file, replacing
/.ssh/id_ed25519 if you are not using the default location and name for your id_ed25519 key.
Note: If you chose not to add a passphrase to your key, you should omit the UseKeychain line.
Add your SSH private key to the ssh-agent and store your passphrase in the keychain. If you created your key with a different name, or if you are adding an existing key that has a different name, replace id_ed25519 in the command with the name of your private key file.
Note: The -K option is Apple’s standard version of ssh-add , which stores the passphrase in your keychain for you when you add an ssh key to the ssh-agent. If you chose not to add a passphrase to your key, run the command without the -K option.
If you don’t have Apple’s standard version installed, you may receive an error. For more information on resolving this error, see «Error: ssh-add: illegal option — K.»
If you have GitHub Desktop installed, you can use it to clone repositories and not deal with SSH keys.
Ensure the ssh-agent is running. You can use the «Auto-launching the ssh-agent» instructions in «Working with SSH key passphrases», or start it manually:
Add your SSH private key to the ssh-agent. If you created your key with a different name, or if you are adding an existing key that has a different name, replace id_ed25519 in the command with the name of your private key file.
Start the ssh-agent in the background.
Add your SSH private key to the ssh-agent. If you created your key with a different name, or if you are adding an existing key that has a different name, replace id_ed25519 in the command with the name of your private key file.
Adding a new SSH key to your GitHub account
To configure your GitHub account to use your new (or existing) SSH key, you’ll also need to add it to your GitHub account.
Before adding a new SSH key to your GitHub account, you should have:
After adding a new SSH key to your GitHub account, you can reconfigure any local repositories to use SSH. For more information, see «Switching remote URLs from HTTPS to SSH.»
Note: DSA keys (SSH-DSS) are no longer supported. Existing keys will continue to function, but you cannot add new DSA keys to your GitHub account.
Copy the SSH public key to your clipboard.
If your SSH public key file has a different name than the example code, modify the filename to match your current setup. When copying your key, don’t add any newlines or whitespace.
Tip: If pbcopy isn’t working, you can locate the hidden .ssh folder, open the file in your favorite text editor, and copy it to your clipboard.
In the upper-right corner of any page, click your profile photo, then click Settings.
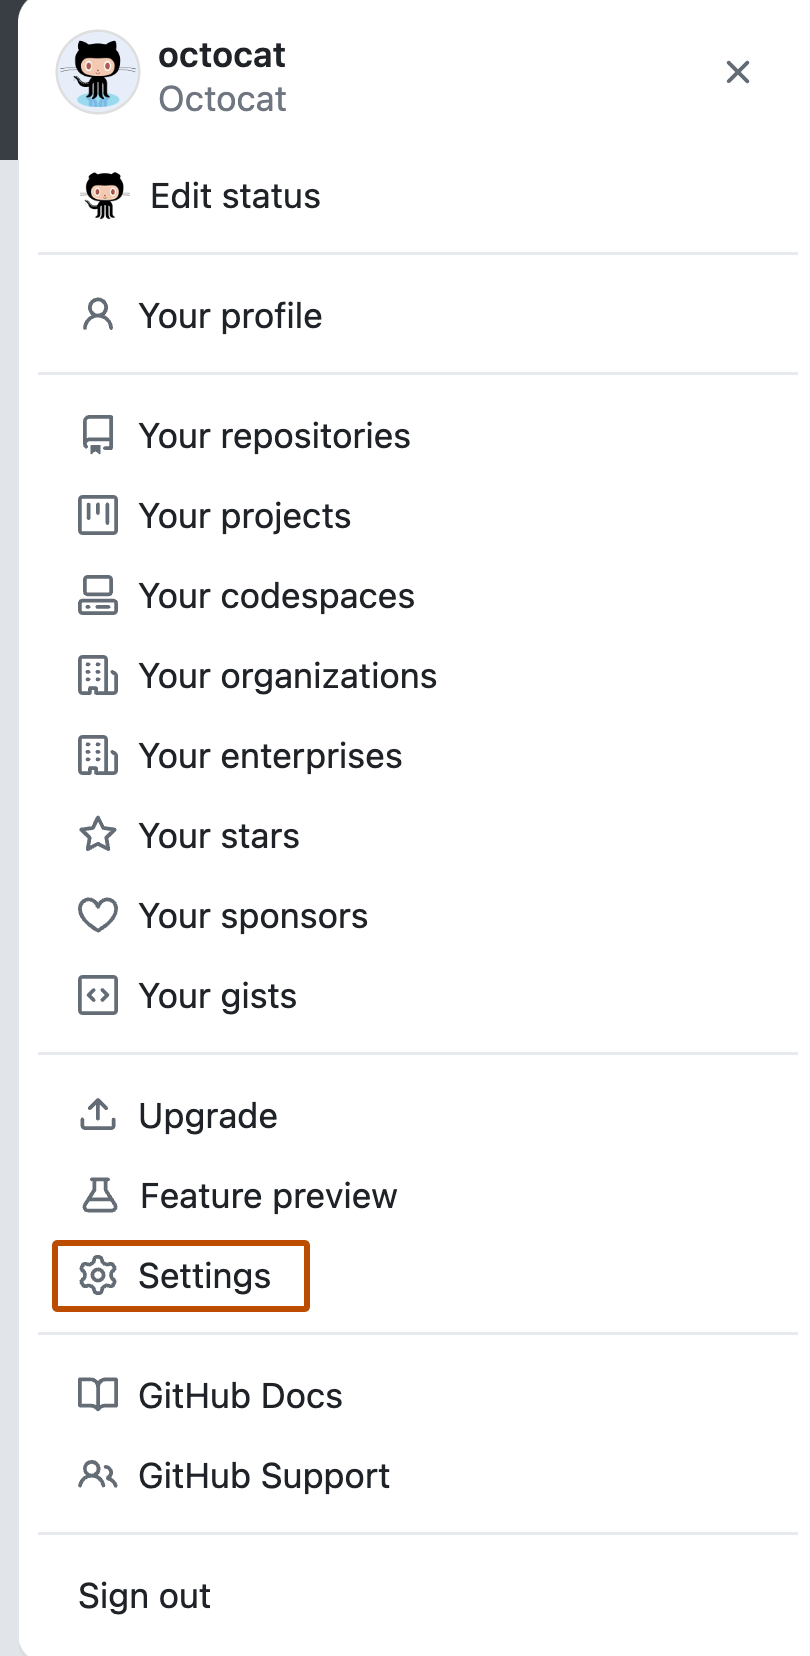
In the user settings sidebar, click SSH and GPG keys.

Click New SSH key or Add SSH key.

In the «Title» field, add a descriptive label for the new key. For example, if you’re using a personal Mac, you might call this key «Personal MacBook Air».
Paste your key into the «Key» field.

Click Add SSH key.

If prompted, confirm your GitHub password.

Copy the SSH public key to your clipboard.
If your SSH public key file has a different name than the example code, modify the filename to match your current setup. When copying your key, don’t add any newlines or whitespace.
Tip: If clip isn’t working, you can locate the hidden .ssh folder, open the file in your favorite text editor, and copy it to your clipboard.
In the upper-right corner of any page, click your profile photo, then click Settings.
In the user settings sidebar, click SSH and GPG keys.
Click New SSH key or Add SSH key.
In the «Title» field, add a descriptive label for the new key. For example, if you’re using a personal Mac, you might call this key «Personal MacBook Air».
Paste your key into the «Key» field.
Click Add SSH key.
If prompted, confirm your GitHub password.
Copy the SSH public key to your clipboard.
If your SSH public key file has a different name than the example code, modify the filename to match your current setup. When copying your key, don’t add any newlines or whitespace.
Tip: If xclip isn’t working, you can locate the hidden .ssh folder, open the file in your favorite text editor, and copy it to your clipboard.
In the upper-right corner of any page, click your profile photo, then click Settings.
In the user settings sidebar, click SSH and GPG keys.
Click New SSH key or Add SSH key.
In the «Title» field, add a descriptive label for the new key. For example, if you’re using a personal Mac, you might call this key «Personal MacBook Air».
how to add existing key to openssh on windows?
I have been using putty/plink/pageant + tortoiseGIT on many computers, and found it difficult and painful and does not work with eclipse.
So I decided to install tortoiseSVN and windowsGIT selecting the openssh version instead of the putty version.
I have an existing key installed in github, and I have the ppk file which was generated which I would had to manually load each time I wanted to use it in pagaent.
But Now I am stuck. How do I do this using openssh? What is the openSSH equivalent of pageant?
I suspect I have to convert the ppk into id_rsa.pub or simlar, but they what do I do with them to be usable on the local machine?
Do I have to install something called openSSH in the same way I installed putty? Does it have something like pageant?
Or should I give up and go back to using putty for SSH (and having to manually load keys every time)
Edit 1. Not found anything in 2h of googling this. Im going to take a wild guess that openssh is not something I need to install, but is something which came with git install. Im going to guess that because there is no mention of it, that windows uses the same scheme as unix, i.e. put the keys
/.ssh/. So I used puttygen to load my ppk, then «export openSSH key». Then i tried saving it as both
/.ssh/mykey.rsa and mykey.dsa (no idea which it should be). This did not work — tortoise git still says
The problem I guess is that there is no way to know if puttygen is exporting the public or private key — it doesnt give you the option.
I also tried saving as id_rsa and id_dsa, no luck.
2 Answers 2
Some background
OpenSSH has no equivalent of pageant. Well, almost. It has an ssh-agent.exe program (man page) and an accompanying ssh-add.exe program (man page) to add keys to the agent.
The unfortunate (for Windows) thing is that the workflow assumed by ssh-agent is like this:
You run it, it prints some information about how it can be reached (by ssh-add ) then detaches from the terminal and goes to the background.
The information it prints is presented in the form of a Unix shell code which sets some environment variables, so most of the time it’s supposed to be run like this:
While this sounds complicated, on any sensible Unix-like system, your Desktop Environment will make sure the SSH agent is spawned early at startup and the environment variables handed off by it are used and are inherited by all the programs later started by the user. So it just works™ without you even noticing.
You run ssh-add to feed keys to a running instance of ssh-agent .
This program locates the agent using the environment variables set on step one.
As you can see, this model does not need to know about graphical user environments etc so you won’t get any fancy tray icon and some sort of GUIs to feed your keys to the agent.
Since this obviously doesn’t play well with the way a user’s session is created in Windows, PuTTY implements its own approach to provide an SSH agent, its own means to locate the running agent and its own protocol to talk with it.
What you can do about this
Continue using PuTTY.
I don’t use Eclipse but I know it uses JGit to work with the repository and talk with remote servers. So if you’ll find a way to tell JGit how to use your own SSH client program to set up an SSH tunnel (like Git for Windows does with its GIT_SSH environment variable) you’ll be able to use Eclipse with PuTTY.
Forfeit the security of your SSH key and work without the need for SSH agent.


