- AcroCleaner
- Windows
- Downloads
- User interface usage
- Command line usage
- Properties
- Macintosh
- Downloads
- Usage
- Known issues
- How and when to use the Creative Cloud Cleaner tool | Advanced steps
- What is the Creative Cloud Cleaner tool?
- When should I use the Adobe Creative Cloud Cleaner tool?
- Important first steps
- macOS
- Windows
- macOS
- Windows
- How to use the Creative Cloud Cleaner tool
- Use Creative Cloud Cleaner tool for Windows
AcroCleaner
Windows
The AcroCleaner is not an uninstaller and should NOT be used as such. Adobe provides the utility as a least resort to repair machines after a failed or partial uninstall. Always uninstall DC products via standard, supported methods.
The Adobe Reader and Acrobat Cleaner Tool removes a standalone installation of Reader or Acrobat, including any leftover preferences and settings remaining after a standard program uninstall.
While most installs, uninstalls, and updates operations happen without incident, there are cases where a user may not be able to complete such tasks due to some registry or file conflict on the machine. This is particularly problematic when permissions set on plist entries or files prevent the successful installation of new installs and/or updates. The cleaner tool fixes such issues by cleaning up corrupted installations, removing or fixing corrupted files, removing or changing permissions registry entries, etc.
Note the following:
The tool provides options for removing problematic Acrobat items only while leaving Reader untouched and vice versa.
The tool cannot be used with any Creative Cloud products or Acrobat delivered with CS products. It can only be used for standalone versions of Acrobat and Reader.
In some scenarios, the cleaner tool for Windows might affect some preferences common between Acrobat and Reader. Therefore, when both Acrobat and Reader products are installed on machine, Adobe recommends the remaining installed product be repaired after running the cleaner Tool.
Downloads
By downloading the software listed below, I acknowledge that I have read and agreed to the terms of the Adobe PDF Test Toolkit License, the Adobe.com Terms of Use and the Adobe Online Privacy Policy.
The following is available for Acrobat and Reader (the Cleaner works with both apps):
64-bit products only:
Feb 9, 2021: 64-bit installer, all tracks. NOTE: Because Acrobat and Reader are delivered via a single installer for the 64-bit release, the Cleaner user interface only shows the ‘Acrobat’ string even when being used with Reader.
32-bit products only:
User interface usage
Verify you have run the product uninstaller. The Cleaner tool is NOT an uninstaller.
Double click the cleaner exe file.
Verify you want to continue, and choose Next.
Accept the EULA and choose Next.
Choose the standalone product to clean and choose Next.
If the product is not found, then Acrobat/Reader is cleaned from the default installation location at ProgramFilesFolder\Adobe\Acrobat *.* folder. The user is also given an option to select and add any other additional installation.
If more than one product is detected, choose which product to remove and whether or not to remove any files that may be shared between Adobe Reader and Acrobat.
Choose Clean Now. Cleanup begins.
When finished, restart the machine.
Command line usage
Open a command prompt.
Run the tool with the command line parameters as shown below.
When finished, restart the machine.
Properties
ProductId: Identifies the product:
0 = Acrobat (Default)
InstallPath: Specifies the product installation path. Default = the product’s default location; e.g. C:Program Files (x86)AdobeReader (version). You must use this parameter when using ScanForOthers = 0.
CleanLevel: Specifies the level of cleanup; i.e. shared components should be cleaned or not:
0 (Default) = clean only components for the selected product.
1 = clean components for the selected product as well as shared components.
ScanForOthers: Specifies whether to search for and delete only the installation directory identified by InstallPath or all directories on the machine:
0 = Search for and delete only directories found on the path specified by the InstallPath parameter.
1 (Default) = Search for and delete installation directories system wide. This search includes non-default paths as well as default paths such as C:Program FilesAdobeAcrobat 10.0.
/?: Invokes the tool’s Help; for example: AdbeArCleaner.exe /?
Macintosh
Downloads
Usage
Verify you have run the product uninstaller. The Cleaner tool is NOT an uninstaller.
Double click to mount the AdobeAcroCleanerTool.dmg
Double click the file: AcroCleanerTool.app
Verify you want to continue, and choose Next.
Accept the EULA and choose Next.
Choose the product to remove and click Next.
Applications found installed are listed separately for both Acrobat and Reader. By default, all the listed applications will be selected for clean-up. Following buttons below the lists can be used to customize the list.
Remove button: Select the application you don’t want to uninstall and click ‘Remove’ button below that particular list.
Refresh button: You can repopulate the full list again using ‘Refresh’ button below that particular list.
Click the Clean button to remove the listed applications.
Press OK to confirm.
Provide an admin password in the admin prompt dialog. Cleanup processing begins.
When complete, press OK.
Press Quit to quit the app or choose View Log.
Known issues
If you have both Acrobat and Reader installed, removing the product that is the default PDF viewer can result in the other product failing to become the new default PDF viewer. When this problem occurs, run Repair on the remaining product and reboot the machine to make the remaining product the default PDF handler.
For Acrobat Pro Extended 9.x, the tool leaves the Acrobat entry in Add Remove Programs. To manually remove this entry, run an uninstallation from the ARP entry or manually remove the following registry entries:
Windows 32 Bit OS: HKLMSOFTWAREMicrosoftWindowsCurrentVersionUninstall
Windows 64 Bit OS: HKLMSOFTWAREWow6432NodeMicrosoftWindowsCurrentVersionUninstall
The product code is language specific. For example, for EFG it would be
The Cleaner Tool removes the Reader 9.x or Acrobat 9.x installation even if the user chooses Cancel at the Files in Use dialog during uninstallation. The File in Use dialog appears when you try to uninstall a currently running product.
Does running the tool write to a log?
During execution, a log file is created at:
Windows 7 and later: C:Users[USERNAME]AppDataLocalTempRaftLogsAdbeArCleaner.log
Windows XP: C:Documents and Settings[USERNAME]Local SettingsTempRaftLogsAdbeArCleaner.log
If the cleaner tool executes the MSI uninstaller as part of the cleanup process, then an additional log file named Msi[RANDOM_NUMBER].tmp.log is created in the above location.
What are the system requirements?
Windows: The tool can be used on any system that is supported by product versions 9.x and 10.x.
Mac: The tool can be used from OS X 10.9 and onward.
How do I uninstall the tool?
To uninstall the tool, just delete it.
How do I provide feedback?
To submit feedback or ask a question, use the Enterprise Forum.
© Copyright 2021, Adobe Inc.. Last update: Aug 24, 2021.
Источник
How and when to use the Creative Cloud Cleaner tool | Advanced steps
The Adobe Creative Cloud Cleaner tool is intended for advanced computer users and can fix many common problems (such as removing old Adobe software, cleaning corrupt installation files, and fixing your host files to establish a connection with Adobe servers).
What is the Creative Cloud Cleaner tool?
The Creative Cloud Cleaner tool is a utility for experienced users to clean up corrupted installations. It removes or fixes problem files and resolves permission issues in registry keys.
When should I use the Adobe Creative Cloud Cleaner tool?
Use the Creative Cloud Cleaner tool with the necessary precautions (such as taking backups of relevant folders) in the case of these issues.
- You have already tried repairing or uninstalling the Creative Cloud desktop app, but still can’t update or install your Creative Cloud app.
- You want to remove older Adobe software completely.
- Your Creative Cloud app fails to launch even though you have already tried uninstalling and reinstalling the app.
- You cannot sign in to Adobe apps even after multiple attempts even after trying these common solutions.
- You cannot connect to Adobe servers and have limited access to Adobe apps and services even after trying these common solutions.
Important first steps
Make sure to follow these steps before you run the Creative Cloud Cleaner tool to avoid potential data loss. Always ensure that you have taken the necessary backups for your files and folders.
Run the log collector tool to take a back-up of your log files.
Why run the log collector tool?
The logs make it easier for Adobe Customer Care to help you in case your run into an error with the Creative Cloud Cleaner tool and decide to contact us.
Check the sync status of your Creative Cloud files in the Creative Cloud desktop app. Wait for all your files to sync completely.
Files that are not synced to your Creative Cloud account could be potentially lost.
Close Adobe Desktop Service and Core Sync in Task manager (Windows) or Activity Monitor (macOS).
Save a copy of the following:
macOS
Windows
Don’t have enough space? If you have run out of space, find the cloudnative folder in the following path and save its copy.
macOS
Windows
Quit any open Adobe apps, including the Creative Cloud desktop app itself.
Close the remaining Adobe background processes in Task Manager (Windows) or Activity Monitor (macOS).
- Creative Cloud
- CCXProcess
- CCLibrary
- CoreSync helper
- Adobe IPC Broker
- armsvc
- AGS Service
Save a copy of all content stored in Adobe product folders, including third-party plug-ins and preference files.
For example, is there a third-party plug-in you have been using for Adobe XD, or a Photoshop workspace you have saved? Keep a copy of the folders where you have them. For details on how to migrate presets, actions, and settings in Photoshop, see Migrate presets, actions, and settings.
If removing older Adobe apps, save a copy of your old installer files.
Adobe only provides downloads to install the two most recent versions of your Creative Cloud apps. If you need continued access to older versions, don’t remove them without first ensuring you have a means to reinstall such as discs or previously saved installers (downloads for older versions are no longer provided by Adobe).
Ensure you’ve completed all the necessary precautions by making recommended backups before you run the tool.
How to use the Creative Cloud Cleaner tool
Choose your operating system to access specific instructions.
Use Creative Cloud Cleaner tool for Windows
Download the Adobe Creative Cloud Cleaner tool.
If prompted, click Save File to download the file on your device.
Right-click the downloaded file and choose Run as Administrator.

Note:
If Run as Administrator is not available when you right-click, double-click AdobeCreativeCloudCleanerTool.exe to run the file.
Follow the onscreen instructions in this order:
a) Choose your language: Type e for English or j for Japanese, and then press Enter .
b) Review the Adobe End-User License Agreement: Type y to accept or n to decline (if you decline, the script stops). Press Enter .
c) Type the number that corresponds to the option you want to select, and then press Enter . For example, type 4 (CC Apps) if you want to uninstall a Creative Cloud app.
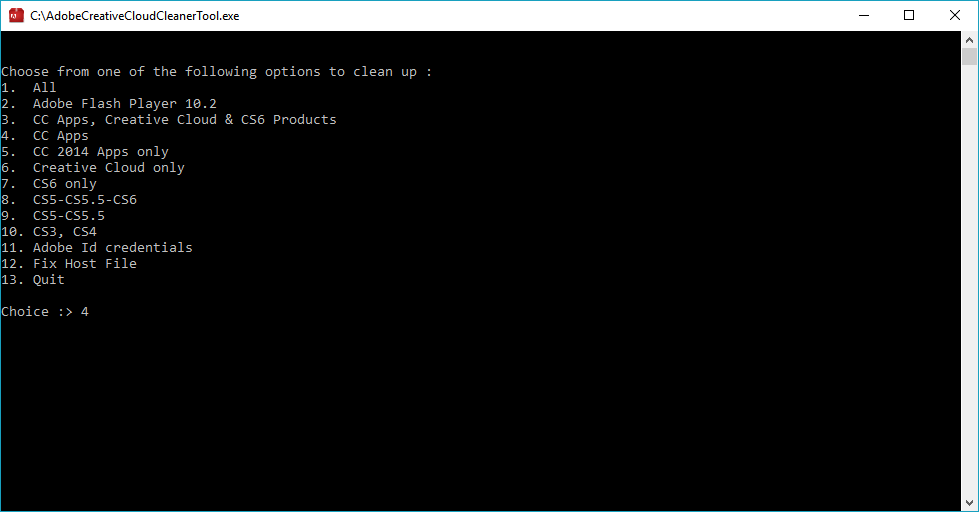
d) Subsequently, to remove an app, select the app that you want to remove by typing the number that corresponds to the app name, and then press Enter .
If you are facing issues with file syncing, you might have to remove CoreSync . To do this, type 1 or 4 and press Enter . Then type the number that corresponds to CoreSync and press Enter .
e) Confirm that you want to remove the entry: Type y and then press Enter .
f) (Optional) If you’re unable to connect to Adobe’s servers, repeat these steps to fix your host file. After accepting the End-User License Agreement, type 12 to select the host file option. Confirm that you want to fix the host file: Type y and then press Enter . The Cleaner tool creates a backup of the host file (named hosts_bkup) in the same directory, which you can revert to if a problem occurs.
When you see the message «Adobe Creative Cloud Cleaner tool completed successfully,» press Enter and restart your computer.
Once you have successfully run the Adobe Creative Cloud Cleaner tool, install your Creative Cloud or Creative Suite application.
Источник
How and when to use the Creative Cloud Cleaner tool | Advanced steps
The Adobe Creative Cloud Cleaner tool is intended for advanced computer users and can fix many common problems (such as removing old Adobe software, cleaning corrupt installation files, and fixing your host files to establish a connection with Adobe servers).
What is the Creative Cloud Cleaner tool?
The Creative Cloud Cleaner tool is a utility for experienced users to clean up corrupted installations. It removes or fixes problem files and resolves permission issues in registry keys.
When should I use the Adobe Creative Cloud Cleaner tool?
Use the Creative Cloud Cleaner tool with the necessary precautions (such as taking backups of relevant folders) in the case of these issues.
- You have already tried repairing or uninstalling the Creative Cloud desktop app, but still can’t update or install your Creative Cloud app.
- You want to remove older Adobe software completely.
- Your Creative Cloud app fails to launch even though you have already tried uninstalling and reinstalling the app.
- You cannot sign in to Adobe apps even after multiple attempts even after trying these common solutions.
- You cannot connect to Adobe servers and have limited access to Adobe apps and services even after trying these common solutions.
Important first steps
Make sure to follow these steps before you run the Creative Cloud Cleaner tool to avoid potential data loss. Always ensure that you have taken the necessary backups for your files and folders.
Run the log collector tool to take a back-up of your log files.
Why run the log collector tool?
The logs make it easier for Adobe Customer Care to help you in case your run into an error with the Creative Cloud Cleaner tool and decide to contact us.
Check the sync status of your Creative Cloud files in the Creative Cloud desktop app. Wait for all your files to sync completely.
Files that are not synced to your Creative Cloud account could be potentially lost.
Close Adobe Desktop Service and Core Sync in Task manager (Windows) or Activity Monitor (macOS).
Save a copy of the following:
macOS
Windows
Don’t have enough space? If you have run out of space, find the cloudnative folder in the following path and save its copy.
macOS
Windows
Quit any open Adobe apps, including the Creative Cloud desktop app itself.
Close the remaining Adobe background processes in Task Manager (Windows) or Activity Monitor (macOS).
- Creative Cloud
- CCXProcess
- CCLibrary
- CoreSync helper
- Adobe IPC Broker
- armsvc
- AGS Service
Save a copy of all content stored in Adobe product folders, including third-party plug-ins and preference files.
For example, is there a third-party plug-in you have been using for Adobe XD, or a Photoshop workspace you have saved? Keep a copy of the folders where you have them. For details on how to migrate presets, actions, and settings in Photoshop, see Migrate presets, actions, and settings.
If removing older Adobe apps, save a copy of your old installer files.
Adobe only provides downloads to install the two most recent versions of your Creative Cloud apps. If you need continued access to older versions, don’t remove them without first ensuring you have a means to reinstall such as discs or previously saved installers (downloads for older versions are no longer provided by Adobe).
Ensure you’ve completed all the necessary precautions by making recommended backups before you run the tool.
How to use the Creative Cloud Cleaner tool
Choose your operating system to access specific instructions.
Use Creative Cloud Cleaner tool for Windows
Download the Adobe Creative Cloud Cleaner tool.
If prompted, click Save File to download the file on your device.
Right-click the downloaded file and choose Run as Administrator.
Note:
If Run as Administrator is not available when you right-click, double-click AdobeCreativeCloudCleanerTool.exe to run the file.
Follow the onscreen instructions in this order:
a) Choose your language: Type e for English or j for Japanese, and then press Enter .
b) Review the Adobe End-User License Agreement: Type y to accept or n to decline (if you decline, the script stops). Press Enter .
c) Type the number that corresponds to the option you want to select, and then press Enter . For example, type 4 (CC Apps) if you want to uninstall a Creative Cloud app.
d) Subsequently, to remove an app, select the app that you want to remove by typing the number that corresponds to the app name, and then press Enter .
If you are facing issues with file syncing, you might have to remove CoreSync . To do this, type 1 or 4 and press Enter . Then type the number that corresponds to CoreSync and press Enter .
e) Confirm that you want to remove the entry: Type y and then press Enter .
f) (Optional) If you’re unable to connect to Adobe’s servers, repeat these steps to fix your host file. After accepting the End-User License Agreement, type 12 to select the host file option. Confirm that you want to fix the host file: Type y and then press Enter . The Cleaner tool creates a backup of the host file (named hosts_bkup) in the same directory, which you can revert to if a problem occurs.
When you see the message «Adobe Creative Cloud Cleaner tool completed successfully,» press Enter and restart your computer.
Once you have successfully run the Adobe Creative Cloud Cleaner tool, install your Creative Cloud or Creative Suite application.
Источник


