- Инструкция по настройке виртуального принтера на печать в ПДФ файл
- Что это такое?
- Обзор и настройка популярных виртуальных принтеров
- PDF24 Creator
- DoPDF
- Adobe PDF
- Как пользоваться?
- Adobe PDF printer is missing | Manually install PDF printer
- Problem: Adobe PDF printer is missing
- Solution: Repair Acrobat installation or add the printer manually
- Solution 1: Repair Acrobat installation
- Solution 2: Manually install the PDF Printer
- Support Knowledgebase
- Install the AdobePS printer driver to create PostScript and printer files in Windows applications
- How to Install an Adobe Printer Driver
- Related
- How to Install Your Adobe Print to PDF Driver on Windows
- Printing a PDF With the Adobe PDF Printer Driver on Windows
- Troubleshooting Your Adobe PDF Printer Driver on Windows
- How to Print to a PDF on a Windows Without the Adobe Driver
- How to Print to a PDF on a Mac OSX Without the Adobe Driver
- Installing PDFs With Adobe Products Other Than Acrobat
Инструкция по настройке виртуального принтера на печать в ПДФ файл

В этой статье Вы найдете несколько ссылок, по которым можно бесплатно скачать бесплатно виртуальный принтер PDF на русском языке, инструкцию по самостоятельной установке и настройке. Отдельно рассмотрена настройка продукта от известной фирмы Adobe. Вы узнаете, что вообще собой представляет этот софт и сможете сравнить возможности аналогичных продуктов от разных компаний.
Что это такое?
Виртуальный принтер — это обычная компьютерная программа создана на одном из языков программирования, как все другие. Суть ее работы заключается в обработке полученного потока информации и создании на его основе pdf файла. По сути, это является только имитацией работы обычного печатающего устройства, но на самом деле ни физической, ни логической связи с реальным аппаратом нет.
А также он может обладать такими характеристиками:
- Конвертация в форматы Djvu и PostScript.
- Создание одного файла на основе нескольких разных документов.
- Преобразование в графические форматы jpeg, tiff и другие.
- Отправка результата «печати» по факсу в онлайн-режиме.
- Возможностю произведения печати через Интернет.
Обзор и настройка популярных виртуальных принтеров
PDF24 Creator
- Практически из любой программы, где есть возможность печати, может создавать пдф документы.
- Поддерживает разъединение и сцепление файлов.
- Возможность сохранения выбранных страниц.
- Работа с несколькими PDF документами одновременно.
- Защита файлов от внешнего доступа злоумышленников.
- Добавление метаданных к документу.
- Удаление, вырезание, смена листов в файле.
- Добавление водяных знаков.

А также разработчики этого виртуального принтера предоставляют:
- Бесплатное пользование и новые версии.
- Простой и понятный интерфейс.
- Поддержка русского и других популярных языков.
DoPDF
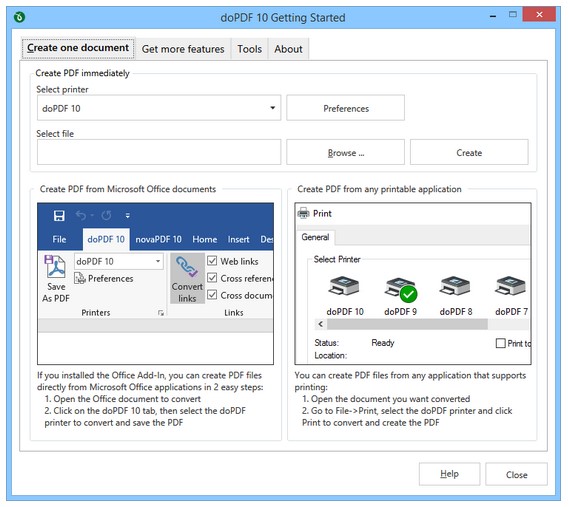
- Бесплатное программное обеспечение.
- Работает на 32 и 64 — битных системах.
- Не требует установки дополнительных скриптов и библиотек.
- Настройка разрешения.
- Поддерживает разные форматы и размеры страниц.
- Возможность текстового поиска в сканированном документе.
- Русскоязычный интерфейс намного упрощает использование утилиты.
- Минимальные требования к компьютерным комплектующим.
- Поддержка всех популярных размеров и форматов.
- Автоматические обновления.
- Использование в офисных программах в одно касание.
- Наличие графической шкалы позволяет увеличивать масштаб в 4 раза.
- Настройка папки для сохранения делает работу еще удобней.
- Возможность вставки набора шрифтов.
Adobe PDF
Если на Вашем компьютере или ноутбуке уже установлен продукт Adobe Acrobat, то высока вероятность, что встроенный PDF принтер готов к использованию. Проверить это можно поискав его в соответственном разделе панели управления. Если он там отсутствует, то произвести его установку можно не скачивая больше никаких файлов.
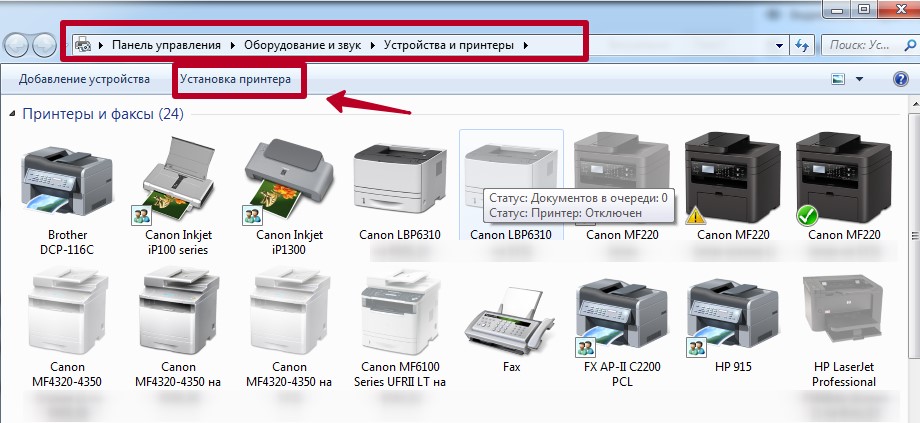
В разделе, как выделено на рисунке выше, нажмите кнопку «Установка». Дальше действуйте по такой инструкции:
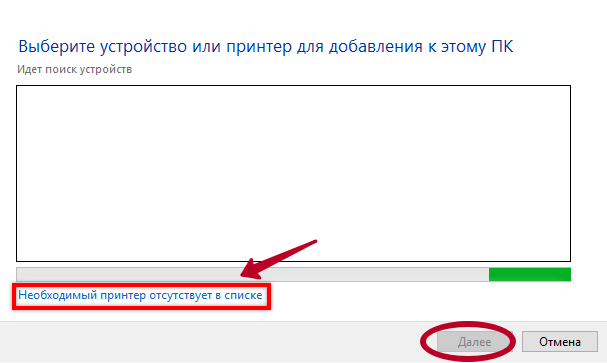
- Выберите ярлык «Необходимый отсутствует в списке».

- Нажмите на вариант с установкой сетевого устройства.
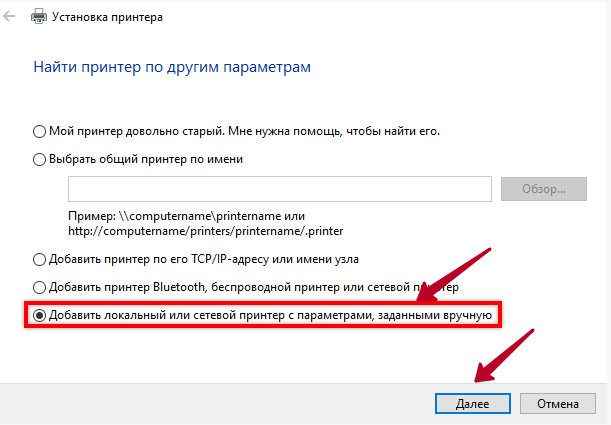
В списке представлены драйвера для разных версий операционных систем. Одна беда — производитель не указал, какой файл для какой версии предназначен, потому придется угадывать. Если такой вариант танцев с бубном не подходит, то установите «Pro» версию Adobe Acrobat DC, в которой принтер пдф инсталлируется по умолчанию. Ссылка на скачивание бесплатной версии на сайте «Адобе».
Как пользоваться?
После скачивания файла его нужно сохранить на одном из дисков, а потом запустить. Желательно это сделать «от имени администратора», чтобы система безопасности не заблокировала установку. Далее выберите язык интерфейса и следуйте указаниям мастера инсталляции. Изменять папку, в которую будут скопированы файлы программы нет причин без явной на то необходимости.
После удачного завершения процесса в разделе с принтерами панели управления Вы сможете увидеть новый принтер. 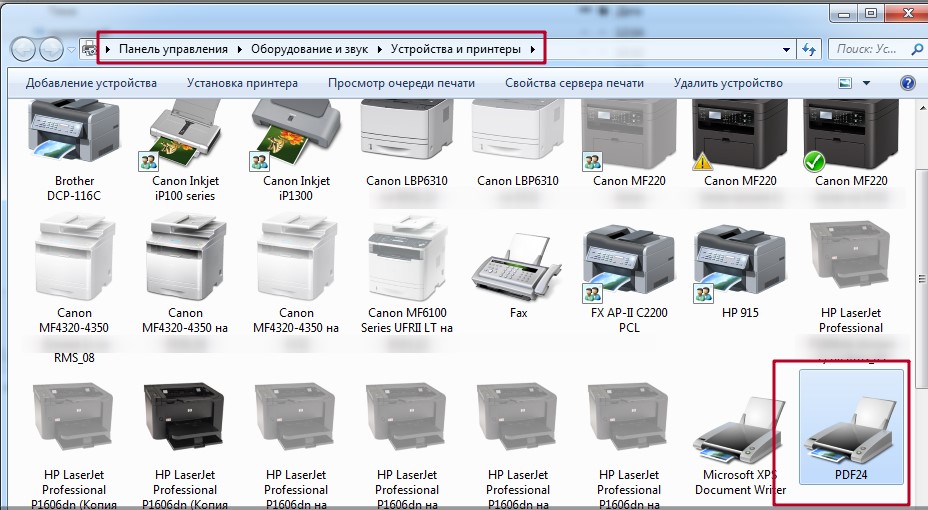 Если в дальнейшем планируете постоянно производить печать в пдф формате, то смело можете устанавливать єтот принтер главным по умолчанию. Для этого выделите его сначала левой клавишей мыши, а потом правой вызовите контекстное меню. В нем выберите строку «Использовать по умолчанию».
 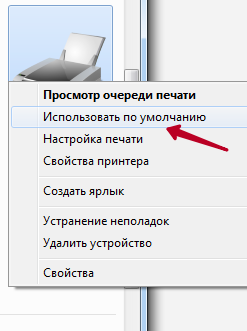 Теперь после нажатия на печать в любой редакторе текста все содержимое будет передаваться виртуальному принтеру для создания PDF документа.
Adobe PDF printer is missing | Manually install PDF printer

某些 Creative Cloud 应用程序、服务和功能在中国不可用。
Problem: Adobe PDF printer is missing
Sometimes Adobe PDF printer doesn’t get installed with Acrobat Standard DC installation.
Solution: Repair Acrobat installation or add the printer manually
To resolve the problem, try the following solutions in the order they appear below.
Solution 1: Repair Acrobat installation
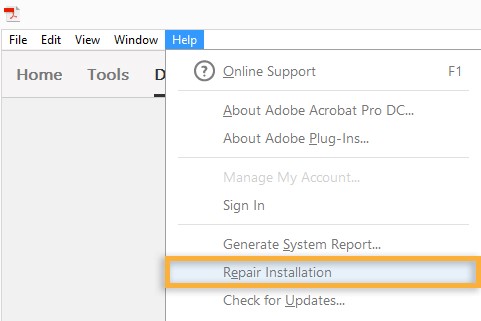
Acrobat DC—or the resources it depends upon—could be damaged. Try repairing the product using the step below.
Run repair from within Acrobat Acrobat DC: Choose Help > Repair Installation.
Solution 2: Manually install the PDF Printer
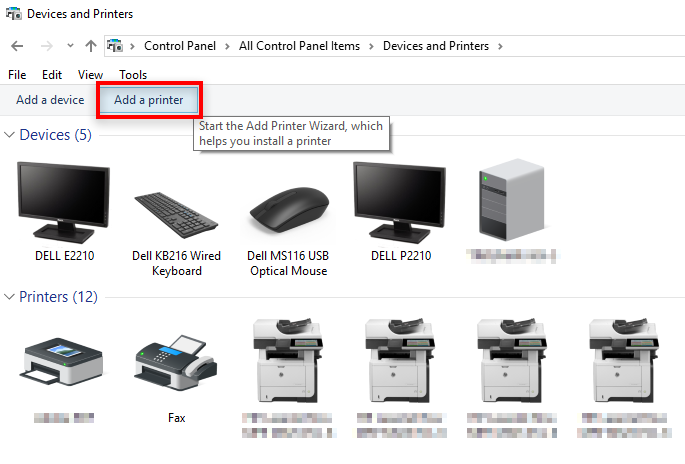
Click Start > Control Panel > Devices and Printers.
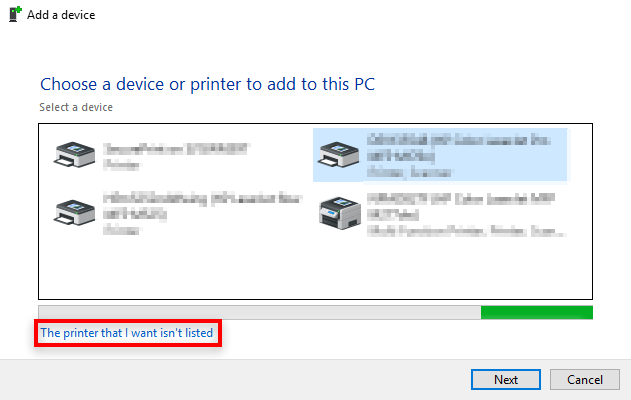
Select Add a printer.
In the Add a Device dialog box, select Add a local printer. If the option is not visible, click The printer that I want isn’t listed .
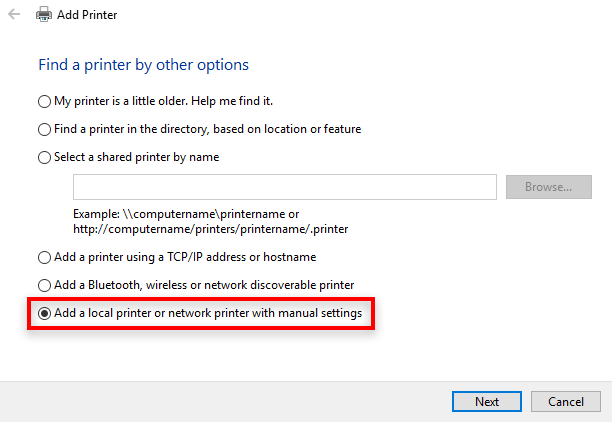
In the Add Printer dialog box, select Add a Local Printer or Network printer with Manual Settings.
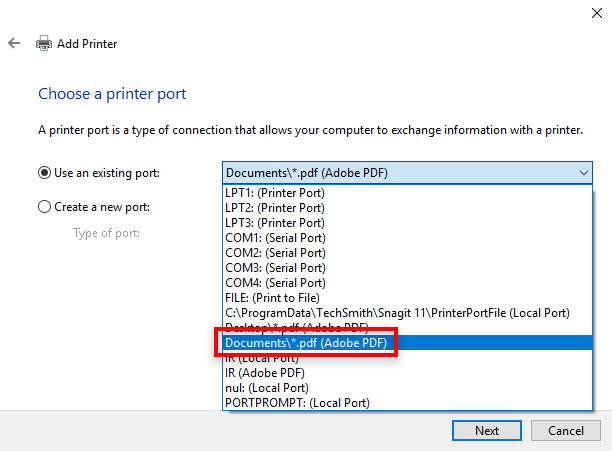
Select Use an existing port option and select Documents\*.pdf (Adobe PDF) from the drop-down list. Click Next.
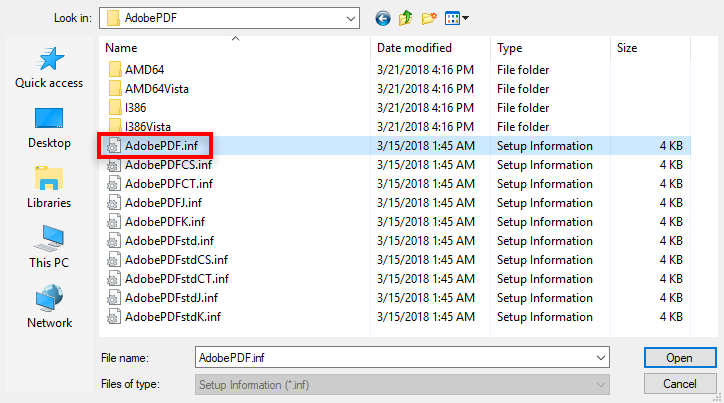
Click Have Disk. Click Browse and then navigate to the location — C:\Program Files (x86)\Adobe\Acrobat \Acrobat\Xtras\AdobePDF
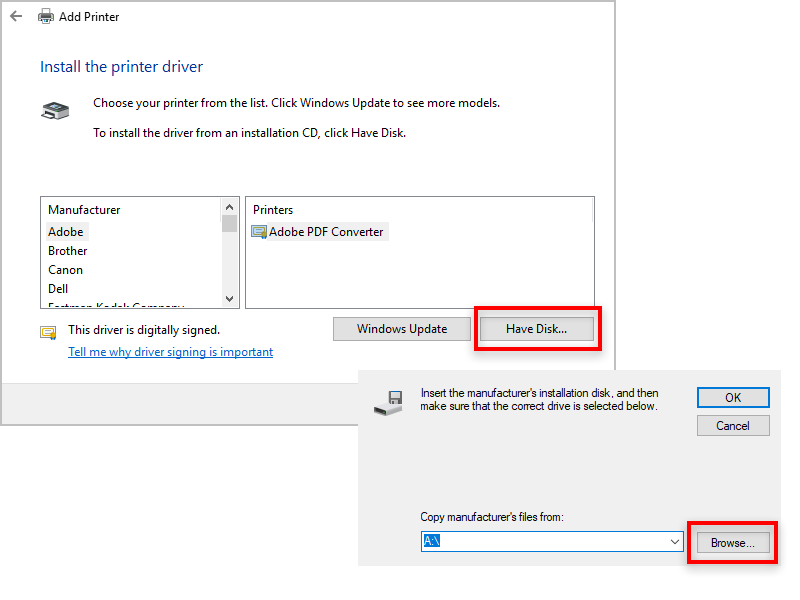
Select AdobePDF.inf from the list. Click Open and then click OK.
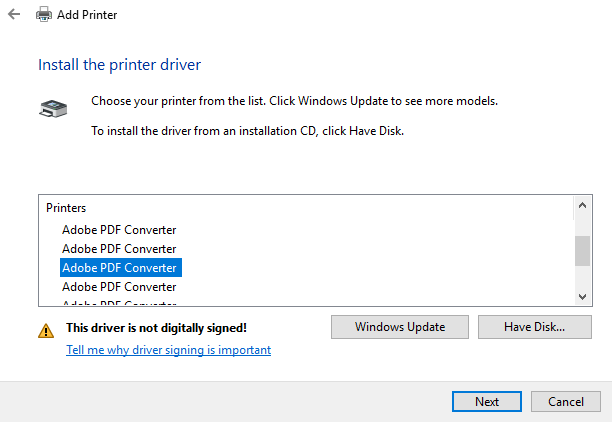
You see many Adobe PDF Converters on the list. Count six down from the top and select the printer. Click Next (you may have to try this multiple times to find the correct Converter from the list that works with your version of Windows).
Name your printer as Adobe PDF. Follow onscreen instructions to complete the installation.
Support Knowledgebase
Install the AdobePS printer driver to create PostScript and printer files in Windows applications
Create a PostScript or printer file
The Adobe PostScript printer driver (AdobePS) lets you to create PostScript files (PS), or printer files (PRN) from any Windows application that prints. (No printer required.) You can then open these files in Adobe Acrobat Distiller 5.0 or later to convert them to PDF files. AdobePS is available from the Adobe website at www.adobe.com/support/downloads/#Printer : Download Adobe Universal PostScript Windows Driver Installer 1.0.6 — [language].
Note: Installing the AdobePS printer driver on 64-bit systems (such as Windows XP x64) is not supported.
When you install AdobePS, specify the Acrobat Distiller PostScript Printer Description (PPD) file. This PPD file adds advanced options to AdobePS, such as color and custom page sizes. (Selecting another PPD file may result in PDF files that contain incorrect color, font, or page size information.) The Acrobat Distiller PPD is installed with Adobe Acrobat, and is available from the Adobe website.
To download the Acrobat Distiller 5.0 PPD file (Adist5.ppd):
2. In the PostScript Printer Drivers area, click Windows.
3. Scroll to the PPD Files area, and then click PPD Files: Adobe.
4. Click Download, and then click Download again to save the Adobe.zip file to your hard disk.
5. Use WinZip or another utility to decompress the Adobe.zip file.
The following procedure requires the Acrobat Distiller PPD file.
1. Double-click the Adobe Universal PostScript Windows Driver Installer (winsteng.exe), and then click Next.
2. Click Accept to accept the End User License Agreement.
3. If the Printer Installation Type dialog box appears, select Install A New PostScript Printer, and then click Next.
4. In the Printer Connection Type dialog box, select the Local Printer option, and then click Next.
5. In the Local Port Selection dialog box, choose one of the following, and then click Next:
— File: Local Port
— File: Creates A File On Disk
6. In the Select Printer Model dialog box, click Browse.
7. Select the Acrobat Distiller PPD file that you downloaded (Adist5.ppd) or select the PPD file that Acrobat installed to the following location, and then click OK:
Note: The following PPD files may appear under different names in the AdobePS installer wizard until selected (for example, «Acrobat Distiller» for Adist5.ppd, or «Adobe PDF 7.0» for Adpdf7.ppd.)
— Acrobat 7.0.x: Program Files\Adobe\Acrobat 7.0\Distillr\Xtras\Adpdf7.ppd
— Acrobat 6.0.x: Program Files\Adobe\Acrobat 6.0\Distillr\Xtras\Adpdf6.ppd
— Acrobat 5.x: Program Files\Adobe\Acrobat 5.0\Distillr\Xtras\Adist5.ppd
9. Select Not Shared, and then click Next.
10. Name the AdobePS printer, select No to printing a test page, select your preference for a default printer, and then click Next.
11. Click Install.
12. In the Printer Configuration dialog box, select No, and then click Next.
13. Click Finish, and then restart the computer if prompted. (A new printer icon appears in the list of printers.)
Create a PostScript or printer file
After you install AdobePS, you can create a PS or PRN file.
1. Choose File > Print.
2. Choose the AdobePS printer from the list of printers.
3. Select Print To File, and then click Print or OK.
How to Install an Adobe Printer Driver
Related
Adobe offers a powerful suite of programs that are helpful to your small business. One of those programs, Adobe Acrobat, provides something called the Adobe PDF Postscript printer driver. This Adobe PDF printer driver is used to create PDF documents using the Adobe Acrobat service. In case you have problems with the installation process, here is how to install Adobe’s Print to PDF driver so you can create PDF documents for your business.
How to Install Your Adobe Print to PDF Driver on Windows
First, if you do not have any version of Adobe Acrobat Standard or Acrobat Pro installed, you will want to install that program. The Adobe PDF printer driver is usually installed properly as part of the normal installation process of Adobe Acrobat. If for some reason the Adobe PDF printer driver isn’t installed as part of the standard installation process, you can follow these steps to install it manually:
- Click the Start menu, and go to Control Panel.
From the Add Printer window, choose Add a Local Printer or Network printer with Manual Settings.
You must now choose a printer port, which is shorthand for a connection that exchanges information from your computer directly to a printer. From the drop down menu under the option to Use and existing port, choose Documents*.pdf (Adobe PDF).
Click Next. Now, you need to find the pdf printer driver inside the Adobe Acrobat folder by selecting the option titled Have Disk, then select the driver from the location on your computer. It will be found at the following directory: C:\Program Files (x86)\Adobe\Acrobat \Acrobat\Xtras\AdobePDF.
Printing a PDF With the Adobe PDF Printer Driver on Windows
As a quick recap now that your PDF printer driver is installed, anytime you want to print a PDF, go to File, and select Print. From the Print Window, select the option for Adobe PDF as your printer of choice, and click Print. You will be asked to name the new PDF file and choose the location you want to save it. Once you click Save, your PDF will be ready for you to access.
Troubleshooting Your Adobe PDF Printer Driver on Windows
If for some reason your Adobe PDF PostScript printer driver is not appearing under the Available Printers section of your Control Panel on Windows, try going to the Help window in Acrobat, and select the Repair Installation option. If you see your Adobe PDF printer show up, but still fails to function correctly, you will need to delete the printer, reboot your computer, and try Repair Installation option again.
How to Print to a PDF on a Windows Without the Adobe Driver
As of Windows 10, it is possible to print to a PDF without Adobe or another third-party printer driver. To print using the onboard Windows 10 tools, go to File, then Print and select the option called Microsoft Print to PDF as your printer. Name and save the file at the location you want accordingly, and choose OK.
If this option isn’t available to you, you can install this PDF printer driver manually as well. Repeat the steps above as if you were installing an Adobe printer driver, but this time:
- Select FILE: (Print to File) instead of Documents*.pdf (Adobe PDF).
- From there, click Next. You will be prompted to select a manufacturer, so choose Microsoft, then select Microsoft Print to PDF and hit Next once more.
How to Print to a PDF on a Mac OSX Without the Adobe Driver
The Adobe PDF printer driver from Acrobat is not actually available to Mac users. Instead, you can still print to PDF by using the Save As Adobe PDF option.
Simply open a file on any Mac OS application, like Pages, and select the option to Print from the File drop down menu. On the Print window, click PDF, and select the Save as Adobe PDF option. Choose your PDF Settings, name your file along with any other accompanying details, and click Save. Your new PDF should now be ready for you.
As a quick note, according to Adobe, there is a glitch in the latest MacOS Mojave (v.10.14) that creates an error when you try to print a PDF with the Save as Adobe PDF option. To fix it, you will need to launch the Automator program, and select the Third Party Automator Actions option. This will bring up a window where you will be asked to check a box to Enable Automator actions from third parties. By checking that box, the error message should be resolved, and you should be able to print your documents to Adobe PDF.
Installing PDFs With Adobe Products Other Than Acrobat
You might have difficulty creating a PDF if you try to do so using the free Adobe Reader, which does not support the ability to create PDF documents. There is, however, one other way to install a print to PDF driver from another Adobe product other than Acrobat. That is by installing Adobe FrameMaker, which also installs the Adobe PDF PostScript printer driver.


