- Litgu.ru — Литературный Гуру
- Advanced Raspberry Pi: Raspbian Linux and GPIO Integration
- Advanced Raspberry Pi. Raspbian Linux and GPIO Integration
- Использование GPIO из Python на Raspberry Pi
- Advanced raspberry pi raspbian linux and gpio integration pdf
- What you’ll learn
- What you’ll need
- 2. Installing GPIO
- 3. Basic GPIO example
- 4. I2C example
- 5. PWM example
- 6. That’s all!
- RPi GPIO Code Samples
- Contents
- Direct register access
- WiringPi
- sysfs
- bcm2835 library
- pigpio
- lgpio (local /dev/gpiochip I/F)
- rgpio (local & remote /dev/gpiochip I/F)
- Python
- RPi.GPIO
- pigpio
- WiringPi2-Python
- Scratch
- Scratch using the ScratchGPIO
- Pridopia Scratch Rs-Pi-GPIO driver
- RpiScratchIO
- RpiScratchIO — Installation
- RpiScratchIO — Documentation and examples
- Java using the Pi4J Library
- Java Webapp GPIO web control via HTTP
- Shell
- sysfs, part of the raspbian operating system
- wiringPi — gpio utility
- pigpio — pigs utility
- pigpio — /dev/pigpio interface
- libgpiod — C library and tools for interacting with the linux GPIO character device
- Lazarus / Free Pascal
- BASIC
- BASIC — Return to BASIC
- BASIC
- Bywater BASIC Interpreter
- BASIC programming of the I/O
- Example of an (unstructured) BASIC program
- BBC BASIC
- Gambas
- Gambas with wiringPi
- Gambas with pigpio
- Graphical User Interfaces
- WebIOPi
- Benchmarks
- Toggling gpios
Litgu.ru — Литературный Гуру
Advanced Raspberry Pi: Raspbian Linux and GPIO Integration
 Название: Advanced Raspberry Pi: Raspbian Linux and GPIO Integration
Автор: Warren Gay
Издательство: Apress
ISBN: 1484239474
Год: 2018
Страниц: 529
Язык: английский
Формат: pdf (true), epub
Размер: 23.1 MB
Jump right into the pro-level guts of the Raspberry Pi with complete schematics and detailed hardware explanations as your guide. You’ll tinker with runlevels, reporting voltages and temperatures, and work on a variety of project examples that you can tune for your own project ideas..
This book is fully updated for the latest Pi boards with three chapters dedicated to GPIO to help you master key aspects of the Raspberry Pi. You’ll work with Linux driver information and explore the different Raspberry Pi models, including the Pi Zero, Pi Zero W, Pi 2, Pi3 B and Pi3 B+. You’ll also review a variety of project examples that you can tune for your own project ideas. Other topics covered include the 1-Wire driver interface, how to configure a serial Linux console, and cross-compile code, including the Linux kernel.
You’ll find yourself turning to Advanced Raspberry Pi over and over again for both inspiration and reference. Whether you’re an electronics professional, an entrepreneurial maker, or just looking for more detailed information on the Raspberry Pi, this is exactly the book for you.
What You’ll Learn
Master I2C and SPI communications from Raspbian Linux in C
Program USB peripherals, such as a 5-inch LCD panel with touch control and the Pi camera
Study GPIO hardware, the sysfs driver interface and direct access from C programs
Use and program the UART serial device.
Who This Book Is For
Advanced Raspberry Pi users who have experience doing basic projects and want to take their projects further.
Источник
Advanced Raspberry Pi. Raspbian Linux and GPIO Integration

Jump right into the pro-level guts of the Raspberry Pi with complete schematics and detailed hardware explanations as your guide. You’ll tinker with runlevels, reporting voltages and temperatures, and work on a variety of project examples that you can tune for your own project ideas.

This book is fully updated for the latest Pi boards with three chapters dedicated to GPIO to help you master key aspects of the Raspberry Pi. You’ll work with Linux driver information and explore the different Raspberry Pi models, including the Pi Zero, Pi Zero W, Pi 2, Pi3 B and Pi3 B+. You’ll also review a variety of project examples that you can tune for your own project ideas. Other topics covered include the 1-Wire driver interface, how to configure a serial Linux console, and cross-compile code, including the Linux kernel.
You’ll find yourself turning to Advanced Raspberry Pi over and over again for both inspiration and reference. Whether you’re an electronics professional, an entrepreneurial maker, or just looking for more detailed information on the Raspberry Pi, this is exactly the book for you.
What You’ll Learn:
Who This Book Is For:
Advanced Raspberry Pi users who have experience doing basic projects and want to take their projects further.
Название: Advanced Raspberry Pi. Raspbian Linux and GPIO Integration
Автор: Warren Gay
Издательство: Apress
Год: 2018
Страниц: 529
Язык: Английский
Формат: pdf (true), epub
Размер: 23.1 мб
Скачать Advanced Raspberry Pi. Raspbian Linux and GPIO Integration
Источник
Использование GPIO из Python на Raspberry Pi
Делюсь своим опытом, полученным при изучении задачи вынесенной в заголовок. В статье рассматриваются два варианта работы, которые можно использовать в Python-программах, обращающихся к портами GPIO Raspberry Pi.
Порты GPIO Raspberry Pi выглядят следующим образом:
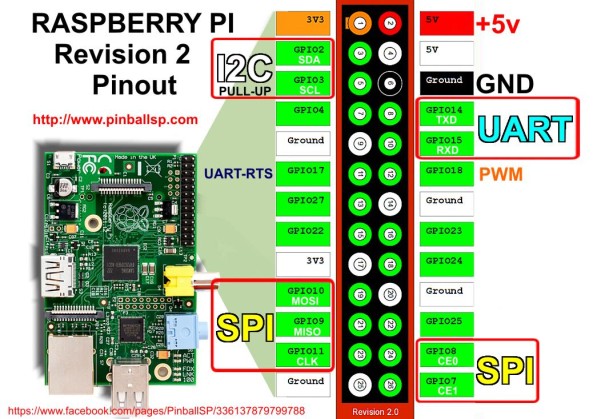
Одним из вариантов работы с GPIO является интерфейс Sysfs. Подробнее о Sysfs интерфейсе GPIO здесь. В этом случае для обращения к портам GPIO используются операции чтения и записи файлов. Для использования конкретного вывода его нужно зарезервировать и установить направление на вход или на выход. После окончания работы с портом его нужно освободить, чтобы другие процессы могли его использовать.
Резервирование порта (XX — номер нужного порта):
При успешном резервировании появляется новая папка по адресу /sys/class/gpio/gpioXX/ . Установка направления выполняется так:
Установка высокого и низкого уровней для порта, настроенного на выход выполняется так:
Определение состояние порта, настроенного на вход делается так:
Освобождение порта после окончания его использования:
Для упрощения работы с GPIO через интерфейс Sysfs мне встретились две утилиты. Одна из них WiringPi GPIO utility, другая quick2wire-gpio-admin.
Основная задача, решаемая этими утилитами — это предоставление возможности работы с GPIO от имени непривилегированного пользователя. При этом WiringPi GPIO utility более функциональна.
Я для работы с GPIO остановился на пакете RPIO (на момент написания последней была версия 0.10.0). Этот пакет работает с портами GPIO напрямую, обращаясь к регистрам BCM2708 через специальное устройство /dev/mem . Что такое RPIO:
Advanced GPIO for the Raspberry Pi. Extends RPi.GPIO with PWM, GPIO interrups, TCP socket interrupts, command line tools and more
RPIO позиционируется как улучшенный и расширенный вариант другого модуля, RPi.GPIO. В документации непосредственно на RPIO подробно рассмотрены только возможности, отсутствующие в RPi.GPIO, по этому за описанием общих для этих модулей функций нужно обращаться к документации RPi.GPIO, доступной здесь.
Устанавливается пакет следующей командой:
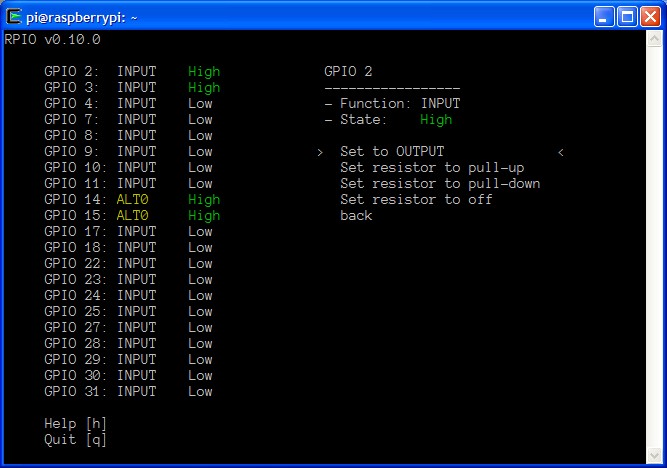
Кроме python-модулей устанавливаюся две программы: rpio-curses и rpio. С их помощью можно, например, получить текущий режим и состояние GPIO и, при желании, изменить их. Так выглядит работа с rpio-curses:
Так можно получить информацию о системе:
Пример python-программы, использующей RPIO:
Источник
Advanced raspberry pi raspbian linux and gpio integration pdf
This tutorial originally appeared on William Wilson’s (jawn-smith) blog and was contributed and modified here with permission.
As of Linux kernel 5.11, the old methods of communicating with header pins on the Raspberry Pi no longer work. This means packages such as RPi.GPIO no longer function properly with newer kernels. This post by Dave Jones (waveform) explains the reasons for the changes. But fear not, there is a new package in Ubuntu 21.04 called LGPIO that allows full control over the header pins with the latest kernel version. This tutorial covers some basic functionality of LGPIO, including examples using basic GPIO control, I²C, PWM, and SPI.
If you already have Ubuntu 21.04 or newer set up on a Raspberry Pi, you are ready for this tutorial. Otherwise, please see how to install Ubuntu Server on your Raspberry Pi and make it 21.04.
What you’ll learn
- How to install and get started with GPIO pins on Ubuntu
- Basic GPIO operations
- Basic I2C operations
- Basic PWM operations
What you’ll need
- A Raspberry 3 or 4 with Ubuntu 21.04 setup and installed
Optionally for the examples:
- A simple breadboard
- 7x 330ohm resistors
- A single red, green or blue LED
- 10 male jumper wires
- 20 female to male jumper wires
- An Arduino Uno
- 5V PWM fan
- A RGB LED
- A rotary encoder
- An MCP3008 analog to digital converter
2. Installing GPIO
Installing LGPIO is easy! Ensure that your software repositories are up to date with:
And install the Python LGPIO library with:
Done. You’re ready to go.
3. Basic GPIO example
The first example is the classic “blink an LED” example. The sample script uses GPIO pin 23 on the Raspberry Pi, so we’ll wire it up with a 330-ohm resistor according to the following diagram:

If wired correctly, the following script will turn the LED on and off for one second each until it receives a keyboard interrupt signal (Ctrl+C)
The line h = lgpio.gpiochip_open(0) opens /dev/gpiochip0 . Then lgpio.gpio_claim_output(h,
) sets the pin as an output. The lgpio.gpio_write() function drives the GPIO pin to HIGH or LOW to turn the LED on or off.
4. I2C example
The I²C example I have created makes use of the Raspberry Pi as the leader and an Arduino Uno as the follower. It uses I²C to have the Arduino Uno blink its onboard LED. The I²C pins on the Raspberry Pi are GPIO 2 and 3. We wire the Pi and Arduino together as follows:

In order to have the Arduino act as an I²C follower, run the following sketch on it:
This sketch joins the I²C bus at address 8. To test that it is working properly, run i2cdetect -y 1 on your Raspberry Pi. The output should look something like this:
If you see the 08 in the first row as above, the Arduino is awaiting instructions over I²C. If you are new to Arduino boards and are unfamiliar with how to compile and upload the sketch, click here for more information.
To have the Raspberry Pi send instructions to the Arduino over I²C, run the following Python script:
If run successfully, the built-in LED on the Arduino Uno will blink on and off for one second each. As you can see, the LGPIO code is as simple as lgpio.i2c_open(1, addr) to open the I²C device and lgpio.i2c_write_byte( , ) to send the data.
5. PWM example
For a PWM example I have a Noctua 5V PWM fan that can be controlled via the Raspberry Pi header pins. The fan can be directly powered by the Raspberry Pi 5V and GND pins. No resistor is needed for the PWM pin, which is GPIO 18 in the example script. The fan model I am using has an open-collector circuit design (as do most fans), so a 1kΩ pull-up resistor is needed. NOTE: The pull-up resistor must be connected to one of the 3.3V pins on the Raspberry Pi. If it is connected to a 5V pin, the Pi could be severely damaged. See the wiring diagram below as an example:

After connecting the fan and Raspberry Pi, run the following Python script to control the speed of the fan with PWM.
As you can see, the GPIO chip is opened the same way as in the basic GPIO example. Rather than just setting the GPIO to LOW/HIGH, we use the LGPIO library to set PWM transactions that control the speed of the fan. This example sets the speed to 0%, 50%, and 100% for 10 seconds each.
6. That’s all!
In Will’s original post the tutorial ended with a homework assignment where he challenges you to modify the PWM script to monitor the CPU temperature and set the speed of the fan accordingly. If you want to give it ago and see more information head over to his blog and read on.
Now you’re done and, hopefully, you’ve had a chance to play around with GPIO on Ubuntu on Raspberry Pi. If this tutorial helped you and you go on to make things using GPIO on Ubuntu on a Pi, whatever it may be, let us know. Either comment below on this tutorial or find your way over to the Raspberry Pi forum, we lurk over there too.
If you do end up building a project off the back of this tutorial and you would like to share it with the Ubuntu community as a blog post or even as a tutorial for this very site, reach out to a member of the Ubuntu Community team and we’ll get something going!
Источник
RPi GPIO Code Samples
The Raspberry Pi GPIOs can be controlled using many programming languages.
Contents
Examples in different C-Languages.
Direct register access
Gert van Loo & Dom, have provided some tested code which accesses the GPIO pins through direct GPIO register manipulation in C-code. (Thanks to Dom for doing the difficult work of finding and testing the mapping.)
Note: For Raspberry Pi 2 and Pi 3, change BCM2708_PERI_BASE to 0x3F000000 for the code to work.
Example GPIO code:
GPIO Pull Up/Pull Down Register Example
WiringPi
Save this, and compile with:
sysfs
The following example requires no special libraries, it uses the available sysfs interface.
bcm2835 library
This must be done as root. To change to the root user:
You must also get and install the bcm2835 library, which supports GPIO and SPI interfaces. Details and downloads from http://www.open.com.au/mikem/bcm2835
pigpio
pigpio provides all the standard GPIO features.
In addition it provides hardware timed PWM suitable for servos, LEDs, and motors and samples/timestamps GPIOs 0-31 up to 1 million times per second (default 200 thousand).
lgpio (local /dev/gpiochip I/F)
lgpio provides all the standard Linux GPIO features.
- reading and writing GPIO singly and in groups
- software timed PWM and waves
- GPIO callbacks
- pipe notification of GPIO alerts
- I2C wrapper
- SPI wrapper
- serial link wrapper
- a simple interface to start and stop new threads
lgpio uses the new /dev/gpiochip interface rather than the deprecated syfs interface.
rgpio (local & remote /dev/gpiochip I/F)
rgpio provides all the standard Linux GPIO features.
- reading and writing GPIO singly and in groups
- software timed PWM and waves
- GPIO callbacks
- I2C wrapper
- SPI wrapper
- serial link wrapper
- simple file handling
- creating and running scripts on the rgpiod daemon
- a simple interface to start and stop new threads
rgpio uses the new /dev/gpiochip interface rather than the deprecated syfs interface.
RaspberryGPIOManager is a very basic C# library to control the GPIO pins via the GPIOPinDriver object. See: https://github.com/AlexSartori/RaspberryGPIOManager
RaspberryPiDotNet library is available at https://github.com/cypherkey/RaspberryPi.Net/. This more advanced library includes a GPIOFile and GPIOMem class. The GPIOMem requires compiling Mike McCauley’s bcm2835 library above in to a shared object.
This example uses the WiringPi Ruby Gem: http://pi.gadgetoid.co.uk/post/015-wiringpi-now-with-serial which you can install on your Pi with «gem install wiringpi»
Alternatively the Pi Piper Gem (https://github.com/jwhitehorn/pi_piper) allows for event driven programming:
SPI access requires being root, whereas GPIO access can be done as any user, as the underlying bcm2835 library (which must be installed) can use the /dev/gpiomem interface.
Python
RPi.GPIO
The RPi.GPIO module is installed by default in Raspbian.
RPi.GPIO script may need to be run as root, but versions above 0.6.0 should run fine as `pi`.
pigpio
pigpio Python scripts may be run on Windows, Macs, and Linux machines. Only the pigpio daemon needs to be running on the Pi.
pigpio provides all the standard gpio features.
In addition it provides hardware timed PWM suitable for servos, LEDs, and motors and samples/timestamps gpios 0-31 up to 1 million times per second (default 200 thousand).
pigpio scripts require that the pigpio daemon be running.
They do not need to be run as root.
RPIO extends RPi.GPIO with TCP socket interrupts, command line tools and more.
WiringPi2-Python
There’s a Python-wrapped version of Gordon Henderson’s WiringPi. See here.
Scratch
Scratch using the ScratchGPIO

Scratch can be used to control the GPIO pins using a background Python handler available from
Pridopia Scratch Rs-Pi-GPIO driver

Scratch control GPIO (use GPIO number not P1 pin number can support GPIO 28,29,30,31)
support I²C 23017 8/16/32/64/128 GPIO, I²C TMP102 Temp sensor, I²C RTC DS1307, I²C ADC ADS1015, I²C PWM, I²C EEPROM 24c32, I²C BMP085 Barometric Pressure/Temperature/Altitude Sensor, GPIO input/output, DC motor, Relay, I²C 16×16 LED matrix, I²C 24×16 Matrix, 84×48 pixels LCD, 16×2 character LCD, 20×4 character LCD, 1-Wire 18B20 Temp Sensor, Ultra Sonic distance sensor, available from
RpiScratchIO
Generic interface for GPIO or other I/O operations. The package allows user modules to be easily added and loaded, to interface with any I/O device. The code is written in Python and uses the scratchpy Python package to interface with Scratch.

RpiScratchIO — Installation
To install the package on the latest Raspbian installation type,
RpiScratchIO — Documentation and examples
More information can be found at https://pypi.python.org/pypi/RpiScratchIO/ The package is also documented in Issues 20 and 22 of The MagPi. RpiScratchIO is the basis of a new BrickPi Scratch handler, which is documented in Issue 23 of The MagPi.
Java using the Pi4J Library
This uses the Java library available at http://www.pi4j.com/. (Any Java application that controls GPIO must be run as root.)
Please note that the Pi4J library uses the WiringPi GPIO pin numbering scheme [1] [2] . Please see the usage documentation for more details: http://pi4j.com/usage.html
More complete and detailed examples are included on the Pi4J website at http://www.pi4j.com/.
The Pi4J library includes support for:
- GPIO Control
- GPIO Listeners
- Serial Communication
- I2C Communication
- SPI Communication
This uses the Java library available at https://github.com/jkransen/framboos. It does not depend on (or use) the wiringPi driver, but uses the same numbering scheme. Instead it uses the default driver under /sys/class/gpio that ships with the distro, so it works out of the box. Any Java application that controls GPIO must be run as root.
Java Webapp GPIO web control via HTTP
This uses the Java Webapp available at https://bitbucket.org/sbub/raspberry-pi-gpio-web-control/overview. You can control your GPIO over the Internet. Any Java application that controls GPIO must be run as root.
Shell
sysfs, part of the raspbian operating system
For operating system versions prior to the raspbian Jessie release, the export and unexport of pins must be done as root. Since the raspbian Jessie release the pi user is a member of the group «gpio» and so control of the GPIO no longer requires a change to the root user. With Jessie, if using a script as in the code below, you’ll need to put a ‘sleep 1’ command in between your ‘export’ and ‘direction’ commands to allow time for the operating system to set up the GPIO number specific direction file.
wiringPi — gpio utility
You need the wiringPi library from https://projects.drogon.net/raspberry-pi/wiringpi/download-and-install/. Once installed, there is a new command gpio which can be used as a non-root user to control the GPIO pins.
has full details, but briefly:
The -g flag tells the gpio program to use the BCM GPIO pin numbering scheme (otherwise it will use the wiringPi numbering scheme by default).
The gpio command can also control the internal pull-up and pull-down resistors:
This sets the pull-up resistor — however any change of mode, even setting a pin that’s already set as an input to an input will remove the pull-up/pull-down resistors, so they may need to be reset.
Additionally, it can export/un-export the GPIO devices for use by other non-root programms — e.g. Python scripts. (Although you may need to drop the calls to GPIO.Setup() in the Python scripts, and do the setup separately in a little shell script, or call the gpio program from inside Python).
These exports GPIO-17 and sets it to output, and exports GPIO-18 and sets it to input.
The export/unexport commands always use the BCM GPIO pin numbers regardless of the presence of the -g flag or not.
If you want to use the internal pull-up/down’s with the /sys/class/gpio mechanisms, then you can set them after exporting them. So:
You can then use GPIO-4 as an input in your Python, Shell, Java, etc. programs without the use of an external resistor to pull the pin high. (If that’s what you were after — for example, a simple push button switch taking the pin to ground.)
A fully working example of a shell script using the GPIO pins can be found at http://project-downloads.drogon.net/files/gpioExamples/tuxx.sh.
pigpio — pigs utility
pigpio provides a command line utility pigs.
pigs provides all the standard gpio features.
In addition it provides hardware timed PWM suitable for servos, LEDs, and motors.
Use man pigs or view the pigs documentation at http://abyz.me.uk/rpi/pigpio/pigs.html
Additional error information may be reported to /dev/pigerr. The following command will display any errors.
pigs requires that the pigpio daemon be running.
For an example pigs script see x_pigs in the pigpio archive.
pigpio — /dev/pigpio interface
pigpio provides command line access via the /dev/pigpio pipe.
/dev/pigpio provides all the standard gpio features.
In addition it provides hardware timed PWM suitable for servos, LEDs, and motors.
The command set is identical to that used by pigs. Use man pigs or view the pigs documentation at http://abyz.me.uk/rpi/pigpio/pigs.html
The result of /dev/pigpio commands are written to /dev/pigout. The following command will display the results.
Errors are reported to /dev/pigerr. The following command will display any errors.
The /dev/pigpio pipe interface requires that the pigpio daemon be running.
For an example /dev/pigpio pipe script see x_pipe in the pigpio archive.
libgpiod — C library and tools for interacting with the linux GPIO character device
List all GPIO chips:
Show all lines on all GPIO chips:
Set GPIO 4 on GPIO chip 0 to high-level. Wait until the user presses [Enter]:
Lazarus / Free Pascal

The GPIO pins are accessible from Lazarus without any third-party software. This is performed by means of the BaseUnix unit that is part of every distribution of Lazarus and Free Pascal or by invoking Unix shell commands with fpsystem. The following example uses GPIO pin 17 as output port. It is assumed that you created a form named GPIO17ToggleBox with a TToggleBox and a TMemo named LogMemo (optional, for logging purposes). The program has to be executed with root privileges.
Unit for controlling the GPIO port:
Alternative way to access the GPIO port with Lazarus / Free Pascal is by using Lazarus wrapper unit for Gordon Henderson’s wiringPi C library or encapsulated shell calls.
The Lazarus wiki describes a demo program that can read the status of a GPIO pin.
BASIC
BASIC — Return to BASIC
‘Return to Basic’ (RTB) can be found here.
It is a new BASIC featuring modern looping constructs, switch statements, named procedures and functions as well as graphics (Cartesian and turtle), file handling and more. It also supports the Pi’s on-board GPIO without needing to be run as root. (You do not need any special setup routines either)
Sample blink program:
BASIC
Bywater BASIC Interpreter
The Bywater BASIC Interpreter (bwBASIC) implements a large superset of the ANSI Standard for Minimal BASIC (X3.60-1978) and a significant subset of the ANSI Standard for Full BASIC (X3.113-1987) in C. It also offers shell programming facilities as an extension of BASIC. bwBASIC seeks to be as portable as possible and is downloadable. [3]
BASIC programming of the I/O
Setting up a GPIO pin to be used for inputs or for outputs.
The control words cannot be loaded directly into the 32 bit ARM registers with 32 bit addresses, as bwBASIC has no POKE and PEEK commands and other versions of BASIC only handle 8 bit registers with 16 bit addresses with these commands. So the GPIO pins need to be exported so that they exist in a file structure which can be accessed from basic with the OPEN command (ref 2).
This must be done in Linux root. BASIC must be run in the root too.
Now to export GPIO pin 4 for example, using a Shell command.
Whilst bwbasic can accommodate shell commands, and we can store a set of these commands (eg. to export a number of GPIO pins at the outset) as numbered statements in a file that can be loaded with the basic command LOAD «filename» and RUN (ref 2), the shell commands have to run as a separate file, as they cannot be run from within, as part of a basic program.
Now the file containing the pin direction setting from BASIC can be accessed.
GPIO pin 4 can be set to input or output by OPENing its pin direction file for output and writing «in» or «out» with a PRINT# command. [4]
This closes the open direction file, whereupon the system performs the action of setting the direction to «out». The system only carries out the action as the file is closed. [5]
Now the output of the gpio 4 pin can be controlled from BASIC.
GPIO 4 pin can be set to 1 or to 0 by OPENing its pin value file for output and writing «1» or «0» with a PRINT# command.
Similarly the output of GPIO pin 4 can be turned off.
Example of an (unstructured) BASIC program
To read the state of a switch and control the power to two LEDs connected to GPIO pins 8,7 and 4 respectively.
Program to set 2 pins as outputs and 1 pin as input and to read the input turning on two different combinations of the two outputs (ie output 0,1 or 1,0) depending on the state of the input (1 or 0).
NEW clears the export.bas program from memory
When all is done, the GPIO pins should be unexported, to leave the R-Pi as we found it. [6]
A simple circuit to provide the switched input and the two LED outputs. [7]
For the two original documents this example has been copied from, see:
BBC BASIC
BBC BASIC for the RPi 2 or RPi 3 (running Raspbian) can be found here.
BBC BASIC supports the RPi’s GPIO via the supplied gpiolib library, it does not need to be run as root.
Here is a simple ‘blink’ program:
Gambas
Gambas is a visual programming language for Linux and is similar in some ways to Visual Basic.
Gambas can make use of C libraries such as wiringPi and pigpio.
Here is some minimal code to get started, which assumes the required library (either wiringPi or pigpio, as applicable) is installed.
Gambas with wiringPi
A few Declarations:-
If we want to set GPIO pin 2 to be an output and set low:-
If we want to read GPIO pin 4:-
Gambas with pigpio
A few Declarations:-
If we want to set Pin 6 to be an output and set low:-
If we want to read GPIO pin 7:-
Graphical User Interfaces
WebIOPi
WebIOPi allows to control each GPIO with a simple web interface that can be used with any browser. Available in PHP and Python, they both require root access, but the Python version serves HTTP itself. Each GPIO pin can be set up as input or output and its LOW/HIGH stae can be changed. WebIOPi is fully customizable, so it can be used for home remote control. It also works over Internet. UART/SPI/I²C support will be added later. See code examples above.
Benchmarks
Toggling gpios
For information about the relative performance at toggling GPIOs for each approach, and a comparison of original Pi vs. Raspberry Pi 2, see:
Источник


