- Unable to connect to internet after installing Windows 7 (no internet what-so-ever)
- No internet connection after installing Windows 7
- Replies (3)
- No Internet connection after installing Windows updates [QUICK FIX]
- How do I fix Internet connection problems after installing Windows updates?
- 1. Device Manager Fix
- 2. Command Prompt Fix
- 3. Clean Boot
- 4. Use Network Troubleshooter
- 5. Update the Network adapter driver
- Run a System Scan to discover potential errors
- 6. Disable antivirus and firewall
- 7. Reinstall your network adapter
- 8. Run Windows 10 Network Reset feature
- How to get back online after a Windows 10 update breaks your internet access
- How to fix common network problems after update on Windows 10
- Reboot computer
- Confirm network settings
- Enable Wi-Fi interface
- Reconnect Wi-Fi connection
- Renable network adapter
- Disable Airplane mode
- Recreate Wi-Fi profile
- Reboot router
- Ping the connection
- How to fix connectivity using Network troubleshooter
- How to reset network stack using Command Prompt
- How to reset network adapter using Settings
- How to update network adapter driver using Device Manager
- Update network adapter online
- Update network adapter offline
- How to rollback network adapter driver using Device Manager
- How to uninstall network adapter driver using Device Manager
- How to disable security apps to fix network problems on Windows 10
- Disable Microsoft Defender Antivirus
- Disable Microsoft Defender Firewall
- How to uninstall recent update to fix network problems on Windows 10
- Uninstall quality update
- Uninstall feature update
- More Windows 10 resources
- Microsoft’s Surface Duo is not ‘failing up’
- Here’s what you can do if Windows 10 update KB5001330 is causing issues
- Review: NZXT made its first AMD motherboard and it’s brilliant
- These are the best PC sticks when you’re on the move
Unable to connect to internet after installing Windows 7 (no internet what-so-ever)
Ok I have no internet at all. My computer tells me I am connected to the internet but when I try to open my browser (I’ve tried IE and Firefox) it tells me «network timeout» on firefox and «Internet explorer cannot display the webpage» in IE.
I updated from Vista to Windows 7 Premium (32 bit).
After I was done it wasn’t connecting. I restarted the computer and it seemed to be working just fine, then it just stops working. The only thing I did between the time it was working and the time it wasn’t was uninstall Java. I didn’t know if this could be the problem so I did a system restore already to go back to the point before I had uninstalled it, but still no web access.
My main problem is that the computer is telling me I am connected to the network and have internet access but when I try to get on the internet it says that my connection has failed.
Also I know it isn’t my internet provider because I am posting this question from my laptop connected to the same internet provider (only wireless) as my Desktop, also I have another Desktop in the house that is connected to the same internet provider (non wireless) that gets internet just fine. so the problem has to be with the computer, and the only major thing that has changed is installing 7.
Someone please help. I really don’t want to have to uninstall Windows 7 because it took a while to install to begin with. but if i have to I shall
No internet connection after installing Windows 7
Original Title: «Internet problem «
Recently i have installed windows 7 after everything was installed i tried going on to the internet and it did not work so i tried updating all my drivers but specialty my wireless driver and that did not work either but that dint even let me connect to another connection all that let me do is to use the internet on the Ethernet cable
Replies (3)
Go over these steps and tell us where the breaking point is.
Check the Device Manager for valid Wireless card entry.
If there is No valid entry, delete any Bogus Entry, and re-install the Wireless card’s Drivers.
Check the Network connections to make sure that you have a Wireless Network Connection Icon/Entry, and that the Properties of the Icon (right click on the Icon) are correctly configured with TCP/IPv4 protocol in the Network Connections Properties.
Make sure that if there is a vendor’s Wireless Utility the utility is Not Running together with the Windows native Wireless utility.
Make sure that No Firewall is preventing/blocking the Wireless components to get to the Network.
Working TCP/IP stack should look this way.
Right click on the Wire card Network Connection, choose Status, Details, and see if it got an IP and the rest of the settings.
Description is the card manufacturing data.
Physical address is the card’s MAC number.
The xx should be a number from 0 to 255 (all xx same number).
yy should be from 0 to 255
zz should be from 0 to 255 (all zz the same number.
The lease date should be valid to the current time.
*Note 1. IP that starts with 169.xxx.xxx.xxx is not valid functional IP.
*Note 2. There might be an IPv6 entries too. However, they are not functional for Internet traffic or LAN. They are needed for Win 7 special HomeGroup configuration.
If everything above is OK you have to be able to connect to the Router.
A Window that says Connected does not means that your are really connected.
Connecting to the Router means that you can enter the Router’s core IP into an address bar of a browse, be able to connect, see, and configure the Router’s menus.
If it does not connecting to the Router log from any computer that can connect to Wireless Router with a Wire, disable the Wireless Security, (make sure that the Wireless broadcast SSID) is On, and try to connect with No Wireless security.
I really checked and configured every thing and it does Not work.
Software Firewall application that is Not configured to allow local traffic (between the computer and the Router is a possible issue too.
some 3rd party Software Firewalls keep blocking aspects of Local Traffic even it they are turned Off (disabled). If possible configure the Firewall correctly, or totally uninstall it to allow clean flow of local network traffic. If the 3rd party software is uninstalled or disables, make sure that Windows native Firewall is On .
Jack-MVP Windows Networking. WWW.EZLAN.NET
Jack MVP, Microsoft Windows Desktop Experience-Networking.
No Internet connection after installing Windows updates [QUICK FIX]

- If you don’t have Internet connection after installing Windows updates, first you will have to check your network adapter using Device Manager. There are a few oher methods you can try in our solution below.
- If you have any other Internet connection error there’s a big chance you will find a solution in our Fix Internet Connection Errors hub.
- One of the solutions is to update the drivers on your computer. Read our guide on how to update your drivers manually.
- If you experienced any other Windows 10 errors we’ve got you covered. Check out our Windows 10 errors hub.

- Download Restoro PC Repair Tool that comes with Patented Technologies (patent available here).
- Click Start Scan to find Windows issues that could be causing PC problems.
- Click Repair All to fix issues affecting your computer’s security and performance
- Restoro has been downloaded by 0 readers this month.
Windows Update can cause as many troubles as it causes good things. One of the issues that Windows Update brings is the disappearance of the Internet connection.
If you faced this problem, don’t worry, because here are a few solutions for No Internet Access or Limited Internet Access.
Here are some more examples and error messages:
- Windows 10 update lost internet connection – This error message also means that you’ve lost the internet connection after installing certain updates.
- Can’t connect to internet after Windows 10 update – As the error message says, this particular issues occurs in Windows 10.
- Windows update no internet connection – It can also happen that you lose the internet connection during the very process of installing Windows Updates.
Table of contents:
How do I fix Internet connection problems after installing Windows updates?
1. Device Manager Fix
- Go to Device Manager and then to Network adapters.
- Expand Network adapters.
- Check if your network adapter shows the message of No Internet Access or Limited connectivity and select it.
- Right-click on your wireless network adapter and go to Update Driver Software.
- Now on a new window, you will need to click on Browse my computer for driver software.
- After that, select Let me pick from a list of device drivers on my computer.
- Choose the Manufacturer’s drivers from the list of two and then click next.
- After the completion of the process just restart your PC and check if you have the internet connection now.
If Device Manager fix didn’t help, try to work a little bit in Command Prompt in order to fix your problem with the internet.
2. Command Prompt Fix
2. Type each of these commands respectively and hit enter after each one of them:
netsh int tcp set heuristics disabled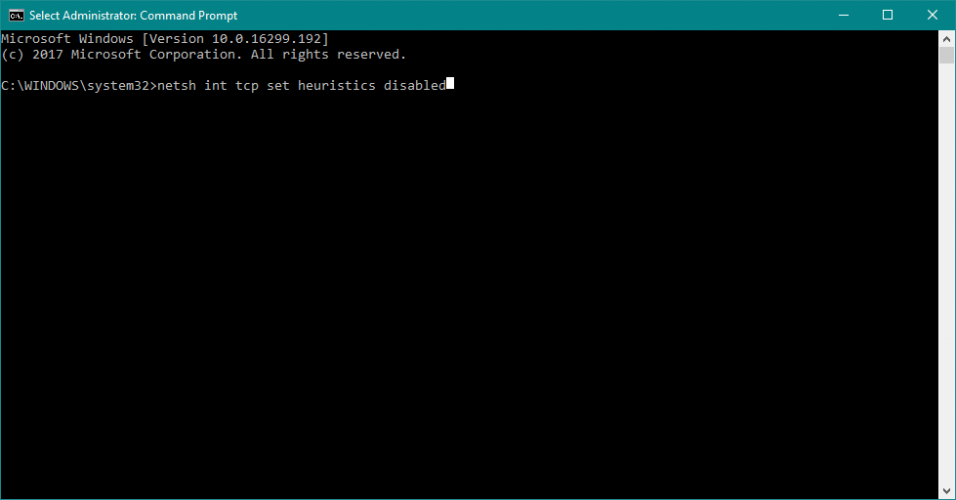
netsh int tcp set global autotuninglevel=disable
netsh int tcp set global rss=enabled
3. Now to check if the settings are disabled and type: netsh int tcp show global
5. Reboot your PC and see if the problem is solved.
3. Clean Boot
- Press the Windows key +R In the Run box, type msconfig and press Enter
- Under the Services tab, check the Hide all Microsoft services and hit Disable all
- Open Task Manager. Under the Startup tab right-click, disable each Startup item and then close Task Manager
- Click Apply/OK
- Restart your PC
- If you have the connection now, try to find which software caused you troubles and uninstall it
Try to perform a Clean Boot to see if there’s any third-party program causing your connection to break.
If you’re interested in how to add or remove startup apps on Windows 10, check out this simple guide. Can’t open Task Manager? Don’t worry, we’ve got the right solution for you.
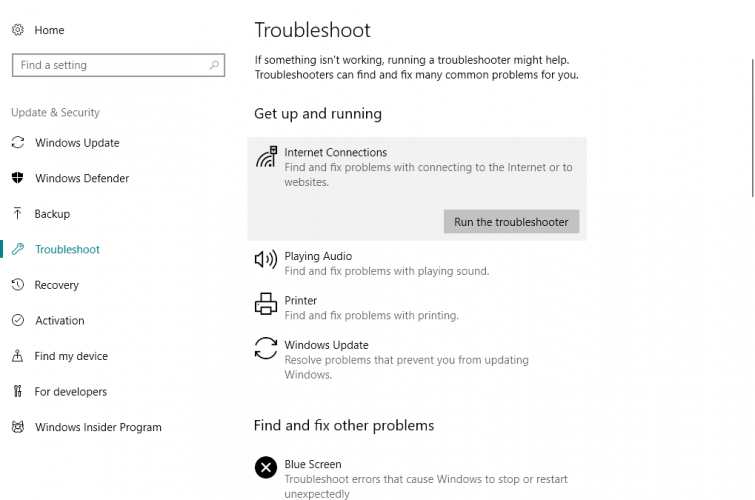
4. Use Network Troubleshooter
- Go to Settings
- Head over to Update & Security >Troubleshoot
- Find Internet connections, and click Run the troubleshooter

- Follow further on-screen instructions
- Restart your computer
5. Update the Network adapter driver
There’s a chance the update you just installed is simply incompatible with your Network adapter. So, the next thing we’re going to do is update your Network adapter.
Run a System Scan to discover potential errors


Click Start Scan to find Windows issues.

Click Repair All to fix issues with Patented Technologies.
But since you can’t connect to the internet, you won’t be able to update your Network adapter the old-fashioned way, through the Device Manager.
So, use another computer, go to your Network adapter or motherboard manufacturer’s website, and download the latest drivers for your Network adapter.
After that, manually install drivers on your computer, and you should be good. If you have any questions, just check our article about updating old drivers in Windows 10.
If you don’t have enough time or you simply want to get over with this error by updating your drivers, we recommend you to download Tweakbit’s Driver Updater tool.
This tool is approved by Microsoft and Norton Antivirus and it will download and install the right driver version for your PC, thus protecting you from damaging your system by installing the wrong drivers.
6. Disable antivirus and firewall
Third-party antivirus programs don’t go along with Windows updates.
Therefore, it’s quite possible that your antivirus is exactly what causes you problems after installing the update. So, consider disabling your antivirus temporarily, and check if you’re able to connect to the internet.
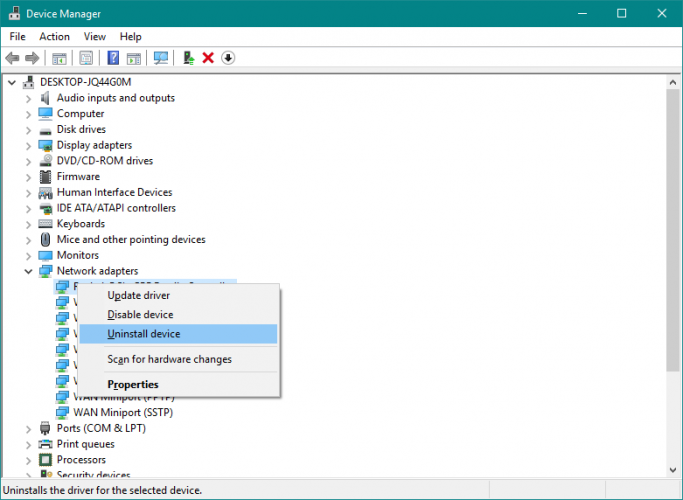
7. Reinstall your network adapter
- Go to Search, type devmngr, and go to Device Manager
- Find your Network Adapter, right-click it, and go to Uninstall Device
- Restart your computer
There’s also a chance the freshly installed update interferes with your network adapter. Most of the time, updating your drivers should be enough.
However, you might also need to completely reinstall your network adapter.
Once you install the network adapter again, you’ll automatically get the latest version, therefore updating the drivers won’t be necessary.
Now, Windows should automatically recognise and install the Network Adapter shortly after you uninstall it. However, if that doesn’t happen, here’s what you need to do:
- Go to Control Panel
- Under Hardware & Sound, go to Add a device
- Wait for the wizard to scan for hardware changes
- Once it finds your Network Adapter, the installation will be finished
8. Run Windows 10 Network Reset feature
- Go to Settings >Network & Internet
- Stay in the Status section
- Scroll down and click Network Reset
- Follow further on-screen instructions
- Restart your computer
There’s another (less-known) troubleshooting option for network problems in Windows 10. And that is the Network Reset feature.
As its name says, this feature resets every important Network feature in your system, which can be beneficial for dealing with potential interferences.
That’s about it, we certainly hope at least one of these solutions helped you resolve the problem with the internet connection after installing Windows updates.
If you have any comments, questions, or suggestions, just let us know in the comments below.
- Download this PC Repair Tool rated Great on TrustPilot.com (download starts on this page).
- Click Start Scan to find Windows issues that could be causing PC problems.
- Click Repair All to fix issues with Patented Technologies (Exclusive Discount for our readers).
Restoro has been downloaded by 0 readers this month.
How to get back online after a Windows 10 update breaks your internet access
 Source: Windows Central
Although Windows 10 updates are important to patch security vulnerabilities and improve the system performance, it is a known fact that quality and feature updates can introduce unintended problems.
Typically, one of the most common issues after installing an update is related to network connectivity. For instance, slow speeds, unreliable or complete loss of connectivity using a wireless or wired connection resulting in problems connecting to the internet and network resources, such as shared printers and folders.
Regardless of the reason, when a device cannot connect to the local network or internet, after a recent update of Windows 10, there are many ways that Microsoft recommends to fix the issue.
In this Windows 10 guide, we will walk you through several ways to resolve common network connection problems after installing an update on your device.
How to fix common network problems after update on Windows 10
If a quality update breaks the network connection, you can follow some basic troubleshooting steps to resolve the problem quickly.
Reboot computer
Although it might be obvious, it’s not for everyone. Typically, a simple reboot can fix most common problems, including problems connecting to the network and the internet.
To restart a device, use these steps:
- Open Start.
- Click the Power option.
Select the Restart option.
 Source: Windows Central
Once you complete the steps, open the web browser and confirm the internet is working, loading a website upon restart.
If the network icon in the notification area shows an active connection, but you cannot open a particular website, try to load a different site as the problem could be with the website. You can also try using a different browser to confirm the problem is not the application.
Confirm network settings
The next step involves using command lines to confirm the problem is not something happening between the device and the router.
To check if the Windows 10 network configuration is working, use these steps:
- Open Start.
- Search for Command Prompt and click the top result to open the console.
Type the following command to find out the IP address of the router and press Enter:
 Source: Windows Central
Confirm the «Default Gateway» address that should be the address of the local router.
Quick tip: In home networks, most routers use the 192.169.1.1 or 192.168.2.1 address. However, depending on the configuration or Internet Service Provider (ISP), the address might be different.
Type the following command to determine if the router is reachable and press Enter:
This example tests the connection between the computer to the router with the 192.168.1.1 address:
In the command, remember to change the 192.168.1.1 for the router’s IP address.
Source: Windows Central
Quick tip: You can also use the ping 127.0.0.1 command to test if the networking stack is installed correctly and working on the computer.
After you complete the steps, if the «Packets» field returned with «4» successful replies, the router’s connection is working, indicating that the problem could lie in the connection between the router and ISP. Or it could be the case that the ISP is currently experiencing issues.
If you can access the internet from your phone or another computer connected to the same network, then the problem could be the device in question.
Enable Wi-Fi interface
If there is no connection to the internet, the wireless interface may not be enabled.
To check and enable a Wi-Fi interface, use these steps:
- Open Settings.
- Click on Network & Internet.
- Click on Wi-Fi.
Turn on the Wi-Fi toggle switch.
 Source: Windows Central
Alternatively, you can also click the «Not connected» network icon from the taskbar notification area and click the Wi-Fi button.
If there is a physical button in the device, make sure to turn it on to enable the interface.
Reconnect Wi-Fi connection
On laptops, the problem could be the wireless adapter or signal, which you might be able to resolve by disconnecting and reconnecting to the network.
To reconnect to a Wi-Fi network, use these steps:
- Open Settings.
- Click on Network & Internet.
Click on Wi-Fi.
Quick tip: If the wireless section is missing, Windows 10 can no longer detect the network adapter, which could indicate a driver or hardware problem.
Turn on the Wi-Fi toggle switch.
Source: Windows Central
Click the Connect button.
Source: Windows Central
Quick tip: Almost all modern routers allow wireless connections using two band frequencies, including the 2.4GHz and 5GHz, which could appear as separate networks. If you see both networks, you can try connecting with a different frequency to see if that resolves the problem. You can use this guide to learn even more ways to connect to a wireless network.
Once you complete the steps, you should be able to connect to the network and the internet.
You can also create a report of the wireless connection history, which can help diagnose the issue.
Renable network adapter
Sometimes updates can inadvertently change settings without the user’s consent. For example, it could happen that an update may disable the adapter or a specific feature, such as Airplane mode, blocking the connection to the internet.
If the network adapter is not present in the Settings app, it could be a driver problem, or the adapter may be disabled.
To check and enable a network adapter on Windows 10, use these steps:
- Open Settings.
- Click on Network & Internet.
- Click on Status.
Under the «Advanced network settings» section, click the Change adapter options option.
Source: Windows Central
Right-click the adapter and select the Enable option.
Source: Windows Central
After you complete the steps, the Wi-Fi or Ethernet adapter will enable and reconfigure automatically.
Disable Airplane mode
If the «Airplane» mode is enabled, you won’t be able to connect to the network. In the case that the update turned on the feature automatically or you forgot it was enabled, you need to make sure to disable it.
To turn off Airplane mode on Windows 10, use these steps:
- Open Settings.
- Click on Network & Internet.
- Click on Airplane mode.
Turn off the Airplane mode toggle switch.
Source: Windows Central
Alternatively, you can also click the airplane icon in the taskbar and click the Airplane mode button.
Recreate Wi-Fi profile
Every time you connect to a wireless network, the credentials, security, and other settings are stored in a profile. In the case that you are having trouble connecting to a particular network, it could be a problem with the profile.
To fix this problem, you can delete and recreate the profile using these steps:
- Open Settings.
- Click on Network & Internet.
- Click on Wi-Fi.
Under the «Wi-Fi» section, click the Manage known networks option.
Source: Windows Central
Click the Forget button.
Source: Windows Central
Click the Connect button.
Source: Windows Central
After you complete the steps, use the web browser to confirm the internet is working again.
It is also possible to manage a Wi-Fi network with the netsh command-line tool, and in this guide, you can learn more about the process.
Reboot router
If the computer does not seem to be the problem, you can also restart the router, which can sometimes fix many common connectivity problems.
To restart the home router, use these steps:
- Locate the router.
- Unplug the power cord.
- Wait at least 60 seconds.
- Reconnect the power cord.
Once you complete the steps, allow three to five minutes for the router to start and check the connection.
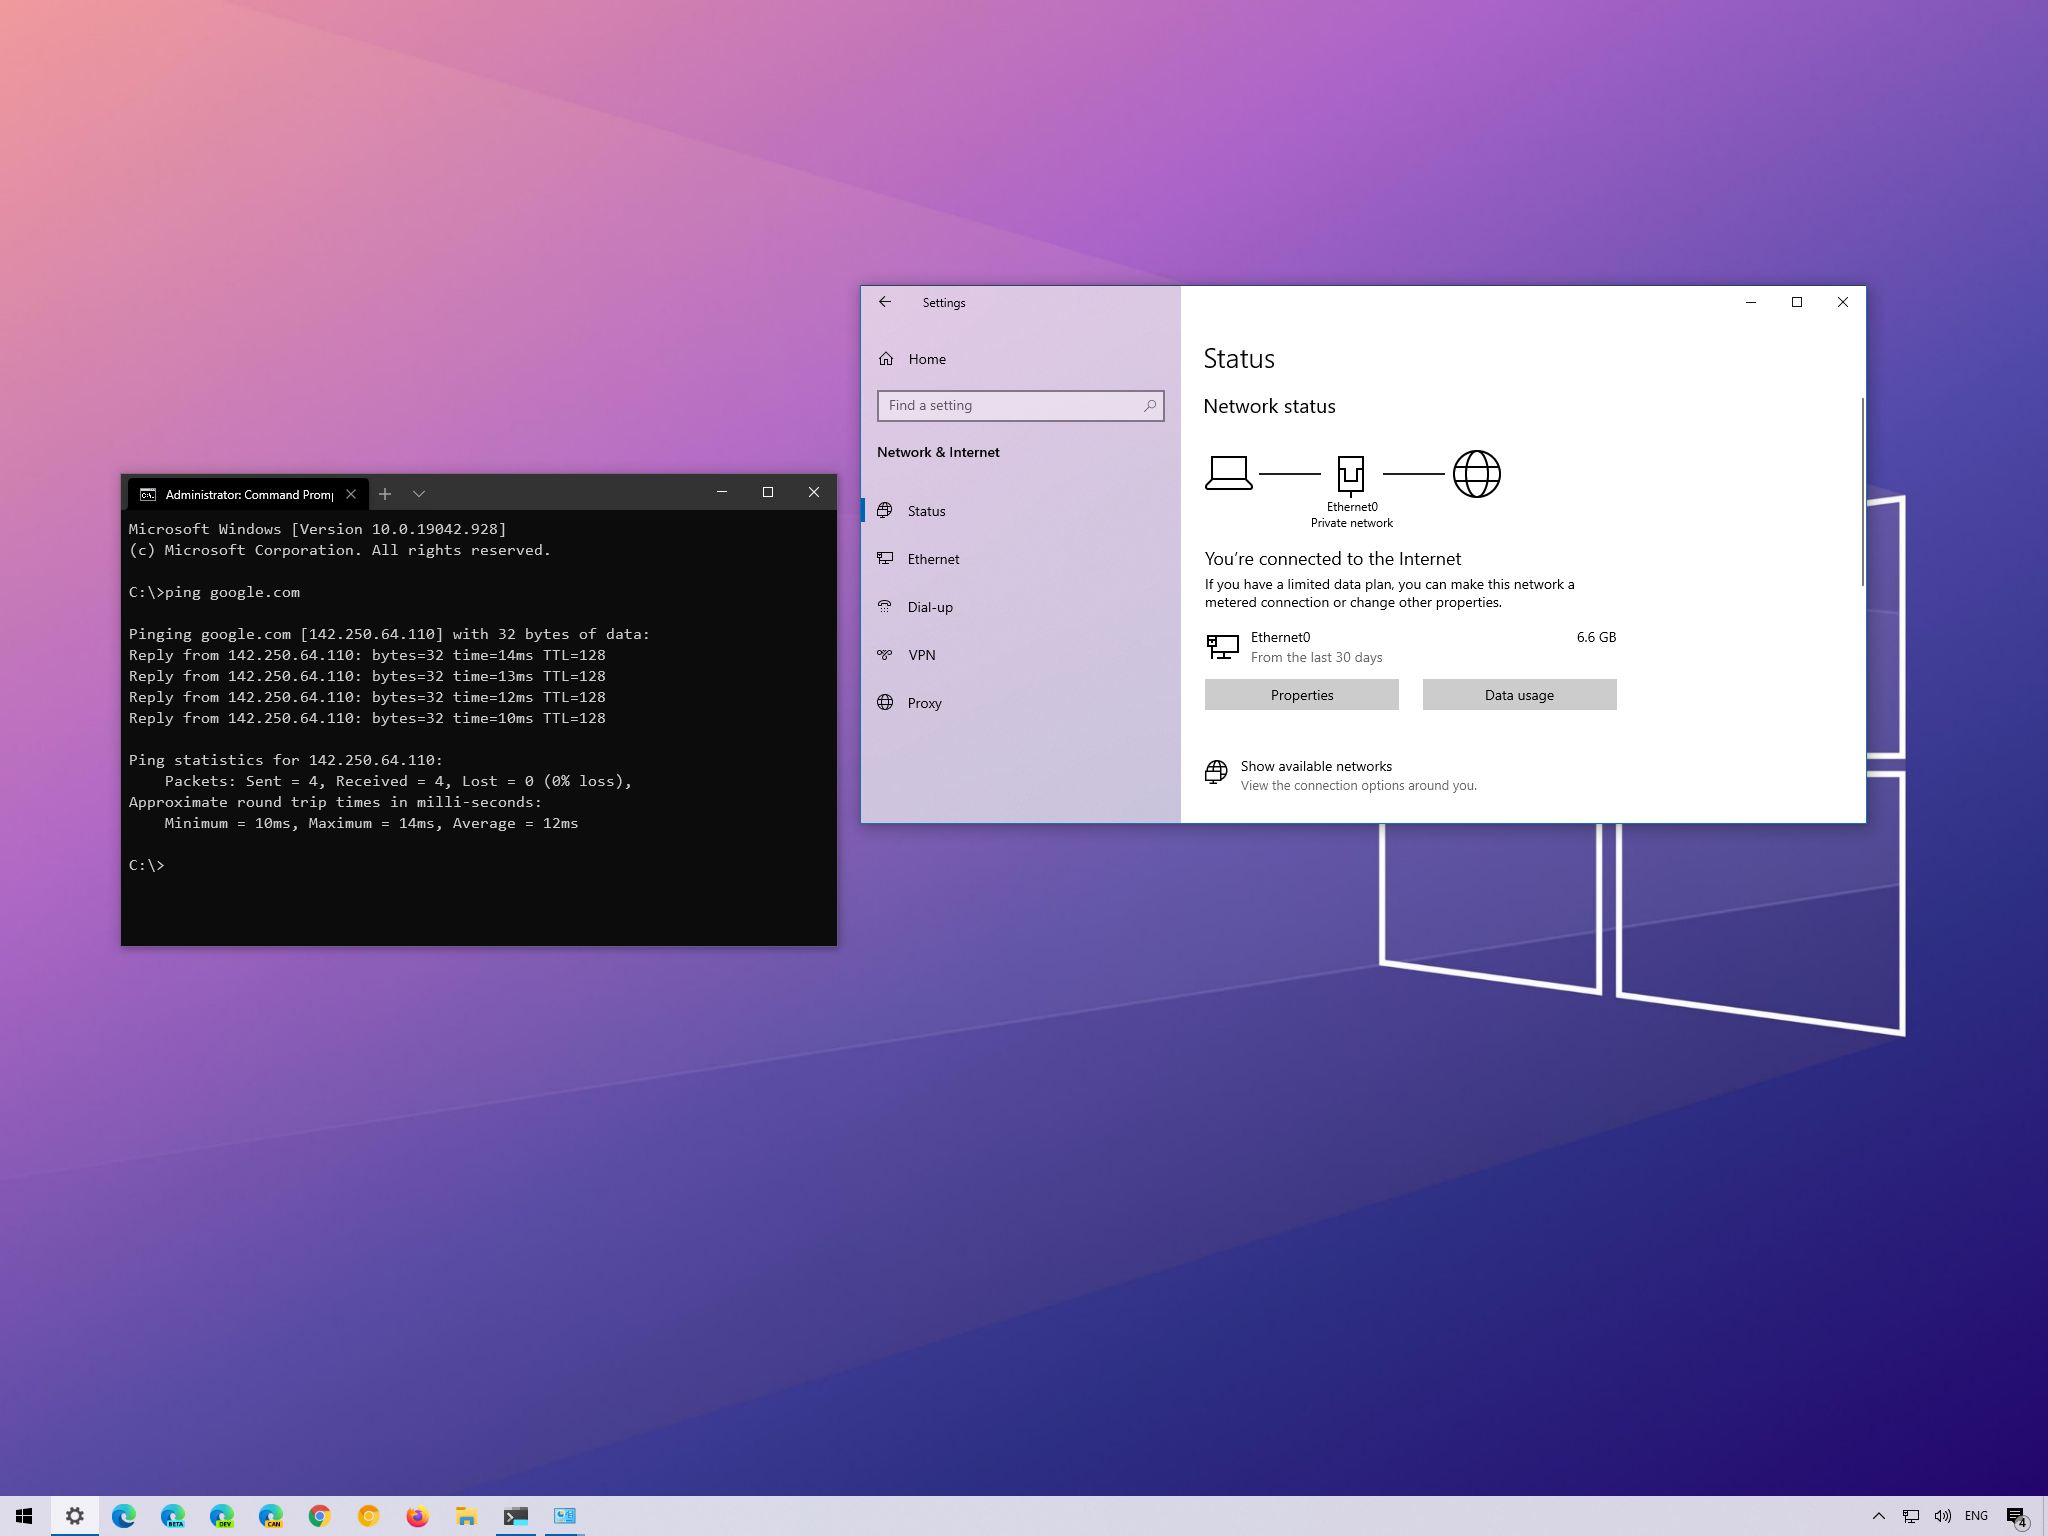
Ping the connection
Opening the web browser and loading a website can confirm whether the internet is working. However, you can also use the ping command tool to check the connection more reliably.
To test the network connection with the ping command, use these steps:
- Open Start.
- Search for Command Prompt and click the top result to open the console.
Type the following command to test the connectivity and press Enter:
Source: Windows Central
Quick tip: We are using «Google.com» as an example, but you can use any online service to test the connection, for instance, «Bing.com.»
Once you complete the steps, if you see four successful replies, it indicates that the internet connection is working.
When using a wired connection, it is wise to change cables and port on the switch to eliminate the possibility of problems with those elements.
In addition to the ping command, Windows 10 offers many other tools to troubleshoot and fix network problems. In this guide, you can learn eight of them.
How to fix connectivity using Network troubleshooter
Windows 10 also includes a troubleshooter tool that you can use to diagnose and repair common networking problems quickly.
To use the network troubleshooter on Windows 10, use these steps:
- Open Settings.
- Click on Update & Security.
- Click on Troubleshoot.
Under the «Recommended troubleshooting» section, click the Additional troubleshooters option.
Source: Windows Central
Click the Run the troubleshooter button.
Source: Windows Central
Select the Troubleshoot my connection to the internet option.
 Source: Windows Central
After you complete the steps, the troubleshooter will scan and resolve any connectivity problem.
How to reset network stack using Command Prompt
You can also try resetting the TCP/IP stack and clearing any DNS information on Windows 10 to resolve the network problem.
To reset the network stack with commands, use these steps:
- Open Start.
- Search for Command Prompt, right-click the top result, and select the Run as administrator option.
Type the following command to reset the components that handles network requests and press Enter:
netsh winsock reset
Type the following command to reset the internet protocol (IP) stack and press Enter:
netsh int ip reset
Source: Windows Central
Type the following command to clear the current networking configuration and press Enter:
Type the following command to reconfigure the network settings automatically and press Enter:
Source: Windows Central
Type the following command to clear the Domain Name System (DNS) information cached and press Enter:
Once you complete the steps, launch the web browser and confirm whether the internet connection is working.
How to reset network adapter using Settings
If you are still dealing with networking problems, Windows 10 has an option to reset all the Wi-Fi and Ethernet network adapters to fix most problems.
To reset all the network adapters on Windows 10, use these steps:
- Open Settings.
- Click on Network & Internet.
- Click on Status.
Under the «Advanced network settings» section, click the Network reset option.
Source: Windows Central
Click the Reset now button.
Source: Windows Central
After you complete the steps, the device will restart automatically, and after the reboot, you should be able to connect to the network and internet.
The process of resetting the networking settings means that you will need to re-enter the security key again. Also, you will have to reconfigure other networking software, such as VPN clients, as necessary.
How to update network adapter driver using Device Manager
Sometimes, an older version of the network driver can cause compatibility issues with a Windows 10 update. Usually, you can fix this by updating the driver to the latest version.
Update network adapter online
If the device is experiencing unreliable connectivity, but it is still possible to connect to the internet, you can check for driver updates using Windows Update.
To install a newer version of the network adapter driver, use these steps:
- Open Settings.
- Click on Update & Security.
- Click on Windows Update.
Click on View optional updates option.
Source: Windows Central
Click the Download and install button.
Source: Windows Central
After you complete the steps, the new driver will download and install automatically to fix the problem. If you cannot find an update, then Windows Update does not have more recent drivers, in which case, you may need to update the adapter manually (see steps below).
Update network adapter offline
If you cannot connect to the internet, you will have to download the driver manually from your manufacturer support website using another device and bring it over using a USB flash drive. You should always use the manufacturer instructions to complete the process, but you can always use the steps below.
To update a network adapter on Windows 10, connect the USB flash drive with the extracted files, use these steps:
- Open Start.
- Search for Device Manager and click the top result to open the app.
- Expand the Network adapters branch.
Right-click the adapter with the problem and select the Update driver option.
Source: Windows Central
Click the Browse my computer for drivers option.
Source: Windows Central
Click the Browser button.
Source: Windows Central
Once you complete the steps, the new update will install to fix the compatibility problem.
How to rollback network adapter driver using Device Manager
If the problem started after applying a driver update, you could roll back to the previous version to temporarily fix the network problem until a newer update becomes available.
To restore a previous version of a driver, use these steps:
- Open Start.
- Search for Device Manager and click the top result to open the app.
- Expand the Network adapters branch.
Right-click the adapter with the problem and select the Properties option.
Source: Windows Central
Click the Roll back driver button.
 Source: Windows Central
Quick tip: If the button is grayed out, it means that the system does not have a backup of the driver.
Once you complete the steps, test the connection with the ping command or load a website with your preferred web browser.
How to uninstall network adapter driver using Device Manager
When the problem occurs after applying a cumulative system update, it could indicate a corruption with the driver or the update made unwanted changes. In this specific situation, you can remove the driver manually, and then Windows 10 will try to reinstall it automatically.
To remove a network adapter driver, use these steps:
- Open Start.
- Search for Device Manager and click the top result to open the app.
- Expand the Network adapters branch.
Right-click the Wi-Fi or Ethernet network adapter and select the Uninstall device option.
Source: Windows Central
After you complete the steps, Windows 10 will detect and reinstall the driver automatically, fixing the network problem.
If the system cannot find the appropriate driver, you can use the previous steps to download and install the network adapter manually.
How to disable security apps to fix network problems on Windows 10
On Windows 10, sometimes, third-party security software (such as antivirus and firewall) can prevent the device from accessing the internet. If this is the case, you can determine if the application is the problem by temporarily disabling it and testing the network connection.
The steps below will help you to disable the security features built into Windows 10. If you have a different solution, then check your software support website for more specific details.
Disable Microsoft Defender Antivirus
To temporarily disable Microsoft Defender on Windows 10, use these steps:
- Open Start.
- Search for Windows Security and click the top result to open the app.
- Click on Virus & threat protection.
Under the «Virus & threat protection settings» section, click the Manage settings option.
Source: Windows Central
Turn off the Real-time protection toggle switch.
Source: Windows Central
Once you complete the steps, test the connection going to «Bing.com» or «Google.com» on your device.
You can always revert the changes by restarting the computer or enabling the Real-time protection option again on step No. 5.
Disable Microsoft Defender Firewall
To temporarily disable the Microsoft Defender Firewall, use these steps:
- Open Start.
- Search for Windows Security and click the top result to open the app.
- Click on Firewall & network protection.
Click the (active) network.
Source: Windows Central
Turn off the Microsoft Defender Firewall toggle switch.
Source: Windows Central
After you complete the steps, confirm whether the internet is working by loading a website with your web browser.
You can enable the firewall again using the same instructions outlined above, but on step No. 5, make sure to turn on the Microsoft Defender Firewall toggle switch.
How to uninstall recent update to fix network problems on Windows 10
Although system updates are meant to resolve issues and improve the experience, it is not uncommon to see buggy updates through Windows Update that can cause connectivity problems. If you suspect a recent update is causing networking issues, you can remove it to mitigate the problem until a newer update becomes available.
Uninstall quality update
To uninstall a quality update on Windows 10, use these steps:
- Open Settings.
- Click on Update & Security.
- Click on Windows Update.
Click the View update history button.
Source: Windows Central
Click the Uninstall updates option.
Source: Windows Central
Click the Uninstall button.
Source: Windows Central
Once you complete the steps, Windows 10 will remove the update to allow the network adapter to work again.
Uninstall feature update
When the problem occurs after installing a major update (such as the October 2020 Update), you can also remove the update to roll back to the previous version, but the steps will be slightly different.
Important: Although rolling back to a previous version is a non-destructive process, it is recommended to create a temporary full backup of your PC in case something goes wrong. Also, the option to roll back is only available during the first ten days after upgrading. After this time, you won’t be able to undo the changes unless you re-install the version you want using a clean installation.
To uninstall a feature update, use these steps:
- Open Settings.
- Click on Update & Security.
- Click on Recovery.
Under the «Go back to a previous version of Windows 10» section, click the Get started button.
Source: Windows Central
Check any of the reasons available.
Source: Windows Central
Click the Next button.
Source: Windows Central
Click the Next button again.
Source: Windows Central
After you complete the steps, Windows 10 will roll back to the previous setup when the network was working correctly.
More Windows 10 resources
For more helpful articles, coverage, and answers to common questions about Windows 10, visit the following resources:
We may earn a commission for purchases using our links. Learn more.
![]()
Microsoft’s Surface Duo is not ‘failing up’
Microsoft announced this week that it was expanding Surface Duo availability to nine new commercial markets. While Surface Duo is undoubtedly a work in progress, this is not a sign of a disaster. It’s also doesn’t mean that Surface Duo is selling a ton either. Instead, the reason for the expansion is a lot more straightforward.
![]()
Here’s what you can do if Windows 10 update KB5001330 is causing issues
In this guide, we’ll show you the steps to get rid of the update KB5001330 to fix profile, gaming, and BSoD problems with the Windows 10 October 2020 Update and May 2020 Update.
![]()
Review: NZXT made its first AMD motherboard and it’s brilliant
NZXT made its first motherboard with an AMD chipset. The N7 B550 supports the latest AMD Ryzen processors and there’s plenty to love about this platform. To differentiate the N7 B550, NZXT made notable changes to the layout of the motherboard to make it easy to create a clean PC build.
![]()
These are the best PC sticks when you’re on the move
Instant computer — just add a screen. That’s the general idea behind the ultra-portable PC, but it can be hard to know which one you want. Relax, we have you covered!


