- AIO Boot Creator — простое создание мультизагрузочной флешки UEFI/BIOS
- Подготовка USB флешки или внешнего диска AIO Boot Creator
- Процесс создания мультизагрузочной флешки
- Видео инструкция
- Aio boot creator linux
- AIO Boot
- Install Grub2 for AIO Boot and integrate WinPE 10 on Linux
- Install AIO Boot
- Install Grub2
- WinPE 10
- AIO Boot
- Boot Linux from the ISO file
- AIO Boot
- loopback.cfg
- How to boot Linux from ISO file using loopback.cfg?
- Ubuntu
- Linux Mint
- Debian 9
- Manjaro 17
AIO Boot Creator — простое создание мультизагрузочной флешки UEFI/BIOS
 Сейчас доступно множество отличных программ для создания загрузочной или мультизагрузочной флешки с Windows 10, 8.1 и Windows 7, Linux, утилитами и инструментами. AIO Boot Creator, по мнению многих пользователей — одна из лучших бесплатных программ, позволяющих сравнительно легко создать мультизагрузочную флешку или внешний жесткий диск.
В этой инструкции о способах создания загрузочной или мультизагрузочной флешки для загрузки в режимах UEFI и Legacy (BIOS) в программы, особенности использования AIO Boot Creator и некоторая дополнительная информация. Также может быть полезным: Лучшие программы для создания загрузочной флешки.
Подготовка USB флешки или внешнего диска AIO Boot Creator
Создание мультизагрузочной флешки с помощью AIO Boot Creator предполагает предварительную подготовку накопителя для последующего помещения образов ISO на него. Действия можно выполнить автоматически или вручную.
- Скачайте AIO Boot Creator либо с официального сайта (aioboot.com, который почему-то не открывается), либо с официальной страницы на GitHub — https://github.com/nguyentumine/AIO-Boot/releases. На указанной странице присутствуют следующие основные файлы: архив 7z с AIOBoot для ручной настройки флешки и AIO_BOOT_Extractor.exe для автоматической записи всего необходимого на флешку. Пароль архива, если потребуется — aioboot
- Если вы загрузили архив и планируете все сделать вручную, то распакуйте содержимое архива на флешку FAT32 таким образом, чтобы в корне накопителя оказались папки AIO, EFI и два исполняемых файла.
- После этого запустите файл AIOCreator.exe на флешке, нажмите кнопку «Bootloaders» и установите загрузчик Grub2.

- Если вы загрузили AIO Boot Extractor, то в общем случае для подготовки флешки FAT32 без её форматирования достаточно запустить программу (при необходимости включить русский язык нажмите по флагу справа вверху), выбрать накопитель, нажать Ok и дождаться завершения процесса (для внешнего жесткого диска может потребоваться отметить пункт «Использовать жесткий диск»).
- При желании использовать NTFS и сохранить возможность UEFI загрузки зайдите в раздел «Авторазбиение», задайте соответствующие параметры и нажмите ОК. В этом случае флешка будет разбита на разделы, один из которых — небольшой FAT32 будет служить для загрузки, другой — NTFS или ExFAT — для хранения образов.
- По завершении 3-го или 4-го шага на флешке появятся те же файлы, что и при ручной распаковке архива на нее.


А теперь несколько примечаний:
- Вам не обязательно создавать отдельные разделы FAT32 и NTFS. В случае, если образ не будет помещаться на FAT32, AIO Boot Creator автоматически разобьет его на части.
- В этой статье упомянут только загрузчик Grub2, как самый часто используемый, однако программа позволяет установить и другие типы загрузчиков на флешку.
Процесс создания мультизагрузочной флешки
После того, как флешка или внешний диск подготовлены, можно добавлять на нее загрузочные образы ISO автоматически или вручную. Для автоматического добавления с использованием AIO Boot Creator:
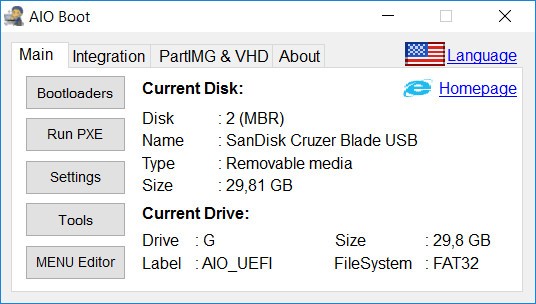
- Запустите с флешки файл AIOCreator.exe. Если вы использовали разбиение флешки на разделы, то запускайте этот файл с того раздела, который большего размера. Если в системе включена опция Secure Boot, вам сообщат о том, что включена безопасная загрузка, это будет мешать загрузке с флешки на данном компьютере и потребуется отключить Secure Boot. Главное окно программы AIO Boot выглядит как на скриншоте ниже.
- Рекомендую зайти в пункт «Настройки» и выбрать русский язык для Grub2. Там же вы можете установить обои для меню и изменить другие опции.
- Перейдите на вкладку «Интеграция», выберите, какой тип образа вы хотите добавить на флешку, после чего укажите файл образа, нажмите Ок, введите как будет называться этот образ в меню при загрузке и дождитесь завершения добавления образа.
- Если флешка в файловой системе FAT32, а образ более 4 Гб, вам сообщат о возможности разбить его на части автоматически.
- Тем же способом можно добавить дополнительные образы для установки Windows 10, 8.1 и Windows 7, образы утилит и различных LiveCD, антивирусные диски на вашу флешку.
- При желании проверить, как выглядит меню и загрузка, вы можете зайти в «Инструменты» и выбрать пункт «Тестовая загрузка QEMU».


Меню при загрузке с флешки AIO Boot Creator на русском языке будет выглядеть примерно следующим образом:

При желании добавить образы вручную, не используя интерфейс программы, вне зависимости от конкретного образа вы можете добавить его в папку AIO\Files на флешке.

После добавления образов в эту папку, вы сможете найти их в меню загрузке в разделе «Загрузка из ISO, WIM, IMG, VHD и IMA.
Видео инструкция
В инструкции приведены лишь базовые действия по созданию мультизагрузочной флешки в программе AIO Boot Creator, в действительности, её возможности значительно шире: вы можете создавать мультизагрузочный ISO образ (в разделе «Инструменты»), использовать встроенные утилиты для создания образов, разбития файлов и работы с разделами, но, как правило, большинство пользователей используют лишь описанный метод.
Источник
Aio boot creator linux
AIO Boot is an All-in-One bootable software for USB and HDD. Is one of the best Multiboot USB Creator for Windows. AIO Boot own unique features, advanced and friendly.

- Support boots in both UEFI and Legacy BIOS modes.
- UEFI mode: Grub2, Clover and rEFInd.
- Legacy mode: Grub2, Grub4Dos, Clover, Enoch Chameleon and Syslinux.
- You can choose between Grub2 and Grub4Dos as the default boot loader. Only use Grub4Dos if your computer is not compatible with Grub2.
- Supports hard drive, external hard drive and USB, including SDcard.
- Boot into Legacy mode on the GPT hard disk.
- Secure Boot support via Shim and MokManager.
- Support booting into UEFI mode from Legacy mode via Clover regardless of your computer does not support UEFI mode.
- Support boot and install OS through Network boot.
- Support to create ISO for burning to CD/DVD.
- Depending on the case, AIO Boot can be installed on multiple partitions:
- FAT32:
- You need to use FAT32 partitions to support booting in UEFI mode.
- Some operating systems like Bitdefender, Fedora and Gentoo… do not support booting on NTFS partitions.
- Ubuntu and Debian’s persistent mode is also not supported on NTFS partitions.
- So we need to use the FAT32 format.
- NTFS:
- NTFS partitions can store files larger than 4GB. You can save large files such as backups, VHD files…
- You can use resident mode larger than 4GB for Android-x86, Remix OS, Phoenix OS and WifiSlax 4.12.
- So we need to use the NTFS format.
- FAT32:
- Supports to integrate multiple Windows XP/7/8.1/10 installers into USB and HDD.
- Support USB 3.0 driver for Windows 7 installer. This helps you to install Windows 7 using USB 3.0. If you use other software, you may get the error “ A required CD/DVD drive device driver is missing. If you have a driver floppy disk, CD, DVD, or USB flash drive, please insert it now. “.
- Support split ISO file into several if ISO file is larger than 4GB but you are using FAT32 format.
- Supports booting multiple operating systems in just one USB. Includes Linux, Android, Antivirus software, Disk utilities, Backup and recovery programs.
- Support booting WinPE and VHD.
- Supports persistent mode for many Linux, Android and anti-virus programs. This means that your data will be saved after each session.
- Supports identification and boot into the operating system already installed on your hard drive. Includes Windows, Linux, MacOS, FreeBSD and Android.
- Supports creating a partition image (.PARTIMG) from ISO file. Use this feature if AIO Boot does not support booting it.
- You can switch between the partitions where you have installed the AIO Boot. The menus and packages will be displayed correspondingly on that partition. From Grub2, press y to do this.
- Supports recovery of Windows bootloader in both UEFI and Legacy BIOS modes.
- You can change the language, background and font size in Settings.
- Password protection for the Grub2 menu.
- Users can not boot, edit menus, or use the Grub2 command line before they enter the correct password.
- The password is encrypted by PBKDF2 so no one will know the password you have set.
- Anyone can change or remove the password if they have access to the Grub2 configuration files.
- Boot from ISO, WIM, IMG, VHD and IMA files: AIO Boot supports booting Linux as well as other utilities from ISO, WIM, VHD, IMG and IMA files.
- Grub2 File Manager: By using Grub2 File Manager, you can browse files and folders on all partitions on your computer. In addition to reading text files, it also supports booting from the files it supports.
- Multiple language support for AIO Boot Extractor, AIOCreator and Grub2 menu.
- Supports creating Windows VHD.
- Support for removing and renaming menus for integrated packages.
AIO Boot Extractor
- Help you reformat USB to FAT32 before installing.
- Helps you create two FAT32 and NTFS partitions.
- FAT32: support boots in UEFI mode.
- NTFS: support for saving files larger than 4GB.
Partition Image Mapper
- Support to create USB installed FreeBSD, TrueOS, Ubuntu Server, Debian, Kali Linux and even macOS without loss of data.
- Support boot multiple operating systems that AIO Boot can not support in the usual way.
You can download AIO Boot and experience now.
Источник
AIO Boot
AIO Boot > AIO Boot > Install Grub2 for AIO Boot and integrate WinPE 10 on Linux
Install Grub2 for AIO Boot and integrate WinPE 10 on Linux
Linux is good and free OS, however Windows is more popular. Because knowledge of Linux is limited, AIO Boot is not supported on Linux at this time. However, you can install AIO Boot and integrate WinPE 10 on Linux then boot into Windows environment to use this tool.
Install AIO Boot
You can install AIO Boot through the simple steps below:
- Download AIO Boot latest version at Github. You need to download the 7-Zip archive (.7z) instead of .exe.
- You should use GParted to reformat the USB drive, use FAT32 format for best support.
- If you do not have the p7zip package installed, you need to install it first, for example on Ubuntu:
- Extract the AIOBoot-v0.9.X.Y.7z file to your USB drive.
- After extracting, your USB drive will have the following files and folders:
- AIO
- EFI
- AIOCreator.exe
- PartIMGMapper.exe
Install Grub2
To be able to boot into AIO Boot, you need to install Grub2 first. Installing Grub2 on Linux can be done with just a few commands. If you only need to boot Grub2 in UEFI mode, you just need the USB drive in FAT32 format and skip the steps below.
- Determine which hard disk you will install Grub2.
Here my USB hard disk is /dev/sdb .
If this command does not exist, you need to install the necessary packages first.
If you do not see any error messages, you have successfully installed Grub2.
Now, you can boot into Grub2 of AIO Boot, to boot into WinPE 10, you need to integrate it first.
WinPE 10
The integration of WinPE 10 only needs to be done once.
- Download WinPE 10.
- Use 7-Zip to extract the files to the USB drive where you installed the AIO Boot.
Источник
AIO Boot
AIO Boot > AIO Boot > Boot Linux from the ISO file
Boot Linux from the ISO file
AIO Boot
AIO Boot supports booting Linux as well as other utilities from ISO, WIM, VHD, IMG and IMA files.
- Just copy the ISO, WIM, VHD, IMG and IMA files to the /AIO/Files directory or its subfolders.
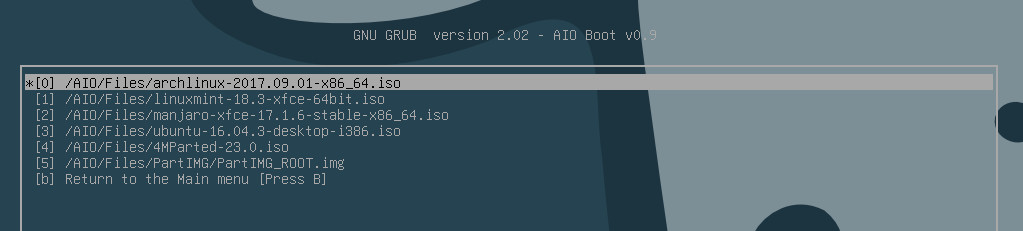
- From the main menu of Grub2, press the j key for quick access to the “Boot from ISO, WIM, IMG, VHD and IMA files” menu.
- Grub2 will list the files that it supports, and then you just select them to boot. The script only lists the files in the /AIO/Files directory and its subfolders. It will be very slow if you list all directories on your computer. For files outside of this folder, you can boot them through the Grub2 File Manager.
For Linux ISO files, the script will automatically detect which distributions it supports. List tested (incomplete):
- 4MParted.
- Arch Linux.
- Bitdefender.
- CentOS.
- Clonezilla.
- Debian Live.
- Fedora.
- Gentoo.
- Gparted.
- Kali Linux.
- Linux Lite.
- Linux Mint.
- Manjaro.
- MiniTool Partition Wizard 9.1.
- Slackware Live Edition.
- Ubuntu.
- WifiSlax 4.12.
- WifiSlax64.
- antiX.
- gNewSense.
- openSuse.
If not detected, the script will give you the option to boot the file with Grub4dos and MemDisk (which does not support UEFI). I used wimboot to boot WinPE 7/8/8.1/10 (.wim) and NTBOOT to boot WinPE XP (.wim) and VHD (.vhd, .vhdx) through Grub4dos. You are also provided with a menu to open files with Loopback.
However, some machines can not boot Linux from the ISO file, it needs to extract. Use AIOCreator.exe to integrate, this tool always uses extraction method if possible. It also supports creating persistent mode for supported Linux distributions. Only use ISO when you can not run AIOCreator.exe, which is useful if you are using a Linux environment.
loopback.cfg
If your ISO file contains the file /boot/grub/loopback.cfg, this ISO file is designed to allow it to boot from an ISO file.
What is a loopback.cfg? A loopback.cfg is basically just a grub.cfg that’s designed to be used to boot a live distribution from an iso file on a filesystem rather than an actual physical CD.
Read more about loopback.cfg here.
How to boot Linux from ISO file using loopback.cfg?
There are many Linux distributions that support loopback.cfg to use Grub2 to boot itself through an ISO file. The most popular are Ubuntu and Ubuntu-based distributions such as Linux Mint … recently, Debian 9 and Manjaro 17 also supported. All of these distributions can use the following menu:
- TITLE : Grub2 menu name.
- PATH : the path to your ISO file.
- /boot/grub/loopback.cfg : the path to the loopback.cfg file in the ISO file.
You can add this menu to Grub2 of AIO Boot or Ubuntu, Linux Mint… The Grub2 menu of AIO Boot is located at /AIO/Menu/Main.cfg. Here are some Linux distributions that support loopback.cfg.
Ubuntu
Includes Kubuntu, Edubuntu, Xubuntu, Mythbuntu, UbuntuStudio, Lubuntu, Ubuntu GNOME, Ubuntu Kylin, Ubuntu MATE and Ubuntu Budgie. And the distributions are based on Ubuntu.
Linux Mint
Debian 9
Manjaro 17
Starting from Manjaro 17.0.6, I have reported the issue of previous versions here. Manjaro is based on Arch Linux, you need to specify the partition that contains the ISO file.
Источник


