- Aircrack-ng
- User Tools
- Site Tools
- Table of Contents
- Airmon-ng
- Description
- Usage
- Usage Examples
- Typical Uses
- Check status and/or listing wireless interfaces
- Checking for interfering processes
- Enable monitor mode
- Disable monitor mode
- Madwifi-ng driver monitor mode
- Usage Tips
- Confirming the Card is in Monitor Mode
- Determining the Current Channel
- How Do I Put My Card Back into Managed Mode?
- Debugging issues
- —verbose flag
- —debug flag
- Usage Troubleshooting
- Madwifi-ng
- Airmon-ng says the interface is not in monitor mode
- My interface was put in monitor mode but tools says it is not
- Interface athX number rising (ath0, ath1, ath2. ath45..)
- Interface ath1 created instead of ath0
- Why do I get ioctl(SIOCGIFINDEX) failed?
- Error message: «wlanconfig: command not found»
- airmon-ng shows RT2500 instead of RT73
- Error «add_iface: Permission denied»
- check kill fails
- SIOCSIFFLAGS: Unknown error 132
- ERROR adding monitor mode interface: command failed: Operation not supported (-95)
- Инструменты Kali Linux
- Список инструментов для тестирования на проникновение и их описание
- Airmon-ng
- Описание Airmon-ng
- Справка по Airmon-ng
- Руководство по Airmon-ng
- Примеры запуска Airmon-ng
- Возврат в режим управляемости
- Альтернативный способ перевода в режим монитора
- Перевод в режим монитора с помощью команд ip и iw
- NetworkManager препятствует переводу беспроводной карты в режим наблюдения
- Установка Airmon-ng
- Aircrack-ng
- User Tools
- Site Tools
- Table of Contents
- Installing Aircrack-ng from Source
- Requirements
- Linux
- Windows (Cygwin)
- FreeBSD, OpenBSD, NetBSD, Solaris
- Optional stuff
- Compiling and installing
- Current version
- Compiling with AirPcap support (cygwin only)
- Compiling on *BSD
- Compiling on OS X
- Latest Git (development) Sources
- ./configure flags
- Troubleshooting Tips
- error while loading shared libraries: libaircrack-ng.so.0
- «command not found» error message
- Installing pre-compiled binaries
- Linux/BSD/OSX
- Windows
Aircrack-ng
User Tools
Site Tools
Table of Contents
Airmon-ng
Description
This script can be used to enable monitor mode on wireless interfaces. It may also be used to go back from monitor mode to managed mode. Entering the airmon-ng command without parameters will show the interfaces status.
Usage
usage: airmon-ng [channel] or airmon-ng
Usage Examples
Typical Uses
Check status and/or listing wireless interfaces
Checking for interfering processes
When putting a card into monitor mode, it will automatically check for interfering processes. It can also be done manually by running the following command:
Killing interfering processes
This command stops network managers then kill interfering processes left:
Enable monitor mode
Note: It is very important to kill the network managers before putting a card in monitor mode!
As you can see, it created a monitor mode interface called wlan0mon and it notified there are a few process that will interfere with the tools.
Disable monitor mode
Don’t forget to restart the network manager. It is usually done with the following command:
Madwifi-ng driver monitor mode
This describes how to put your interface into monitor mode. After starting your computer, enter “iwconfig” to show you the current status of the wireless interfaces. It likely looks similar the following output.
If you want to use ath0 (which is already used):
And the system will respond:
Now, if you do “iwconfig”:
You can see ath0 is gone.
To put wifi0 in monitor mode:
Now enter “iwconfig”
You can see ath0 is in monitor mode. Also make sure the essid, nickname and encryption have not been set. The access point shows the MAC address of the card. The MAC address of the card is only shown when using the madwifi-ng driver. Other drivers do not show the MAC address of the card.
If ath1/ath2 etc. is running then stop them first prior to all the commands above:
You can set the channel number by adding it to the end: airmon-ng start wifi0 9
Usage Tips
Confirming the Card is in Monitor Mode
To confirm that the card is in monitor mode, run the command “iwconfig”. You can then confirm the mode is “monitor” and the interface name.
For the madwifi-ng driver, the access point field from iwconfig shows your the MAC address of the wireless card.
Determining the Current Channel
To determine the current channel, enter “iwlist channel”. If you will be working with a specific access point, then the current channel of the card should match that of the AP. In this case, it is a good idea to include the channel number when running the initial airmon-ng command.
How Do I Put My Card Back into Managed Mode?
It depends on which driver you are using. For all drivers except madwifi-ng:
For madwifi-ng, first stop ALL interfaces:
Where X is 0, 1, 2 etc. Do a stop for each interface that iwconfig lists.
For mac80211 drivers, nothing has to be done, as airmon-ng keeps the managed interface alongside the monitor mode one (mac80211 uses interface types rather than modes of operation). If you no longer need the monitor interface and want to remove it, use the following:
X is the monitor interface number — 0 unless you run multiple monitoring interfaces simultaneously.
Debugging issues
airmon-ng has two options to show more information, which can be useful when reporting or debugging issues.
—verbose flag
It gives information about the system as well as details about the wireless card.
In this case, the following additional information can be seen:
—debug flag
It will give the same information as verbose and add more details:
Usage Troubleshooting
Madwifi-ng
Quite often, the standard scripts on a linux distribution will setup ath0 and or additional athX interfaces. These must all be removed first per the instructions above. Another problem is that the script set fields such as essid, nickname and encryptions. Be sure these are all cleared.
Airmon-ng says the interface is not in monitor mode
It most likely mean the interface mode was changed from monitor to managed mode by a network manager. In this case, when stopping monitor mode, this is not a problem.
My interface was put in monitor mode but tools says it is not
It usually means the interface was put in monitor mode prior to killing network managers. And the network manager put the card back in managed mode.
Refer to the documentation above to kill network managers and put it back into monitor mode.
Interface athX number rising (ath0, ath1, ath2. ath45..)
The original problem description and solution can be found in this forum thread.
Problem: Every time the command “airmon-ng start wifi0 x” is run, a new interface is created as it should, but there where two problems. The first is that for each time airmon-ng is run on wifi0 the interface number on ath increases: the first time is ath1, the second ath2, the third ath3, and and so on. And this continues so in a short period of time it is up to ath56 and continuing to climb. Unloading the madwifi-ng driver, or rebooting the system has no effect, and the number of the interface created by airmon-ng continues to increase.
The second problem is that if you run airmon-ng on wifi0 the athXX created does not show as being shown as in Monitor mode, even though it is. This can be confirmed via iwconfig.
All these problem related to how udev assigns interface names. The answer is in this ticket: http://madwifi-project.org/ticket/972#comment:12 Thanks to lucida. The source of the problem comes from the udev persistent net rules generator.
Each distro is different… So here is a solution specifically for Gentoo. You should be able to adapt this solution to your particular distribution.
Gentoo 2.6.20-r4 Udev 104-r12 Madwifi 0.9.3-r2 Aircrack-ng 0.7-r2
Change the file /etc/udev/rules.d/75-persistent-net-generator.rules
From: KERNEL==“eth*|ath*|wlan*|ra*|sta*…….. To: KERNEL==“eth*|Ath*|wlan*|ra*|sta*…….
In other words, you just capitalize the a. ath* becomes Ath*. Save the file.
Now delete the file /etc/udev/rules.d/70-persistent-net.rules.
Remove the driver and insert back.
Removing ath also works: KERNEL==“eth*|wlan*|ra*|sta*….
This is also on Gentoo, both 2.6.19-gentoo-r5 and 2.6.20-gentoo-r6
For Ubuntu, see this Forum posting. The modified version of /etc/udev/rules.d/75-persistent-net-generator.rules is:
Interface ath1 created instead of ath0
This troubleshooting tip applies to madwifi-ng drivers. First try stopping each VAP interface that is running (“airmon-ng stop IFACE” where IFACE is the VAP name). You can obtain the list from iwconfig. Then do “airmon-ng start wifi0”.
If this does not resolve the problem then follow the advice in this thread.
Why do I get ioctl(SIOCGIFINDEX) failed?
If you get error messages similar to:
Error message: «wlanconfig: command not found»
If you receive “wlanconfig: command not found” or similar then the wlanconfig command is missing from your system or is not in the the path. Use locate or find to determine if it is on your system and which directory it is in.
If it is missing from your system then make sure you have done a “make install” after compiling the madwifi-ng drivers. On Ubuntu, do “apt-get install madwifi-tools”.
If it is not in a directory in your path then move it there or add the directory to your path.
airmon-ng shows RT2500 instead of RT73
Error «add_iface: Permission denied»
You receive an error similar to:
or similar to this:
This means you have an old version of airmon-ng installed. Upgrade to at least v1.0-rc1. Preferably you should upgrade to the current version. See the installation page for more details. Also, don’t forget you need to be root to use airmon-ng (or use sudo).
check kill fails
Distros from now on are going to adopt ‘upstart’ which is going to replace the /sbin/init daemon which manages services and tasks during boot.
and then proceed with greping and killing the pids of dhclient and wpa_supplicant.
This is the only way to kill ALL of the potentially problematic pids for aireplay-ng permanently. The trick is the kill the daemons first and then terminate the ‘tasks’.
SIOCSIFFLAGS: Unknown error 132
If you have an output similar to:
It indicates that RF are blocked. It needs to be enabled by using the switch on your laptop and/or using the following command:
ERROR adding monitor mode interface: command failed: Operation not supported (-95)
It is known to happen on the Raspberry Pi, when using airmon-ng. When that happens, the following can be seen in dmesg:
There may be instances of the following in dmesg as well prior to the above output:
Even though dmesg says the interface is already in monitor mode and “iw dev wlan0 info” confirms it is, airodump-ng will fail and report the interface data linktype is Ethernet. This is a bug in the driver and/or firmware, and the workaround is to reboot the system or to reload the driver:
Источник
Инструменты Kali Linux
Список инструментов для тестирования на проникновение и их описание
Airmon-ng
Описание Airmon-ng
airmon-ng — это баш скрипт, созданный для перевода беспроводных карт в режим наблюдения.
Автор: Thomas d’Otreppe, Первоначальная работа: Christophe Devine
Справка по Airmon-ng
Руководство по Airmon-ng
airmon-ng — это скрипт, который может использоваться для включения режима наблюдения на беспроводном интерфейсе. Он также может использоваться для перевода из режима наблюдения в режим управляемости. Ввод команды airmon-ng без параметров отобразит статус интерфейсов. Она может выводить список/убивать программы, которые могут вмешиваться в беспроводную карту и также устанавливает верные источники в /etc/kismet/kismet.conf.
start [канал]
Включает режим наблюдения на интерфейсе (и задаёт канал).
check [kill]
Список программ, которые могут вмешиваться в беспроводную карту. Если указать ‘kill’, то будет сделана попытка убить их всех.
Примеры запуска Airmon-ng
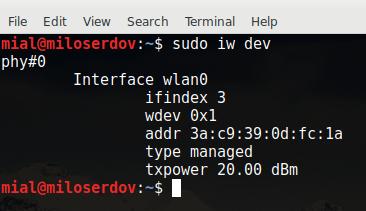
Просматриваем доступные сетевые интерфейсы:
Проверяем процессы, которые могут нам помешать
Перед переводом в режим наблюдения, убиваем процессы, которые нам могут помешать:
Пытаемся перевести интерфейс wlan0 в режим наблюдения:
Проверяем, была ли беспроводная карта переведена в режим монитора:
Сетевая карта изменила название интерфейса и переведена в режим монитора, наблюдения (об этом свидетельствует строка Monitor).
Возврат в режим управляемости
Альтернативный способ перевода в режим монитора
Вы можете использовать альтернативный вариант перевода беспроводного интерфейса в режим наблюдения:
Или в одну строку
Всё прошло успешно — сетевая карта переведена в режим наблюдения (об этом говорит строка Mode:Monitor).
Возврат в управляемый режим:
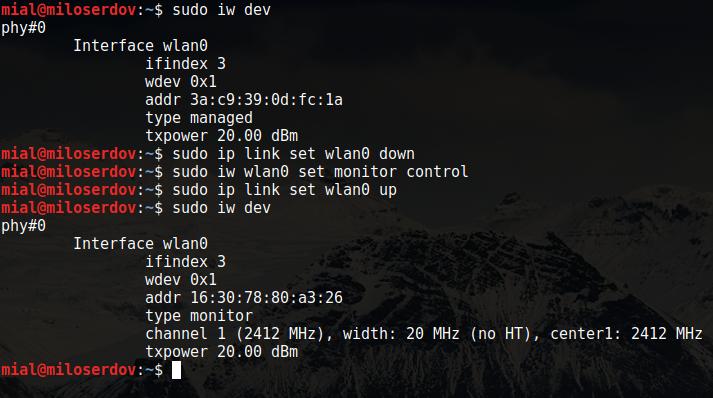
Перевод в режим монитора с помощью команд ip и iw
Команды ifconfig и iwconfig признаны устаревшими. Поэтому хотя предыдущий способ попрежнему прекрасно работает, доступна альтернативная его реализация с помощью новых программ. Узнайте имя беспроводного интерфейса:
Далее выполните последовательность команд
заменив на действительное имя вашего беспроводного интерфейса (у меня это wlan0):
В BlackArch (имя интерфейса wlp2s0), последовательность команд выглядит так:
Команда в одну строку:
Следующая большая команда должна сама определять имя беспроводного интерфейса и переводить его в режим монитора:
Возврат в управляемый режим:
Для интерфейса wlan0 реальные команды выглядят так:
NetworkManager препятствует переводу беспроводной карты в режим наблюдения
При определённых условиях NetworkManager может не дасть Wi-Fi адаптеру перевестись в режим монитора. Более того, уже переведённую в режим монитора беспроводную карту он может вернуть в управляемый режим. Поэтому рекомендуется отключать NetworkManager при тестировании на проникновение беспроводных сетей.
В Kali Linux и BlackArch это делается так:
Примечание, после отключения NetworkManager пропадёт Интернет!
Установка Airmon-ng
Программа предустановлена в Kali Linux.
Установка в другие операционные системы
Эта программа из пакета Aircrack-ng. Т.е. для её установки нужно установить Aircrack-ng.
Источник
Aircrack-ng
User Tools
Site Tools
Table of Contents
Installing Aircrack-ng from Source
Legacy information can be found here.
Requirements
Linux
Windows (Cygwin)
Install the following via Homebrew (brew):
FreeBSD, OpenBSD, NetBSD, Solaris
Install the following via pkg:
Optional stuff
Compiling and installing
Current version
Compiling with AirPcap support (cygwin only)
Compiling on *BSD
Commands are exactly the same as Linux but instead of make, use gmake (with CC=gcc5 CXX=g++5 or any more recent gcc version installed).
Compiling on OS X
Commands are exactly the same as Linux
Latest Git (development) Sources
Note: Compilation parameters can also be used with the sources from our git repository.
./configure flags
When configuring, the following flags can be used and combined to adjust the suite to your choosing:
Troubleshooting Tips
error while loading shared libraries: libaircrack-ng.so.0
Run ldconfig as root or with “sudo” to solve the issue.
«command not found» error message
After you do “make install” then try to use any of the Aircrack-ng suite commands, you get the error message “command not found” or similar. Your system will look for the Aircrack-ng commands in the directories defined by the PATH command.
Normally, the Aircrack-ng suite programs and man pages are placed in:
On your system, to determine which directories have the Aircrack-ng programs enter the following. If using “locate” be sure to first run “updatedb”.
Once you know the directories (exclude the source directories) then determine which directories are in your PATH. To see which directories are included in PATH on your particular system enter:
It should show something like:
At this point compare the actual locations with the directories in your PATH. If the directories are missing from your PATH then you have a few options:
Installing pre-compiled binaries
Linux/BSD/OSX
We offer packages for a number of Linux distributions in 64 bit thanks to PackageCloud.io so you can use your distro’s package manager to install and keep Aircrack-ng up to date:
While most folks want to use our “release” packages, “git” packages are available too for those who decide to use bleeding edge.
More details about them can be found in our blog post.
On OSX, install it is via Macports or brew. Simply do “brew install aircrack-ng” or “sudo ports install aircrack-ng”
Windows
The Windows version of the Aircrack-ng suite does not have an install program. You must manually install (unzipping archive) the software.
Here are the steps to follow for Windows:
Prior to using the software, make sure to install the drivers for your particular wireless card. See this link for the instructions. We currently only support Airpcap; other adapters may be supported but require development of your own DLL so the different tools can interact with it.
To now use the Aircrack-ng suite, start Windows Explorer and double click on Aircrack-ng GUI .exe inside “bin” subdirectory. The GUI requires .NET version 4.6.1 to run.
Источник


