- Alienware Green Skin Pack
- Alienware Red Skin Pack
- 186 Comments
- Gustavo
- Alienware240
- Munja
- Abyss
- Alienware Collection
- 55 Comments
- Stock market trading apps in India
- Nicaster
- David
- john kayo
- Proofy
- Mr. Royce
- Hadrian
- skinpack
- ThuggzBunny
- Tawny Tomblin
- jaszk
- Virginia
- MindFker
- Rietman Baihaqqi
- Sagar
- skinpack
- lucky
- skinpack
- Leave a Reply Cancel reply
- Alienware Skin Pack
- Startup Sound Changer 1.0
- UltraUXThemePatcher 4.1.1
- Incredibox
- Always On Top Maker 1.00
- Windows 10 Login Background Changer 1.0.2.0
- iOs Skin Pack 1.0
- Alienware Windows 10 Theme
- Introduction & Preparation
- Installing Alienware Visual Style
- Adding Alienware Rainmeter Skin
Alienware Green Skin Pack


Transform Windows 7/8/8.1/10 to Alienware Green
Size: 28 MB | Update: 10/21/2019 | Downloads: 10,000,000+
Note: Before installing SkinPack you need to update your windows drivers from here and fix your windows problems from here.
Best work on 100% scale and layout size, you need to set it from display setting, also for remove Windows Ribbons install Old New Explorer from here.
| Malware/virus warning? Read the FAQ.
Windows 7\8.1\10 RS2\RS3\RS4\RS5\19H1|19H2|20H1|20H2 [X86_X64]
Alienware Green SkinPack for Android is here:

6 best Alienware SkinPack collections is here now:

on Win10 to remove 3D Objects folder, OneDrive and Quick access from This PC and Navigation Pane use Winaero Tweaker from here
Note: Please unistall old or other version of skin packs before install new one. if your theme not changed or its like classic windows you need to install uxtheme patcher from here and after restart select new theme from personalization.
Use it at your own risk!
You’re advised to Create a System Restore Point before installing skinpack. If you have problem with install or uninstall skinpack, please check our help page.
Alienware Red Skin Pack


Transform Windows 7/8/8.1/10 to Alienware Red
Size: 25 MB | Update: 10/14/2019 | Downloads: 10,000,000+
Best work on 100% scale and layout size, you need to set it from display setting, also for remove Windows Ribbons install Old New Explorer from here.
| Malware/virus warning? Read the FAQ.
Windows 7\8.1\10 RS2\RS3\RS4\RS5\19H1|19H2|20H1|20H2 [X86_X64]
Alienware Red SkinPack for Android is here:

6 best Alienware SkinPack collections is here now:
on Win10 to remove 3D Objects folder, OneDrive and Quick access from This PC and Navigation Pane use Winaero Tweaker from here
Note: Please unistall old or other version of skin packs before install new one. if your theme not changed or its like classic windows you need to install uxtheme patcher from here and after restart select new theme from personalization.
Use it at your own risk!
You’re advised to Create a System Restore Point before installing skinpack. If you have problem with install or uninstall skinpack, please check our help page.
186 Comments
Gustavo
Hola al Principio me funciono todo bien , pero ahora 10 iconos no me funcionan, esos iconos estan instalados los programas.
Pero me aparece que no estan instalados y Windows no los puede encontrar, Ayuda muchas Gracias!!
Alienware240
Hola Excelente Skin hace 1 semana que lo estoy usando y no tengo ningun problema, O.S Windows 10 19H2
Me encanto tu Trabajo Impresionante Segui asi y muchas gracias estoy muy agradecido gracias por compartir tu don y talento
Gracias por tus Trabajos y los muchos skin desde Hace tiempo te sigo y los e utilizado en diferentes S.O windows 7,8.1
Saludos desde Uruguay!!
Can you please update this to the latest version of windows its been over a year since you have updated this theme!
Is this working for Win 10 Creators Update?
I had this Pack installed in Win 10. After the Update to Creators Update all icons are windows standard. I downloded this pack, but the installer says “Please connect to the Internet”.
It’s a bit weird, because i am connected. ^^
(Sorry when my english is not correct, it’s not my spoken languange.)
Solved. My Firewall blocked the connection.
Right after a fresh install of Windows Home Premium and all the drivers for the M18x R1…I installed the Red Skin Pack, rebooted and got a “Boot Manager is corrupt” message. I bought this from someone else and it ran fine with the Red Skin Pack and same OS. No boot manager issues or any issue at all. However I did not install the “Alienware M18x BIOS, A04” file from the Dell website assuming this has been done and why take an unnecessary risk executing this file…Should I run this file before installing the Red Skin Pack or any skin pack/theme for that matter? Thanks for any help. I don’t wanna keep reinstalling Windows 7.
Solved: I located the bootmgr.ini file that was changed to “bootmgr.
” after installing the Red Skin Pack from another source (not from this site) and renamed it to “bootmgr.ini” as it should have been unchanged. I used WinPE 7 to browse thr C drive. Works perfect now.
Munja
Are you people going to make it for Windows 10 ??
Abyss
For Windows 8 users having trouble with window text being too dark – try this
Go to start, search for ‘regedit” Run as Admin. In the left panel, navigate to CONTROL PANEL then click on COLORS. On the right on the bottom, go to Window, right click and select MODIFY. Change to “38 38 38”. Do this again for Window Frame, change to “88 88 88”. One more time with WindowText, change colors to “166 166 166”.
These are not set in stone, you can change the colors to your liking but these settings work for me. Exit, and next time you sign in to Windows the colors will take effect.
Great theme, been using it for a while now without any problems. Just make sure you install carefully, you don’t want to install all the extra crap.
Oh yeah, For VLC users, grab the Alienware Darkstar skin. It goes well with this.
after installing this, icon packs goes well but the background of my explorer is still white lol. When you said “window frame” do you mean, the default white background of the explorer?
Alienware Collection
55 Comments
Stock market trading apps in India
It’s a free and easy to use trading app
Nicaster
i got it easy download.#thebest
David
Bonjour, y’a t’il une mise a jour de prévu sur le pack alienware car sur la dernière version de W10 April 2018 Update car pack ne marche plus. Merci
john kayo
how do you people download this?
yeah, i know, right ?
these days people always make something good hard to get..
Proofy
its actually very easy
Mr. Royce
yeahh idon`t know its hard to download, why??
Hadrian
Como se desinstala el skinpack. no lo encuentro por ningun lado.
skinpack
ThuggzBunny
Is there any chance The Violet Alienware will become available for Windows 10? Pretty please? 🙂
Tawny Tomblin
jaszk
he instale temas alienware skinpack en mis 2 computadoras en laptop acer aspire one perfecto y otro es un soneview all in one un poco malo,al iniciar el windows aparece me dice cierra programa algo que no esta funciondo y cierre dice hay que reportar mensaje.. pero no se que mensaje debo enviar ?
Virginia
wow, i installed the Deathstar yesterday, didn’t need either of the patches for it to work, of course i guess if you want the 2d/3d you’ll need one of those patches.
MindFker
i have installed alienware red skin succesfully, but the taskbar is a bit glitched. how can I fix that ?
Rietman Baihaqqi
how to instal this skinpack? i have installed uxtheme and uxstyle
Sagar
will this work on win 10 pro build 14394
Okay, i finally got “Alienware Light Skin Pack” installed in my computer, unfortunately it could not boot properly, barely access to the desktop.
It happened restart over and over again.
I had to format everything, once again, for windows 10 enterprise x64, also i just hopefully can download “Alienware Light ICON Pack”, that’s it.
It appears i can only install the iconpacks rather than the skinpacks, because i think this “Alienware Light Skin Pack” not really stable.
Thus, i prefer the iconpacks instead of the skinpacks, just in case.
skinpack
as you can see its just support windows 10 RS1 so you need to update your windows to last version
lucky
I installed the alien ware skin pack, unfortunately the only thing it installed is the font, icons and wallpaper is there anything special when it comes to installing the theme pack? because the tab menu is still as it…anyway thanks for the skins love your works…great job
skinpack
you need to install uxtheme patcher first
Leave a Reply Cancel reply
This site uses Akismet to reduce spam. Learn how your comment data is processed.
Alienware Skin Pack
Desktop customization program for computers running Windows operating systems
- Category Desktop customization software
- Program license Free
- Size 32.39 MB
- Works under: Windows 8
- Program available in English
- Program by Hamed Danger

Startup Sound Changer 1.0
Customize the audio files your PC plays at boot-up and other times
UltraUXThemePatcher 4.1.1
Customize, create and update your desktop easily with this app

Incredibox
Set the beat, rhythm and tempo with this addicting, educational drag and drop music learning app

Always On Top Maker 1.00
Software that allows Windows users to permanently place a window or tab in front of others

Windows 10 Login Background Changer 1.0.2.0
Make you computer screen really shine with new images each time you logon from anywhere

iOs Skin Pack 1.0
An application to customize your Windows device to look like an iOS device
Alienware Windows 10 Theme

– It Came from Outer Space to Take Over Your Desktop –
A few years ago, I put up an Alienware Theme for Windows 7 tutorial that was massively popular. Now it’s time to build up a new desktop with Windows 10. With an amazing Alienware Visual Style for Windows 10 and a sleek Alienware Skin for Windows 10 with Rainmeter, you’ll create the best free Alienware Windows 10 Theme out there.
This theme will be split in to 3 parts: Introduction, Visual Style and Rainmeter. Each part will have step-by-step instructions to guide you along. Ready? Let’s get started!
Introduction & Preparation
The following is high-level desktop customization. You’ll be using various tools and resources to bring together a unique desktop that represents the futuristic sci-fi theme of the Alienware systems regardless of whether you actually own an Alienware PC or not.
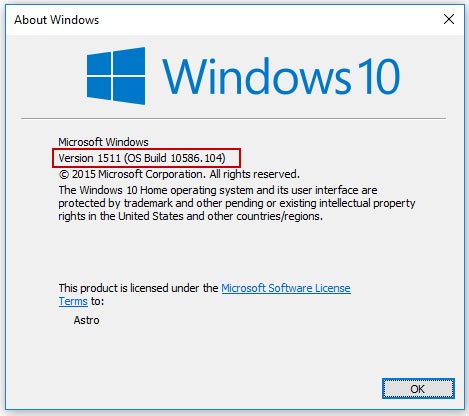
1. REQUIREMENTS: This theme requires that you have Windows 10 with the November 2015 update installed. So it must be Version 1511, Build 10586. Trying this theme on other builds is not likely to work. To find out which version of Windows you have, type winver in the start menu and hit enter.
2. CAUTION: While the process is fairly simple and should take about 15 – 30 minutes to set up, make sure you follow the instructions correctly and backup any file that you may have to modify. Just drop a comment below if you need any help. Before we begin installing the theme, make sure you create a system restore point so that we can restore our PC in case something goes wrong. It is really important you do this before going to the next step.
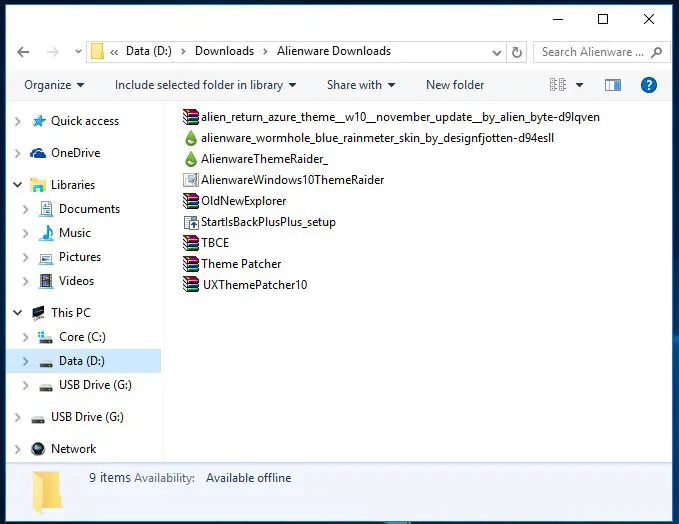
3. TO DOWNLOAD: Imagine we are going to build a spaceship and we need to assemble all the parts first. Download these 4 files that are listed below. Do NOT run any of them for now.
Extract the contents of the AlienwareThemeRaiderDownloads.rar into a new folder and put the other 3 files that you downloaded in there as well. So you end up with a similar folder like this for quick access.
Now we’ll move on to installing the visual style for our theme.
Installing Alienware Visual Style

A Visual Style is a 3rd party theme that will change several aspects of your PC. This includes changes to your explorers, task bar, start menu, cursor, sound and icons. Credits to AlienByte for creating the Alienware visual style that we’ll be using.
In order to use 3rd party themes, you need to patch your system by installing the following applications. If you’ve already used 3rd party themes before it is likely your system is already patched, in which case you may not have to install these applications again.
1. OldNewExplorer: Extract the OldNewExplorer.rar file that you downloaded to a new folder and run the OldNewExplorerCfg program. Set the settings as the same as the screenshot you see below. Hit Install and complete the installation.

2. StartIsBack: Next run the StartIsBackPlusPlus_setup.exe file that you downloaded and complete the installation. After installation, simply close the program if it runs automatically.
3. UXThemePatcher: Now extract the UXThemePatcher10.rar file that you downloaded and run the UXThemePatcher10.exe and complete the setup. After the installation is complete the system will do a quick restart.
4. Copy Theme Files: The next thing we need to do is extract the contents of the alien_return_azure_theme__w10__november_update__by_alien_byte-d9lqven.zip file that you downloaded into a new folder. Navigate to the Theme W10 TH2 Alien Return Azure folder inside it.
Copy paste the two contents of that folder into the C:\Windows\Resources\Themes folder of your PC.

5. More Patching: Extract the contents of the Theme Patcher.rar that you downloaded into a new folder. You’ll find a Add_Take_Ownership_to_context_menu file inside a Take Ownership REG files folder. Run it and confirm to complete the registry change.
5a. Now go to your C:\Windows\System32 folder and search for themeui.dll. Right click the file and click Open File Location.

5b. Right click the file and click Take Ownership. Select Yes when prompted for confirmation.

5c. Now right click the file again and rename it to themeui.dll.del. Click Yes and then Continue when prompted.

5d. Now copy/paste the themeui.dll file that you’ll find in the File Patch x86 (if your Windows 10 is 32-bit) or File Patch x64 (if your Windows 10 is 64-bit) folders from Step 5 to the C:\Windows\System32 folder.
5e. Repeat steps 5a to 5d for two more files: uxtheme.dll and uxinit.dll.
6. RESTART: Once you’ve copy/pasted all 3 files, restart your system for patches to take effect.
7. Taskbar Color Effect: Extract the contents of the TBCE.zip file that you downloaded into a new folder. Run the Taskbar Color Effect.exe file that you extracted. You’ll find it added as a new icon in your systray. Right click the icon and go to Settings.

Once it opens, select Custom Image BG option. It’ll prompt you to select an image so browse to the Taskbar Alien Return Azure TBCE folder that you extracted in Step 4 and select that Alien Return Azure taskbar image.

Click Save for changes to take effect.
8. Alienware Theme Raider Theme Pack: For the last step, run the AlienwareWindows10ThemeRaider.deskthemepack file that you downloaded. And voila, if you did everything right, you’ll have something that looks like this with modified explorers, task bar, icons, cursors and sounds.

If your taskbar doesn’t look the same, try to run StartIsBack and set the transparency of the taskbar to 100%. Also make sure the taskbar icons are set to Large Size by right clicking the taskbar and selecting Properties.
If it still doesn’t look right, drop a comment below with a screenshot of your PC and I’ll take a look.
That’s it for the visual style. In the next part, we’ll get that cool Rainmeter skin for our desktop.
Adding Alienware Rainmeter Skin
1. Rainmeter: As you may already know, Rainmeter is a light weight productivity application that can change your desktop completely. If you don’t already have it, go right ahead and set it up.
2. Fonts: The rainmeter skin uses a font called DS-Digital so go ahead and download the DS-Digital font. Extract the fonts to a new folder and right click and select Install to install them to your PC.
3. Alienware Theme Raider Skin: Once you’ve installed Rainmeter and got the hang of things, simply run the AlienwareThemeRaider_.rmskin file that you downloaded. Credits to deviantart user designfjotten for creating the rainmeter skin and wallpaper that we use for our theme. With the settings set as below, install it.

The Alienware skin and layout should be loaded automatically. Depending on your monitor resolution the skins might not be placed exactly as you see below. You can simply click and drag as them as you like.
You’ll find several skins that show Hard Disk usage, CPU & RAM usage, Network usage and Recycle Bin status. There are 2 skins that show the Uptime of the PC as well as the current time.

And that’s it! Congrats
! You’ve successfully completed this tutorial. Kudos to you for sticking through to the end!
You can take things one step further by modifying all your icons. Here’s a cool Alienware icon pack that might be of help. You could also check out more rainmeter skins to add to your desktop.
RESET TO DEFAULT: Change the theme back to the default Windows 10 theme to switch back the Visual Style to default. Uninstall StartIsBack to switch back to the Windows 10 task bar and Start Menu.
CREDITS: As mentioned before, credits to deviantart users designfjotten and AlienByte for creating the cool rainmeter skin and visual style respectively.
Hope you liked this theme. If you have any questions, suggestions or comments, drop them below. Good luck


