- Remote Desktop — VNC 4+
- AndreasPrang
- Screenshots
- Description
- Ratings and Reviews
- works great, but.
- this app is amazing!
- Does what it says. Works between Linux and Macs!
- App Privacy
- No Details Provided
- Работа с несколькими пространствами Spaces на Mac
- Создать область
- Перемещение между пространствами
- Перенос окна приложения из одной области в другую
- Назначение пространств для приложений
- Удаление области
- Chrome Remote Desktop 17+
- Securely access your computer
- Google LLC
- Screenshots
- Description
- What’s New
- Ratings and Reviews
- Great effort & easy to set up, but lacking basic features
- I LOVE THE APP BUT THERE IS SOME THINGS THAT NEED TO BE ADDED .
- Works great! Suggestions!
- Microsoft Remote Desktop 4+
- Work from anywhere
- Microsoft Corporation
- Screenshots
- Description
- What’s New
Remote Desktop — VNC 4+
AndreasPrang
Screenshots
![]()
Description
Open VNC connections from your Mac to another as fast as possible.
No playing. No paying. No tricky features. It just works!
Any questions or problems? Please contact me: info@iSolute.de
Ratings and Reviews
works great, but.
— recent connection list didn’t work
— didn’t find a way how to save a connection
— and i didn’t like, that computer where i connect to, has to give permission first, which is not convenient
pls address these issues, and I will change to 5 starts.
I see people complain and see that it is just a wrapper, but i tried to find the original apple app, and i couldn’t 🙂
ok, figured out how to use the Remote Screen client without this app:
Go to Finder -> Go -> Connect to server -> vnc://ip_you_want_to_connect
this app is amazing!
this app is amazing!! that’s right. It does everything that its designed to do and without charging a dime! I looked at the other apps and they were charging ridiculous amount of money for something as simple as remote desktop. That’s crazy. Hats off to the developer for saving us some bucks!
Does what it says. Works between Linux and Macs!
I was trying to find an EASY way to remote connect between my home (Linux) and work (MacBook) Easier than the built in screen share app in Mac. Just pre-authorized VNC on my Linux input the IP address on the Mac and BAM. Done and done. Fast connection, too. Love it.
App Privacy
The developer, AndreasPrang , has not provided details about its privacy practices and handling of data to Apple.
No Details Provided
The developer will be required to provide privacy details when they submit their next app update.
Источник
Работа с несколькими пространствами Spaces на Mac
Если при открытии приложений беспорядок на рабочем столе Mac растет, можно использовать Mission Control для создания дополнительных рабочих столов, которые называются пространствами. Когда Вы работаете в области Spaces, Вы видите только те окна, которые находятся в этой области Spaces.
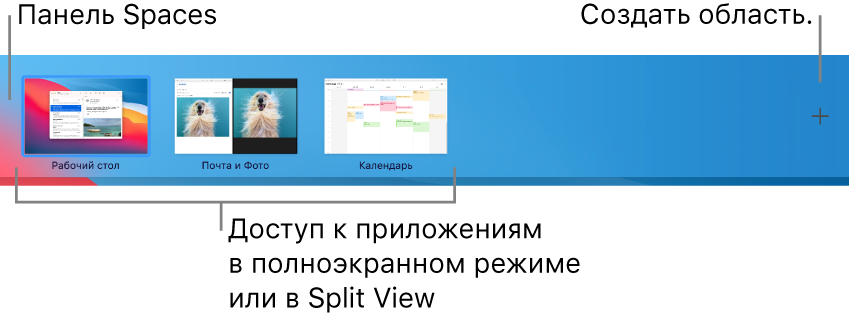
Создать область
Если Вы работаете с приложениями в полноэкранном режиме или Split View, миниатюры приложений отображаются в панели Spaces.
В панели Spaces нажмите кнопку добавления  .
.
Система поддерживает до 16 пространств.
Закончив, нажмите миниатюру пространства, чтобы открыть его.
Совет. Сделайте каждое пространство уникальным, назначив всем пространствам разные картинки рабочего стола. Для этого назначьте всем рабочим столам Системные настройки (см. информацию о назначении приложений ниже) и измените картинку рабочего стола в каждом из пространств.
Перемещение между пространствами
На Mac можно сделать следующее.
При использовании трекпада смахните влево или вправо тремя или четырьмя пальцами. На Magic Mouse смахните двумя пальцами.
Нажмите клавишу Control и клавишу со стрелкой вправо или влево.
Войдите в Mission Control, переместите указатель к верхнему краю экрана, затем нажмите пространство в панели Spaces.
Если у Вашего Mac есть панель Touch Bar, можно включить показ пространств в панели Touch Bar, используя раздел настроек «Клавиатура». Затем можно будет просто коснуться пространства в панели Touch Bar, чтобы его открыть.
Перенос окна приложения из одной области в другую
На Mac можно сделать следующее.
Перетяните окно приложения, которое хотите переместить, к краю экрана. Через короткое время окно перемещается в следующую область.
Перейдите в пространство, в котором находится окно для переноса, войдите в Mission Control, затем перетяните окно вверх в пространство, которое хотите использовать.
Перетянув окно на приложение в полноэкранном режиме в панели Spaces, можно использовать приложения в режиме Split View.
Назначение пространств для приложений
Если Вы используете две области или более, Вы можете назначить приложение (или Системные настройки) определенной области, чтобы оно всегда открывалось в этой области.
На Mac нажмите значок приложения в Dock, удерживая клавишу Control.
Возможно, Вам придется сначала открыть приложение, чтобы увидеть его значок в панели Dock.
В появившемся контекстном меню выберите «Параметры», затем выберите один из следующих вариантов.
Все Рабочие столы. Приложение открывается во всех областях.
Этот Рабочий стол. Приложение открывается только в текущей области. Если Вы используете приложение в полноэкранном режиме, оно отображается в своей собственной области.
Рабочий стол на дисплее [номер]. Приложение открывается в текущей области на определенном дисплее (если доступно несколько дисплеев).
Нет. Приложение открывается в той области, в которой Вы работаете в данный момент.
По умолчанию при переходе к приложению автоматически отображается пространство, в котором находятся открытые окна этого приложения. Например, если Вы создаете новый документ TextEdit на рабочем столе 3, однако окна TextEdit уже открыты на рабочем столе 2, новый документ открывается на рабочем столе 2. Чтобы изменить эту настройку, откройте меню «Apple»

> «Системные настройки», нажмите «Mission Control» и снимите флажок переключения.
Удаление области
На Mac войдите в Mission Control, затем переместите указатель к верхнему краю экрана.
В панели Spaces наведите указатель на область, которую хотите удалить, затем нажмите появившуюся кнопку «Удалить»  .
.
Если в области есть открытые окна, они будут перемещены в другую область.
Чтобы быстро выйти из полноэкранного режима приложения или режима Split View, наведите указатель на миниатюру в панели Space, а затем нажмите появившуюся кнопку «Выход»  .
.
Источник
Chrome Remote Desktop 17+
Securely access your computer
Google LLC
Screenshots
![]()
![]()
![]()
![]()
![]()
Description
Securely access your computer from your iOS device. It’s fast, simple and free.
• On the computer you want to access remotely, open Chrome and visit the Chrome Remote Desktop website
• Follow the instructions to set up your computer for remote access
• On your iOS device, open the app and tap on any of your online computers to connect
What’s New
Stability improvements and bug fixes.
Ratings and Reviews
Great effort & easy to set up, but lacking basic features
This was a breeze to set up. I just followed the instructions and was able to remotely access my MacBook Air from my iPad within minutes. The only problem, however, is that the on-screen keyboard within the app as well as BT keyboard support is VERY limited. How limited, you ask? Well, the arrow keys don’t work, so typing is kind of wonky and interrupted with frequent tapping to put the cursor where you want it. Pressing delete will work as a backspace, but pressing fn+delete does not work, neither do any other fn+ shortcuts. Other shortcuts like CMD+C or ctrl+C to copy/paste don’t work either. Google, thanks for the free product, but please update keyboard support! Thanks.
I LOVE THE APP BUT THERE IS SOME THINGS THAT NEED TO BE ADDED .
I have been using this app for a while now and it has been incredibly useful in so many situations but there is one thing that bugs me so much; The app needs is own custom Keyboard, a semi transparent, customizable keyboard. It bugs me quite a bit that they haven’t thought to do it yet because it is nessessary! How is anyone supposed to use Esc or any of the other essential keys?! A 4 layer keyboard would be great, first layer has the letters, backspace, Shift/CapsLock, space bar, return/enter and the main punctuation marks ( like most regular keyboards); And again like most keyboards there would be a second and third layer of numbers and other symbols and then ANOTHER layer that has all the Esc, Ctrl, Shift, Windows, Tab, Print Screen, F1-F12 buttons among others. That would really bring it all together, and instead of having it integrated make it a custom Keyboard that you have to enable in settings and all that but have its option settings in the app.
I hope you would take this suggestion into consideration because it would be so helpful to most of not all users of the Chrome Remote Desktop app.
Thank you,
A loyal customer.
Works great! Suggestions!
Needless to say, this is a wonderful app to have, definitely more than 5 stars. I’m not on the go much and when I do end up on the go I either bring my laptop with me or have no use for it. But this app is still pretty fun to play around with. There are only a few things that I would say could be done with the app:
— Latency can be reduced. I have a feeling it is something to do with the app, because it will lag on my iPod while my laptop is running quite fine.
— Add mouse wheel, left click, and right click buttons off to the side when using the mouse. That would be a nice addition and add more functionality to the mouse.
— Fix the mouse sync. When I move the mouse on my iPod, it is in sync with my laptop, but when I move the mouse on my laptop, it does not sync with the mouse on my iPod.
— Add full screen support. I noticed that apps in full screen will not appear on my iPod.
— Earlier I said I like to toy around with it. It is pretty fun to play games on my laptop through my iPod. This goes along with the mouse sync part, but it would be nice if the mouse in the app would go to the center of the screen when playing games. It makes it a little hard to play games when, depending on where your mouse is, you constantly make a hard left. Oh well!
If you did these things, it would still be worth more than 5 stars! Keep up the good work, Google!
Источник
Microsoft Remote Desktop 4+
Work from anywhere
Microsoft Corporation
Screenshots
![]()
![]()
![]()
![]()
![]()
Description
Use Microsoft Remote Desktop for Mac to connect to a remote PC or virtual apps and desktops made available by your admin. With Microsoft Remote Desktop, you can be productive no matter where you are.
Configure your PC for remote access using the information at https://aka.ms/rdsetup.
Learn about our other Remote Desktop clients at https://aka.ms/rdclients.
• Access remote PCs running Windows Professional or Enterprise and Windows Server.
• Access managed resources published by your admin.
• Connect through a Remote Desktop Gateway.
• Secure connection to your data and applications.
• Simple management of your connections and user account from the Connection Center.
• Audio and video streaming.
• Redirect folders, your clipboard, and local devices such as microphones and cameras.
Submit feedback at https://aka.ms/rdmacfbk.
What’s New
In this release we’ve worked through some bugs that were hanging around in our backlog. Some items we addressed include:
• Added background refresh for subscribed workspaces.
• Fixed an issue where the session window may jump to another monitor when auto-reconnect kicks in.
• Fixed an issue where the session window would sometimes be enlarged after connecting.
• Addressed an issue where the name of a redirected folder would be incorrect in the remote session.
• Fixed a bug that made it difficult to resize remote app windows.
• Improved the error messages that are displayed when user accounts fail to update.
• Fixed an issue where window titles in the list of connected remote apps were blank.
• Addressed a multimon issue where the mouse cursor shape would not update correctly when dragging between monitors.
• Added a checkbox to General Preferences to enable/disable Microsoft Teams optimizations.
• Added UI to report if a remote app could not be launched on the server due to not being on the system allow list.
• Fixed an issue where the session window could not be made wider when placed at the top or bottom of the screen.
• Addressed scenarios where the mouse cursor would disappear while connected to a remote PC.
• Deletion of an Azure Virtual Desktop workspace now correctly removes all associated workspaces.
• Fixed an issue where adding a folder to redirect to a bookmark would enable the «Add» button with an empty PC name.
• Addressed an issue where double-clicking the title bar incorrectly stretched the session window.
• Updated the mouse to change to a hand glyph when hovering over a red input error indicator.
• Fixed an issue where the session window would flash rapidly in the «Mission Control» or «Application windows» view.
In addition, we have continued to make updates to improve connectivity and performance metrics when connecting to Azure Virtual Desktop.
Note that by default subscribed workspaces are refreshed every six hours. This interval can be changed using the ClientSettings.WorkspaceAutoRefreshInterval user default (minimum is 30 minutes and maximum is 24 hours).
Thanks to everyone who reported bugs and worked with us to diagnose and fix issues. If you encounter any errors, you can contact us via Help > Report an Issue.
Источник


