- Linux
- Install Home Assistant Operating System
- Download the appropriate image
- Create the Virtual Machine
- Hypervisor specific configuration
- Start up your Virtual Machine
- Install Home Assistant Container
- Platform Installation
- Restart Home Assistant
- Docker Compose
- Exposing Devices
- Optimizations
- Install Home Assistant Core
- Install dependencies
- Create an account
- Create the virtual environment
- Install Home Assistant Supervised
- Домашний linux сервер своими руками
- Аппаратная часть
Linux
Install Home Assistant Operating System
Download the appropriate image
Follow this guide if you already are running a supported virtual machine hypervisor. If you are not familiar with virtual machines we recommend installation Home Assistant OS directly on a Raspberry Pi or an ODROID.
Create the Virtual Machine
Load the appliance image into your virtual machine hypervisor. (Note: You are free to assign as much resources as you wish to the VM, please assign enough based on your add-on needs)
Minimum recommended assignments:
All these can be extended if your usage calls for more resources.
Hypervisor specific configuration
- Create a new virtual machine
- Select “Other Linux (64Bit)
- Select “Use an existing virtual hard disk file”, select the VDI file from above
- Edit the “Settings” of the VM and go “System” then Motherboard and Enable EFI
- Then “Network” “Adapter 1” Bridged and your adapter.
- Create a new virtual machine in virt-manager
- Select “Import existing disk image”, provide the path to the QCOW2 image above
- Choose “Generic Default” for the operating system
- Check the box for “Customize configuration before install”
- Select your bridge under “Network Selection”
- Under customization select “Overview” -> “Firmware” -> “UEFI x86_64: …”.****
- Create a new virtual machine
- Select “Custom”, make it compatible with the default of Workstation and ESX
- Choose “I will install the operating system later”, select “Linux” -> “Other Linux 5.x or later kernel 64-bit”
- Select “Use Bridged Networking”
- Select “Use an existing virtual disk” and select the VMDK file above,
After creation of VM go to “Settings” and “Options” then “Advanced” and select “Firmware type” to “UEFI”.
Start up your Virtual Machine
- Start the Virtual Machine
- Observe the boot process of Home Assistant Operating System
- Once completed you will be able to reach Home Assistant on homeassistant.local:8123. If you are running an older Windows version or have a stricter network configuration, you might need to access Home Assistant at homeassistant:8123 or http://X.X.X.X:8123 (replace X.X.X.X with your ’s IP address).
With the Home Assistant Operating System installed and accessible you can continue with onboarding.
Install Home Assistant Container
These below instructions are for an installation of Home Assistant Container running in your own container environment, which you manage yourself. Any OCI compatible runtime can be used, however this guide will focus on installing it with Docker.
This guide assumes that you already have an operating system setup and a container runtime installed (like Docker).
If you are using Docker then you need to be on at least version 19.03.9, ideally an even higher version, and libseccomp 2.42 or newer.
Platform Installation
Installation with Docker is straightforward. Adjust the following command so that /PATH_TO_YOUR_CONFIG points at the folder where you want to store your configuration and run it.
Once the Home Assistant Container is running Home Assistant should be accessible using http:// :8123 (replace with the hostname or IP of the system). You can continue with onboarding.
Restart Home Assistant
If you change the configuration you have to restart the server. To do that you have 3 options.
- In your Home Assistant UI go to the Configuration panel ->Server management and click the “Restart” button.
- You can go to the Developer Tools ->Services, select the service homeassistant.restart and click “Call Service”.
- Restart it from a terminal.
Docker Compose
In order to use docker-compose you first need to install docker-compose on your system.
As the Docker command becomes more complex, switching to docker-compose can be preferable and support automatically restarting on failure or system restart. Create a docker-compose.yml file:
Start it by running:
Exposing Devices
In order to use Z-Wave, Zigbee or other integrations that require access to devices, you need to map the appropriate device into the container. Ensure the user that is running the container has the correct privileges to access the /dev/tty* file, then add the device mapping to your container instructions:
Optimizations
The Home Assistant Container is using an alternative memory allocation library jemalloc for better memory management and Python runtime speedup.
As jemalloc can cause issues on certain hardware, it can be disabled by passing the environment variable DISABLE_JEMALLOC with any value, for example:
The error message : Unsupported system page size is one known indicator.
Install Home Assistant Core
This guide assumes that you already have an operating system setup and have installed Python 3.8 (including the package python3-dev ) or newer.
Install dependencies
Before you start make sure your system is fully updated, all packages in this guide are installed with apt , if your OS does not have that, look for alternatives.
Install the dependencies:
Create an account
Add an account for Home Assistant Core called homeassistant . Since this account is only for running Home Assistant Core the extra arguments of -rm is added to create a system account and create a home directory.
Create the virtual environment
First we will create a directory for the installation of Home Assistant Core and change the owner to the homeassistant account.
Next up is to create and change to a virtual environment for Home Assistant Core. This will be done as the homeassistant account.
Once you have activated the virtual environment (notice the prompt change to (homeassistant) [email protected]:/srv/homeassistant $ ) you will need to run the following command to install a required Python package.
Once you have installed the required Python package it is now time to install Home Assistant Core!
Start Home Assistant Core for the first time. This will complete the installation for you, automatically creating the .homeassistant configuration directory in the /home/homeassistant directory, and installing any basic dependencies.
You can now reach your installation via the web interface on http://homeassistant.local:8123 .
If this address doesn’t work you may also try http://localhost:8123 or http://X.X.X.X:8123 (replace X.X.X.X with your machines’ IP address).
When you run the hass command for the first time, it will download, install and cache the necessary libraries/dependencies. This procedure may take anywhere between 5 to 10 minutes. During that time, you may get “site cannot be reached” error when accessing the web interface. This will only happen for the first time, and subsequent restarts will be much faster.
Install Home Assistant Supervised
This way of running Home Assistant will require the most of you. It also has strict requirements you need to follow.
Unless you really need this installation type, you should install Home Assistant OS (this can also be a virtual machine), or Home Assistant Container.
- First make sure you understand the requirements.
- Then head over to home-assistant/supervised-installer to set it up.
Once the Home Assistant Supervised installation is running and Home Assistant accessible you can continue with onboarding.
Источник
Домашний linux сервер своими руками
Хочется поделиться с хабросооществом информацией о том как я собирал домашний сервер.

Из софта на домашнем сервере будет «крутиться» следующий набор:
- torrent клиент с web-мордой
- DHCP — раздаем ip адреса и сетевые настройки
- TFTP — для сетевой загрузки
- OpenVPN — для хождения в сеть с нетбука из недоверенных сетей
- FTP/Samba/NFS — сетевые шары для доступа с домашних машин
- Radius — для WPA2 авторизации
- DigiTemp — мониторинг домашней температуры
Аппаратная часть
При выборе аппаратной части, вариантов было несколько:
- старенький комп
- самосбор на базе mini-ITX
- тонкий клиент HP T5000
- тонкий клиент на базе Neoware CA2
Первый вариант был сразу же отброшен из-за шума, пыли и энергопотребления. Второй был заказан, пока шли комплектующие, я успел передумать (захотелось шум и энергопотребление свести до минимума). В итоге, на Ebay были куплены тонкие клиенты HP t5000 и Neoware CA2. Месяц спустя пришли тонкие клиенты и из двух, после долгих размышлений, был выбран Neoware CA2. В него идеально поместился 2.5′ HDD и вторая сетевая карта.
После допиливания, в буквальном смысле, Neoware CA2 я принялся ставить на него Ubuntu 9.10 с офисного TFTP сервера. Установку производил самую минимальную. Если бы не было набора для сетевой установки, ставил бы Debian с USB CD-ROM и netinstall диска. Сам я ярый фанат RHEL/CentOS, но на домашний сервер решил ставить что-то из debian семейства, для расширения кругозора.
Torrent клиент и вебморда
Теперь перейдем к установке torrent клиента и вебморды. Была выбрана связка rtorrent + rutorrent, установка из репозитариев была отметена сразу, т.к. «родной» пакет был собран без xmlrpc-c который расширяет функционал rutorrent. Ниже фактически, скрипт для авто-установки rtorrent+rutorrent+lighttpd+php.
Устанавливаем всё что необходимо для компиляции xmlrpc-c, libtorrent, rtorrent
apt-get install checkinstall subversion build-essential make autoconf autotools-dev automake libtool libcurl4-openssl-dev libsigc++-2.0-dev pkg-config libncurses5-dev
apt-get remove rtorrent libtorrent11 libxmlrpc-c3 libxmlrpc-c3-dev libxmlrpc-core-c3 libxmlrpc-core-c3-dev
Компилируем и «заворачиваем» в .deb пакет xmlrpc-c, libtorrent, rtorrent
svn co xmlrpc-c.svn.sourceforge.net/svnroot/xmlrpc-c/advanced xmlrpc-c
cd xmlrpc-c
./configure —prefix=/usr && make && checkinstall -D
cd ..
wget libtorrent.rakshasa.no/downloads/libtorrent-0.12.6.tar.gz
tar zxfv libtorrent-0.12.6.tar.gz
cd libtorrent-0.12.6
rm -f scripts/
./autogen.sh && ./configure —prefix=/usr && make && checkinstall -D
cd ..
wget libtorrent.rakshasa.no/downloads/rtorrent-0.8.6.tar.gz
tar zxfv rtorrent-0.8.6.tar.gz
cd rtorrent-0.8.6
rm -f scripts/
./autogen.sh && ./configure —with-xmlrpc-c —prefix=/usr && make && checkinstall -D
К сожалению, rtorrent не умеет работать в режиме daemon, по этому будем использовать screen
apt-get install screen -y
wget libtorrent.rakshasa.no/raw-attachment/wiki/RTorrentCommonTasks/rtorrentInit.sh —output-document=/etc/init.d/rtorrent
chmod +x /etc/init.d/rtorrent
sed -i ‘s/»user»/»torrents»/’ /etc/init.d/rtorrent
update-rc.d rtorrent defaults
useradd -d /torrents -m torrents
Создаем конфиг и папки для сессий и готовых торрент закачек, после чего стартуем rtorrent.
mkdir /torrents/.rtorrent_session
cat >> /torrents/.rtorrent.rc
Теперь займемся вебмордой rutorrent. Для работы rutorrent необходим вебсервер и интерпретатор php.
apt-get install lighttpd php5-cgi php5-cli php5-curl curl -y
lighty-enable-mod fastcgi
echo ‘server.modules += ( «mod_scgi» )’ >> /etc/lighttpd/lighttpd.conf
cat >> /etc/lighttpd/lighttpd.conf
( «127.0.0.1» =>
(
«host» => «127.0.0.1»,
«port» => 5000,
«check-local» => «disable»
)
)
)
EOF
/etc/init.d/lighttpd force-reload
Вебсервер готов, теперь будем ставить rutorrent и несколько полезных плагинов к нему.
cd /var/www/
svn checkout rutorrent.googlecode.com/svn/trunk/rutorrent
cd /var/www/rutorrent/plugins/
svn checkout rutorrent.googlecode.com/svn/trunk/plugins/tracklabels
svn checkout rutorrent.googlecode.com/svn/trunk/plugins/cookies
svn checkout rutorrent.googlecode.com/svn/trunk/plugins/autotools
svn checkout rutorrent.googlecode.com/svn/trunk/plugins/erasedata
chown -R www-data:www-data /var/www/
Теперь можно заходить по server_ip/rutorrent и начинать пользоваться.
Теперь установим DHCP сервер и создадим для него конфиг таким образом чтобы клиенты получали:
router 192.168.1.1
dns сервер 8.8.8.8
сервер времени time.nist.gov
tftp сервер 192.168.1.1
и для примера фиксированная выдача 192.168.1.100 клиенту с MAC-адресом 00:1B:FC:33:F0:25
aptitude install dhcp3-server
cat >> /etc/dhcp3/dhcpd.conf
строчки с option-150 нужны для моего VoIP телефона Cisco 7940.
TFTP и сетевая установка
aptitude install xinetd atftpd atftp
cat >> /etc/xinetd.d/tftp
Теперь проверим, работает ли tftp сервер
root@dvr:
# echo bla > /tftpboot/123
root@dvr:
# atftp 127.0.0.1
tftp> get 123
tftp>
root@dvr:
# cat 123
bla
Всё нормально, теперь создадим netinstall наборы для нескольких ОС: Ubuntu karmic, Ubuntu lucid, Debian lenny, Debian sid, Debian squeeze, Fedora 13, CentOS 5.5, Mandriva 2010.0, Suse 11.2, Slackware 13.1, Hardware Detection Tool, memtest и MHDD. Для этого предлагаю использовать слегка модифицированный скрипт который я взял с HowtoForge.
apt-get install lftp -y
wget itblog.su/tftpboot_installs.sh
bash tftpboot_installs.sh
Теперь добавим SystemRescueCd в PXE меню
wget «http://downloads.sourceforge.net/project/systemrescuecd/sysresccd-x86/1.6.3/systemrescuecd-x86-1.6.3.iso?use_mirror=citylan»
mount -o loop systemrescuecd-x86-1.6.1.iso /mnt/
cp /mnt/sysrcd.* /var/www/
cp /mnt/isolinux/initram.igz /tftpboot/
cp /mnt/isolinux/rescuecd /tftpboot/
cat >> /tftpboot/pxelinux.cfg/default
Без особого труда в это меню можно добавить продукты Acronis, инсталляцию и запуск Windows XP и прочее.
Вот так будет выглядеть наше меню: 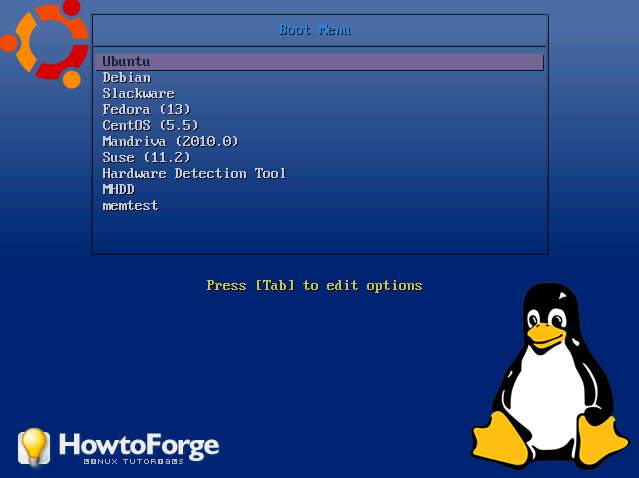
Продолжение в следующей части. А именно:
- OpenVPN сервер для «хождения» в сеть из не доверенных сетей (например из гостиницы)
- FTP/Samba/NFS сетевые шары
- Radius для авторизации wi-fi клиентов
- DigiTemp зачатки умного дома, мониторинг температуры в квартире и за окном
- festival — говорящий будильник
- бакапы с хостинга
и подытожит статью скрипт который всё это установит в «два клика».
С удовольствием выслушаю замечания и дополнения.
Источник


