- Web-сервер на Windows 7 – обзор и установка XAMPP
- Что такое сборка Web-сервера?
- Что такое XAMPP?
- Где скачать XAMPP?
- Установка XAMPP
- Шаг 1
- Шаг 2
- Шаг 3
- Шаг 4
- Шаг 5
- Запускаем и проверяем работу Apache, PHP и MySQL
- Веб-сервер для Windows
- Скачать Apache для Windows
- Официальный сайт Apache
- Как настроить Apache на Windows
- Что может веб-сервер в Windows
- Версии Apache для Windows
- Сборка Apache + PHP + MySQL + phpMyAdmin
- Configure your Servers for the Windows Web Hosting Platform
- Introduction to the Windows Web Platform
- Configure your Hyper-v Host for Shared Web Hosting
- Create your Web Server VM
- Configure the Web Server Components to support WebMatrix
- Option 1: Via Web Platform Installer 3.0 (recommended)
- Option 2: Manually install Web Server components
- Configure your Content Server VM
- Configure your Control Panel Server VM
Web-сервер на Windows 7 – обзор и установка XAMPP
Для разработки и тестирования сайтов или веб-приложений обычно используют локальный Web-сервер, а после разработки переносят уже на рабочий сервер. Поэтому сегодня я предлагаю рассмотреть возможность установки локального web-сервера на операционную систему Windows 7, и так как у нас сайт для начинающих разработчиков, мы будем использовать готовую сборку web-сервера на примере XAMPP.
И начнем мы с основ, т.е. узнаем, что же это такое сборка web-сервера, из чего она состоит, зачем она нужна, в частности разберем сборку XAMPP, установим ее и, конечно же, проверим ее работу.
Что такое сборка Web-сервера?
Сборка Web-сервера – это некий комплект приложений необходимых для функционирования сайтов, после развертывания которого, можно сразу переходить к их разработке, не отвлекаясь и не вникая в настройки каждого компонента web-сервера.
В сборку web-сервер обычно входит как минимум 3 компонента: это непосредственно сам HTTP сервер, средство разработки сайтов, т.е. библиотеки языка программирования, интерпретатор и т.д., и система управления базами данных. Для таких сборок используется бесплатное программное обеспечение, поэтому самыми распространенными компонентами являются веб сервер Apache, СУБД MySQL, языки программирования PHP и Perl.
Если говорить о том, для чего вообще нужна такая сборка, так как Вы сами понимаете, что все это в отдельности устанавливается и настраивается, то она нужна в основном для того, чтобы облегчить жизнь начинающим разработчикам, чтобы они могли просто установить одну программу и сразу начать, скажем, учиться программировать (создавать сайты). Для примера в качестве операционной системы нашего локального web сервера мы будем использовать Windows 7, так как именно ОС Windows от компании Microsoft широко используется у нас в России.
Конечно же, после того как разработка сайта или веб приложения окончена, необходимо перенести все на рабочий сервер, который скорей всего будет использовать операционную систему на базе Linux. Например, мы с Вами уже рассматривали возможность установки и настройки полноценного, рабочего web-сервера на CentOS 7.1, где мы как раз по отдельности устанавливали и настраивали каждый из компонентов web-сервера, там мы использовали Apache, PHP и MySQL. Также если кому интересна установка СУБД MySQL на Windows, то это мы подробно рассмотрели вот здесь.
Примечание! Использовать сборку веб сервера на продакшн хостинге для сайтов не рекомендуется, тем более что сами разработчики предупреждают, что эти сборки не предназначены для внедрения в производство.
В число самых популярных сборок web-сервера входят: Denwer, Open Server, XAMPP, WampServer. Как видно из названия статьи, сегодня мы будем рассматривать XAMPP.

Что такое XAMPP?
XAMPP — это бесплатная, кроссплатформенная сборка веб-сервера, которая включает Apache, MySQL PHP и Perl.
Как не трудно догадаться XAMPP — это аббревиатура:
- X – означает, сборка есть под все операционные системы (Windows, Linux, OS X);
- A – Apache;
- M – MySQL;
- P – PHP;
- P – Perl.
В последнюю, на сегодняшний день (Июнь 2015), сборку XAMPP для Windows включено следующее программное обеспечение: Apache 2.4.12, MySQL 5.6.24, PHP 5.6.8, phpMyAdmin 4.3.11, OpenSSL 1.0.1, XAMPP Control Panel 3.2.1, Webalizer 2.23-04, Mercury Mail Transport System 4.63, FileZilla FTP Server 0.9.41, Tomcat 7.0.56 (with mod_proxy_ajp as connector), Strawberry Perl 7.0.56 Portable.
Где скачать XAMPP?
Загрузить данную сборку можно со страницы загрузки официального сайта — https://www.apachefriends.org/ru/download.html
И так как мы будем устанавливать XAMPP на Windows, то соответственно и скачиваем дистрибутив под эту операционную систему, например, я хочу скачать версию XAMPP с PHP 5.6.8 для этого, и жму соответствующую ссылку.
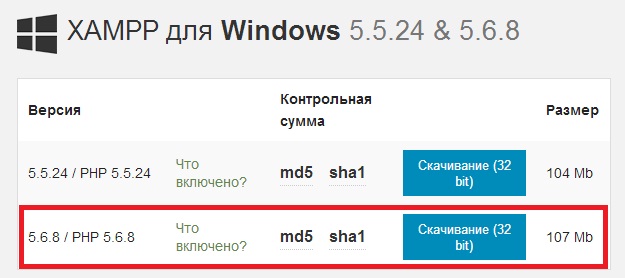
После чего у нас загрузится дистрибутив размером 107 мегабайт.
Данная сборка поддерживает операционные системы Windows, начиная с Vista.
Установка XAMPP
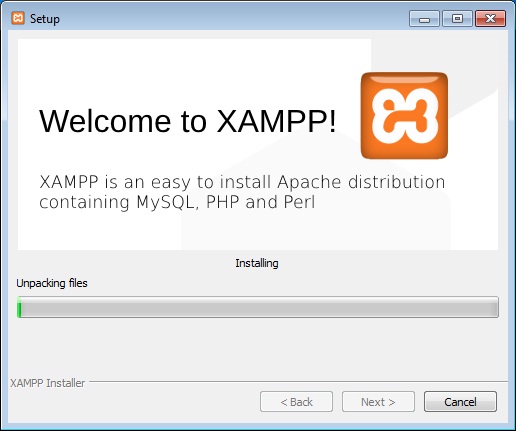
Приступаем к установке сборки Web-сервера XAMPP, она простая, поэтому проблем возникнуть не должно.
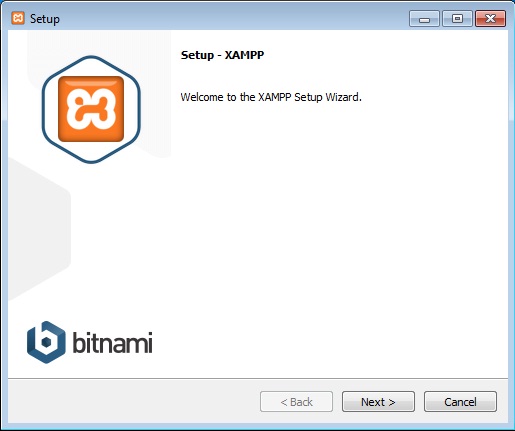
Шаг 1
Запускаем скаченный файл xampp-win32-5.6.8-0-VC11-installer.exe. Первое окно программы установки — это окно приветствия, жмем «Next».
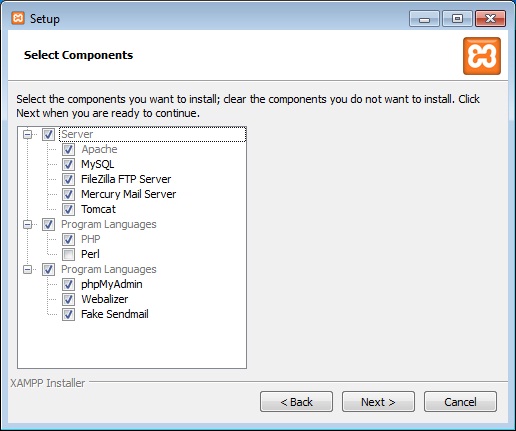
Шаг 2
Далее, выбираем компоненты, которые нужно установить, по умолчанию выбрано все, но если Вы не хотите что-то устанавливать, т.е. Вам это не нужно, то можете снять галочку с соответствующего пункта, например, мне не нужен Perl, жмем «Next».
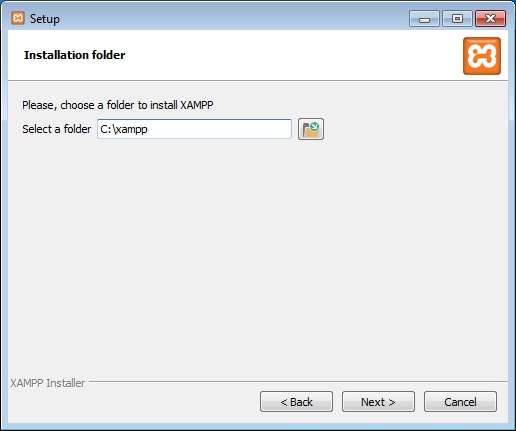
Шаг 3
Затем выбираем каталог, в который мы будем устанавливать XAMPP, я оставлю по умолчанию, жму «Next».
Шаг 4
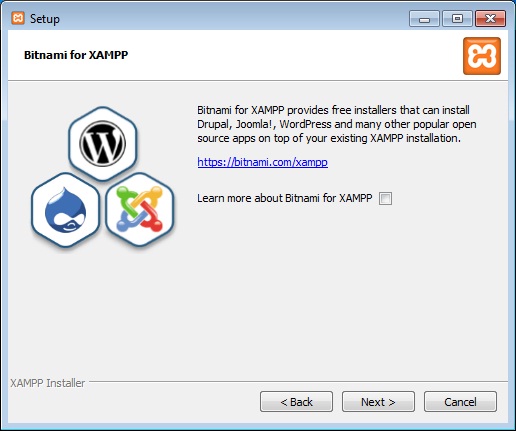
На этом шаге мы можем оставить или убрать галочку «Узнать больше о Bitnami для XAMPP», я галочку убрал, жму «Next».
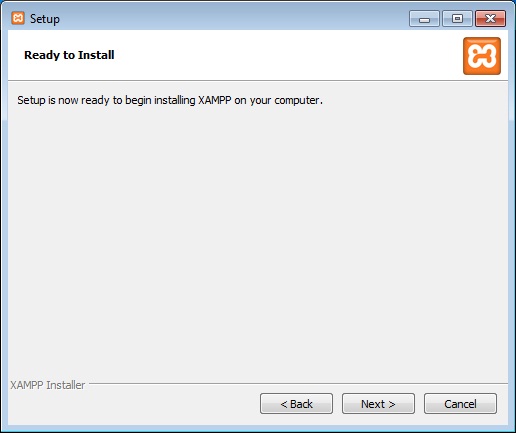
Шаг 5
Все готово к установке, жмем «Next».
После того как установка будет завершена, нам предложат сразу запустить «Control Panel», жмем «Finish».
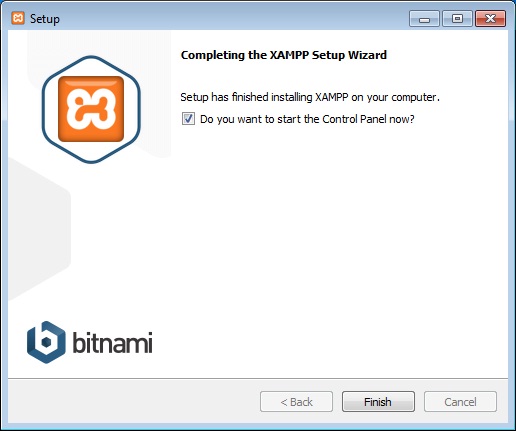
Вот и все, у нас запустилась панель управления XAMPP.

Запускаем и проверяем работу Apache, PHP и MySQL
Как мы видим, сразу после установки все сервисы не запущены, поэтому мы запускаем их кнопкой «Start».
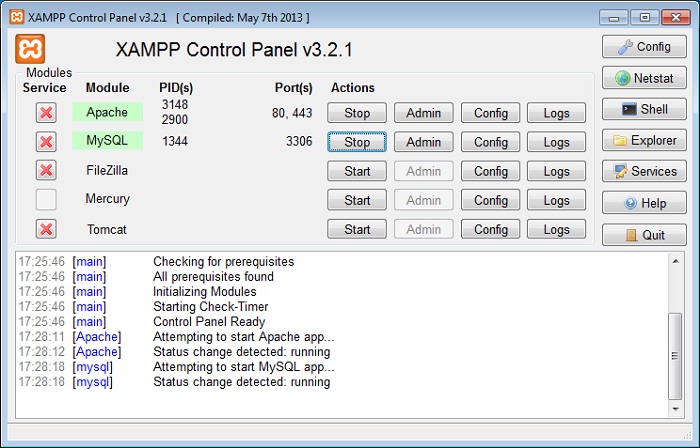
Зеленым выделены те сервисы, которые в данный момент запущены.
Сначала давайте проверим работу Apache, для этого просто в браузере набираем localhost, и если мы увидим следующую картину, то значит все в порядке.

Для проверки MySQL и PHP давайте напишем простой скрипт на PHP, который проверит подключение к базе данных MySQL. Для этого создаем в каталоге C:\xampp\htdocs\ папку test, кстати, все, что находится в папке htdocs, можно удалить. В папке test создаем файл index.php со следующим кодом;
Сохраняем и в браузере обращаемся по адресу http://localhost/test/ в ответ мы должны получить версию MySQL.

Если Вы это удивили, значит и Apache и PHP и MySQL запущены и работают.
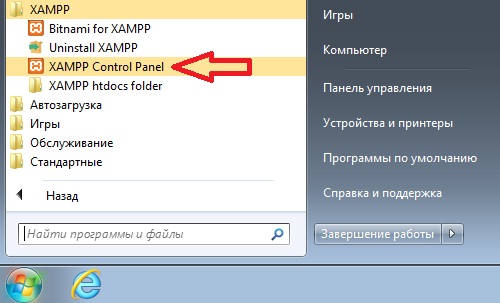
Теперь немного расскажу о панели управления XAMPP. Запустить ее можно через меню «Пуск->Все программы->XAMPP».
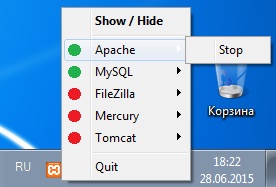
После запуска в системном трее появится значок для быстрого управления, т.е. запуска и остановки сервисов.
На этом предлагаю заканчивать, так как все готово для разработки сайтов на базе Apache, MySQL и PHP, еще раз замечу, что данная сборка подходит исключительно для разработки и тестирования веб приложений, использовать ее в качестве рабочей платформы для сайтов не рекомендуется. Удачи!
Веб-сервер для Windows
Apache – это веб-сервер под Windows. На веб-сервере можно размещать сайты и открывать их на своём или на других компьютерах так, будто они находятся в Интернете.
Apache является бесплатным, у него открыт исходный код, сервер гибок в настройке.

Скачать Apache для Windows
Последней версией Apache для Windows является 2.4.46, она вышла 18 февраля 2021 года.
Ссылки для скачивания:
Убедитесь, что у вас установлена последняя версия Visual C++ Redistributable for Visual Studio 2015-2019, которая необходима для работы Apache в Windows (версия 14.28.29325.2 и выше):
Официальный сайт Apache
Официальным сайтом веб-сервера Apache является: https://httpd.apache.org/
Но данный сайт содержит только исходный код и не распространяет бинарные (исполнимые) файлы. Если вы не можете самостоятельно скомпилировать файлы из исходного кода, то вы можете скачать их с рекомендуемого сайта.
Официально рекомендованным источником исполнимых файлов является Apache Lounge. Именно с на его файлы даны ссылки чуть выше.
Как настроить Apache на Windows
Настройка Apache выполняется в текстовых файлах, а для запуска нужно использовать командную строку – для пользователей Windows это может оказаться непривычным. Ситуация осложняется тем, что подсказки в конфигурационных файлах на английском языке, а веб-сервер в случае ошибки выводит очень мало информации.
Если вам нужен только веб-сервер без дополнительных модулей, то вы можете ограничиться базовой настройкой.
Если вы хотите ещё быстрее получить готовый веб-сервер, то к вашим услугам сборки, которые включают все необходимые компоненты и настройки.
Особенностью Apache, PHP и других компонентов веб-сервера является то, что все эти программы являются портативными, т.е. вам достаточно скачать сборку, распаковать её, кликнуть батник для запуска служб и вы через секунду получаете рабочий, правильно настроенный веб-сервер на Microsoft Windows.
Что может веб-сервер в Windows
Веб-сервер на локальном компьютере может абсолютно всё, что умеют веб-сервера на хостингах. Веб-сервер подойдёт для разработки и тестирования сайтов и веб-приложений использующих, например, AJAX. Именно веб-сервер позволит вам работать со структурой веб-сайта так, будто бы он уже размещён на хостинге.
Вы можете подключат и использовать при тестировании и разработке:
- модули Apache (например, mod_rewrite)
- PHP (требуется дополнительная установка)
- базы данных (требуется дополнительная установка)
Версии Apache для Windows
В настоящее время актуальной веткой Apache является 2.4.*. Предыдущее поколение Apache 2.2.* является устаревшим и больше не поддерживается. Новые версии, исправления ошибок и патчи безопасности начиная с 2018 года выпускаются теперь только для Apache 2.4. Именная эта версия предоставлена для скачивания на этом сайте.
Сборка Apache + PHP + MySQL + phpMyAdmin
Если вы хотите в несколько кликов получить работающий веб-сервер Apache + PHP + MySQL + phpMyAdmin на Windows, то скачайте готовую сборку, которая включает полностью настроенный для Windows веб-сервер, который достаточно распаковать и запустить кликом по ярлыку.
Configure your Servers for the Windows Web Hosting Platform
Introduction to the Windows Web Platform
The Microsoft Web Platform gives you the framework, web server, database and tools your customers need to build and run Web sites and applications on Windows. It provides a complete ecosystem of products, technologies, partners, and customers. You will be able to easily setup your servers with
| Tools | Customer | Web Hosting Provider |
|---|---|---|
| Web Platform Installer (Web PI) | Installs Web Platform Tools and Apps | Installs Web Plat Tools and Apps |
| WebMatrix | Installs/Develops Applications, Customizes, and Publishes to Hosting Provider | Supports customers publishing through WebMatrix by configuring |
| Web Hosting Gallery | Browse/Search for hosting | Publishes offerings |
| Web Application Gallery | Browse/Search for Web Applications to customize and publish to a hosting provider | Supports these popular applications |
| WebsitePanel | Uses it to manage their Hosting Account and resources | Uses it to manage their plans, customers, resource allocation, and provisioning |

Image 4: The Microsoft Web Platform Ecosystem
Configure your Hyper-v Host for Shared Web Hosting
As we discussed earlier, you can setup a shared hosting environment with a basic configuration consisting of a single server. The following steps will guide you through the setup of a single server running as a Hyper-v host. This server will host the three VM Servers as described above.
To get started, setup the hyper-v host server with Windows Server 2008 R2 Enterprise. This version of Windows includes four guest licenses (Windows Server Standard or Enterprise); it allows you to setup the host with four guests and pay monthly only for the host server after you have customer websites in any of the guest servers.
a. Click the «Server Manager» button in the task bar; or click «Start» menu, type «Server Manager» and press Enter. This will bring up the Server Manager application.
b. On the left panel of Server Manager click on «Roles»

c. Under «Roles Summary» click on «Add Roles». Follow the Add Roles Wizard to Add the Hyper-v role. The wizard will ask you to reboot the computer; when you log back in, the wizard will complete the Hyper-v configuration.


Create your Web Server VM
This section will guide you through the creation of a guest VM to be the Web Server using Windows Server 2008 R2 SP1 Standard.
a. On the host machine, click the «Start» menu, type «Hyper-v Manager» and press Enter. This will bring up the Hyper-v Manager application.

b. On the «Actions» bar (right side) click «New» and select «Virtual Machine». The New virtual Machine Wizard will come up.

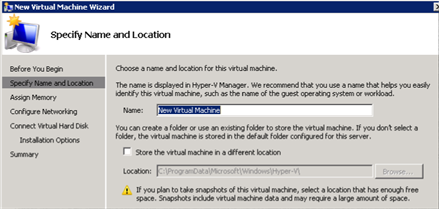
c. Enter the name of the virtual machine, I usually use a descriptive name that refers to the OS version used, for example «WS2K8R2Std».
d. On the same screen, select the location of where in disk the virtual machine will be stored. Do so by checking the check box and selecting the location you will use for the Web Server VM.
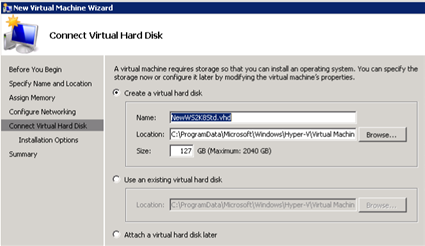
e. If you already have a prepared virtual hard disk available, this is the moment to specify to use it for your VM; otherwise you could create one from scratch or attach one later.
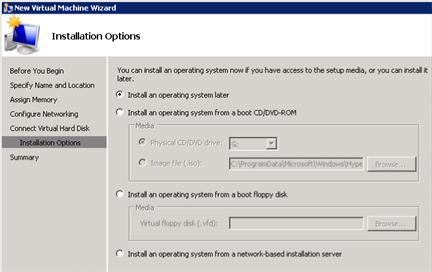
f. The next step is to install the OS, you have several options, for some of them you need to have the OS media ready. If you have not visited the SPLA site to download Windows Server 2008 R2 SP1 Standard, now is the time. You can use the downloaded OS in this step or do it later from a DVD, network drive, or network-based installation server.
From this point on your VM will be ready for you to start and connect to, use the Hyper-v Manager and double click on the machine listed under «Virtual Machines» in the center panel.
Configure the Web Server Components to support WebMatrix
This article will walk you through installing the required server components to be WebMatrix compatible and fulfill the Spotlight requirements for the Web Hosting Gallery.
To simplify the installation of the web server components, we highly recommend installing Web Platform Installer, also known as WebPI, on both machines. WebPI is a tool that automates the installation of a vast majority of server components and other products for Microsoft’s Web Platform.
If you prefer to not use WebPI, all of the required components can also be installed by hand or via your own provisioning scripts.
Option 1: Via Web Platform Installer 3.0 (recommended)
If you have WebPI 3.0 installed, the following link will automatically launch it with all of the basic web server components you’ll need ready to install:
Login in the VM created in the previous section, use your administration account. Notice that these instructions will work regardless of whether you are using a VM or an actual machine.
Install Spotlight Components using Web PI. This link will install WebPI (if you have not done so already) and will let you review the list of products and dependencies before you start the process of installing the components. Notice that this list of components completely fulfills the Spotlight requirements from the Web Hosting Gallery.

Once the Web PI window is displayed, click the «Items to be installed» link to review the list of products and dependencies.
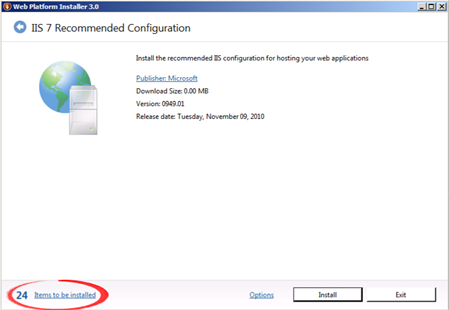
Scroll down to see the rest of the items in the list:

Here is the list of Products to install:
- IIS 7 or above Web Server including the following modules: Web Deploy 2.0, FTP, Media Services 3.0, IIS Remote Management Services, CGI, URL Rewrite 2.0, SQL Server 2008 Management Objects (SMO), Windows Cache 1.1 for PHP, MySQL Connector, Microsoft SQL Server Driver for PHP 2.0
- Frameworks: .NET 3.5 SP1, .NET 4.0, ASP.NET, ASP.NET MVC, and PHP 5.2.14 or higher
Review the license page and accept the terms to continue with the install:


If you are not using Windows Server 2008 R2 SP1, install the following Web Server Patch: Extensionless URL Hotfix. This hotfix is required for ASP.NET Web Pages to function correctly. It is discussed further in this blog post.
(Optional) Install Spotlight Components plus PHP/MySQL related components using Web PI. Many of the web applications that can be published by WebMatrix have PHP/MySQL components as requirements. To ensure you are able to support those applications, you can use this link to install everything above plus PHP/MySQL related components
Option 2: Manually install Web Server components
Here is the full list of which components are installed by those links, so you can confirm against the list of products listed in WebPI. Note that many of them bring in dependencies – that is expected behavior – but the total download should not exceed 50 MB or so.
- [Required] IIS 7 Web Server basic components. Required for basic web server functionality.
- [Required] .NET Framework 3.5 SP1. Some applications depend on this framework
- [Required] .NET Framework 4.0. Some applications depend on this framework
- [Optional] PHP (5.2.14 or higher). This is not required for Spotlight, but many applications that can be published by WebMatrix depend on this framework
- [Required] ASP.NET. This framework is the backend of many of the most popular web applications
- [Required] ASP.NET MVC 1.0. A handful of applications in the App Gallery depend on this installed centrally
- [Optional] You can also optionally install ASP.NET MVC3 and ASP.NET Web Pages, which gives you the ability to host applications written in the new «Razor» syntax of ASP.NET. However, note that the binaries required for these kinds of applications are automatically published by WebMatrix. That is, each end user who publishes applications of this type will automatically end up with the required binaries in a /bin/ folder within their site root directory, so it is not really necessary to install them centrally.
- [Required] Microsoft Web Deploy. Web Deploy is a client-server tool that simplifies the deployment of sites and applications to IIS servers. While WebMatrix supports web application publishing using both FTP and Web Deploy protocols, the latter providers a faster, more secure, and richer experience. It also lets the user deploy whole apps, including databases, ensuring they work both locally and remotely. It is the highlight of the WebMatrix publishing story.
- [Required] FTP Publishing Service. To ensure the option of FTP exists for maximum compatibility
- [Optional] Media Services. For IIS Smooth Streaming support
- [Required] IIS Remote Management Service. To allow your users to manage aspects of their accounts using the IIS console. Also a dependency for Web Deploy to function properly
- [Required] FastCGI for IIS. Provides a much faster CGI implementation than the default
- [Required] URL Rewrite. A dependency for many applications to function correctly
- [Required] SQL Server 2008 Management Objects. A dependency for many applications to function correctly, and for WebDeploy to manage SQL Server db’s.
- [Optional] Windows Cache Extension 1.1 for PHP. Highly recommended when running PHP on Windows.
- [Optional] MySQL Connector/Net 6.2.3 or higher. Necessary for .NET applications using MySQL databases
- [Optional] Microsoft Drivers for PHP for SQL Server in IIS. Necessary for PHP applications using SQL Server
- Extensionless URL Hotfix. Needed only if you are not using Windows 2008 R2 SP1. Required for ASP.NET Web Pages to function correctly. It is discussed further in this blog post.
Database Server Components (see next section):
- [Optional] PHP Driver for SQL Server. We highly recommended installing this component on your database server if you are supporting PHP.
• Proceed to configure the database server machine.
• Ensure that the Web Deploy 2.0 (or higher) component is configured to allow delegated deployments. This is critical, as it is the primary method that allows your customers to publish to your servers with WebMatrix.
Create & Configure your SQL Server VM
Create a second guest as the Database Server Virtual Machine
Follow the same steps outlined in «Create your Web Server VM» to create the Database Server VM.
Add Database Server Components to the Database VM
- Download the SQL Server 2008 R2 Web media from the SPLA site, find the link in the email you received confirming your SPLA agreement.
- [Required] Install SQL Server 2008 R2 Web on the Database VM. Follow the installation wizard instructions. WebPI supports installing Microsoft SQL Server 2008 Express edition, but we do not recommend this product in shared hosting environments, you should use the full version instead on a separate server.
- Install MySQL, use the following related article to ensure the installation supports WebMatrix.
Configure your Content Server VM
Create a third guest as the Content Server Virtual Machine
Download the Windows Server 2008 R2 Enterprise media from the SPLA site, find the link in the email you received confirming your SPLA agreement.
Follow the same steps outlined in 2.a to create the VM Server.
Install the Windows Server Backup features in the content server:
Click the «Server Manager» button in the task bar; or click «Start» menu, type «Server Manager» and press Enter. This will run the Server Manager application.

On the left panel of Server Manager click on «Features»
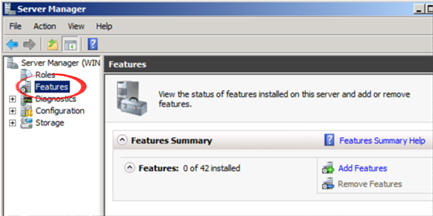
Under «Features Summary» click on «Add Features». Follow the Add Features Wizard to Add the Backup service.


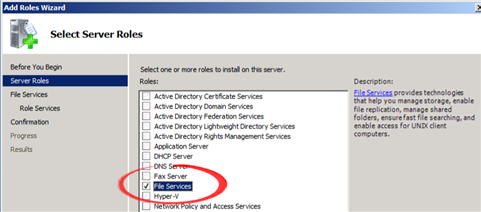
Install the File Services role in the content server.
Click the «Server Manager» button in the task bar; or click the «Start» menu, type «Server Manager» and press Enter. This will run the Server Manager application.

On the left panel of Server Manager click on «Roles»
Under «Roles Summary» click on «Add Roles». Follow the Add Roles Wizard to Add the «File Services» role.

Configure your Control Panel Server VM
Create a second Web Server VM, configure follow the same steps that you did for the first Web Server. This server will act as the Control Panel server; it will host WebsitePanel (we will install it in a subsequent section). It could also help you troubleshoot websites issues. This final VM will complete the four guests allowed by your Windows Server Enterprise 2008 R2 license. If you are planning on a larger deployment, you may want to use the Windows Server 2008 R2 Datacenter edition which has no license limits on guests.


