- 11 of the biggest problems with Windows 10, and how to fix them
- Problem: Not enough space for updates
- Workarounds:
- Problem: Automatic updates causing errors
- Workarounds:
- Problem: Bluetooth isn’t working
- Potential solutions:
- Problem: Cortana isn’t working
- Potential solutions:
- Problem: Can’t open Windows Store or can’t download apps
- Potential solutions:
- Problem: Wi-Fi unstable, slow, or won’t connect
- Potential solutions:
- Problem: Printer won’t connect
- Workarounds:
- Problem: Spammed by notifications
- Workarounds:
- Problem: Files are opening in different apps
- Potential solutions:
- Problem: Startup times are slow
- Potential solutions:
- Problem: The Search Bar or Start Menu disappears
- Fix sound problems in Windows 10
11 of the biggest problems with Windows 10, and how to fix them
 Greg Mombert/Digital Trends Since its release in 2015, Windows 10 has served as a popular operating system that improved features from previous versions while offering greater flexibility and customization options. The launch was plagued with a variety of issues, but subsequent updates have improved the product immensely. Although there are several common issues that you may encounter when using Windows 10, it’s nothing that can’t be solved with a bit of know-how. Here are eleven of the biggest problems with Windows 10 and how to fix them.
![]()
Problem: Not enough space for updates
Depending on the size of your hard drive and how full it is, hearing about the release of a new update may leave you dreading the next time you boot up your PC. Naturally, few people want to have to choose between important data and applications and a functioning computer, but that’s exactly where you’ll be if you leave it too long.
Workarounds:
- Head to the Control Panel and review your applications to see if there are any you can do without or haven’t used in a long time.
- Consider investing in a thumb drive or external hard drive to let you free up space by transferring files.
- Empty your recycle bin or download a free tool to help manage your hard drive quickly and easily.
Problem: Automatic updates causing errors
Updates to Windows 10 are mandatory, so you can only avoid downloading and installing them for so long. While this should mean you have stable software with the latest security patches and fixes, problems will occur from time to time. With app publishers having to release new versions with each Windows 10 update (not to mention internal issues with old drivers and corrupted code), every major update will usually come with its share of issues.
Workarounds:
- If you encounter issues after your computer receives an automatic update, you should make use of the System Restore function, reset your computer to a previous point in time and try performing the update manually by going to the Microsoft website.
- You can prevent Windows 10 from upgrading automatically by using the Windows Settings menu. Search for Automatic Updates in your search bar, then select Check For Updates, which will open the Windows Updates menu. From there, you can select either Pause Updates For 7 Days or Advanced Options to pause automatic updates for up to 35 days.
Problem: Bluetooth isn’t working
Occasionally, Windows 10 users have trouble getting Bluetooth to work properly. This can impact your keyboard, mouse, headphones, speakers, and anything else that connects to your computer via Bluetooth.
Potential solutions:
- Go to Settings > Devices and make sure that Bluetooth is toggled on and that you haven’t accidentally hit a function key or manual Bluetooth switch that turned it off.
- Make sure that your Bluetooth accessory is fully charged and that you are following the pairing process. Sometimes you have to hold down a button to make the device discoverable. Check with the manufacturer for details.
- There’s a reasonable chance that this is a driver problem. You’ll want to check with the manufacturer that you have the latest driver, especially if you’re jumping straight from Windows 7, 8, or 8.1 to 10.
- A few people have reported that uninstalling the driver for the device you’re having an issue with, rebooting your machine, and then letting Microsoft automatically detect it and install the driver will do the trick.
Problem: Cortana isn’t working
Window’s 10 Cortana virtual assistant can perform a variety of tasks, but only if she feels like work. Error messages from Cortana include the program not being available in their region or language, despite being in a supported region and using a supported language. In some cases, Cortana is not on by default or not working properly.
Potential solutions:
- First of all, hit Start > Cortana > Settings, and you can toggle Cortana on and off.
- Take a look in Settings > Time & Language. You need to make sure that you’re using one of the supported languages listed on Microsoft’s website.
- Make sure that your Microphone is plugged in and is recognized by Windows. You can look at your audio settings by doing a Windows search for Sound and opening the Sound menu. You’ll find microphones listed on the Recording tab.
- Perform an audio diagnostic to determine if there are any driver issues or other problems.
- Restart Windows and see if it tries to conduct any repairs or updates, which can often solve Cortana bugs. Sometimes you’ll have to be patient and wait for a Microsoft fix to the problem, such as the Cortana bug that popped up in the Windows 10 Anniversary update.
Problem: Can’t open Windows Store or can’t download apps
Following a major update, users often report Windows Store issues after updating Windows 10, though they sometimes occur without warning. It won’t open at all for some people, while others find it impossible to download apps or app updates. There’s a chance that the delayed app downloads and updates are a result of busy servers or updates being rolled out, but there are some things you can try:
Potential solutions:
- Press Windows + R to bring up the Run box. If this shortcut command does not work (some Windows bugs may affect its use), search for Run in the search box and open the Run app. Then type “wsreset.exe” in the box and press Enter. This will clear your Store cache and can often help remove any corrupted data. When finished, reboot your computer and see if you can open the Store. If that doesn’t work, then delete your download queue and try it again. Some people report that it worked for them after a few tries.
- If you can’t access the Windows Store, it might be because you have the wrong region or time zone set. Go to Settings > Time & Language and ensure the settings are correct.
- Check online and see if there are any reported server outages or issues with particular apps.
Problem: Wi-Fi unstable, slow, or won’t connect
Issues with Wi-Fi are some of the most frustrating problems that Windows 10 users can encounter. Whether it’s slow speeds, an intermittent connection, or not having your Wi-Fi work at all, knowing the basic steps to restore your internet can be crucial.
Potential solutions:
- Start by turning your router and your computer off and on again. It might be a well-worn joke, but it often works.
- If you can’t get Wi-Fi to work at all, then you might have a driver problem — the simplest solution is to run diagnostics and have your PC search for a new driver. If that doesn’t work, contact your network adapter manufacturer and make sure that you have the latest driver. You might have to download it on another computer and install it via USB flash drive.
- Ensure that your router also has the latest firmware, which you’ll find on the manufacturer’s website.
- Go to Settings > Network & Internet > Wi-Fi. Make sure that the Connect Automatically box is checked for the network you want to connect to.
- Go to Settings > Network & Internet > Wi-Fi > Manage Wi-Fi Settings > Manage Known networks and choose your network, then click Forget. Reboot the machine and enter the network details to connect fresh.
Problem: Printer won’t connect
Given that printers are generally one of the least replaced electronic devices in the average home or office, there’s a good chance that your elderly printer may not communicate well with Windows 10. Fortunately, Microsoft has provided a solution to help your printer connect and stay connected.
Workarounds:
- Open Settings > Devices > Printers & Scanners. Select Add A Printer Or Scanner, though it will likely not be found. Click The Printer That I Want Isn’t Listed, then choose My Printer Is A Little Older, Help Me Find It. This will open a list to choose your printer from. Select Next, name your printer, then click Next until a screen opens saying Print A Test Page. Once the test page prints, your printer has successfully connected.
Problem: Spammed by notifications
There are few things as frustrating as being constant interruptions from notifications while in the middle of a gaming session, video-conference, or other attention-heavy activity. Thankfully, this issue is quick and easy to resolve, so you can remain unbothered during important work or leisure time.
Workarounds:
- From the Start Menu, select Settings >System >Notifications. You can customize the notification settings for your entire PC and determine which notifications are visible and which are not.
Problem: Files are opening in different apps
When you update Windows 10, all your apps and files go back to their default settings or, in some cases, switch default preferences altogether. Some people have found that files that once opened in familiar apps are now opening in the wrong app or in an app they’ve never opened in before.
Potential solutions:
- Switch your app settings back. If you are new to Windows 10 or had a recent update, it probably switched your customary settings to something new. For individual files, locate the file and right-click it to reveal your options. Select Open With and select Choose Another App. Find the app you prefer and select it. An option will appear asking you to confirm that you Always Use This App when opening similar files.
- Select the Start button, then Apps >Default Apps. From the Default Apps menu, select Choose Default Apps By File Type. Locate the file extension in question and then select a default app to open these files. Should you not have a preference in mind, select Choose A Default instead. Once you exit the menu, the files should be opened by the correct app in the future.
Problem: Startup times are slow
If your Windows 10 startup time has suddenly increased, this usually means that your startup settings are suboptimal. If those log in wait times are growing ridiculous, it’s time to do something about it.
Potential solutions:
- Reduce your start-up apps. Windows 10 starts a certain number of apps every time you log in. One of the most direct ways to reduce login time is to cut down on those apps. Open your Task Manager by pressing Ctrl + Alt + Delete and choosing Task Manager. Open the link that says More Details, then select Start-up. This menu controls your start-up settings, including all the apps that boot up. Look through enabled apps and disable any that you don’t absolutely need.
- Use a free program like CCleaner to remove trackers and clear out temporary files and other bloatware cluttering up your OC.
Problem: The Search Bar or Start Menu disappears
While the Windows 10 Taskbar’s customization features are advantageous, certain functions can cause unwary users a great deal of annoyance. For example, you might be hard at work on an important file and absentmindedly down scroll to your Taskbar, only to see that the Start Menu or Search bar has seemingly vanished. If your Taskbar has not been locked, a simple mistake can remove vital functions from being easily accessible and create unneeded stress and anxiety. Fortunately, this issue is straightforward to resolve.
Fix sound problems in Windows 10
If you’re having audio problems, the following suggestions might help. The tips are listed in order, so start with the first one, see if that helps, and then continue to the next one if it doesn’t.
If multiple audio output devices are available, check that you have the appropriate one selected. Here’s how:
Select the Speakers icon on the taskbar.
Next, select the arrow to open a list of audio devices connected to your computer.
Check that your audio is playing to the audio device you prefer, such as a speaker or headphones.
If this doesn’t help, continue to the next tip.
The audio troubleshooter might be able to fix audio problems automatically.
To run the troubleshooter
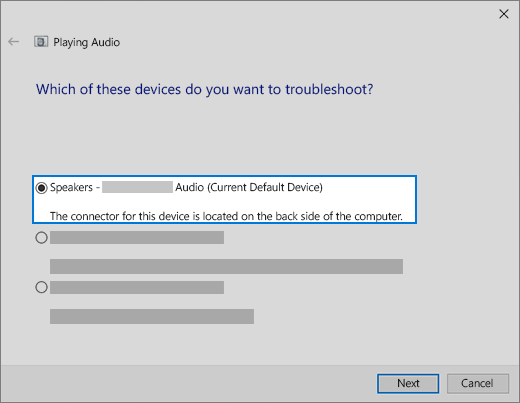
In the search box on the taskbar, type audio troubleshooter, select Fix and find problems with playing sound from the results, then select Next.
Select the device you want to troubleshoot and then continue through the troubleshooter.
You can also launch the troubleshooter from audio Settings. Select Start > Settings > System > Sound > Troubleshoot.
If running the troubleshooter doesn’t help, continue to the next tip.
To check for updates
Select Start > Settings > Update & Security > Windows Update > Check for updates.
Do one of the following:
If the status says «You’re up to date, go to the next tip.
If the status says «Updates are available,» select Install now.
Select the updates you want to install, then select Install.
Restart your PC and see if your sound is working properly.
If that didn’t solve your problem, continue to the next tip.
Try these steps
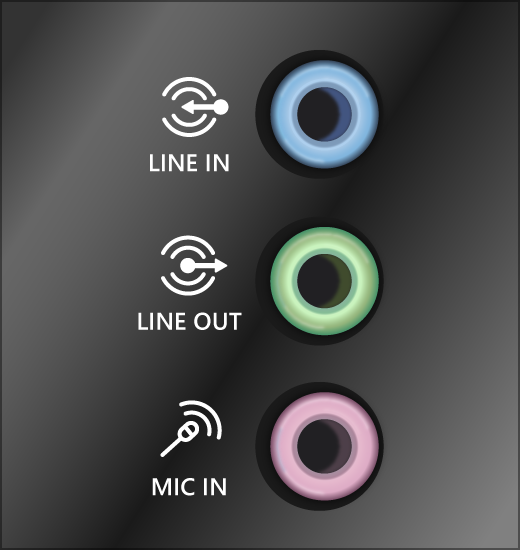
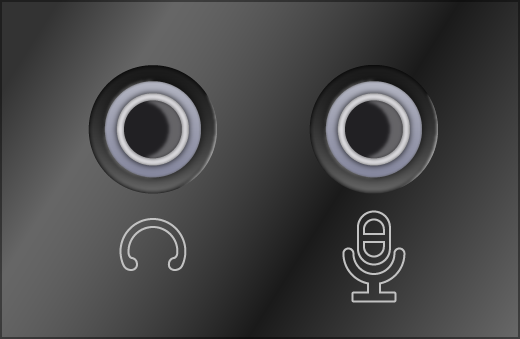
Check your speaker and headphone connections for loose cords or cables. Make sure all cords and cables are plugged in.
If you have multiple 5mm jacks to plug into, especially on a surround sound system, make sure all cords and cables are plugged into the correct jack.
If it’s not clear which jack goes with which cord, consult your hardware manufacturer, or try the most obvious outputs one at a time and see if they work.
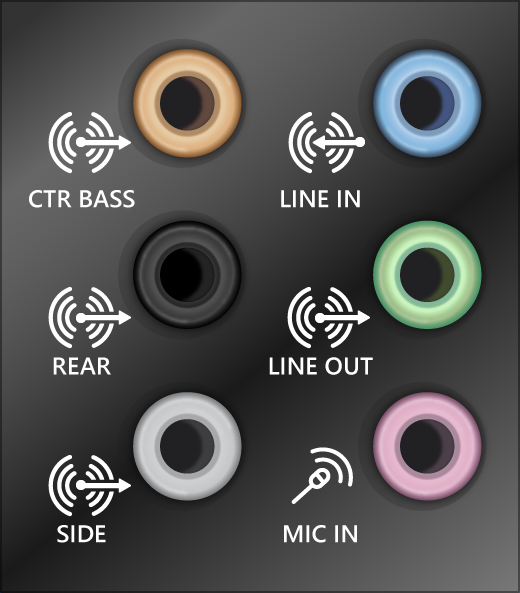
Note: Some systems use a green jack for output and pink for mic input and others will be labeled «headphone» or «microphone.»
Make sure the power is turned on and check the volume level.
Make sure the mute setting is not turned on, and try turning up all the volume controls.
Remember some speakers and apps have their own volume controls. Be sure to check them all.
Try connecting your speaker and headphones to a different USB port.
It’s possible that your speakers won’t work when your headphones are plugged in. Unplug your headphones and see if that helps.
If your cables and volume are OK, see the next sections for additional troubleshooting.
Check to make sure your audio devices aren’t muted and haven’t been disabled.
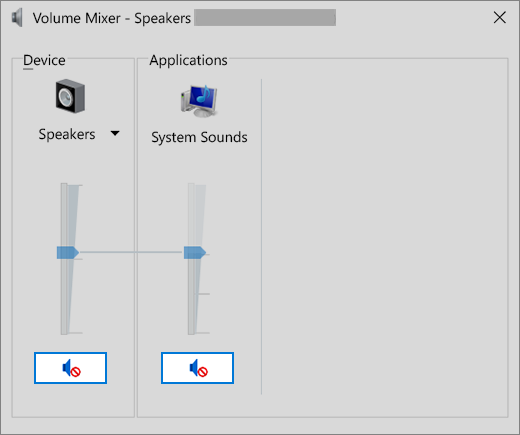
Right-click the Speakers icon on the taskbar, and then select Open Volume mixer.
You’ll see a set of volume controls for your devices. Make sure none of them are muted. If any of them are muted, you’ll see a red circle with a line through it next to the volume control. In that case, select the volume control to unmute.
Check your device properties to make sure that your devices have not been disabled by mistake. Select Start > Settings > System > Sound .
Select your audio device, and then select Device properties. Be sure to select Device properties for both the output and input devices.
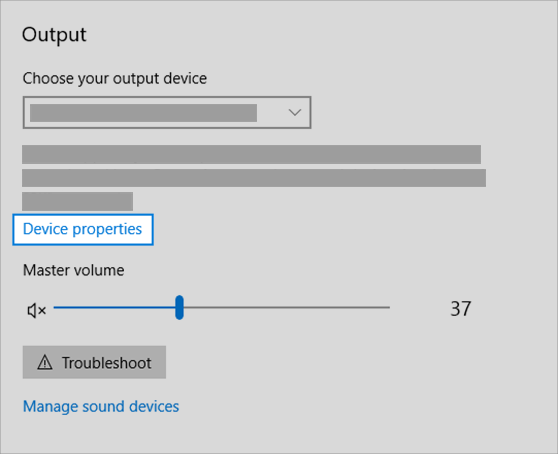
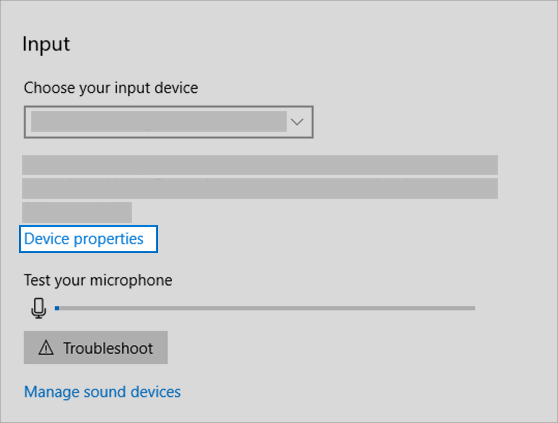
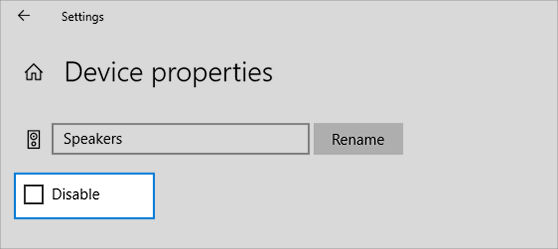
Make sure the Disable check box is cleared for the output and input devices.
If that didn’t solve your problem, continue to the next tip.
Hardware problems can be caused by outdated or malfunctioning drivers. Make sure your audio driver is up to date and update it if needed. If that doesn’t work, try uninstalling the audio driver (it will reinstall automatically). If that doesn’t work, try using the generic audio driver that comes with Windows. If you’re having audio issues after installing updates, try rolling back your audio driver.
To update your audio driver automatically
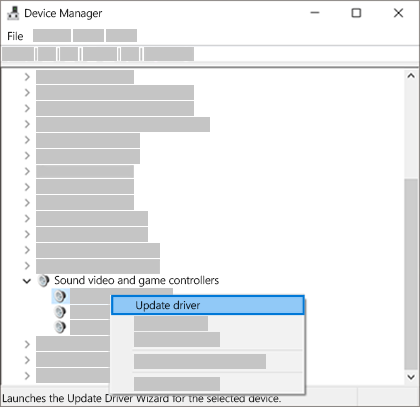
In the search box on the taskbar, type device manager, then select it from the results.
Select the arrow next to Sound, video and game controllers to expand it.
Right-click the listing for your sound card or audio device, such as headphones or speakers, select Update driver, then select Search automatically for updated driver software. Follow the instructions to complete the update.
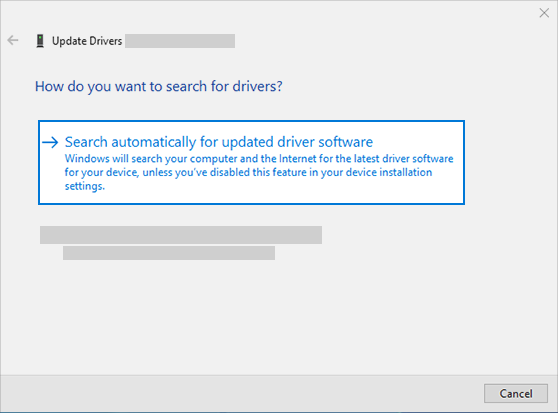
If Windows doesn’t find a new driver, look for one on the device manufacturer’s website and follow those instructions. If that doesn’t work, try uninstalling your audio driver.
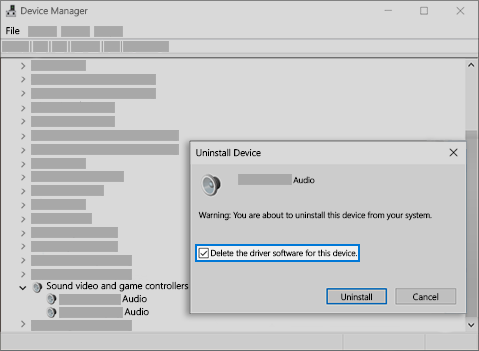
To uninstall your audio driver
In the search box on the taskbar, type device manager, then select it from the results.
Select the arrow next to Sound, video and game controllers to expand it.
Right-click the listing for your sound card or audio device, select Uninstall device, select the Delete the driver software for this device check box, and then select Uninstall.
Restart your PC.
Note: Be sure to save documents and any other current work before you restart.
This restart will automatically prompt your PC to reinstall your audio driver.
To restart, select Start > Power > Restart .
If those options didn’t work, try using the generic audio driver that comes with Windows.
To use the generic audio driver that comes with Windows
In the search box on the taskbar, type device manager, then select it from the results.
Select the arrow next to Sound, video and game controllers to expand it.
Right-click the listing for your sound card or audio device, then select Update driver > Browse my computer for driver software > Let me pick from a list of device drivers on my computer.
Select the audio device whose driver you want to update, select Next, and then follow the instructions to install it.
If these steps didn’t solve your audio issue, visit your device manufacturer’s website and install the most recent audio/sound drivers for your device. Following is an example of a driver download page for a sound device manufacturer.
If you have audio issues after installing updates
If your audio was working before you ran Windows Update and now isn’t working, try rolling back your audio driver.
To roll back your audio driver
In the search box on the taskbar, type device manager, then select it from the results.
Select the arrow next to Sound, video and game controllers to expand it.
Right-click the listing for your sound card or audio device, then select Properties.
Select the Driver tab, then select Roll Back Driver.
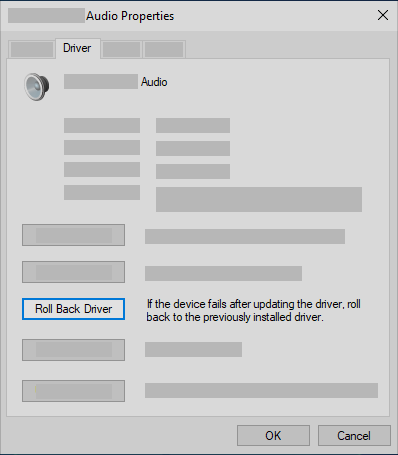
Read and follow the instructions and then select Yes if you want to roll back your audio driver.
If rolling back your audio driver didn’t work or wasn’t an option, you can try to restore your PC from a system restore point.
Restore your PC from a system restore point
When Microsoft installs updates on your system, we create a system restore point in case problems arise. Try restoring from that point and see if that fixes your sound problems. For more info, see «Restore from a system restore point» in Recovery options in Windows 10.
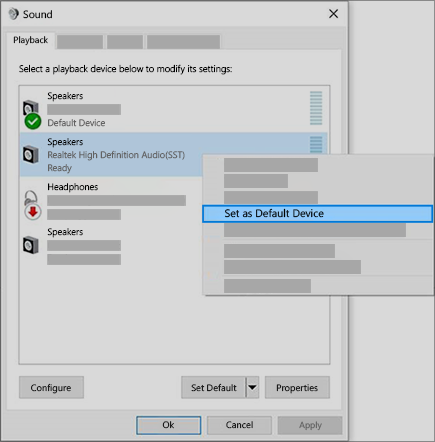
If you’re connecting to an audio device—such as headphones or speakers—using USB or HDMI, you might need to set that device as the default audio device. If you’re using an external monitor that doesn’t have built-in speakers, make sure that the monitor isn’t already selected as your default output device. if it is, you won’t have any audio. You can check that when you set your default output audio device. Here’s how:
In the search box on the taskbar, type control panel, then select it from the results.
Select Hardware and Sound from the Control Panel, and then select Sound.
On the Playback tab, right-click the listing for your audio device, select Set as Default Device, and then select OK.
If setting your audio device as the default device doesn’t help, continue to the next tip for additional troubleshooting.
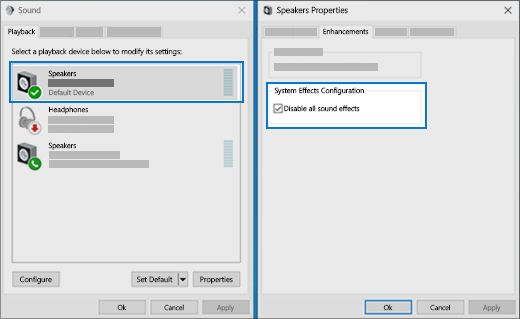
Sometimes having audio enhancements on can result in audio issues. Disabling them may resolve your issue.
In the search box on the taskbar, type control panel, then select it from the results.
Select Hardware and Sound from the Control Panel, and then select Sound.
On the Playback tab, right-click the Default Device, and then select Properties.
On the Enhancements tab, select either the Disable all enhancements or the Disable all sound effects check box (depending on which option you see), select OK, and try to play your audio device.
If that doesn’t work, on the Playback tab, select another default device (if you have one), select either the Disable all enhancements or the Disable all sound effects check box (depending on which option you see), select OK, and try to play audio again. Do this for each default device.
If turning off audio enhancements doesn’t help, see the next sections for additional troubleshooting.
In the search box on the taskbar, type services, then select it from the results.
Select each of the following services, right-click, and then select Restart:
Windows Audio Endpoint Builder
Remote Procedure Call (RPC)
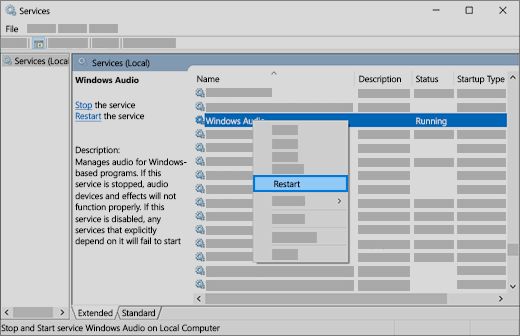
If restarting these services doesn’t resolve your issue, see the next sections for more troubleshooting.
In the search box on the taskbar, type control panel, and then select it from the results.
Select Hardware and Sound from the Control Panel, and then select Sound.
On the Playback tab, right-click (or press and hold) Default Device, and then select Properties.
On the Advanced tab, under Default Format, change the setting, select OK,and then test your audio device. If that doesn’t work, try changing the setting again.
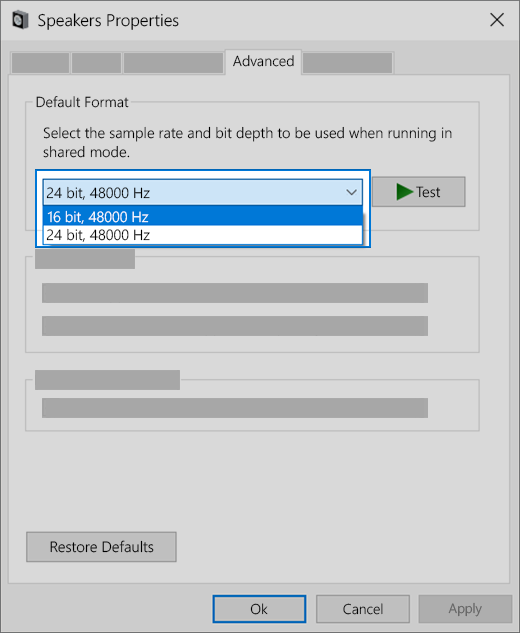
If trying different audio formats doesn’t help, see the next sections for additional troubleshooting.
Many updates require you to restart your device.
To check and see if you have installed updates pending and need to restart
Save your work and close all open applications.
Select Start > Power . If you have installed updates pending, you’ll see options to Update and restart and Update and shut down.
Select one of those restart options to apply the updates
If restarting doesn’t help, see the next section for additional troubleshooting.
Some audio problems might be caused by an issue with the audio system’s IDT High Definition Audio CODEC. This can be fixed with a manual driver update which allows you to choose the sound driver you want to use.
Note: Not all systems will have an IDT High Definition Audio CODEC.
To check and see if you have one, and to manually update the driver
In the search box on the taskbar, type device manager, then select it from the results.
Select the arrow next to Sound, video and game controllers to expand it.
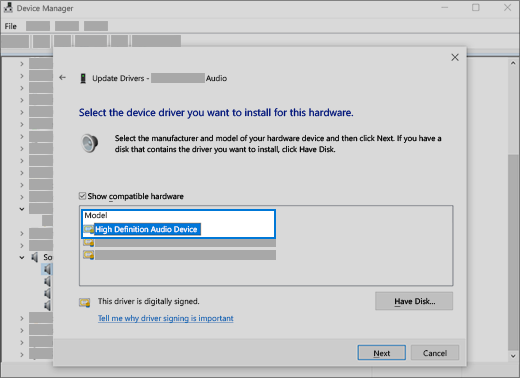
Look for IDT High Definition Audio CODEC. If it’s listed, right-click it and select Update driver, then select Browse my computer for driver software > Let me pick from a list of device drivers on my computer.
You’ll see a list of pre-installed drivers. Select High Definition Audio Device, and then select Next.
1. Select Start > Settings > Privacy , and then select Microphone from the left menu.
Under Allow access to the microphone on this device, select Change. Make sure the toggle is turned On.
If you’re having this issue with a specific app, scroll down to Choose which Microsoft Store apps can access your microphone and make sure that the toggle next to that app is turned On as well.


