- Windows Forms
- How to Pass Data Between Forms
- Form on Top of All Other Windows
- MDI Form
- Объект My.Forms My.Forms Object
- Remarks Remarks
- Свойства Properties
- Пример Example
- Шаг 1. Создание проекта приложения Windows Forms Step 1: Create a Windows Forms App project
- Откройте Visual Studio 2017. Open Visual Studio 2017
- Запустите Visual Studio 2019. Open Visual Studio 2019
- Сведения о проекте приложения Windows Forms About the Windows Forms App project
- Дальнейшие действия Next steps
Windows Forms
VB.Net programmers have made extensive use of forms to build user interfaces. Each time you create a Windows application, Visual Studio will display a default blank form, onto which you can drag and drop controls from the Visual Studio Toolbox window.
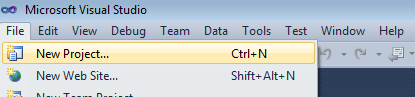
The first step is to start a new project and build a form. Open your Visual Studio and select File->NewProject and select Visual Basic from the New project dialog box and select Windows Froms Application. Enter your project name instead of WindowsApplication1 in the bottom of dialouge box and click OK button. The following picture shows how to crate a new Form in Visual Studio.
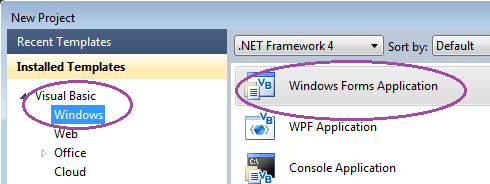
Select project type from New project dialog Box.
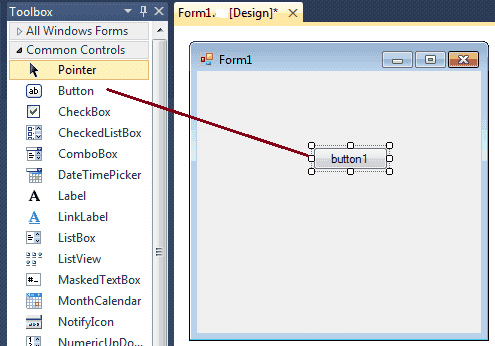
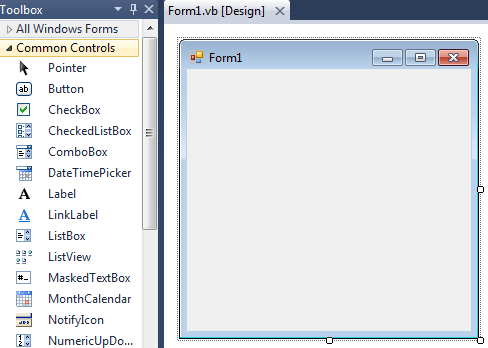
When you add a Windows Form to your project, many of the forms properties are set by default. Although these values are convenient, they will not always suit your programming needs. The following picture shows how is the default Form look like.
At the top of the form there is a title bar which displays the forms title. Form1 is the default name, you can change the name to your convenience . The title bar also includes the control box, which holds the minimize, maximize, and close buttons.
If you want to set any properties of the Form, you can use Visual Studio Property window to change it.
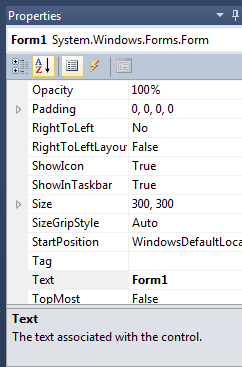
For example , to change the forms title from Form1 to MyForm, click on Form1 and move to the right side down Properties window, set Text property to MyForm. Then you can see the Title of the form is changed. Likewise you can set any properties of Form through Properties window.
You can also set the properties of the Form1 through coding. For coding, you should right-click the design surface or code window and then clicking View Code.
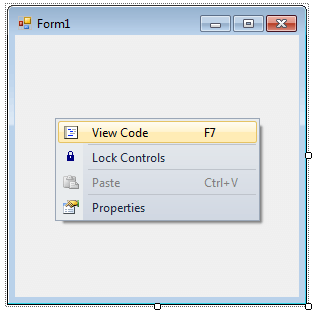
When you right click on Form then you will get code behind window, there you can write your code.
For example , if you want to change the back color of the form to Brown , you can code like this.
Likwise you can change other properties of Form1 through coding.
How to Pass Data Between Forms
In VB.Net , there are many situations the new programmers face the same problem about how to pass data and values from one form to another. We can pass values from one form to another in a number of ways. The following link will guide you . Pass Data Between VB.Net Forms
Form on Top of All Other Windows
You can bring a Form on top of VB.Net application by simply setting the Form.topmost form property to true will force the form to the top layer of the screen. More about. How to keep Form on Top of All Other Windows
MDI Form
A VB.Net Multiple Document Interface (MDI) programs can display multiple child windows inside them. This is in contrast to single document interface (SDI) applications, which can manipulate only one document at a time. More about. VB.Net MDI Form
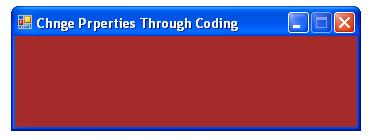
The following VB.Net source code shows how to change the Title, BackColor, Size, Location and MaximizeBox properties of Form1. Copy and paste the following VB.Net source code to source code editor of your Visual Studio.
When you execute (press F5 key) the program the form is look like the following image.
The Windows based programs you create using Visual Basic .NET run in the context of a form. When you close the form, the application also ends.
Объект My.Forms My.Forms Object
Предоставляет свойства для доступа к экземпляру каждой формы Windows Form, объявленной в текущем проекте. Provides properties for accessing an instance of each Windows form declared in the current project.
Remarks Remarks
My.Forms Объект предоставляет экземпляр каждой формы в текущем проекте. The My.Forms object provides an instance of each form in the current project. Имя свойства совпадает с именем формы, к которой обращается свойство. The name of the property is the same as the name of the form that the property accesses.
Доступ к формам, предоставляемым объектом, можно получить My.Forms с помощью имени формы без уточнения. You can access the forms provided by the My.Forms object by using the name of the form, without qualification. Так как имя свойства совпадает с именем типа формы, это позволяет получить доступ к форме, как если бы она имела экземпляр по умолчанию. Because the property name is the same as the form’s type name, this allows you to access a form as if it had a default instance. Например, выражение My.Forms.Form1.Show будет эквивалентно Form1.Show . For example, My.Forms.Form1.Show is equivalent to Form1.Show .
My.Forms Объект предоставляет только формы, связанные с текущим проектом. The My.Forms object exposes only the forms associated with the current project. Он не предоставляет доступ к формам, объявленным в упоминаемых библиотеках DLL. It does not provide access to forms declared in referenced DLLs. Для доступа к форме, предоставляемой библиотекой DLL, необходимо использовать полное имя формы, записанное как dllname. Формнаме. To access a form that a DLL provides, you must use the qualified name of the form, written as DllName.FormName.
Свойство можно использовать OpenForms для получения коллекции всех открытых форм приложения. You can use the OpenForms property to get a collection of all the application’s open forms.
Объект и его свойства доступны только для приложений Windows. The object and its properties are available only for Windows applications.
Свойства Properties
Каждое свойство My.Forms объекта предоставляет доступ к экземпляру формы в текущем проекте. Each property of the My.Forms object provides access to an instance of a form in the current project. Имя свойства совпадает с именем формы, к которой обращается свойство, а тип свойства совпадает с типом формы. The name of the property is the same as the name of the form that the property accesses, and the property type is the same as the form’s type.
При конфликте имен имя свойства для доступа к форме — RootNamespace _ Namespace _ формнаме. If there is a name collision, the property name to access a form is RootNamespace _ Namespace_FormName. Например, рассмотрим две формы с именем, Form1. Если одна из этих форм находится в корневом пространстве имен WindowsApplication1 и в пространстве имен Namespace1 , поэтому доступ к этой форме осуществляется через My.Forms.WindowsApplication1_Namespace1_Form1 . For example, consider two forms named Form1. If one of these forms is in the root namespace WindowsApplication1 and in the namespace Namespace1 , you would access that form through My.Forms.WindowsApplication1_Namespace1_Form1 .
My.Forms Объект предоставляет доступ к экземпляру главной формы приложения, созданному при запуске. The My.Forms object provides access to the instance of the application’s main form that was created on startup. Для всех других форм My.Forms объект создает новый экземпляр формы при обращении к нему и сохраняет его. For all other forms, the My.Forms object creates a new instance of the form when it is accessed and stores it. Последующие попытки доступа к этому свойству возвращают этот экземпляр формы. Subsequent attempts to access that property return that instance of the form.
Форму можно удалить, назначив Nothing свойству для этой формы. You can dispose of a form by assigning Nothing to the property for that form. Средство задания свойств вызывает Close метод формы, а затем присваивает Nothing хранимому значению. The property setter calls the Close method of the form, and then assigns Nothing to the stored value. Если присвоить значение, отличное от Nothing свойства, метод задания выдаст ArgumentException исключение. If you assign any value other than Nothing to the property, the setter throws an ArgumentException exception.
Можно проверить My.Forms , сохраняет ли свойство объекта экземпляр формы с помощью Is IsNot оператора или. You can test whether a property of the My.Forms object stores an instance of the form by using the Is or IsNot operator. С помощью этих операторов можно проверить, имеет ли свойство значение Nothing . You can use those operators to check if the value of the property is Nothing .
Как правило, Is IsNot оператор или должен считывать значение свойства для выполнения сравнения. Typically, the Is or IsNot operator has to read the value of the property to perform the comparison. Однако если текущее свойство хранится Nothing , свойство создает новый экземпляр формы, а затем возвращает этот экземпляр. However, if the property currently stores Nothing , the property creates a new instance of the form and then returns that instance. Однако компилятор Visual Basic обрабатывает свойства объекта по- My.Forms разному и позволяет Is IsNot оператору или проверить состояние свойства без изменения его значения. However, the Visual Basic compiler treats the properties of the My.Forms object differently and allows the Is or IsNot operator to check the status of the property without altering its value.
Пример Example
В этом примере изменяется заголовок формы по умолчанию SidebarMenu . This example changes the title of the default SidebarMenu form.
Чтобы этот пример работал, проект должен иметь форму с именем SidebarMenu . For this example to work, your project must have a form named SidebarMenu .
Этот код будет работать только в проекте приложения Windows. This code will work only in a Windows Application project.
Шаг 1. Создание проекта приложения Windows Forms Step 1: Create a Windows Forms App project
Первый шаг в создании программы для просмотра изображений — это создание проекта приложения Windows Forms. When you create a picture viewer, the first step is to create a Windows Forms App project.
Откройте Visual Studio 2017. Open Visual Studio 2017
В строке меню выберите Файл > Создать > Проект. On the menu bar, choose File > New > Project. Диалоговое окно должно выглядеть так же, как на следующем снимке экрана. The dialog box should look similar to the following screenshot.
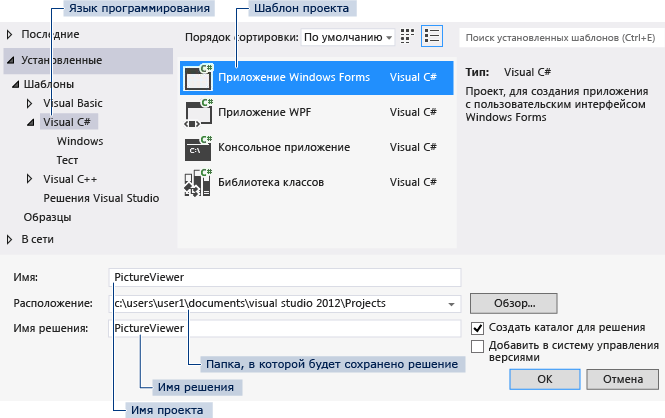
Диалоговое окно _ _»Новый проект» New project _ _dialog box
В левой части диалогового окна Новый проект выберите Visual C# или Visual Basic, а затем — Классическое приложение Windows. On the left side of the New Project dialog box, choose either Visual C# or Visual Basic, and then choose Windows Desktop.
В списке шаблонов проектов выберите Приложение Windows Forms (.NET Framework). In the project templates list, choose Windows Forms App (.NET Framework). Назовите новую форму PictureViewer и нажмите кнопку ОК. Name the new form PictureViewer, and then choose the OK button.
Если вы не видите шаблон Приложение Windows Forms (.NET Framework), используйте Visual Studio Installer, чтобы установить рабочую нагрузку Разработка классических приложений .NET. If you don’t see the Windows Forms App (.NET Framework) template, use the Visual Studio Installer to install the .NET desktop development workload.
Дополнительные сведения см. в разделе Установка Visual Studio. For more information, see the Install Visual Studio page.
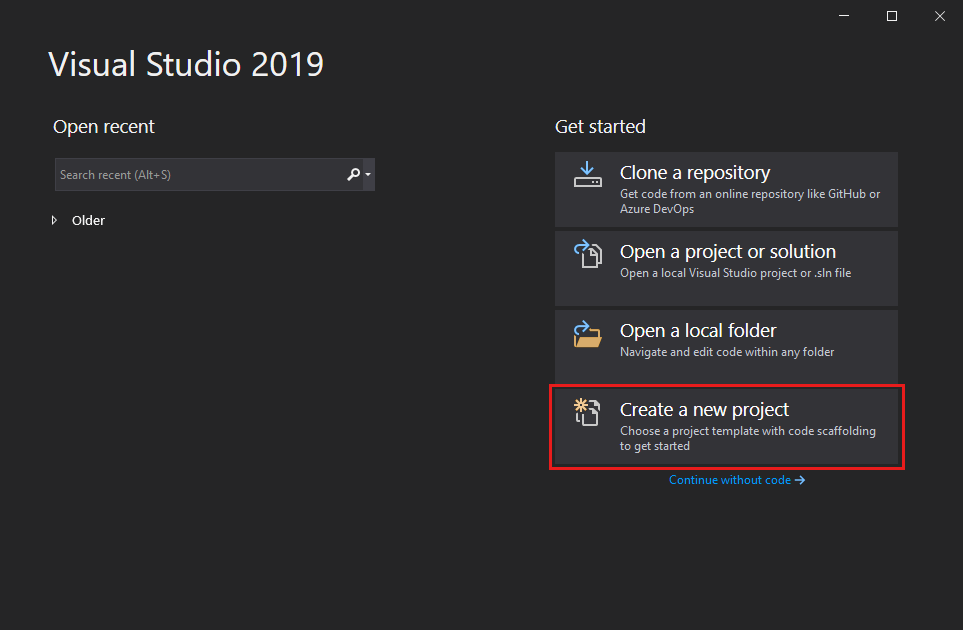
Запустите Visual Studio 2019. Open Visual Studio 2019
На начальном экране выберите Создать проект. On the start window, choose Create a new project.
В поле поиска окна Создание проекта введите Windows Forms. On the Create a new project window, enter or type Windows Forms in the search box. Затем в списке Тип проекта выберите Рабочий стол. Next, choose Desktop from the Project type list.
Применив фильтр Тип проекта, выберите шаблон Приложение Windows Forms (.NET Framework) для C# или Visual Basic и нажмите кнопку Далее. After you apply the Project type filter, choose the Windows Forms App (.NET Framework) template for either C# or Visual Basic, and then choose Next.

Если шаблон Приложение Windows Forms (.NET Framework) отсутствует, его можно установить из окна Создание проекта. If you don’t see the Windows Forms App (.NET Framework) template, you can install it from the Create a new project window. В сообщении Не нашли то, что искали? выберите ссылку Установка других средств и компонентов. In the Not finding what you’re looking for? message, choose the Install more tools and features link.

После этого в Visual Studio Installer выберите рабочую нагрузку Разработка классических приложений .NET. Next, in the Visual Studio Installer, choose the Choose the .NET desktop development workload.

Затем нажмите кнопку Изменить в Visual Studio Installer. After that, choose the Modify button in the Visual Studio Installer. Вам может быть предложено сохранить результаты работы; в таком случае сделайте это. You might be prompted to save your work; if so, do so. Выберите Продолжить, чтобы установить рабочую нагрузку. Next, choose Continue to install the workload.
В поле Имя проекта окна Настроить новый проект введите PictureViewer. In the Configure your new project window, type or enter PictureViewer in the Project name box. Затем нажмите Создать. Then, choose Create.
Visual Studio создает решение для приложения. Visual Studio creates a solution for your app. Решение играет роль контейнера для всех проектов и файлов, необходимых приложению. A solution acts as a container for all of the projects and files needed by your app. Более подробно эти термины поясняются далее в этом учебнике. These terms will be explained in more detail later in this tutorial.
Сведения о проекте приложения Windows Forms About the Windows Forms App project
Среда разработки содержит три окна: главное окно, Обозреватель решений и окно Свойства. The development environment contains three windows: a main window, Solution Explorer, and the Properties window.
Если какое-либо из этих окон отсутствует, можно восстановить макет окон по умолчанию. If any of these windows are missing, you can restore the default window layout. В строке меню выберите Окно > Сброс макета окна. On the menu bar, choose Window > Reset Window Layout.
Можно также отобразить окна с помощью команд меню. You can also display windows by using menu commands. В строке меню выберите Вид > Окно «Свойства» или Обозреватель решений. On the menu bar, choose View > Properties Window or Solution Explorer.
Если открыты какие-либо другие окна, закройте их с помощью кнопки Закрыть (x) в верхнем правом углу. If any other windows are open, close them by choosing the Close (x) button in their upper-right corners.
- Главное окно. В этом окне выполняется основная часть работы, например работа с формами и редактирование кода. Main window In this window, you’ll do most of your work, such as working with forms and editing code. В окне показана форма в редакторе форм. The window shows a form in the Form Editor. В верхней части окна находятся две вкладки — вкладка Начальная страница и вкладка Form1.cs [Design]. At the top of the window, the Start Page tab and the Form1.cs [Design] tab appear. (В Visual Basic имя вкладки заканчивается на .vb, а не на .cs.) (In Visual Basic, the tab name ends with .vb instead of .cs.)
- Главное окно. В этом окне выполняется основная часть работы, например работа с формами и редактирование кода. Main window In this window, you’ll do most of your work, such as working with forms and editing code. В окне показана форма в редакторе форм. The window shows a form in the Form Editor.
- Окно «Обозреватель решений». В этом окне можно просматривать все элементы, входящие в решение, и переходить к ним. Solution Explorer window In this window, you can view and navigate to all items in your solution.
Если выбрать файл, содержимое в окне Свойства изменится. If you choose a file, the contents of the Properties window changes. Если открыть файл кода (с расширением .cs в C# и .vb в Visual Basic), откроется сам файл кода или конструктор для него. If you open a code file (which ends in .cs in C# and .vb in Visual Basic), the code file or a designer for the code file appears. Конструктор — это визуальная поверхность, на которую можно добавлять элементы управления, такие как кнопки и списки. A designer is a visual surface onto which you can add controls such as buttons and lists. При работе с формами Visual Studio такая поверхность называется конструктор Windows Forms. For Visual Studio forms, the designer is called the Windows Forms Designer.
Окно «Свойства». В этом окне производится изменение свойств элементов, выбранных в других окнах. Properties window In this window, you can change the properties of items that you choose in the other windows. Например, выбрав форму Form1, можно изменить ее название путем задания свойства Text, а также изменить цвет фона путем задания свойства Backcolor. For example, if you choose Form1, you can change its title by setting the Text property, and you can change the background color by setting the Backcolor property.
В верхней строке в обозревателе решений отображается текст Решение «PictureViewer» (1 проект). Это означает, что Visual Studio автоматически создала для вас решение. The top line in Solution Explorer shows Solution ‘PictureViewer’ (1 project), which means that Visual Studio created a solution for you. Решение может содержать несколько проектов, но пока что вы будете работать с решениями, которые содержат только один проект. A solution can contain more than one project, but for now, you’ll work with solutions that contain only one project.
В строке меню выберите Файл > Сохранить все. On the menu bar, choose File > Save All.
Другой вариант — нажать кнопку Сохранить все на панели инструментов, как показано на рисунке ниже. As an alternative, choose the Save All button on the toolbar, which the following image shows.
Кнопка «Сохранить все» _ _на панели инструментов Save All _ _toolbar button
Visual Studio автоматически заполняет имя папки и имя проекта, а затем сохраняет проект в папке проектов. Visual Studio automatically fills in the folder name and the project name and then saves the project in your projects folder.
Дальнейшие действия Next steps
Следующий раздел руководства: Шаг 2. Запуск приложения . To go to the next tutorial step, see Step 2: Run your app.


