- FIX: Windows 10 minimizes all windows
- Windows 10 minimized all my windows [FIX]
- 1. General troubleshooting
- 2. Turn off Tablet mode
- 3. Boot in Safe Mode with networking then perform an SFC scan
- 4. Run the Microsoft Safety Scanner
- 5. Create a new user profile
- 6. Uncheck Interactive services detection setting
- 7. Disable Aero Shake using Registry Editor
- 8. Disable the Microsoft Consumer Experience with the Local Group Policy Editor
- Top 7 Methods to Fix Apps and Programs Automatically Minimizing in Windows 10
- How To Fix Apps & Programs Automatic Minimizing In Windows 10?
- METHOD 1: Using Action Center
- METHOD 2: Through Settings App
- METHOD 3: Disable Game Mode
- METHOD 4: Run As Admin And In A Different Compatibility Mode
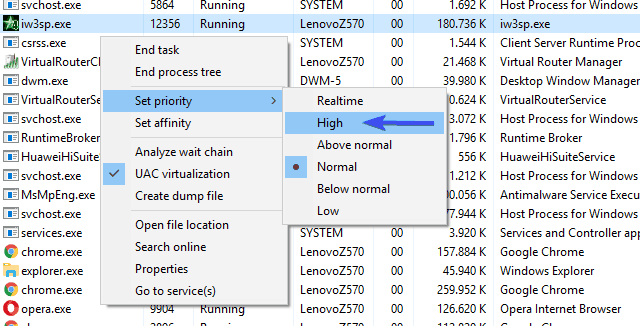
- METHOD 5: Give Game’s Process A Higher CPU Priority
- METHOD 6: Run An Antivirus Scan
- Get SpyHunter to make your system secure & virus free
- METHOD 7: Check Faulty USB
- Make Your Windows PC/laptop Error Free
- Get Windows Repair Tool, to fix various Windows issues & errors
- Conclusion
FIX: Windows 10 minimizes all windows

If you find Windows 10 minimizes all windows as you work on your computer or laptop, try the solutions listed below to fix the problem.
Windows 10 minimized all my windows [FIX]
1. General troubleshooting
- Run an antivirus scan as a safety spot check. For better performance, scan your computer or device because it has been noted that after using Windows 10 for a couple of months, system performance may be affected and you may get other app errors. To enhance your computer’s speed and performance, scan it after a specific interval, to maintain your computer and protect it from any type of errors.
- Check your USB ports as sometimes a faulty USB connecting and re-connecting could lead to Windows 10 minimizing windows. A dodgy port could cause sudden de-connection so windows would not have time to pop up and the windows you open will be deselected
2. Turn off Tablet mode
Windows 10 has the Tablet Mode or Continuum feature which is specially designed for touch-enabled devices like a tablet and others. Tablet Mode works like a bridge between your computer and the touch-enabled device, so when it is turned on, all modern apps open in full window mode such that the main apps window is affected. This causes the automatic minimizing of windows if you open any of its sub-windows.
To fix this, turn off Tablet mode using settings app by doing the following:
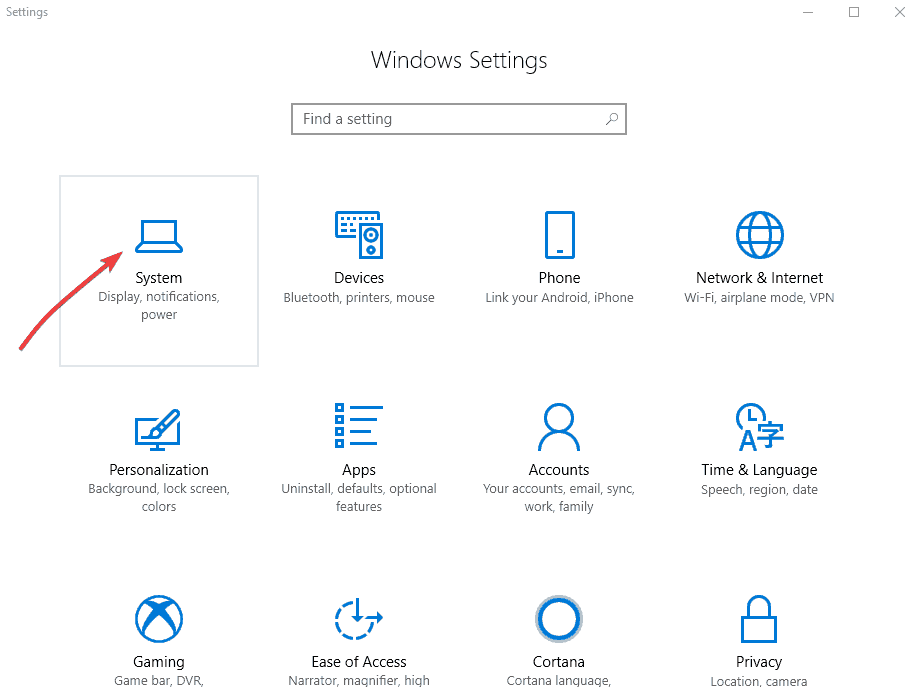
- Open Start and select Settings

- Click System
- Click Tablet Mode
- Now, under When I sign in, select Use Desktopmode then close the window
- Under When this device automatically switches tablet mode on/off, select Don’t ask me and don’t switch
- Under Hide app icons on the taskbar in tablet mode, slide to select OFF
- Finally, under automatically hide the taskbar in tablet mode, slide to select OFF


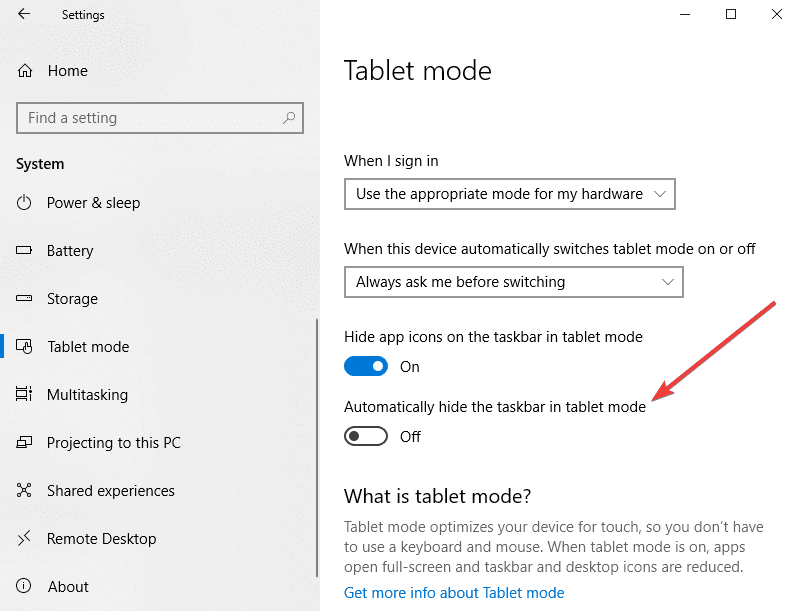
Once you do this, the Windows 10 minimizes all windows issue will be resolved.
3. Boot in Safe Mode with networking then perform an SFC scan
This starts Windows in safe mode, including the network drivers and services you need to access the internet or other computers on the same network.
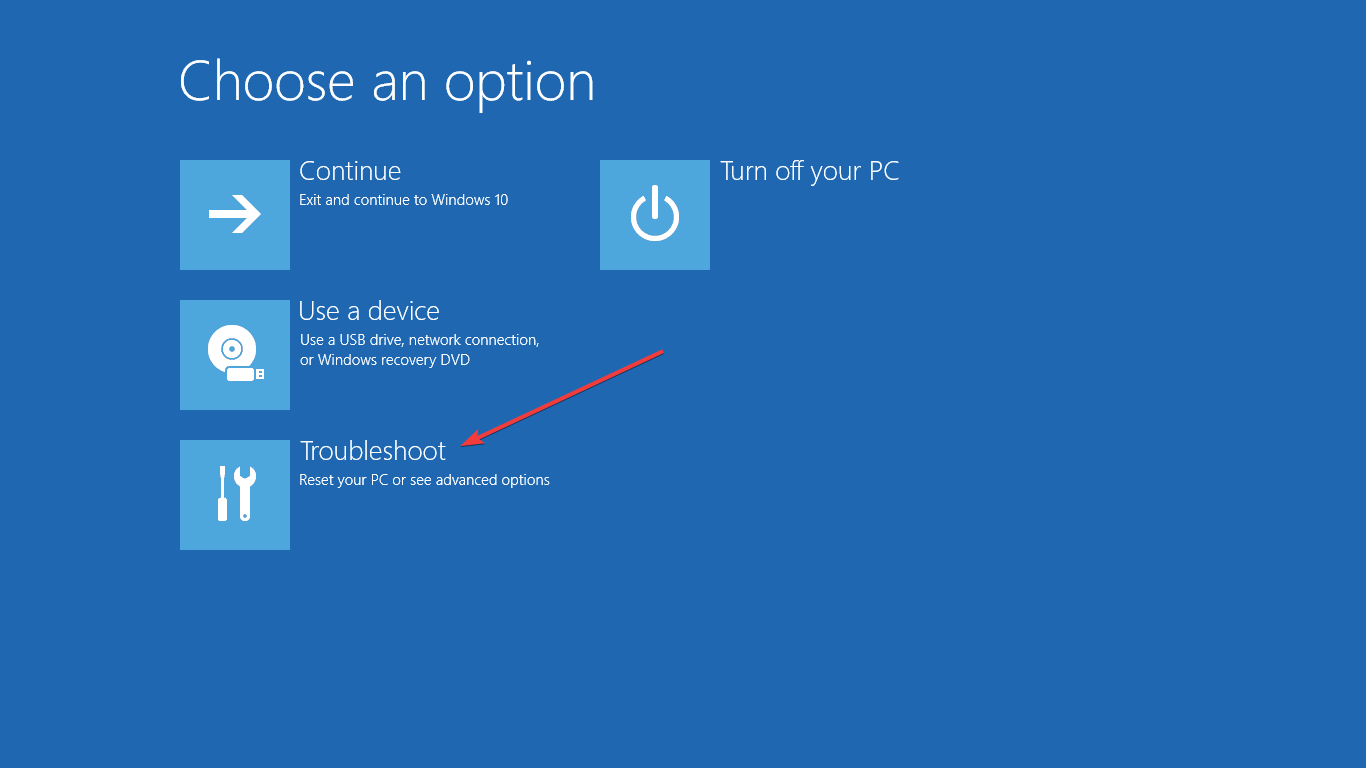
- Restart your computer
- When the sign-in screen is displayed, hold down the SHIFT key while you select Power then Restart
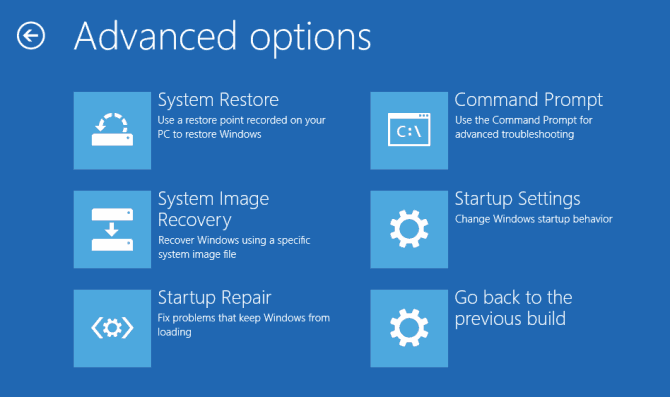
- After the computer restarts to Choose an option screen, select Troubleshoot
- Click Advanced options
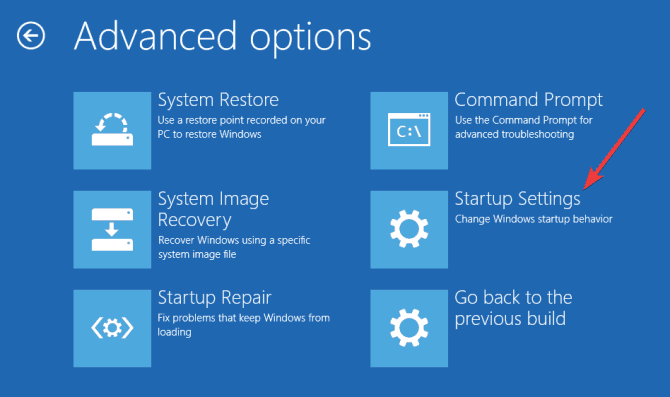
- Open Startup Settings
- Click Restart
- Once it restarts, you will see a list of options. select 5 or F5 for Safe Mode with Networking
Once you’re in safe mode with networking, perform an SFC scan. This lets you scan your computer system for any corrupt files and fixes these corruptions in the system files. To do this:
- Click Start and type CMD in the search bar
- Right-click Command Prompt in the search results and select Run as administrator
- Type sfc /scannow and press enter
- If there are no errors from the scan, restart your computer and see if the Windows 10 minimizes all windows issue recurs.
4. Run the Microsoft Safety Scanner
This is a free downloadable security tool for on-demand scanning, which helps remove malware, and collaborates with your existing antivirus software. However, you need to use it within 10 days after downloading it, after which it will expire.
In order to rerun a scan with the latest antimalware definitions, download and install it again. If you run the virus scan without reinstalling Microsoft Safety Scanner, the program will be deleted, and any infected files and folders can also get deleted.
5. Create a new user profile
A corrupt user profile can cause Windows 10 to prevent any access to files or folders, hence minimizing all windows. You need to create a new user account (local) to resolve this. Here’s how:
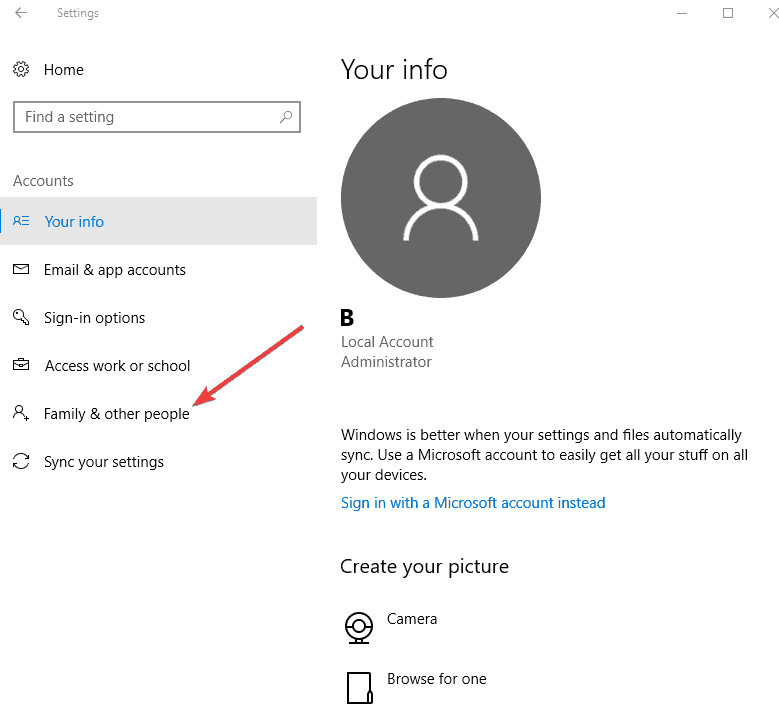
- Click Start and select Settings
- Select Accounts
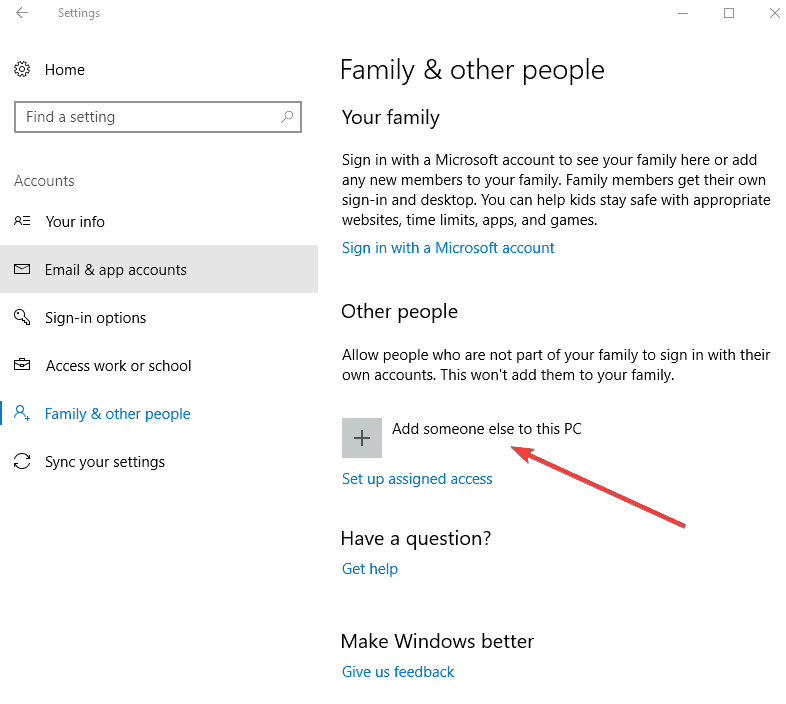
- Click Family and Other people
- Click Add someone else to this PC
- Fill in the form with the user name and password. Your new user account will be created.
- Click on Change account type
- Click the drop down arrow to set the account to local user level
- Restart your computer

Login to the new account you just created and see if the problem goes away. If it does, your old profile is corrupted, so to fix it, do the following:
- Use the newly created user profile to downgrade your usual account
- Click Apply or Ok
- Raise back your old profile to its default admin level
- Rinse and repeat a few times to remove any corruption
- Leave your account on as Administrator
6. Uncheck Interactive services detection setting
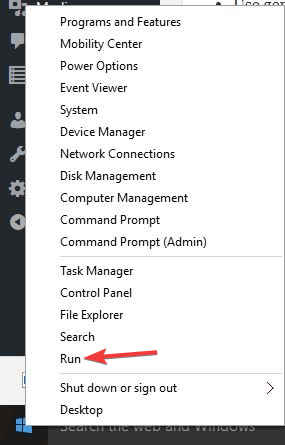
- Right-click Start and select Run
- Type msconfig and press enter or click OK
- Press ALT+D together and press enter so as to configure the system for a diagnostic startup
- Reboot and check if the issue is gone
- Right-click Start again and select Run
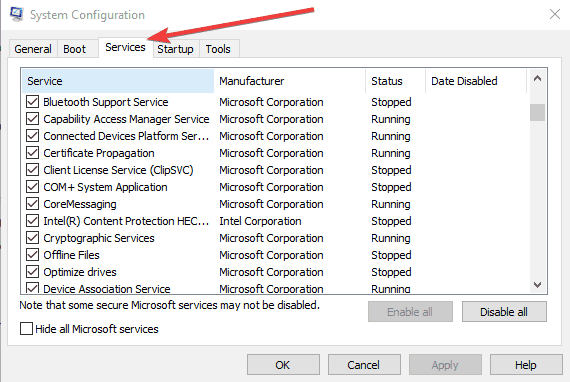
- From the menu bar, select Services
- Find Interactive services detection and uncheck its box
- Click Apply and OK
- Go to Task Manager and click Show processes from all users
- Look for the same Interactive services detection and end the process
- Restart your computer

Turn off/Disable Aero Shake feature
Aero Shake is a Windows 10 feature that can sometimes cause Windows 10 minimizes all windows problem, but you can turn it off from the Registry Editor or Group Policy editor.
7. Disable Aero Shake using Registry Editor
Note: The steps outlined here for Registry Editor must be followed carefully because any incorrect modifications to the registry may cause serious damage to your computer. Before making any changes, backup the registry for restoration in case of any problems.
- Right-click Start button
- Click Run
- Type regedit in the Run box
- Click OK or press Enter
- If a password or administrator permission is required, click Yes or Allow
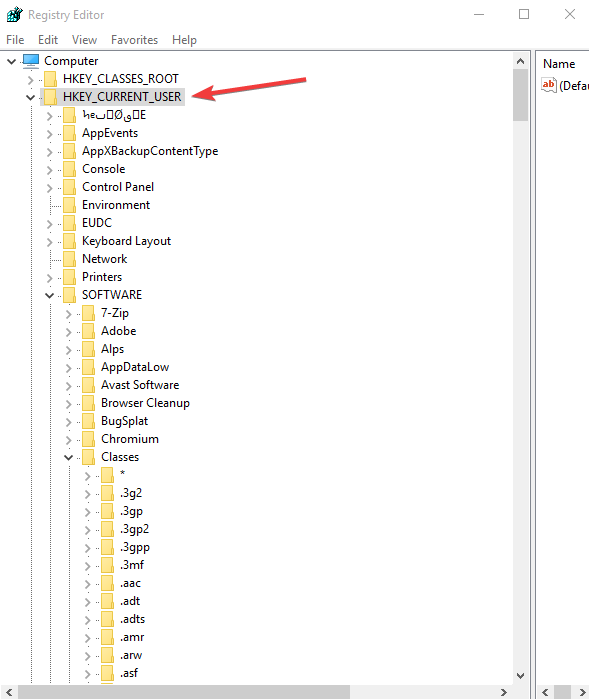
- Find and select this registry subkey: HKEY_CURRENT_USER\SOFTWARE\Microsoft\Windows\CurrentVersion\Explorer\Advanced
- Create new value in the Advanced key by right-clicking Advanced key
- Select New> DWORD (32-bit) Value.
- Name the new value DisallowShaking .
- Double-click the new DisallowShaking value to open its properties window
- Change the value from 0 to 1 in the Value data box
- Click OK and close Registry Editor. The changes should reflect immediately
Note: If you want to reverse the change later, you can go back into Registry Editor and either set the DisallowShaking value back to 0 or delete the value altogether
8. Disable the Microsoft Consumer Experience with the Local Group Policy Editor
If you’re using Windows 10 Pro or Enterprise, disable Aero Shake from the Local Group Policy Editor.
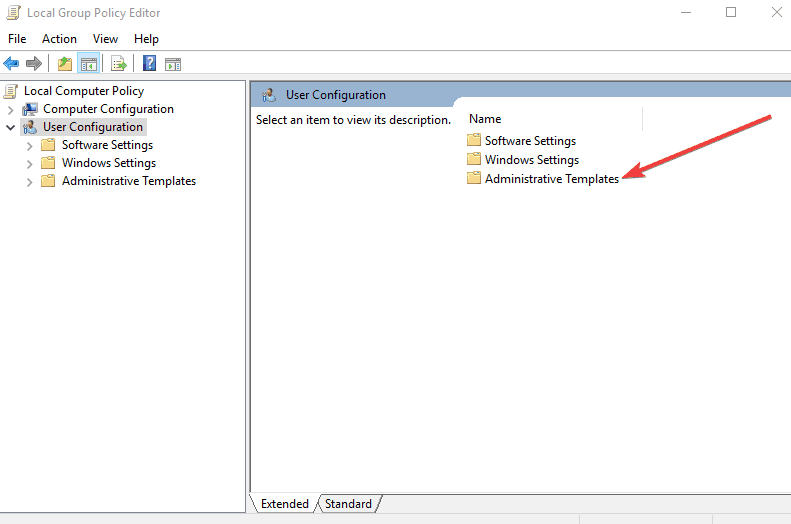
- Click Start and in the search bar type gpedit.msc and press enter
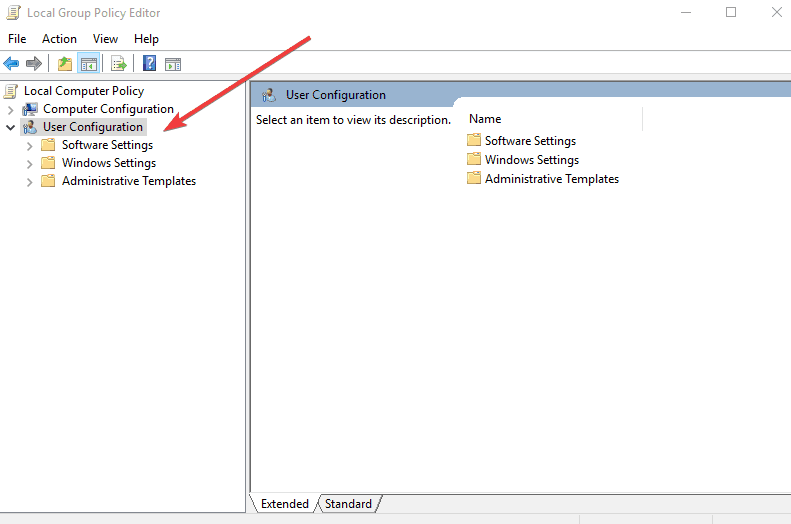
- In Local Group Policy Editor, go to the left pane and find User configuration
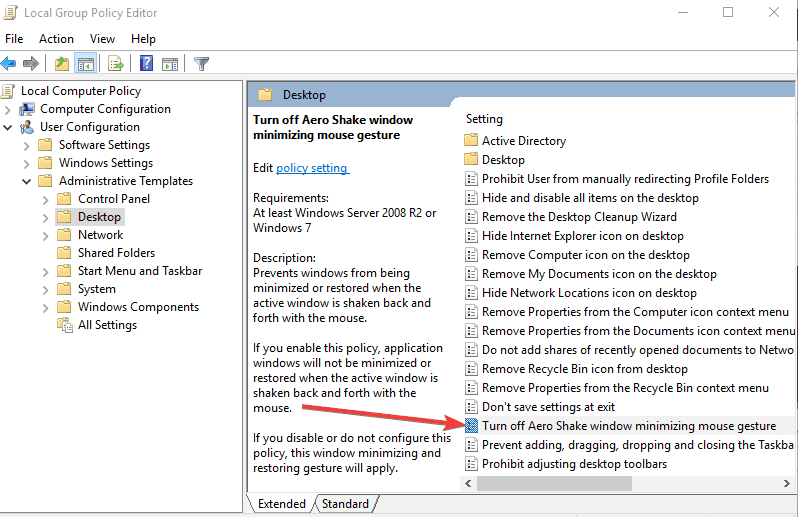
- Click and select Administrative Templates
- Click Desktop
- Find Turn off Aero Shake window minimizing mouse gesture and double click on it
- In the properties window that opens, select the Enabled option and click OK.
- Exit the Local Group Policy Editor.

Note: To enable Aero Shake again, just follow the same procedure and set the “Turn off Aero Shake window minimizing mouse gesture” option back to Disabled or Not Configured.
Were you able to fix Windows 10 minimizes all windows problems using these solutions? Let us know in the comments section below.
RELATED STORIES TO CHECK OUT:
Top 7 Methods to Fix Apps and Programs Automatically Minimizing in Windows 10
Nowadays Windows 10 users are suffering from a very odd issue. In this situation, users get unable to see the title bar buttons such as “Minimize, maximize/restore, close” and many apps get minimized automatically to the task bar when a sub-window is opened.
Well, these issues are very irritating and annoying, and in this blog you, I am discussing how to stop auto minimize Windows 10 automatically.
Generally when a user executes any modern or metro apps in full Windows then “title bar” or caption (minimize, maximize/restore or close) available on the title bar gets inactive.
Another case is, when the user opens a sub-window of any running application then main Windows of the application get minimized automatically. If you are facing above discussed Windows 10 problems, then don’t worry because these are not a problem, actually, these are the features developed by Windows 10 known as “Tablet Mode” (aka Continuum) feature.
These features are specially designed for the touch-enabled device such as Windows 10 tablet and others. This feature works like a bridge between the PC and the touch-enabled device. When you turn on this Tablet Mode then all modern applications open in full Window mode and so that occasionally the main app’s window gets minimized automatically if user opens any of its sub Windows.
How To Fix Apps & Programs Automatic Minimizing In Windows 10?
Here, I have discussed some easy and effective methods to solve the Windows Keep Minimizing on their own issue. Keep reading the below section to stop auto minimizing in Windows 10.
METHOD 1: Using Action Center
- Open the Action Center(or Notification Center), to do this click on the Action Center icon from Task bar notification area.
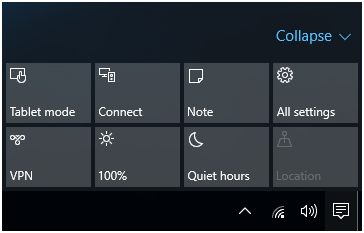
- After it, click on the “Tablet mode” tile to stop the tablet mode.
METHOD 2: Through Settings App
- Open the settings app, to do this you have to press the WIN+I keys together.
- After it, go to “System -> Tablet mode” part and set the choice “Make windows more touch-friendly when using your devices as a tablet” to Off.
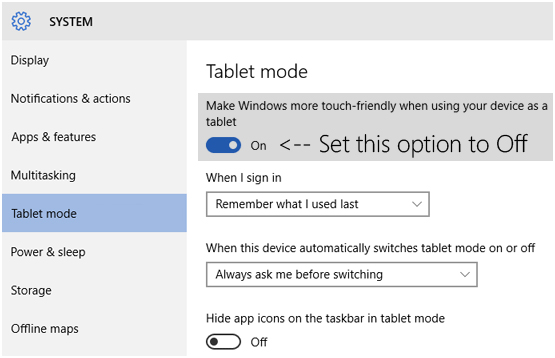
Above given methods are able to disable the Tablet Mode feature, and after turning off this mode the above-discussed problems (lost title bar buttons and automatic minimization of Windows 10 programs) to Taskbar will be fixed.
METHOD 3: Disable Game Mode
In order to disable Windows 10 Game mode you have to follow the given instructions carefully:
- First you have to open the Setting of your Windows system by pressing the Windows key + I.
- Select Gaming and open Game Mode from the left pane.
- Toggle ‘Use Game Mode’ off.

METHOD 4: Run As Admin And In A Different Compatibility Mode
Apply the following steps:
- First you have to go to the game’s installation folder, the location is generally C: Program Files. After it, you have to find out the main EXE file.
- Right-click on the EXE file and select Properties.
- Go to the Compatibility tab.
- Select the “Run this program in compatibility mode” and then choose Windows from the drop-down menu.
- At this step, you have to mark on the box next to “Run this program as an administrator”.
- At last you have to save the changes and restart the game.

METHOD 5: Give Game’s Process A Higher CPU Priority
Here you need to change the game process to resolve Windows keep minimizing themselves Windows 10. Follow the steps given below to do so:
- Run the game, and then press Alt + Tab or Ctrl + Alt + Delete
- You will see that the game gets minimized.
- Now, you have to right-click on the taskbar and then open Task Manager.
- Pick the Details tab.
- At this step, right-click on the game process and select the Set Priority > High.
- Now, try to run the game again.
METHOD 6: Run An Antivirus Scan
Here, it is suggested to scan your system with an antivirus for safety check. It is also observed that after using Windows 10 OS for few months the performances gets affected and display other app errors which will leads to the automatic minimizing of Windows.
To improve your PC/ laptop speed and performance always scan your computer from time to time to maintain your system’s performance and secure it from any types of errors.
Get SpyHunter to make your system secure & virus free
METHOD 7: Check Faulty USB
Always check the USB ports because sometimes the connecting of faulty USB leads to the auto-minimizing of Windows in Windows 10. Faulty USB port may cause abrupt disconnection because of this reason windows will not have a time to pop up on the screen and the open Windows will be deselected which will be the reason for the Windows 10 automatic minimize problem.
Make Your Windows PC/laptop Error Free
In case if manual methods won’t work for you then I have an easy and automatic solution to fix Windows 10 automatic minimize problem. I will strongly recommend you to use third-party tool which will scan your device and will fix all the problems/ errors which generates internally while using the device.
Windows Repair Tool will maintain your computer performance and protect it from any types of error you are facing while using the device. This tool is user-friendly and very easy to understand and you don’t need any technical knowledge for it. I will strongly suggest you to download this tool and get rid of any type of error which is troubling you a lot.
Get Windows Repair Tool, to fix various Windows issues & errors
Conclusion
I hope the above given methods will help you to fix automatic minimizing of Windows 10. I have tried my best to explain you the possible solutions to prevent auto minimize Windows 10.
If you don’t have enough technical knowledge and you are not able to perform the manual methods then try the automatic Windows repair tool which help you to get rid of the app problem in Windows 10.
If you have any queries, suggestions then feel free to write to us on Facebook or Twitter.


