- Terminal Server commands: MSG
- Summary
- Syntax
- Parameters
- Security restrictions
- Additional notes
- Examples
- Базовые команды для настройки и управления Windows Server Core
- Настройка Windows Server Core с помощью SCONFIG
- Основные команды PowerShell для настройки Server Core
- Настройка параметров сети
- Настройка времени/даты
- Задать имя компьютера, добавить в домен, активация
- Разрешить удаленный доступ
- Настройка Windows Firewall
- Установка обновлений в Server Core
- Управление ролями, службами и процессами Windows
- Часто используемые команды в Server Core
- All windows server commands
- Syntax
- Parameters
- Remarks
Terminal Server commands: MSG
This article introduces syntax and parameters of Terminal Server commands MSG.
Original product version: В Windows 10 — all editions
Original KB number: В 186480
Summary
MSG sends a message.
Syntax
Parameters
username : Identifies the user.
sessionname : Identifies the name of the session. The name was created by the system administrator when the session was configured.
sessionID : Specifies the ID of the session.
filename : Identifies a file containing a list of usernames , sessionnames , and sessionIDs to which to send the message.
message (message string): The text of the message you want to send. If no message is entered, standard input (STDIN) is read for the message.
/server:servername : Allows the Terminal Server to be specified. Otherwise, the current Terminal Server is used.
/time:seconds (time delay): Sets the amount of time you must wait before you receive confirmation from the target session that the message has been received.
/w (wait): Wait for a response from the target user(s).
/v (verbose): Displays information about the actions being performed.
/? (help): Displays the syntax for the command and information about the command’s options.
Security restrictions
The user must have Message access permission for the session.
Additional notes
If no user or session is specified, msg displays an error message. If the you specify the name of a session, it must identify an active session. Wildcards may be used for parameters. If a single wildcard is present (*), it specifies all users in the system.
Examples
To send the message titled Falafel? to all sessions for user MIKES, type:
To send a message to session MODEM02, type:
To send a message to session 12, type:
To send a message to all sessions contained in the file USERLIST, type:
To send the text in the file MSG.DAT as a message to all sessions for username TERRYJ, type:
To send a message to all logged-on users, type:
To send the message to all users, with an acknowledgment timeout of 10 seconds, type:
Messages do not queue on the Client screen. It may be useful to use the TIME: parameter so initial messages will expire and be replaced by new messages.
Базовые команды для настройки и управления Windows Server Core
В этой статье я постарался собрать в одном месте основные команды cmd и PowerShell, которые полезны при настройке и управлении Windows Server Core. Думаю, этот гайд будет полезен как новичкам, так и опытным системным администраторам, как справочник по базовым командам Server Core.
Преимущества Windows Serve Core:
- Меньшие требования к ресурсам;
- Повышенная стабильность, безопасность, требует установки меньшего количества обновлений (за счет меньшего количества кода и используемых компонентов);
- Идеально подходит для использования в качестве сервера для инфраструктурных ролей (контроллер домена Active Directory, DHCP сервер, Hyper-V сервер, файловый сервер и т.д.).
Server Core лицензируется как обычный физический или виртуальный экземпляр Windows Server (в отличии от Hyper-V Server, который полностью бесплатен).
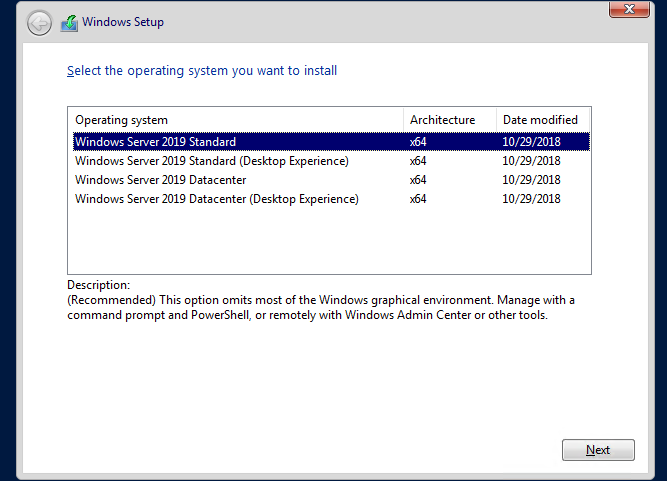
Для установки Windows Server 2016/2019 в режиме Core нужно выбрать обычную установку. Если вы выберите Windows Server (Desktop Experience), будет установлен GUI версия операционной системы (в предыдущих версиях Windows Server она называлась Server with a GUI).
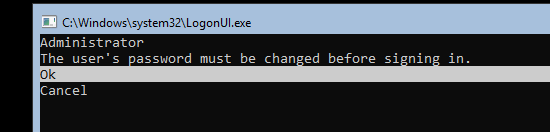
После установки Windows Server Core перед вами появляется командная строка, где нужно задать пароль локального администратора.
При входе на Server Core открывается командная строка (cmd.exe). Чтобы вместо командной строки у вас всегда открывалась консоль PowerShell.exe, нужно внести изменения в реестр. Выполните команды:
Powershell.exe
Set-ItemProperty -Path ‘HKLM:\Software\Microsoft\Windows NT\CurrentVersion\WinLogon’ -Name Shell -Value ‘PowerShell.exe’
И перезагрузите сервер:

Настройка Windows Server Core с помощью SCONFIG
Для базовой настройки Server Core можно использовать встроенный скрипт sconfig. Просто выполните команду sconfig в консоли. Перед вами появиться меню с несколькими пунктами:
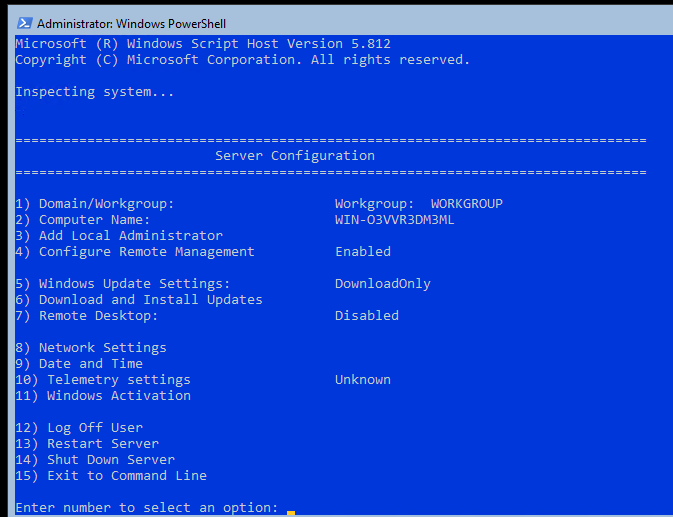
С помощью меню Server Configuration можно настроить:
- Добавить компьютер в домен или рабочую группу;
- Изменить имя компьютера (hostname);
- Добавить локального администратора;
- Разрешить/запретить удаленное управления и ответы на icmp;
- Настроить параметры обновления через Windows Update;
- Установить обновления Windows;
- Включить/отключить RDP;
- Настроить параметры сетевых адаптеров (IP адрес, шлюз, DNS сервера);
- Настроить дату и время;
- Изменить параметры телеметрии;
- Выполнить logoff, перезагрузить или выключить сервер.
Все пункт в меню sconfig пронумерованы. Чтобы перейти в определенное меню наберите его номер и Enter.
В некоторых пунктах меню настройки sconfig есть вложенные пункты. Там также, чтобы перейти к определенной настройке, нужно сделать выбор цифры пункта меню.
Не будем подробно рассматривать все пункты настройки sconfig, т.к. там все достаточно просто и очевидно. Однако в большинстве случаев администраторы предпочитают использовать для настройки новых хостов с Server Core различные PowerShell скрипты. Это намного проще и быстрее, особенно при массовых развёртываниях.
Основные команды PowerShell для настройки Server Core
Рассмотрим основные команды PowerShell, которые можно использовать для настройки Server Core.
Узнать информацию о версии Windows Server и версии PowerShell:
Get-ComputerInfo | select WindowsProductName, WindowsVersion, OsHardwareAbstractionLayer
$PSVersionTable

Для перезагрузки Server Core нужно выполнить команду PowerShell :
Чтобы выполнить выход из консоли Server Core, наберите:
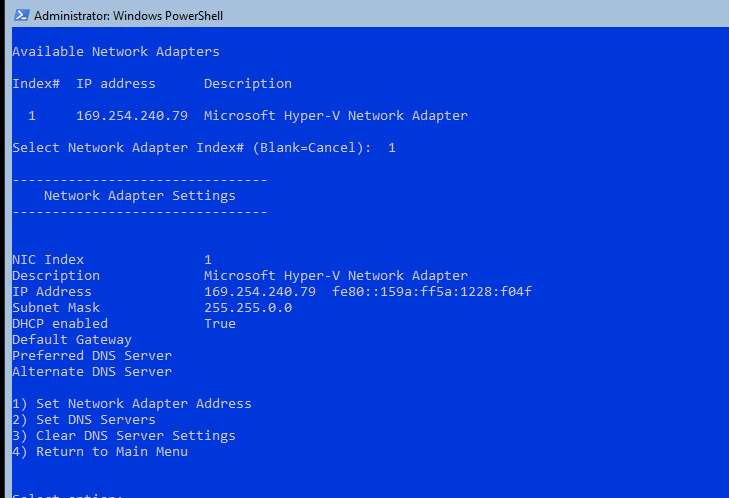
Настройка параметров сети
Теперь нужно из PowerShell нужно настроить параметры сети (по умолчанию Windows настроена на получение адреса от DHCP). Выведите список сетевых подключений:
Теперь укажите индекс интерфейса сетевого адаптера (InterfaceIndex), который нужно изменить и задайте новый IP адрес:
New-NetIPaddress -InterfaceIndex 4 -IPAddress 192.168.13.100 -PrefixLength 24 -DefaultGateway 192.168.13.1
Set-DNSClientServerAddress –InterfaceIndex 4 -ServerAddresses 192.168.13.11,192.168.13. 111
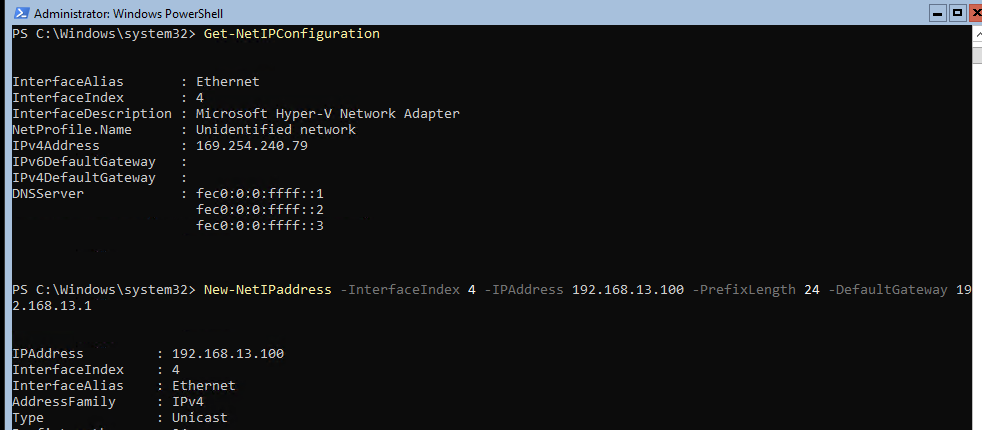
Проверьте текущие настройки:
Set-DnsClientServerAddress –InterfaceIndex 4 –ResetServerAddresses
Set-NetIPInterface –InterfaceIndex 4 -Dhcp Enabled
Включить/отключить сетевой адаптер:
Disable-NetAdapter -Name “Ethernet0”
Enable-NetAdapter -Name “Ethernet 0”
Включить, отключить, проверить статус поддержки IPv6 для сетевого адаптера:
Disable-NetAdapterBinding -Name «Ethernet0» -ComponentID ms_tcpip6
Enable-NetAdapterBinding -Name «Ethernet0» -ComponentID ms_tcpip6
Get-NetAdapterBinding -ComponentID ms_tcpip6
netsh Winhttp set proxy :
Настройка времени/даты
Вы можете настроить дату, время, часовой пояс с помощью графической утилиты intl.cpl или с помощью PowerShell:
Set-Date -Date «09/03/2022 09:00»
Set-TimeZone «Russia Time Zone 3
Задать имя компьютера, добавить в домен, активация
Чтобы изменить имя компьютера:
Rename-Computer -NewName win-srv01 -PassThru

Добавить сервер в домен Active Directory:
Add-Computer -DomainName «corp.winitpro.ru » -Restart
Если нужно добавить дополнительных пользователей в администраторы, можно настроить групповую политику или добавить вручную:
Add-LocalGroupMember -Group «Administrators» -Member «corp\anovikov»
Для активации Windows Server нужно указать ваш ключ:
Или можно активировать хост на KMS сервере (например, для Windows Server 2019):
slmgr /ipk N69G4-B89J2-4G8F4-WWYCC-J464C
slmgr /skms kms-server.winitpro.ru:1688
slmgr /ato
Разрешить удаленный доступ
Разрешить удаленный доступ к Server Core через RDP:
cscript C:\Windows\System32\Scregedit.wsf /ar 0
Разрешить удаленное управление:
Configure-SMRemoting.exe –Enable
Enable-NetFirewallRule -DisplayGroup “Windows Remote Management”
Настройка Windows Firewall
Информация о настройке Windows Firewall есть в статье по ссылке. Здесь оставлю несколько базовых команд.
Включить Windows Defender Firewall для всех профилей:
Set-NetFirewallProfile -Profile Domain,Public,Private -Enabled True
Изменить тип сети с Public на Private:
Get-NetConnectionProfile | Set-NetConnectionProfile -NetworkCategory Private
Полностью отключить Windows Firewall (не рекомендуется):
Get-NetFirewallProfile | Set-NetFirewallProfile -enabled false
Разрешить подключение через инструменты удаленного управления:
Enable-NetFireWallRule -DisplayName “Windows Management Instrumentation (DCOM-In)”
Enable-NetFireWallRule -DisplayGroup “Remote Event Log Management”
Enable-NetFireWallRule -DisplayGroup “Remote Service Management”
Enable-NetFireWallRule -DisplayGroup “Remote Volume Management”
Enable-NetFireWallRule -DisplayGroup “Remote Scheduled Tasks Management”
Enable-NetFireWallRule -DisplayGroup “Windows Firewall Remote Management”
Enable-NetFirewallRule -DisplayGroup «Remote Administration»
Установка обновлений в Server Core
Для управления параметрами обновлений предпочтительно использовать групповые политики Windows Update, но можно задать параметры и вручную.
Отключить автоматическое обновление:
Set-ItemProperty -Path HKLM:\Software\Policies\Microsoft\Windows\WindowsUpdate\AU -Name AUOptions -Value 1
Автоматически скачивать доступные обновления:
Set-ItemProperty -Path HKLM:\Software\Policies\Microsoft\Windows\WindowsUpdate\AU -Name AUOptions -Value 3
Получить список установленных обновлений:
Get-Hotfix
Или
wmic qfe list
Для ручной установки обновлений Windows можно использовать утилиту wusa:
Wusa update_name.msu /quiet
Также для установки и управления обновлениями из командной строки удобно использовать PowerShell модуль PSWindowsUpdate.
Управление ролями, службами и процессами Windows
Для получения списка всех доступных ролей в Windows Server Core выполните команду PowerShell:
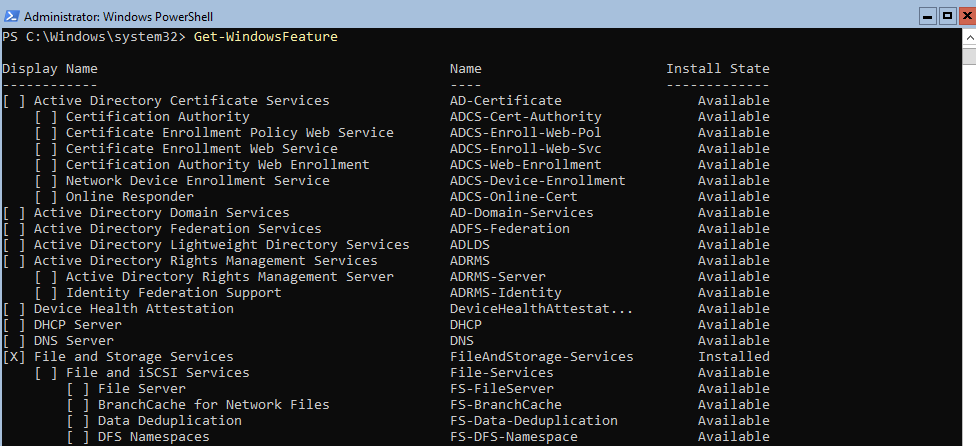
Получить список всех установленных ролей и компонентов в Windows Server(можно быстро понять, для чего используется сервер):
Get-WindowsFeature | Where-Object <$_. installstate -eq "installed">| ft Name,Installstate
Например, для установки службы DNS воспользуйтесь такой командой:
Install-WindowsFeature DNS -IncludeManagementTools
Список всех служб в Windows:
Список остановленных служб:
Restart-Service -Name spooler
Для управление процессами можно использовать стандартный диспетчер задач (taskmgr.exe) или PowerShell модуль Processes:
Get-Process cmd, proc1* | Select-Object ProcessName, StartTime, MainWindowTitle, Path, Company|ft
Часто используемые команды в Server Core
Ну и наконец, приведу список различных полезных мне команд, которые я периодически использую в Server Core.
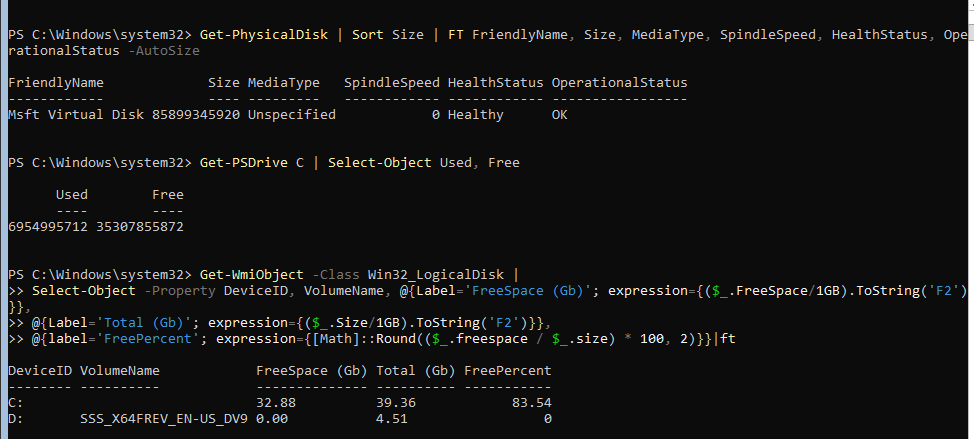
Информация о статусе и здоровье физических дисков (используется стандартный модуль управления дисками Storage):
Get-PhysicalDisk | Sort Size | FT FriendlyName, Size, MediaType, SpindleSpeed, HealthStatus, OperationalStatus -AutoSize
Информация о времени последних 10 перезагрузок сервера:
Get-EventLog system | where-object <$_.eventid -eq 6006>| select -last 10
Get-ItemProperty HKLM:\Software\Wow6432Node\Microsoft\Windows\CurrentVersion\Uninstall\* | Select-Object DisplayName, DisplayVersion, Publisher, InstallDate | Format-Table –AutoSize
Скачать и распаковать zip файл с внешнего сайта:
Invoke-WebRequest https://contoso/test.zip -outfile test.zip
Expand-Archive -path ‘.\test.zip’ -DestinationPath C:\Users\Administrator\Documents\
Чтобы скопировать все файлы из каталога на удаленный компьютер по сети можно использовать Copy-Item:
$session = New-PSSession -ComputerName remotsnode1
Copy-Item -Path «C:\Logs\*» -ToSession $session -Destination «C:\Logs\» -Recurse -Force
Для установки драйвера можно использовать стандартную утилиту:
Pnputil –i –a c:\distr\hpdp.inf
Также Microsoft предлагает специальный пакет Server Core App Compatibility Feature on Demand (FOD), который позволяет установить в Windows Server 2019 некоторые графические инструменты и консоли (MMC, Eventvwr, Hyper-V Manager, PerfMon, Resmon, Explorer.exe, Device Manager, Powershell ISE). Этот FOD доступен для загрузки в виде ISO при наличии активной подписки. Установка выполняется командой:
Add-WindowsCapability -Online -Name ServerCore.AppCompatibility
Установка Server Core App Compatibility Feature on Demand будет использовать дополнительно около 200 Мб оперативной памяти в Server Core.
В этой статье я постарался собрать самые нужные команды, которые нужно постоянно держать под рукой при работе с Windows Server Core. Время от времени я буду обновлять статью и добавлять новые команды, которые покажутся мне нужными для повседневной работы.
All windows server commands
Starts a new instance of the command interpreter, Cmd.exe. If used without parameters, cmd displays the version and copyright information of the operating system.
Syntax
Parameters
| Parameter | Description |
|---|---|
| /c | Carries out the command specified by string and then stops. |
| /k | Carries out the command specified by string and continues. |
| /s | Modifies the treatment of string after /c or /k. |
| /q | Turns the echo off. |
| /d | Disables execution of AutoRun commands. |
| /a | Formats internal command output to a pipe or a file as American National Standards Institute (ANSI). |
| /u | Formats internal command output to a pipe or a file as Unicode. |
| /t: < | > | Sets the background (b) and foreground (f) colors. |
| /e:on | Enables command extensions. |
| /e:off | Disables commands extensions. |
| /f:on | Enables file and directory name completion. |
| /f:off | Disables file and directory name completion. |
| /v:on | Enables delayed environment variable expansion. |
| /v:off | Disables delayed environment variable expansion. |
| Specifies the command you want to carry out. | |
| /? | Displays help at the command prompt. |
The following table lists valid hexadecimal digits that you can use as the values for and :
| Value | Color |
|---|---|
| 0 | Black |
| 1 | Blue |
| 2 | Green |
| 3 | Aqua |
| 4 | Red |
| 5 | Purple |
| 6 | Yellow |
| 7 | White |
| 8 | Gray |
| 9 | Light blue |
| a | Light green |
| b | Light aqua |
| c | Light red |
| d | Light purple |
| e | Light yellow |
| f | Bright white |
Remarks
To use multiple commands for , separate them by the command separator && and enclose them in quotation marks. For example:
If you specify /c or /k, cmd processes, the remainder of string, and the quotation marks are preserved only if all of the following conditions are met:
You don’t also use /s.
You use exactly one set of quotation marks.
You don’t use any special characters within the quotation marks (for example: & ( ) @ ^ | ).
You use one or more white-space characters within the quotation marks.
The string within quotation marks is the name of an executable file.
If the previous conditions aren’t met, string is processed by examining the first character to verify whether it is an opening quotation mark. If the first character is an opening quotation mark, it is stripped along with the closing quotation mark. Any text following the closing quotation marks is preserved.
If you don’t specify /d in string, Cmd.exe looks for the following registry subkeys:
HKEY_LOCAL_MACHINE\Software\Microsoft\Command Processor\AutoRun\REG_SZ
HKEY_CURRENT_USER\Software\Microsoft\Command Processor\AutoRun\REG_EXPAND_SZ
If one or both registry subkeys are present, they’re executed before all other variables.
Incorrectly editing the registry may severely damage your system. Before making changes to the registry, you should back up any valued data on the computer.
You can disable command extensions for a particular process by using /e:off. You can enable or disable extensions for all cmd command-line options on a computer or user session by setting the following REG_DWORD values:
HKEY_LOCAL_MACHINE\Software\Microsoft\Command Processor\EnableExtensions\REG_DWORD
HKEY_CURRENT_USER\Software\Microsoft\Command Processor\EnableExtensions\REG_DWORD
Set the REG_DWORD value to either 0Г—1 (enabled) or 0Г—0 (disabled) in the registry by using Regedit.exe. User-specified settings take precedence over computer settings, and command-line options take precedence over registry settings.
Incorrectly editing the registry may severely damage your system. Before making changes to the registry, you should back up any valued data on the computer.
When you enable command extensions, the following commands are affected:
assoc
call
chdir (cd)
color
del (erase)
endlocal
for
ftype
goto
if
mkdir (md)
popd
prompt
pushd
set
setlocal
shift
start (also includes changes to external command processes)
If you enable delayed environment variable expansion, you can use the exclamation point character to substitute the value of an environment variable at run time.
File and directory name completion is not enabled by default. You can enable or disable file name completion for a particular process of the cmd command with /f:<on | off>. You can enable or disable file and directory name completion for all processes of the cmd command on a computer or for a user logon session by setting the following REG_DWORD values:
HKEY_LOCAL_MACHINE\Software\Microsoft\Command Processor\CompletionChar\REG_DWORD
HKEY_LOCAL_MACHINE\Software\Microsoft\Command Processor\PathCompletionChar\REG_DWORD
HKEY_CURRENT_USER\Software\Microsoft\Command Processor\CompletionChar\REG_DWORD
HKEY_CURRENT_USER\Software\Microsoft\Command Processor\PathCompletionChar\REG_DWORD
To set the REG_DWORD value, run Regedit.exe and use the hexadecimal value of a control character for a particular function (for example, 0Г—9 is TAB and 0Г—08 is BACKSPACE). User-specified settings take precedence over computer settings, and command-line options take precedence over registry settings.
Incorrectly editing the registry may severely damage your system. Before making changes to the registry, you should back up any valued data on the computer.
If you enable file and directory name completion by using /f:on, use CTRL+D for directory name completion and CTRL+F for file name completion. To disable a particular completion character in the registry, use the value for white space [0Г—20] because it is not a valid control character.
Pressing CTRL+D or CTRL+F, processes the file and directory name completion. These key combination functions append a wildcard character to string (if one is not present), builds a list of paths that match, and then displays the first matching path.
If none of the paths match, the file and directory name completion function beeps and does not change the display. To move through the list of matching paths, press CTRL+D or CTRL+F repeatedly. To move through the list backwards, press the SHIFT key and CTRL+D or CTRL+F simultaneously. To discard the saved list of matching paths and generate a new list, edit string and press CTRL+D or CTRL+F. If you switch between CTRL+D and CTRL+F, the saved list of matching paths is discarded and a new list is generated. The only difference between the key combinations CTRL+D and CTRL+F is that CTRL+D only matches directory names and CTRL+F matches both file and directory names. If you use file and directory name completion on any of the built-in directory commands (that is, CD, MD, or RD), directory completion is assumed.
File and directory name completion correctly processes file names that contain white space or special characters if you place quotation marks around the matching path.
You must use quotation marks around the following special characters: & [ ] | < >^ = ; ! ‘ + , `
If the information that you supply contains spaces, you must use quotation marks around the text (for example, «Computer Name»).
If you process file and directory name completion from within string, any part of the path to the right of the cursor is discarded (at the point in string where the completion was processed).


