Windows commands
All supported versions of Windows (server and client) have a set of Win32 console commands built in.
This set of documentation describes the Windows Commands you can use to automate tasks by using scripts or scripting tools.
Prerequisites
The information that is contained in this topic applies to:
- Windows Server 2019
- Windows Server (Semi-Annual Channel)
- Windows Server 2016
- Windows Server 2012 R2
- Windows Server 2012
- Windows Server 2008 R2
- Windows Server 2008
- Windows 10
- Windows 8.1
Command shell overview
The Command shell was the first shell built into Windows to automate routine tasks, like user account management or nightly backups, with batch (.bat) files. With Windows Script Host you could run more sophisticated scripts in the Command shell. For more information, see cscript or wscript. You can perform operations more efficiently by using scripts than you can by using the user interface. Scripts accept all Commands that are available at the command line.
Windows has two command shells: The Command shell and PowerShell. Each shell is a software program that provides direct communication between you and the operating system or application, providing an environment to automate IT operations.
PowerShell was designed to extend the capabilities of the Command shell to run PowerShell commands called cmdlets. Cmdlets are similar to Windows Commands but provide a more extensible scripting language. You can run Windows Commands and PowerShell cmdlets in Powershell, but the Command shell can only run Windows Commands and not PowerShell cmdlets.
For the most robust, up-to-date Windows automation, we recommend using PowerShell instead of Windows Commands or Windows Script Host for Windows automation.
You can also download and install PowerShell Core, the open source version of PowerShell.
Incorrectly editing the registry may severely damage your system. Before making the following changes to the registry, you should back up any valued data on the computer.
To enable or disable file and directory name completion in the Command shell on a computer or user logon session, run regedit.exe and set the following reg_DWOrd value:
To set the reg_DWOrd value, use the hexadecimal value of a control character for a particular function (for example, 0 9 is Tab and 0 08 is Backspace). User-specified settings take precedence over computer settings, and command-line options take precedence over registry settings.
Command-line reference A-Z
To find information about a specific command, in the following A-Z menu, click the letter that the command starts with, and then click the command name.
.shell (Command Shell)
The .shell command launches a shell process and redirects its output to the debugger, or to a specified file.
Parameters
InFile
Specifies the path and file name of a file to be used for input. If you intend to offer no input after the initial command, you can specify a single hyphen (-) instead of InFile, with no space before the hyphen.
OutFile
Specifies the path and file name of a file to be used for standard output. If -o **** OutFile is omitted, output is sent to the Debugger Command window. If you do not want this output displayed or saved in a file, you can specify a single hyphen (-) instead of OutFile, with no space before the hyphen.
ErrFile
Specifies the path and file name of a file to be used for error output. If -e ErrFile is omitted, error output is sent to the same place as standard output. If you do not want this output displayed or saved in a file, you can specify a single hyphen (-) instead of ErrFile, with no space before the hyphen.
Options
Can be any number of the following options:
-ci «Commands«
Processes the specified debugger commands, and then passes their output as an input file to the process being launched. Commands can be any number of debugger commands, separated by semicolons, and enclosed in quotation marks.
-x
Causes any process being spawned to be completely detached from the debugger. This allows you to create processes which will continue running even after the debugging session ends.
ShellCommand
Specifies the application command line or Microsoft MS-DOS command to be executed.
Environment
Modes
user mode, kernel mode
Targets
live, crash dump
Platforms
Additional Information
For other ways of accessing the command shell, see Using Shell Commands.
Remarks
The .shell command is not supported when the output of a user-mode debugger is redirected to the kernel debugger. For more information about redirecting output to the kernel debugger (sometimes called NTSD over KD), see Controlling the User-Mode Debugger from the Kernel Debugger.
The entire line after the .shell command will be interpreted as a Windows command (even if it contains a semicolon). This line should not be enclosed in quotation marks. There must be a space between .shell and the ShellCommand (additional leading spaces are ignored).
The output from the command will appear in the Debugger Command window, unless the -o **** OutFile parameter is used.
Issuing a .shell command with no parameters will activate the shell and leave it open. All subsequent commands will be interpreted as Windows commands. During this time, the debugger will display messages reading , and the WinDbg prompt will be replaced with an Input> prompt. Sometimes, a separate Command Prompt window will appear when the debugger leaves the shell open. This window should be ignored; all input and output will be done through the Debugger Command window.
To close this shell and return to the debugger itself, type exit or .shell_quit. (The .shell_quit command is more powerful, because it works even if the shell is frozen.)
This command cannot be used while debugging CSRSS, because new processes cannot be created without CSRSS being active.
You can use the -ci flag to run one or more debugger commands and then pass their output to a shell process. For example, you could pass the output from the !process 0 7 command to a Perl script by using the following command:
Complete List of All Windows 10 Shell Commands

If you want to learn what are some of the most useful Shell commands used in Windows 10, as well as many other specific commands, read this guide. We bet you probably didn’t know some of these commends were even available up until now. 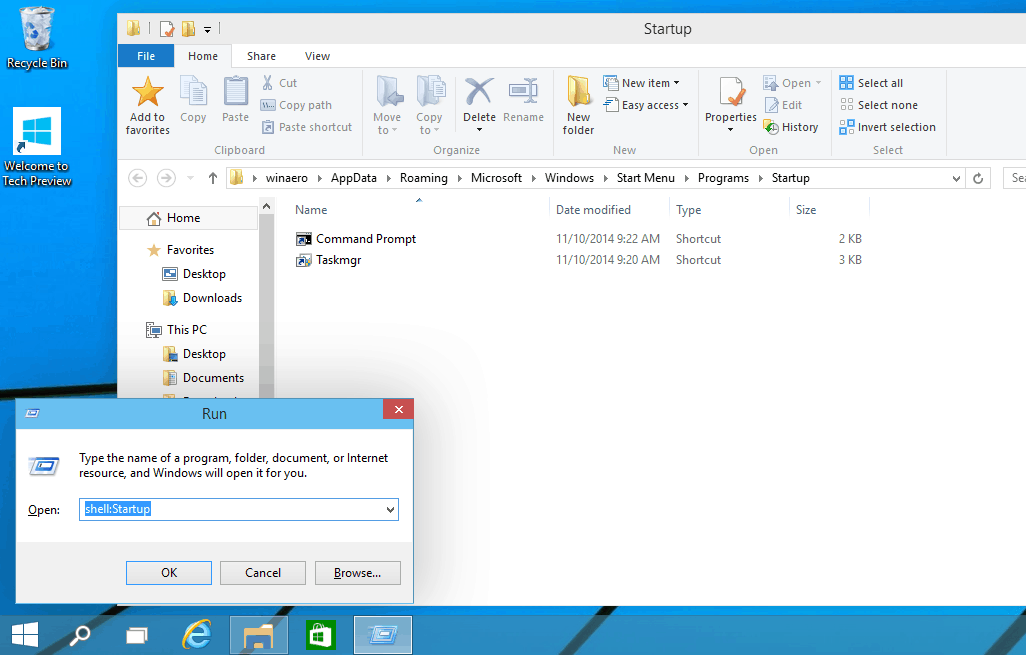
Accessing these commands is done by entering the “Run” feature in your Windows 10 operating system. Also, by using these Shell commands you will be able to access a specific system folder or one of the Control Panel applets you have available in your Windows 10 operating system.
List of Shell commands in Windows 10
First of all, you will need to press and hold the “Windows” button and the “R” button in order to bring up the “Run” window.
From the “Run” window you will need to write down one of the below commands and afterwards press the “Enter” button in order to access the specific feature.
Windows 10 Shell commands:
- “shell:AccountPictures”
Note: this command accesses the account pictures folder you have in your Windows 10 device. - “shell:AddNewProgramsFolder”
Note: Adds a new program folder. - “shell:Administrative Tools”
Note: Accesses administrative tools folder. - “shell:AppData”
Note: Accesses AppData folder in the Windows 10 system. - “shell:Application Shortcuts”
Note: Accesses Application Shortcuts folder. - “shell:AppsFolder”
Note: Accesses the Apps Folder. - “shell:AppUpdatesFolder”
Note: Accesses the Apps updates folder. - “shell:Cache”
Note: Accesses the Cache folder. - “shell:Camera Roll”
Note: Access camera roll folder. - “shell:CD Burning”
Note: Accesses the temporary burn folder. - “shell:ChangeRemoveProgramsFolder”
Note: Accesses the Remove/Change program folder. - “shell:Common Administrative Tools”
Note: Accesses the Administrative Tools folder. - “shell:Common AppData”
Note: Accesses the Common AppData folder. - “shell:Common Desktop”
Note: Accesses the public desktop folder. - “shell:Common Documents”
Note: Accesses Public Documents folder. - “shell:Common Programs”
Note: Accesses Programs folder. - “shell:Common Start Menu”
Note: Accesses the start menu folder. - “shell:Common Startup”
Note: Accesses Startup folder situated in t he Windows 10 system. - “shell:Common Templates”
Note: Accesses “Common Templates” folder. - “shell:CommonDownloads”
Note: Accesses Downloads folder. - “shell:CommonMusic”
Note: Accesses the music folder. - “shell:CommonPictures”
Note: Accesses “Pictures” folder. - “shell:CommonRingtones”
Note: Accesses the ringtones folder. - “shell:CommonVideo”
Note: Accesses the public “Video” folder. - “shell:ConflictFolder”
Note: Accesses the “Conflict” folder in the Windows 10 system. - “shell:ConnectionsFolder”
Note: Opens up the connections folder - “shell:Contacts”
Note: Opens the Contact folder - “shell:ControlPanelFolder”
Note: Opens the Control panel folder. - “shell:Cookies”
Note: Opens the Cookies folder. - “shell:CredentialManager”
Note: Opens the Credential manager feature. - “shell:CryptoKeys”
Note: Opens up the Crypto keys folder - “shell:CSCFolder”
Note: Opens the CSC Folder. - “shell:Desktop”
Note: Opens up the Desktop folder. - “shell:Device Metadata Store”
Note: Opens the metadata store folder. - “shell:DocumentsLibrary”
Note: Opens the Documents Library folder - “shell:Downloads”
Note: Opens the Downloads folder - “shell:DpapiKeys”
Note: Opens the DpapiKeys folder - “shell:Favorites”
Note: Opens the Favorites folder. - “shell:Fonts”
Note: Opens the Fonts folder. - “shell:Games”
Note: Opens the Games folder. - “shell:GameTasks”
Note: Opens the Game Tasks folder - “shell:History”
Note: Opens the History folder - “shell:HomeGroupCurrentUserFolder”
Note: Opens the HomeGroup folder for the current user. - “shell:HomeGroupFolder”
Note: Opens HomeGroup folder. - “shell:ImplicitAppShortcuts”
Note: Opens the Implicit Apps shortcut folder. - “shell:InternetFolder”
Note: Opens Internet Folder. - “shell:Libraries”
Note: Opens Libraries folder. - “shell:Links”
Note: Opens the Links folder. - “shell:Local AppData”
Note: Opens Local AppData folder. - “shell:LocalAppDataLow”
Note: Opens Local AppDataLow folder. - “shell:LocalizedResourcesDir”
Note: Opens LocalizedResources folder. - “shell:MAPIFolder”
Note: Opens MAPI folder. - “shell:MusicLibrary”
Note: Opens LusicLibrary folder. - “shell:My Music”
Note: Opens My Music folder. - “shell:My Video”
Note: Opens My Video folder. - “shell:MyComputerFolder”
Note: Opens MyComputer folder. - “shell:NetHood”
Note: Opens NetHood folder. - “shell:NetworkPlacesFolder”
Note: Opens NetworkPlaces folder. - “shell:OEM Links”
Note: Opens OEM Links folder. - “shell:OneDrive”
Note: Opens OneDrive folder in Windows 10 - “shell:Original Images”
Note: Opens Original Images folder. - “shell:Personal”
Note: Opens Personal folder. - “shell:PhotoAlbums”
Note: Opens PhotoAlbums folder. - “shell:PicturesLibrary”
Note: opens PicturesLibrary folder. - “shell:Playlists”
Note: Opens Playlists folder. - “shell:PrintersFolder”
Note: Opens Printer folder. - “shell:PrintHood”
Note: Opens PrintHood folder. - “shell:Profile”
Note: Opens Profile folder. - “shell:ProgramFiles”
Note: Opens ProgramFiles folder. - “shell:ProgramFilesCommon”
Note: Opens ProgramFilesCommon folder. - “shell:ProgramFilesCommonX64”
Note: Opens ProgramFilesCommonX64 folder. - “shell:ProgramFilesCommonX86”
Note: Opens ProgramFilesCommonX86 folder. - “shell:ProgramFilesX64”
Note: Opens ProgramFilesX64 folder. - “shell:ProgramFilesX86”
Note: Opens ProgramFilesX86 folder. - “shell:Programs”
Note: Opens Programs folder. - “shell:Public”
Note: Opens Public folder. - “shell:PublicAccountPictures”
Note: Opens PublicAccountPictures folder. - “shell:PublicGameTasks”
Note: Opens PublicGameTasks folder. - “shell:PublicLibraries”
Note: Opens PublicLibraries folder. - “shell:Quick Launch”
Note: Opens Quick Launch folder. - “shell:Recent”
Note: Opens up recent items folder - “shell:RecordedTVLibrary”
Note: Opens up recorder file in the Windows 10 system - “shell:RecycleBinFolder”
Note: Opens the system Recycle Bin folder - “shell:ResourceDir”
Note: Opens up the Resource folder - “shell:Retail Demo”
Note: Opens up Demo folder - “shell:Ringtones”
Note: Opens up the Ringtones folder in Windows 10 - “shell:Roamed Tile Images”
Note: Opens up the Roamed Tile images folder - “shell:Roaming Tiles”
Note: Opens the Roaming Tiles folder - “shell:SavedGames”
Note: It opens the SavedGames folder you have in the Windows 10 system - “shell:Screenshots”
Note: Opens the Screenshots folder - “shell:Searches”
Note: Opens the Search folder. - “shell:SearchHistoryFolder”
Note: Opens the Search History folder you have in the system. - “shell:SearchHomeFolder”
Note: Opens the Search Home folder. - “shell:SearchTemplatesFolder”
Note: Opens the Search templates folder. - “shell:SendTo”
Note: Opens the SendTo folder. - “shell:SkyDriveCameraRoll”
Note: Opens the SkyDriveCameraRoll folder. - “shell:SkyDriveMusic”
Note: Opens the SkyDriveMusic folder. - “shell:SkyDrivePictures”
Note: Opens the SkyDrivePictures folder. - “shell:Start Menu”
Note: Opens up the Start menu folder. - “shell:StartMenuAllPrograms”
Note: Opens the AllPrograms folder you have in the start menu. - “shell:Startup”
Note: Opens the Startup folder. - “shell:SyncCenterFolder”
Note: Opens the SyncCenter folder. - “shell:SyncResultsFolder”
Note: Opens the SyncResults folder. - “shell:SyncSetupFolder”
Note: opens the SyncSetup folder. - “shell:System”
Note: Opens the System folder. - “shell:SystemCertificates”
Note: Opens the SystemCertificates folder. - “shell:SystemX86”
Note: Opens SystemX86 folder. - “shell:Templates”
Note: Opens the Templates folder. - “shell:ThisPCDesktopFolder”
Note: Opens the ThisPCDesktop folder. - “shell:User Pinned”
Note: Opens User pinned folder. - “shell:UserProfiles”
Note: Opens the user profiles folder. - “shell:UserProgramFiles”
Note: Opens Program Files folder. - “shell:UserProgramFilesCommon”
Note: Opens Program Files Common folder. - “shell:UsersFilesFolder”
Note: Opens the Files folder from a specific user you are logged in with. - “shell:UsersLibrariesFolder”
Note: Opens the Libraries folder for a specific user. - “shell:VideosLibrary”
Note: Opens Video library folder. - “shell:Windows”
Note: Opens the “Windows” folder.
Is it worth mentioning that you can use the commands listed above in CMD and File Explorer as well. If you prefer CMD, simply type start and then add the Shell command that you want to run. In File Explorer, you can use the address bar to enter the commands listed above.
There you have it, a quick way to access the Run window as well as all the available shell commands within the Windows 10 operating system. If you have any questions related to this guide, let us know in the comments below and we will help you as soon as we can.
RELATED STORIES TO CHECK OUT:


