- Обновление Windows 10 KB5001330 приносит очередные проблемы, включая BSOD
- реклама
- реклама
- реклама
- реклама
- Fix: Operation did not complete successfully [Virus, PUP]
- How to fix the ERROR VIRUS INFECTED issue?
- 1. Change your antivirus
- ESET Internet Security
- 2. Turn off Windows Defender
- 3. Add the problematic file to the exclusions list
- 4. Disable your antivirus software
- 5. Perform a detailed scan
- 6. Update the problematic software
- 7. Use Command Prompt to repair the problematic file
- 8. Perform a clean boot
- 9. Perform a system restore
- 10. Reset Windows 10
Обновление Windows 10 KB5001330 приносит очередные проблемы, включая BSOD
В некоторых конфигурациях Windows 10 возникают серьезные проблемы из-за недавнего обновления под номером KB5001330. Пользователи сообщают о проблемах с установкой, проблемах с производительностью, временной ошибке профиля пользователя и предупреждении о сбое системы.
реклама
На этой неделе во вторник Microsoft выпустила новые накопительные обновления за апрель 2021 года для поддерживаемых версий ОС. Для версии 20H2/2004 Microsoft выпустила Windows 10 KB5001330, обязательное обновление безопасности, направленное на устранение ряда уязвимостей и проблем, вызванных предыдущим обновлением, включая проблемы с принтерами.
Согласно многочисленным сообщениям на сайтах социальных сетей, растет число пользователей, которые не могут установить последнее обновление Windows на свое оборудование. При попытке это сделать появляются ошибки: 0x800f081f, 0x800f0984.
Об ошибках при загрузке обновления KB5001330 сообщили многие пользователи в Центре отзывов.
реклама
«Я получаю постоянный сбой при установке KP5001330 с кодом ошибки 0x800f0984. Это происходит на Surface Studio 2 и Pro 7. Второй месяц подряд нельзя установить накопительное обновление на моих устройствах. Установка приостанавливается на 20%, затем снова на 73%, потом на 100%, затем происходит сбой», — отметил один из пользователей.
В редких случаях также может повторяться известная ошибка временного профиля пользователя. Последний раз об этой ошибке сообщалось в декабре, она создает новый профиль пользователя при загрузке операционной системы после применения накопительного обновления. В этом случае пользовательские файлы и настройки (например, обои) могут исчезнуть.
«После обновления я больше не могу войти в свой компьютер. В нем говорится, что службе профилей пользователей не удалось войти в систему. Профиль пользователя не может быть загружен», — пожаловался один пользователь.
«После обновления Windows предлагает войти в гостевой профиль», — другой пользователь подтвердил проблему.
реклама
К счастью, есть обходной путь для решения указанной проблемы. Необходимо либо откатить обновление, либо вручную переместить пользовательские файлы.
Кроме того, пользователи сообщают о сбоях в играх: графических артефактах и значительном падении частоты кадров, но проблему можно решить, удалив накопительное обновление вручную. Лишь некоторые пользователи сообщают об этих проблемах на форумах, и, похоже, они не так распространены, как другие ошибки.
Также многие сталкиваются с периодическими появлениями BSOD (синего экрана смерти)/
«Это обновление сломало Windows для меня и других. BSOD при обновлении сообщал, что определенного драйвера больше нет или он не поддерживается. Я восстановил Windows и обновился снова, затем BSOD на моем ПК повторился дважды за несколько часов. Я удалил обновление. Это случилось не только со мной, поэтому я бы посоветовал не устанавливать это обновление», — сообщил один из пользователей.
реклама
Если вы загрузили обновление April 2021 Patch Tuesday и столкнулись с какими-либо проблемами, лучший способ решить проблему — это удалить исправление, выполнив следующие действия:
1. Откройте приложение «Настройки»;
2. Нажмите «Обновление и безопасность»;
3. Нажмите «Центр обновления Windows»;
4. Нажмите «Просмотреть историю обновлений»;
5. Нажмите «Удалить обновления», затем выберите KB5001330, чтобы удалить его;
6. Перезагрузите компьютер.
На данный момент компания Microsoft никак не прокоментировала многочисленные жалобы пользователей.
Fix: Operation did not complete successfully [Virus, PUP]

- The operation did not complete successfully error happens when your computer gets infected with a virus.
- The first thing you can do to remove the virus is to change your antivirus software.
- Sometimes, the Windows Defender mistakes certain files for being infected, so try disabling it.
- You can also use the Command Prompt to let Windows scan and fix the problematic file.

This error is usually followed by Operation did not complete successfully because the file contains a virus message, and today we’re going to show you how to fix this error on Windows 10.
We have to mention that your PC’s antivirus or Windows Defender might also mistake uninfected files for being problematic, resulting in the error message.
Thankfully, we covered all the aspects regarding this problem in the article below, so we advise you to follow our instructions thoroughly.
How to fix the ERROR VIRUS INFECTED issue?
1. Change your antivirus

Removing the antivirus isn’t the best solution, but if it helps, you might want to try switching to a different antivirus tool that is known for fixing such errors.
Perhaps, your current antivirus software wasn’t able to stop the virus from entering your device, or it simply malfunctioned and it’s giving you the error.
Therefore, you need a new antivirus that has a Home Network scanner which keeps an eye on all your home network, thus allowing you to track all possible attacks on every computer in the network.
What you also need from your antivirus is an advanced machine learning AI feature that continuously scans for signatures and blocks them the same second they look suspicious.

ESET Internet Security
2. Turn off Windows Defender
- Press Windows Key + I to open the Settings app.
- Once the Settings app opens, go to the Update & security section.
- In the left pane navigate to Windows Defender and in the right pane disableReal-time protection.


Using an antivirus is rather important, and Windows 10 comes with its own antivirus software called Windows Defender.
For the most part, this is a solid antivirus, but few users reported that Windows Defender can cause this and other errors to occur.
To fix this problem, it’s advised that you turn off Windows Defender completely.
Before we show you how to do that, you need to be sure that the file you’re trying to run isn’t malicious.
If you’re trying to run a file from a safe source, it’s most likely not infected. To turn off Windows Defender, do the following:
After doing that, Windows Defender will be disabled and you’ll be able to run the file without any problems.
Some users reported that this method will disable Windows Defender temporarily, so it will turn itself on again after a short period of time.
To completely disable Windows Defender, you need to edit your registry.
To do that, follow these steps:
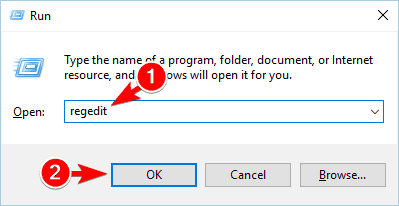
- Press Windows Key + R and enter regedit.
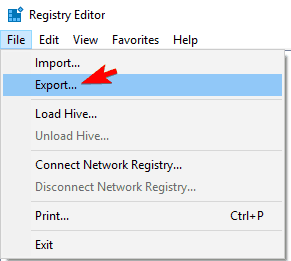
- Optional: Before making any changes to the registry, it’s always good to create a backup in case anything goes wrong.
- To back up your registry, go to File > Export.
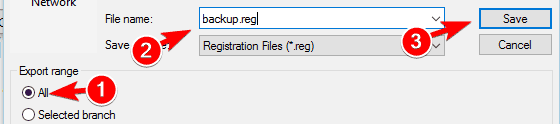
- Select All as Export range and enter the desired name.
- Choose a safe location and click on the Save button to export your registry. In case any problems occur, you can simply run this file and restore the registry to its original state.
- Choose a safe location and click on the Save button to export your registry. In case any problems occur, you can simply run this file and restore the registry to its original state.
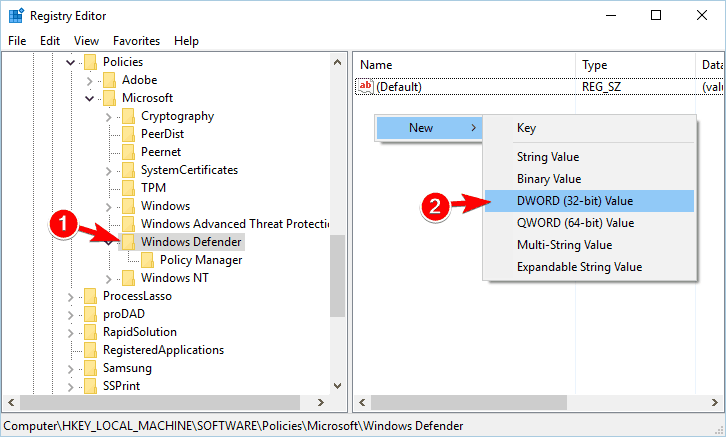
- In the left pane, navigate to the following path: HKEY_LOCAL_MACHINE\SOFTWARE\Policies\Microsoft\Windows Defender
- Look for DisableAntiSpyware DWORD in the right pane.
- If this DWORD isn’t available, right-click the empty space in the right pane and choose New > DWORD (32-bit Value).
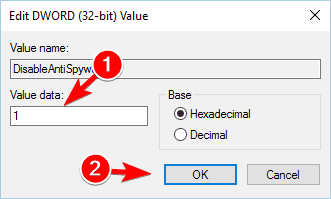
- Enter DisableAntiSpyware as the name of the new DWORD and double click it.
- Set Value data to 1 and click OK to save changes.
After doing that, Windows Defender will be permanently disabled and you won’t see this error anymore.
If you don’t want to edit your registry, you can disable Windows Defender by using Group Policy Editor. To do that, follow these steps:
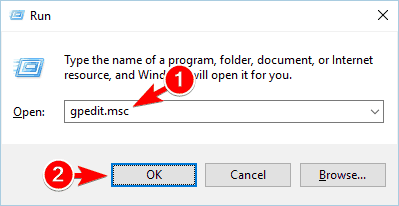
- Press Windows Key + R and enter gpedit.msc.
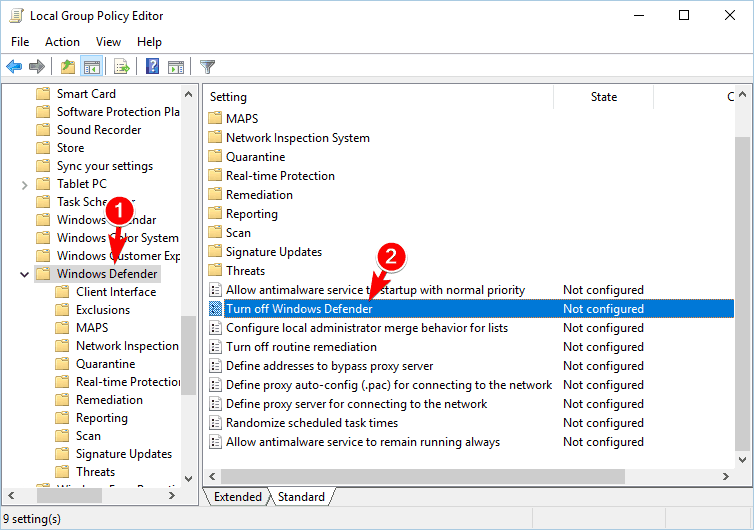
- Once Group Policy Editor opens, in the left pane navigate to the following path: Computer Configuration\Administrative\Templates\Windows\Components\Windows\Defender
- In the right pane, double click on Turn off Windows Defender.
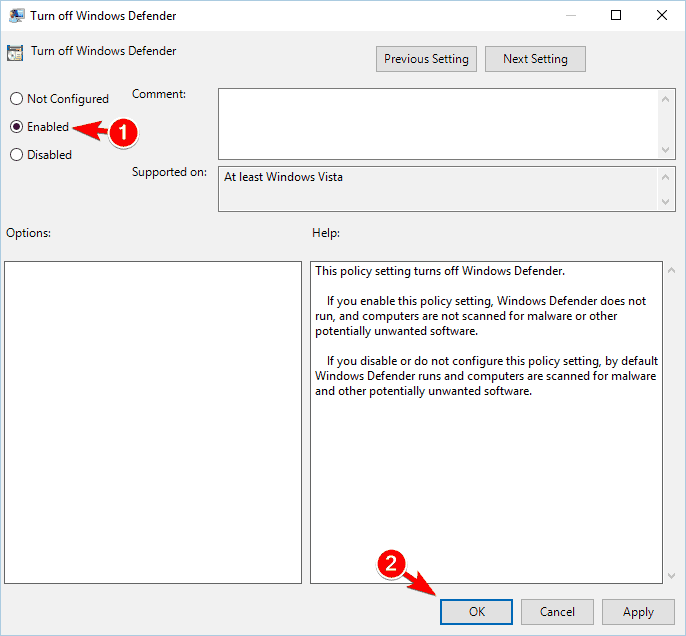
- Select Enabled option and click on Apply and OK to save changes.
Keep in mind that disabling Windows Defender can leave your PC vulnerable to malware, so we advise you to download and install a third-party antivirus tool as soon as possible.
3. Add the problematic file to the exclusions list
If you’re getting this error while trying to access a certain file, it’s possible that the file is falsely identified as a threat. If you’re sure that the file isn’t malicious, add it to the exclusions list and check if that solves the problem.
Developers reported this problem while trying to test their applications on their PC.
However, the issue can occur with downloaded files as well, so if you’re positive that the downloaded file isn’t infected, add it to the list of exclusions to fix this problem.
4. Disable your antivirus software

Sometimes these types of problems can occur due to third-party antivirus tools. Some antivirus might not be fully compatible with your PC or with other software, and that can lead to this error.
To fix the problem, try disabling your antivirus for a short time.
Try to run the file again and check if the problem still persists. If that doesn’t help, you might have to uninstall your antivirus completely and check if that solves the problem.
5. Perform a detailed scan
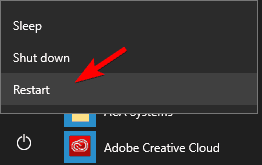
- Open the Start Menu and click the Power button.
- Press and hold the Shift key on your keyboard and choose the Restart option from the menu.
- A list of options will appear. Click on Troubleshoot > Advanced options > Startup Settings.
- Now click the Restart button.
- Once your PC restarts, you’ll see a list of options.
- Select any version of Safe Mode by pressing the corresponding key.
- Once you enter Safe Mode, perform all the necessary scans and try to remove the malware.
Sometimes this error can occur due to an actual malware infection, and if that’s the case, you need to perform a detailed scan.
In addition to your current antivirus software, you’re advised to use other tools to scan your system. To be sure that your system is clean, we advise you to scan it with multiple tools just to be sure.
6. Update the problematic software
If the error appears when trying to run specific software on your PC, you might want to try updating that application.
Several users reported this error with certain applications, and according to them, you need to download and install the latest version of these apps to fix the problem.
Sometimes these applications can have few bugs and glitches that can cause this error, but you can avoid this problem by keeping them up to date.
7. Use Command Prompt to repair the problematic file
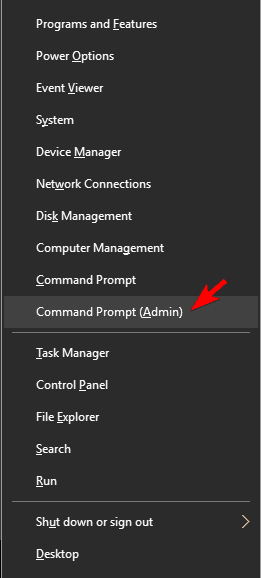
- Press Windows Key + X and choose Command Prompt (Admin) from the menu.
- Once the Command Prompt opens, enter the following lines: sfc /SCANFILE=C:windowsexplorer.exesfc /SCANFILE=C:WindowsSysWow64explorer.exe
- We used c:windowsexplorer.exe as an example, so be sure to replace it with the correct path on your PC
If just a single file is affected by this error, you can fix it by using Command Prompt.
Several users reported problems with explorer.exe and Operation did not complete successfully because the file contains a virus message, but you can fix them easily by following these steps:
After running those commands the problematic file should be fixed and you’ll be able to access it again.
This error can sometimes appear due to corrupted system files, and in our example, we showed you how to use SFC scan to fix those files.
We used c:windowsexplorer.exe as an example, so be sure to replace it with the correct path on your PC.
8. Perform a clean boot
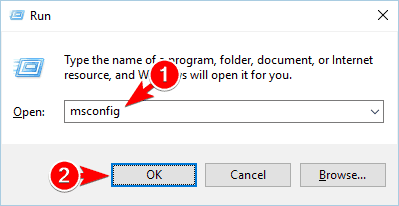
- Press Windows Key + R and enter msconfig.
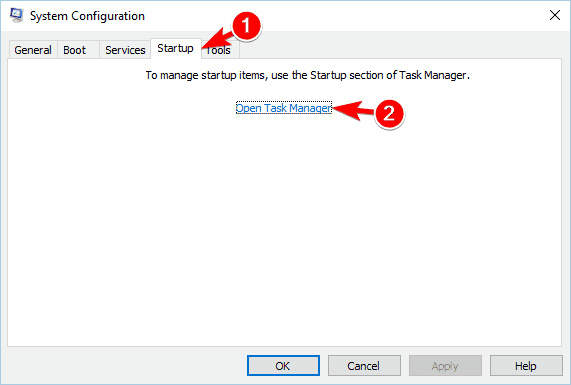
- Go to Services tab, check to Hide all Microsoft services option and click on Disable all.
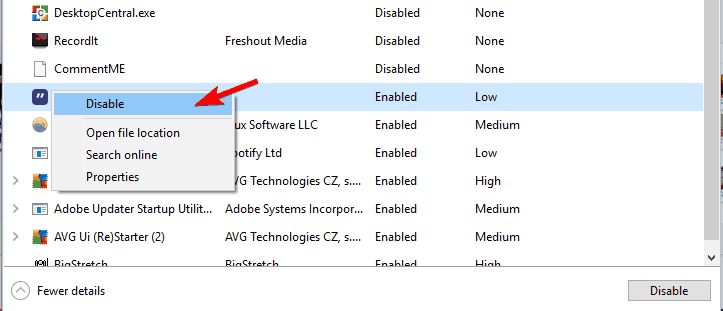
- Now go to the Startup tab and click on OpenTask Manager.
- When Task Manager opens, you’ll see a list of all startup applications.
- Right-click each application on the list and choose Disable from the menu.
- Repeat this step for all entries on the list.
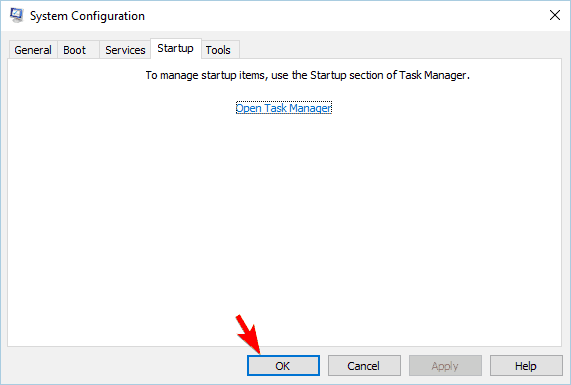
- Close Task Manager and go back to the System Configuration window.
- Click Apply and OK to save changes.
- After doing that, restart your PC.

Sometimes third-party applications can cause this error to appear on your PC. These applications will often start with Windows automatically and cause this and other errors to occur.
To fix this problem you need to perform Clean boot and find the problematic application.
If disabling startup services and applications fixes the problem, you need to repeat these steps again and turn on services and startup applications one by one or in groups.
After enabling each set of apps or services you need to restart your PC or log out and log back into your Windows 10 profile. Repeat this step until you find the application that is causing this problem.
After finding it, uninstall it or update it to the latest version and check if that solves the problem.
9. Perform a system restore
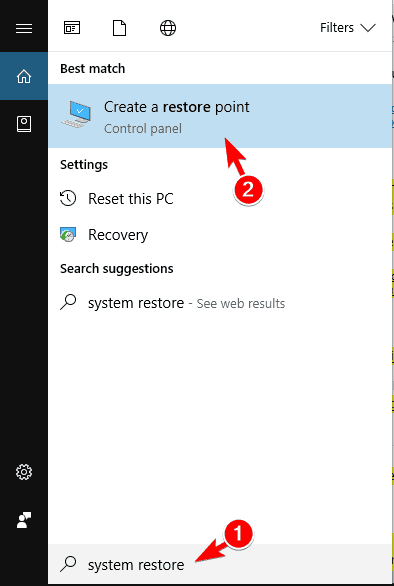
- Press Windows Key + S and enter system restore.
- Choose Create a restore point from the menu.
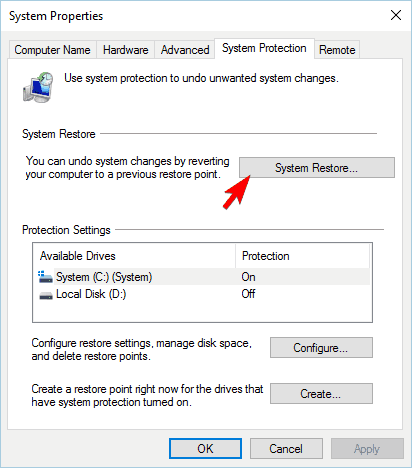
- System Properties window will now appear.
- Click on the System Restore button.
- System restore window will now open.
- Click on Next, and choose the desired restore point and click Next.
- Follow the instructions on the screen to complete the restoration process.
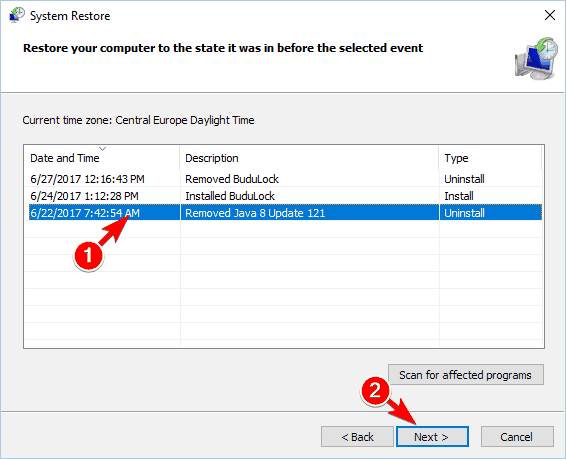
If you’re having this error, you might be able to fix it by performing System Restore. By using this feature you can restore your PC and prevent this problem from appearing.
After restoring your system, check if the problem still persists.
10. Reset Windows 10
- Open the Start Menu, press the Power button, press and hold the Shift key and click on Restart.
- Now choose Troubleshoot > Reset this PC > Remove everything.
- If you’re asked to insert Windows 10 installation media, be sure to do so.
- Select the version of Windows you have installed and click on Only the drive where Windows is installed.
- By using this option only your system drive, in most cases, C will be cleaned. This means that the installation will remove all files from this drive.
- Now select Just remove my files option.
- You’ll now see the list of changes that will occur after performing the reset.
- To start the reset process, click the Reset button.
- Follow the instructions on the screen to complete the reset.

Note: we have to mention that this solution will remove all files from your system, so it’s highly recommended to back up all your important files.
This solution will also remove all installed apps, so you’ll have to install them again. To perform this solution you might need a Windows 10 installation media, so create one using Media Creation Tool.
After you reset Windows 10, you’ll have a clean installation of Windows and the error should be fixed.
ERROR_VIRUS_INFECTED error and Operation did not complete successfully because the file contains a virus message can cause a lot of problems on your PC.
In some cases, these errors can be caused by a false alarm, but you should be able to fix this problem by using one of our solutions.


